Set-Up Instructions - Innovative Medical Products
Set-Up Instructions - Innovative Medical Products
Set-Up Instructions - Innovative Medical Products

You also want an ePaper? Increase the reach of your titles
YUMPU automatically turns print PDFs into web optimized ePapers that Google loves.
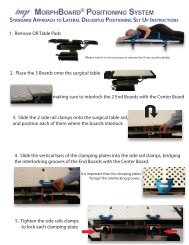
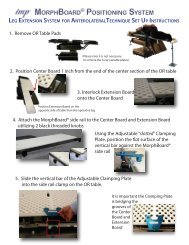
1. Replace OR Table Pads with green pads.<br />
If using X-Ray cassette,<br />
it is not necessary to remove<br />
the X-ray cassette plates.<br />
2. Position patient with gluteal fold at separation of pads.<br />
3. During prep of surgical leg, remove single OR Table Pad.<br />
4. Create a 3”- 5” fold in final drape under the buttocks.<br />
5. Place De Mayo Knee Positioner® in the well<br />
to achieve maximum flexion.
<strong>Set</strong> <strong>Up</strong> <strong>Instructions</strong> Continued- page 2<br />
6. Check flexion for final approval of<br />
freedom of the drape to allow full range<br />
of motion when the Positioner is locked on drapes.<br />
7. Position clamp directly under gliding<br />
pins and lock to the OR Table Side Rail<br />
with the Single Lever Clamp.<br />
ATTACHING THE SINGLE LEVER CLAMP<br />
8. Position the clamp under<br />
the pins. With Left hand,<br />
squeeze the jaws tight and<br />
rotate the lever to lock.<br />
9. Holding the jaws, tighten<br />
the knurled knob all the way.<br />
10. While holding the clamp,<br />
rotate the lever to unlock.<br />
11. Turn the knurled knob<br />
1/4 to 1/2 a rotation.<br />
12. Rotate the lever to lock<br />
position requiring only 2<br />
finger pressure. Works like<br />
a vice grip and “snaps”<br />
into place.<br />
13. Slide pins into clamp.<br />
14. Tighten knurled knobs.
<strong>Set</strong> <strong>Up</strong> <strong>Instructions</strong> Continued- page 3<br />
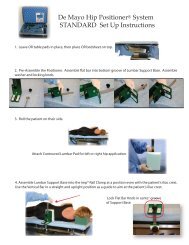
15. Protect your patient from potential Pressure Ulcers. Insert the Patient Protector Pad<br />
into the sterile boot.<br />
STERILE<br />
LATEX FREE FOAM<br />
16. Wrap cohesive bandage around the foot starting with a minimum of six (6) foot wraps, tear,<br />
and finish the wrap above the bracket around the calf.<br />
Avoid wrapping cohesive bandage over the bracket on the back of the boot<br />
17. Place the Pressure Protector Pad on the<br />
square post.<br />
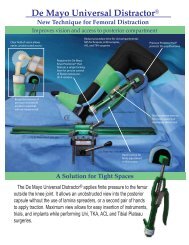
18. With the leg at 90 0 of flexion, position the<br />
fully collapsed Distractor placing the pressure<br />
Protector Pad at the distal femur.<br />
19. Insert the small pin at the base of the Distractor in the most Proximal slot on the back of<br />
the boot.
<strong>Set</strong> <strong>Up</strong> <strong>Instructions</strong> Continued- page 4<br />
20. In addition to the Single Locking Lever, as greater forces are applied, the thumb screw<br />
“Emergency Brake” provides extra locking pressure when using the Distractor.<br />
21. Squeeze the large green handle to distract.<br />
22. Press the small silver lever to release distraction.<br />
<strong>Set</strong> <strong>Up</strong> for the<br />
De Mayo Distractor®<br />
with the<br />
De Mayo Knee Positioner®<br />
is now complete<br />
De Mayo Universal Distractor®is a registered trademark of <strong>Innovative</strong> <strong>Medical</strong> <strong>Products</strong>, Inc.<br />
De Mayo Universal Distractor® U.S. Patent No. 8,048,082<br />
De Mayo Knee Positioner® is a registered trademark of <strong>Innovative</strong> <strong>Medical</strong> <strong>Products</strong>, Inc.<br />
De Mayo Knee Positioner® U.S. Patent No. 7,380,299<br />
©2013 <strong>Innovative</strong> <strong>Medical</strong> <strong>Products</strong>, Inc.<br />
ALL RIGHTS RESERVED 01/2013