Operation Manual Porta-Ray 400 - UV Adhesives
Operation Manual Porta-Ray 400 - UV Adhesives
Operation Manual Porta-Ray 400 - UV Adhesives

Create successful ePaper yourself
Turn your PDF publications into a flip-book with our unique Google optimized e-Paper software.
BLAZE TECHNOLOGY PTE LTD<br />
<strong>Operation</strong> <strong>Manual</strong><br />
<strong>Porta</strong>-<strong>Ray</strong> <strong>400</strong><br />
Model 39639/39640 – 120/230 Volt Metal Halide Lamp<br />
Model 39697/39713 – 120/230 Volt Mercury Lamp<br />
<strong>UV</strong> Curing Light Source<br />
Focused Beam Flood Lamp System<br />
Phone: (860) 482-1010 Fax: (860) 496-0608<br />
www.dymax.com<br />
TM-060<br />
PN 39957<br />
Rev 08/15/07<br />
Blaze Technology Pte Ltd Tel: 65 6270 2188 Fax: 65 6270 9188 www.blaze.com.sg email: sales@blaze.com.sg
BLAZE TECHNOLOGY PTE LTD<br />
TM-060 PN 39957 <strong>Porta</strong>-<strong>Ray</strong> <strong>400</strong> Focused Beam<br />
Rev 08/15/07 2<br />
Blaze Technology Pte Ltd Tel: 65 6270 2188 Fax: 65 6270 9188 www.blaze.com.sg email: sales@blaze.com.sg
BLAZE TECHNOLOGY PTE LTD<br />
TABLE OF CONTENTS<br />
Unpacking and Inspection ..................................................................... .5<br />
Safety .................................................................................................... .5<br />
General.................................................................................................. .8<br />
Specifications ........................................................................................ .10<br />
Components Description ........................................................................ 12<br />
<strong>Operation</strong>............................................................................................. ...13<br />
Maintenance ........................................................................................ ...16<br />
Troubleshooting................................................................................... ....18<br />
Spare Parts List ................................................................................... …19<br />
Definition of Terms .............................................................................. …19<br />
Warranty.............................................................................................. …21<br />
Blaze Technology Pte Ltd Tel: 65 6270 2188 Fax: 65 6270 9188 www.blaze.com.sg email: sales@blaze.com.sg
BLAZE TECHNOLOGY PTE LTD<br />
The enclosed Dymax <strong>Porta</strong>-<strong>Ray</strong> <strong>400</strong> Focused Beam <strong>UV</strong> Curing Light Flood Lamp System was developed and<br />
manufactured by the DYMAX team, driven by a desire to best serve your needs. Before shipping, your <strong>Porta</strong>-<strong>Ray</strong><br />
Curing Lamp was thoroughly checked and tested for trouble-free performance.<br />
The proper set up and operation of this Flood Lamp System will maximize safety and user-friendly performance,<br />
providing optimum yield of your technological process.<br />
THEREFORE, WE ENCOURAGE YOU TO READ, UNDERSTAND, AND FOLLOW ALL SAFETY AND OPERATING<br />
INSTRUCTIONS AND RECOMMENDATIONS COMPILED IN THIS AND OTHER RELATED MANUALS prior to<br />
setting up and operating this new Flood Lamp System or its individual components.<br />
If you encounter a problem, have any questions, or would like to help us with your suggestions or recommendations,<br />
please contact our Technical or Customer Service Departments at 860-482-1010.<br />
TM-060 PN 39957 <strong>Porta</strong>-<strong>Ray</strong> <strong>400</strong> Focused Beam<br />
Rev 08/15/07 4<br />
Blaze Technology Pte Ltd Tel: 65 6270 2188 Fax: 65 6270 9188 www.blaze.com.sg email: sales@blaze.com.sg
BLAZE TECHNOLOGY PTE LTD<br />
1. UNPACKING AND INSPECTION<br />
Upon receipt of the unit, carefully remove the contents from the boxes and check for damage. DYMAX ® is not<br />
responsible for damage from shipping – all claims for shipping damage should be made with carrier.<br />
Check all boxes for contents and write down any serial numbers for further reference. You may wish to retain original<br />
shipping cartons in case you need to repackage any item for return.<br />
If you observe or experience any problem with your equipment, notify DYMAX Customer Service, your authorized<br />
distributor, or your DYMAX Representative immediately.<br />
NOTE: REPORT ANY SHORTAGE TO DYMAX CORPORATION CUSTOMER SERVICE - Phone: (860) 626-6329<br />
or 860- 482-1010, Fax: (860) 489-3232<br />
Before continuing with unpacking and installation, please read the following Chapters of this <strong>Manual</strong> for safety<br />
recommendations and installation, operation, and troubleshooting instructions.<br />
List of Parts Included<br />
1. One PORTA-RAY <strong>400</strong>R lamp head with attached bottom accessory compartment.<br />
2. One <strong>400</strong>-Watt <strong>UV</strong>A enhanced arc lamp (installed) - other spectral versions optional.<br />
3. One lamp headrest / mini curing chamber with drawer.<br />
4. One pair of <strong>UV</strong>/IR protective glasses.<br />
5. One AC power cord.<br />
6. One PORTA-RAY <strong>400</strong>R owner’s manual.<br />
7. One Face Shield<br />
2. DYMAX <strong>UV</strong> CURING SYSTEM SAFETY CONSIDERATIONS<br />
DYMAX ultraviolet curing technology has been used successfully for over 25 years. The fast cure, one component<br />
nature of our <strong>UV</strong> curing technology has made it the process of choice for many manufacturers requiring a Cure on<br />
Demand assembly process. The purpose of this document is to provide information relating to the use of DYMAX<br />
<strong>UV</strong> curing systems. There are four common questions/concerns related to <strong>UV</strong> curing systems: <strong>UV</strong> exposure, high<br />
temperature surfaces, ozone, and bright visible light.<br />
<strong>UV</strong> EXPOSURE<br />
Standard DYMAX <strong>UV</strong> curing systems and bulbs have been designed to primarily emit <strong>UV</strong>A light 3 (as shown in Chart 1).<br />
<strong>UV</strong>A light is generally considered the safest of the three <strong>UV</strong> ranges: <strong>UV</strong>A, <strong>UV</strong>B, and <strong>UV</strong>C. Although OSHA does not<br />
currently regulate ultraviolet light exposure in the workplace, the American Conference of Governmental Industrial<br />
Hygienists (ACGIH) does recommend Threshold Limit Values (TLV′s) for ultraviolet light. The strictest interpretation of<br />
the TLV (over the <strong>UV</strong>A range) for workers’ eyes and skin is 1 mW/cm 2 (intensity), continuous exposure. Unless<br />
TM-060 PN 39957 <strong>Porta</strong>-<strong>Ray</strong> <strong>400</strong> Focused Beam<br />
Rev 08/15/07 5<br />
Blaze Technology Pte Ltd Tel: 65 6270 2188 Fax: 65 6270 9188 www.blaze.com.sg email: sales@blaze.com.sg
BLAZE TECHNOLOGY PTE LTD<br />
workers are placing bare hands into the curing area, it is unusual to exceed these limits. To put 1 mW/cm 2 limit into<br />
perspective, cloudless summer days in Connecticut regularly exceed 3 mW/cm 2 of <strong>UV</strong>A light and also include the more<br />
dangerous <strong>UV</strong>B light (primarily responsible for sun tans, sun burns and skin cancer) as well.<br />
The human eye can not detect “pure” <strong>UV</strong> light, only visible light. A radiometer should be used to measure stray <strong>UV</strong><br />
light to confirm the safety of a <strong>UV</strong> curing process. A workstation that exposes an operator to more than 1 mW/cm 2 of<br />
<strong>UV</strong>A continuously should be redesigned.<br />
<strong>UV</strong> adhesive curing can be a regulatory compliant, “worker-friendly” manufacturing process when the proper safety<br />
equipment and operator training is utilized. There are two ways to protect operators from <strong>UV</strong> exposure: shield the<br />
operator and/or shield the source.<br />
SHIELD THE OPERATOR<br />
<br />
<br />
<strong>UV</strong>-Blocking Eye Protection – <strong>UV</strong>-blocking eye protection is recommended when operating <strong>UV</strong> curing<br />
systems. Both clear and tinted <strong>UV</strong>-blocking eye protection is available from DYMAX (see Table 1).<br />
<strong>UV</strong>-Blocking Skin Protection – Where the potential exists for <strong>UV</strong> exposure upon skin, opaque, <strong>UV</strong>blocking<br />
clothing, gloves, and full-face shields are recommended.<br />
SHIELD THE SOURCE OF <strong>UV</strong><br />
Any substrate that blocks <strong>UV</strong> light can be used as a shield to protect workers from stray <strong>UV</strong> light. The<br />
following materials can be used to create simple shielding structures or blind corners:<br />
<br />
<br />
<br />
Sheet Metal – Aluminum, steel, stainless steel, etc. Sheet metal should be coated black or black anodized to minimize<br />
reflection of <strong>UV</strong> and visible light toward operators.<br />
Rigid Plastic Film – Transparent, <strong>UV</strong>-blocking plastics (typically polycarbonate or acrylic) are commonly<br />
used to create shielding where transparency is also desired. These rigid plastic films are available either<br />
water-clear or tinted.<br />
Flexible Film – <strong>UV</strong>-blocking, flexible urethane films can be used to quickly create workstation shielding.<br />
This <strong>UV</strong>-blocking, flexible urethane film is available from DYMAX (see Table 1).<br />
HIGH TEMPERATURE SURFACES<br />
Surfaces exposed to high intensity curing lights will rise in temperature. The intensity, distance, exposure time, cooling<br />
fans, and the type/color of the surface can all affect the actual surface temperature. In some cases, exposed surfaces<br />
can reach temperatures capable of producing a burn or causing damage to a substrate. In these cases, care must be<br />
taken to ensure either a more moderate surface temperature or appropriate protection/training for operators.<br />
TM-060 PN 39957 <strong>Porta</strong>-<strong>Ray</strong> <strong>400</strong> Focused Beam<br />
Rev 08/15/07 6<br />
Blaze Technology Pte Ltd Tel: 65 6270 2188 Fax: 65 6270 9188 www.blaze.com.sg email: sales@blaze.com.sg
BLAZE TECHNOLOGY PTE LTD<br />
OZONE<br />
Standard DYMAX bulbs (<strong>UV</strong>A type) generate an insignificant amount of <strong>UV</strong>C and therefore essentially no ozone 3 .<br />
Some <strong>UV</strong> curing systems, like those used to cure <strong>UV</strong> inks, emit primarily “shortwave” (<strong>UV</strong>B and <strong>UV</strong>C) energy. Upon<br />
exposure to <strong>UV</strong>C light (specifically
BLAZE TECHNOLOGY PTE LTD<br />
3. GENERAL<br />
The PORTA-RAY <strong>400</strong>R light cure system may be placed on any bench or shelf that has access to an 115VAC 50/60-<br />
cycle single-phase power source in a clean operation area.<br />
CAUTION: The <strong>Porta</strong>-<strong>Ray</strong> is available in 115 VAC and 230 VAC configurations. The unit’s voltage<br />
configuration is clearly identified by a bright orange label, located adjacent to the unit’s AC power input<br />
connector at the side of the lamp head. Operating with voltage outside the specified range may result in<br />
damage to the system.<br />
Since the <strong>Porta</strong><strong>Ray</strong> is an air-cooled unit, dust or airborne particles can clog the internal cooling passages and cause<br />
overheating. Allow a 4-inch clearance on all sides of the lamp head during operation for unrestricted airflow.<br />
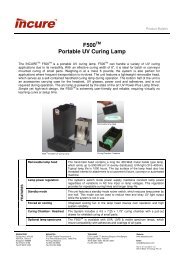
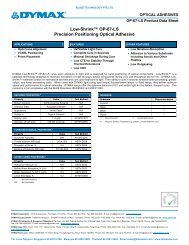
Mounting<br />
Fig. 1, <strong>Porta</strong><strong>Ray</strong> lamp mounted<br />
on headrest<br />
The lamp head assembly should always be placed on the headrest, or held away from any flammable surfaces. Never<br />
place the lamp head directly on the work surface. The <strong>Porta</strong><strong>Ray</strong> is also designed to be fixture, machine or conveyor<br />
mounted using the two threaded holes in the top surface of the lamp head.<br />
Fig. 2, <strong>Porta</strong><strong>Ray</strong> lamp head mounting hole dimensions (in inches).<br />
TM-060 PN 39957 <strong>Porta</strong>-<strong>Ray</strong> <strong>400</strong> Focused Beam<br />
Rev 08/15/07 8<br />
Blaze Technology Pte Ltd Tel: 65 6270 2188 Fax: 65 6270 9188 www.blaze.com.sg email: sales@blaze.com.sg
BLAZE TECHNOLOGY PTE LTD<br />
The lamp head assembly can also be placed on a shelf type structure, supporting the unit by its bottom outside edges.<br />
For this type of mounting, a windowed hole must be cut in the shelf, which would provide adequate clearance for the<br />
unit’s bottom-side light exposure opening, and also for the cooling air exhaust holes.<br />
Shielding<br />
All installations should incorporate adequate shielding of radiated <strong>UV</strong> light, in order to prevent eye and skin burn of the<br />
operator or others passing through the work area (refer to <strong>UV</strong> Safety Warning in the following Safety Considerations<br />
section of the manual). The supplied headrest / curing chamber can be used with the <strong>Porta</strong><strong>Ray</strong> to minimize the amount<br />
of stray <strong>UV</strong> light scattering in the work area. Custom shielding may be constructed using sheet metal, <strong>UV</strong> blocking<br />
acrylic or polycarbonate to prevent operator exposure to <strong>UV</strong> radiation.<br />
Dimensions<br />
WARNING: To prevent risk of eye or skin burn, all personnel must be protected from direct or indirect<br />
exposure to the <strong>UV</strong> light produced by the <strong>Porta</strong><strong>Ray</strong> curing system. Extreme care should be used when<br />
designing custom <strong>UV</strong> shielding to insure personnel will not be exposed to harmful <strong>UV</strong> radiation. Additionally,<br />
<strong>UV</strong> protective glasses and protective clothing should be used at all times while working in the vicinity of the <strong>UV</strong><br />
curing system.<br />
Electrical Safety<br />
<strong>Porta</strong><strong>Ray</strong> lamp head overall dimensions (in inches).<br />
High voltage and current energize the <strong>UV</strong> Lamp. A high voltage power supply and igniter combination is<br />
designed to provide lamp-starting voltages, to limit current, and subsequently provide a uniform output of<br />
energy. To avoid the risk of electrical shock, do not attempt to replace the lamp before turning off the power<br />
input switch, and disconnecting the input power cord.<br />
The electrical system of this unit should be serviced by qualified service personnel.<br />
High Temperatures<br />
TM-060 PN 39957 <strong>Porta</strong>-<strong>Ray</strong> <strong>400</strong> Focused Beam<br />
Rev 08/15/07 9<br />
Blaze Technology Pte Ltd Tel: 65 6270 2188 Fax: 65 6270 9188 www.blaze.com.sg email: sales@blaze.com.sg
BLAZE TECHNOLOGY PTE LTD<br />
Due to the high output power of this system, high temperatures may be present on the surfaces of the lamp, reflector,<br />
lamp head and headrest. Extreme care should be taken to prevent touching any of these surfaces before allowing<br />
sufficient time for all temperatures to drop to safely back to room temperature after power has been removed. Also, the<br />
lamp head assembly should never be placed on or near any flammable surface while the lamp is on, or before its<br />
temperature has cooled back to room temperature. Never place the lamp head or parts to be cured on a heat sensitive<br />
surface. Always cure parts on a metallic or non-flammable surface. When the unit is not in use, place the lamp head<br />
on the headrest, and switch the standby switch to the low power position to minimize temperature rise.<br />
WARNING: Placing the Lamp Housing Assembly on or near flammable surfaces while the lamp is on, or still<br />
hot could result in fire.<br />
4. SPECIFICATIONS<br />
Category Parameter Value Conditions/Notes<br />
General Model PORTA-RAY <strong>400</strong>R<br />
Part Number<br />
PN 39639 (120VAC Metal PN 39640 (240VAC Metal Halide<br />
Halide Bulb)<br />
Bulb)<br />
PN39697(120VAC<br />
Mercury Bulb)<br />
PN 39713 (240VAC Mercury Bulb)<br />
Power Supply Input Voltage 100-120VAC +-10% 200-240VAC +-10%<br />
Input Current (max) 7 Amperes 3.5 Amperes<br />
Source Input Frequency 47 Hz to 63 Hz 47 Hz to 63 Hz<br />
Lamp Power Regulation ± 1%<br />
Protection<br />
Inrush current limit,<br />
Line voltage surge,<br />
Short circuit,<br />
Open circuit,<br />
Hot re-strike,<br />
Over temperature,<br />
Ignition retry timeout 5 minute<br />
Lamp Lamp Type <strong>400</strong> Watt Metal Halide Quartz, ozone-free<br />
Lamp Voltage<br />
135 ± 15V<br />
Arc Length<br />
32 mm<br />
Burning Position<br />
Horizontal<br />
Radiation Flux 72 Watts 315 - <strong>400</strong> nm<br />
Warm-up Time<br />
1 to 2 minutes<br />
Cooling Time Before Restart 5 minutes typical<br />
Lamp protection prevents restart of<br />
hot lamp<br />
Lamp Peak Irradiance 500mW/cm2 <strong>UV</strong>A 2” from base of lamp head<br />
Curing Area 5 x 3” minimum Affected by lamp height<br />
Lamp Life 1000 hours typical Affected by # of on/off cycles<br />
Environmental Operating Temperature<br />
+10 °C to +40 °C<br />
(+50 °F to +104 °F)<br />
Storage Temperature<br />
0 °C to +60 °C<br />
(+32 °F to +140 °F)<br />
Relative Humidity<br />
30 to 75% operating,<br />
10 to 100% storage<br />
Non-condensing<br />
Cooling<br />
Forced air<br />
Over-temp Shutdown 67 °C (internal)<br />
Dimensions L x W x H (inches) 8” x 5” x 16.5” Including bottom enclosure<br />
Weight (lbs.) 6 lbs. w bottom box 3.5 lbs. lamp head only<br />
Max Chamber Part Size 4.25” x 4.25” x 2” For curing in headrest<br />
TM-060 PN 39957 <strong>Porta</strong>-<strong>Ray</strong> <strong>400</strong> Focused Beam<br />
Rev 08/15/07 10<br />
Blaze Technology Pte Ltd Tel: 65 6270 2188 Fax: 65 6270 9188 www.blaze.com.sg email: sales@blaze.com.sg
BLAZE TECHNOLOGY PTE LTD<br />
Spectral Output of Standard Metal Halide Bulb<br />
Spectral Output of Mercury Bulb<br />
Output Intensities (Typical)<br />
WAVELENGTH INTENSITY (mW/cm 2 )<br />
<strong>UV</strong>-A * (365 nm) <strong>400</strong><br />
* Intensity with the beam focused, measured with an Accu-Cal 50 <strong>UV</strong> radiometer calibrated and traceable to NIST.<br />
TM-060 PN 39957 <strong>Porta</strong>-<strong>Ray</strong> <strong>400</strong> Focused Beam<br />
Rev 08/15/07 11<br />
Blaze Technology Pte Ltd Tel: 65 6270 2188 Fax: 65 6270 9188 www.blaze.com.sg email: sales@blaze.com.sg
BLAZE TECHNOLOGY PTE LTD<br />
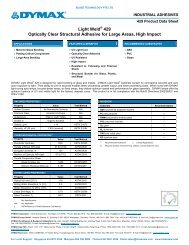
5. Components Description<br />
(1) Handle<br />
(2) Mounting<br />
Holes<br />
(3) Lamp Full/Half<br />
Power Switch<br />
(4) Input Power<br />
Switch &<br />
Receptacle<br />
(5) Output Air<br />
Louvers<br />
(5) Input Air<br />
Louvers<br />
(6) Accessories<br />
Storage<br />
Compartment<br />
(7) Cooling<br />
Fan<br />
(9) Arc Lamp<br />
(8) Lamp Head<br />
Latches<br />
(10) Reflector<br />
TM-060 PN 39957 <strong>Porta</strong>-<strong>Ray</strong> <strong>400</strong> Focused Beam<br />
Rev 08/15/07 12<br />
Blaze Technology Pte Ltd Tel: 65 6270 2188 Fax: 65 6270 9188 www.blaze.com.sg email: sales@blaze.com.sg
BLAZE TECHNOLOGY PTE LTD<br />
Item<br />
Description<br />
1. Handle The <strong>Porta</strong><strong>Ray</strong> handle can be used to carry the curing system when the lamp<br />
head is latched to bottom accessory compartment, or to hold the lamp head<br />
during manual curing operations.<br />
2. Mounting Holes These two threaded holes can be used for fastening the lamp head to a<br />
fixture, machine or conveyor.<br />
3. Lamp Power Select Switch The Lamp Power rocker switch selects either the “full” or “standby” lamp<br />
power setting. When curing or warming-up the lamp, the switch should be<br />
set to full power. Between curing operations, the switch can be set to the<br />
half power standby setting, which reduces the amount of heat and stray <strong>UV</strong><br />
light radiated by the unit. The switch should always be set to “standby” when<br />
the lamp is idling on the headrest. When switching back to full power, the<br />
lamp will be ready for curing again after a brief 10 second re-warming<br />
period.<br />
4. Input Power Switch & Receptacle The Input Power switch is used to apply or remove main power to the<br />
<strong>Porta</strong><strong>Ray</strong> system. Co-located with the switch is the IEC type power cord<br />
socket where the input line cord is inserted.<br />
5. Input/output Cooling Air Louvers The input & output air louvers channel cooling air from the fan, in and out of<br />
the lamp head. These must remain unobstructed.<br />
6. Accessories Storage<br />
Compartment<br />
This bottom box can be used to store and transport curing accessories (e.g.<br />
headrest, glasses, power cord & adhesive).<br />
7. Cooling Fan The lamp head fan cools the lamp, reflector and internal power supply circuit<br />
board assembly.<br />
8. Lamp head latches These latches are used to secure the lamp head to the bottom accessories<br />
compartment during transport & storage.<br />
9. Arc Lamp Medium pressure arc lamp which produces <strong>UV</strong> & visible light.<br />
10. Reflector Lamp reflector which collects and concentrates light from all sides of the arc<br />
lamp. This surface should be kept clean to insure maximum light output.<br />
6. OPERATION<br />
The <strong>Porta</strong><strong>Ray</strong> is designed to be an extremely user-friendly system, which has a minimum of controls, and is easy to<br />
operate. Therefore, the following operating instructions are brief.<br />
TM-060 PN 39957 <strong>Porta</strong>-<strong>Ray</strong> <strong>400</strong> Focused Beam<br />
Rev 08/15/07 13<br />
Blaze Technology Pte Ltd Tel: 65 6270 2188 Fax: 65 6270 9188 www.blaze.com.sg email: sales@blaze.com.sg
BLAZE TECHNOLOGY PTE LTD<br />
Unlatching and removing lamp head<br />
A. Open the latches on the side of the unit, and remove the lamp from the bottom enclosure by lifting it by the handle.<br />
B. Place the lamp head on the headrest with the drawer closed.<br />
Lamp head on headrest<br />
C. Plug the IEC type connector of the AC Power Cord, into the power input receptacle in the side of the lamp head.<br />
Plug in the opposite end of the line cord into a nearby single phase power outlet.<br />
D. To start the system, turn on the Input Power Switch at the side of the unit. The lamp should turn on.<br />
E. During the warm-up period, the switch on the top of the lamp should be set to full power mode. A one to two minute<br />
warm-up time is required for the lamp to reach full intensity.<br />
WARNING: Bluish light is projected from the unit becoming brighter as the unit warms up. This ultra-violet light can<br />
be harmful to the eyes and skin. <strong>UV</strong> protective glasses and clothing are required to prevent burns of eyes and<br />
skin. Care should also be taken to protect other personnel in the area from unintentional exposure to the <strong>UV</strong><br />
light (see section 2 for additional <strong>UV</strong> safety information).<br />
F. To change to the standby power mode, switch the lamp power rocker switch to the half power position (rocker<br />
paddle pressed toward the closest handle stem). The lamp intensity will visibly dim when the unit is in this low power<br />
mode.<br />
NOTE: The <strong>Porta</strong><strong>Ray</strong> system is designed for continuous operation. It is suggested that the lamp remain on<br />
during work breaks. Frequent stopping and starting of the lamp will reduce lamp life. In general, leave the unit<br />
in standby power mode for periods of non-use of less than thirty minutes. The unit will require only a brief 10<br />
second rewarming period before the lamp returns to full intensity. Once the input power is switched off, the<br />
lamp will require a minimum of 5 minutes of cooling time before restarting.<br />
TM-060 PN 39957 <strong>Porta</strong>-<strong>Ray</strong> <strong>400</strong> Focused Beam<br />
Rev 08/15/07 14<br />
Blaze Technology Pte Ltd Tel: 65 6270 2188 Fax: 65 6270 9188 www.blaze.com.sg email: sales@blaze.com.sg
BLAZE TECHNOLOGY PTE LTD<br />
Curing in headrest<br />
G. The headrest can be used as a curing chamber for small parts. To cure parts in the head rest, pull the drawer open<br />
using the black pull knob, and load components onto the center of the tray. Close the drawer, set the power mode<br />
switch to the full power position and wait the appropriate amount of time for curing to complete.<br />
WARNING: While the drawer is in the fully open position, the back side of the drawer will block most of the<br />
<strong>UV</strong> light and prevent it from scattering into the work area. However, <strong>UV</strong> glasses and skin protection should<br />
still be worn during curing to insure safe operation.<br />
H. When curing is complete, set the power mode switch to the standby position to minimize temperature rise of the<br />
lamp head and headrest. Open the drawer and remove the cured parts.<br />
Handheld curing<br />
I. To perform handheld curing, lift the lamp head from the headrest using the handle, switch to full power mode and<br />
hold the lamp 2 to 6 inches from the target substrate.<br />
NOTE: The height of the Lamp can be adjusted up or down to control the intensity of light reaching the<br />
substrate being cured. Refer to the adhesive manufacturer’s data sheet for appropriate exposure time and<br />
intensity levels. The optimum height and exposure time required to provide proper curing may need to be<br />
adjusted experimentally.<br />
J. When curing is complete, place the lamp head back on the headrest, and set the power mode switch back to the<br />
standby position.<br />
TM-060 PN 39957 <strong>Porta</strong>-<strong>Ray</strong> <strong>400</strong> Focused Beam<br />
Rev 08/15/07 15<br />
Blaze Technology Pte Ltd Tel: 65 6270 2188 Fax: 65 6270 9188 www.blaze.com.sg email: sales@blaze.com.sg
BLAZE TECHNOLOGY PTE LTD<br />
Shut Down<br />
To shut down the light cure system, place the lamp head back on the headrest, and shut off the input power switch.<br />
Allow the lamp and surrounding components time to cool before placing the head close to temperature sensitive<br />
materials or before re-packaging the system for transportation.<br />
7. MAINTENANCE<br />
Maintenance Considerations<br />
During the production process, various deposits of foreign matter may accumulate on the lamp and reflector surfaces.<br />
Product vapors can also condense on these surfaces over time, causing poor transmittance/reflectance of <strong>UV</strong> light,<br />
and reduced curing efficiency. To insure maximum light output of the curing system, these surfaces should be<br />
inspected and cleaned at regular intervals as required.<br />
The lamp will also need to be replaced periodically as its <strong>UV</strong> output drops sufficiently enough to prevent complete<br />
product curing. A radiometer should be used to monitor system <strong>UV</strong> light output over time. If a radiometer is not<br />
available, the quality of the product’s curing should be checked regularly as a less direct indicator of lamp<br />
performance. If a radiometer is not used to track lamp performance, then the lamp should be replaced after<br />
approximately every 1000 hours of operation.<br />
Cleaning of Optics and Lamp Replacement<br />
The following procedure should be followed carefully for optics cleaning & lamp replacement:<br />
WARNING: To avoid coming in contact with dangerous high voltages or high temperatures, the following<br />
power down & cooling procedure must be completed before attempting any maintenance operations on the<br />
<strong>Porta</strong><strong>Ray</strong> <strong>400</strong>R <strong>UV</strong> Lamp: Turn off the input power switch at the side of the lamp head, and unplug the power<br />
cord from the input power receptacle. Wait 15 minutes or until the lamp and other hot components cool back to<br />
room temperature before proceeding with any maintenance operations.<br />
1. Remove the lamp head from its headrest or fixture, and place it upside-down on a soft clean surface.<br />
CAUTION: It is extremely important to avoid touching (with your hand) the aluminum reflector, and the glass<br />
portion of the lamp. Contaminants from your skin will cause oxidation of the reflector, and unwanted refraction<br />
of light through the contaminated portion of the filter glass and lamp. These contaminants may also cause<br />
localized hot spots on the quartz envelope of the lamp, which could result in premature lamp failure. Clean<br />
cotton gloves or a clean soft cloth should be used when handling or cleaning the lamp and reflector.<br />
2. Using cotton gloves or a clean soft cloth, remove the lamp by holding it near one end, and pushing into the<br />
adjacent spring loaded socket. Once the other end of the lamp has cleared the walls of its socket, tilt the cleared<br />
end of the lamp up slightly, and remove the lamp from the other socket that is still engaged.<br />
3. Using a clean soft cloth dampened with isopropyl alcohol, clean the surfaces of the aluminum reflector.<br />
CAUTION: Do not use abrasive cleaning compounds or steel wool for cleaning the reflector. These harsh<br />
products will remove the finish and reduce the reflector efficiency.<br />
4. Wipe the lamp lightly with a clean isopropyl dampened cloth. If the lamp shows signs of bulging or shape<br />
distortion, then replace it. Otherwise, dry and polish the lamp with a clean dry cloth.<br />
5. Re-insert the cleaned or new lamp between the lamp sockets, with the filler nipple facing the reflector. Be sure to<br />
center each lamp electrode in its socket to insure proper electrical connection and to avoid arcing (which could<br />
damage the lamp or socket). The lamp is non-polarized so it does not matter which electrode is placed in which<br />
socket.<br />
TM-060 PN 39957 <strong>Porta</strong>-<strong>Ray</strong> <strong>400</strong> Focused Beam<br />
Rev 08/15/07 16<br />
Blaze Technology Pte Ltd Tel: 65 6270 2188 Fax: 65 6270 9188 www.blaze.com.sg email: sales@blaze.com.sg
BLAZE TECHNOLOGY PTE LTD<br />
6. Mount the lamp head back on its headrest or fixture, and reconnect the input power cord.<br />
7. Re-test the unit to insure satisfactory light intensity and cure time is achieved.<br />
Accessories Storage, Packaging and Carrying<br />
Once the lamp has cooled sufficiently, the system can be re-packaged and transported. The bottom portion of the<br />
<strong>Porta</strong><strong>Ray</strong> can be used for storing related curing accessories (such as the headrest, power cord, <strong>UV</strong> glasses and<br />
adhesive. After accessories have been inserted, the lamp head can be latched onto the bottom enclosure for system<br />
storage or transportation to another location.<br />
TM-060 PN 39957 <strong>Porta</strong>-<strong>Ray</strong> <strong>400</strong> Focused Beam<br />
Rev 08/15/07 17<br />
Blaze Technology Pte Ltd Tel: 65 6270 2188 Fax: 65 6270 9188 www.blaze.com.sg email: sales@blaze.com.sg
BLAZE TECHNOLOGY PTE LTD<br />
8. TROUBLESHOOTING<br />
ONLY QUALIFIED MAINTENANCE PERSONNEL SHOULD ATTEMPT<br />
THE FOLLOWING PROCEDURES:<br />
Problem Probable Cause Solution<br />
1. Lamp operates but has<br />
low output, or slow curing.<br />
2. Lamp does not light, but<br />
fan running.<br />
3. Lamp does not start, fan<br />
not running.<br />
A. Lamp Power switch is in<br />
half power position.<br />
B. Lamp too far from<br />
substrate being cured.<br />
C. Adhesive not compatible<br />
with lamp type.<br />
D. Reflector or lamp requires<br />
cleaning.<br />
E. Defective or excessively<br />
aged lamp.<br />
A. Lamp not properly<br />
installed.<br />
B. Over-temperature<br />
protection activated<br />
C. Defective or excessively<br />
aged lamp.<br />
A. Power cord not properly<br />
connected or defective.<br />
A. Place switch in the full power position during<br />
curing.<br />
B. Adjust lamp height to within 2 to 4 inches of<br />
surface being cured.<br />
C. Compare the adhesive’s light spectral<br />
requirements with the Lamp’s spectral chart in the<br />
Specifications section. Contact factory for optional<br />
lamp types if required.<br />
D. Clean reflector and lamp as per maintenance<br />
procedure.<br />
E. Replace lamp (see lamp replacement procedure<br />
in maintenance section)<br />
A. Disconnect power, and verify both lamp<br />
electrodes are properly centered in sockets.<br />
B. Allow unit to cool and operate unit in cooler<br />
environment (see Specifications section for<br />
operating temperature range).<br />
C. Replace lamp (see lamp replacement procedure)<br />
A. Verify both ends of the power cord are fully<br />
inserted into their sockets, or replace power cord.<br />
B. No power at outlet. B. Test for power at wall outlet.<br />
NOTE: WHEN CONTACTING DYMAX CORPORATION, AN AUTHORIZED DYMAX DISTRIBUTOR, OR<br />
MANUFACTURER’S REPRESENTATIVE, BE SURE TO KNOW AND PROVIDE THE FOLLOWING:<br />
• MODEL NUMBER OF LIGHT SOURCE IN QUESTION.<br />
• SERIAL NUMBER OF LIGHT SOURCE IN QUESTION.<br />
• PRODUCT NUMBER OF ADHESIVE IN QUESTION (IF APPLICABLE).<br />
• LOT NUMBER OF ADHESIVE IN QUESTION (IF APPLICABLE).<br />
ALL RETURNS TO DYMAX CORPORATION MUST BE ACCOMPANIED BY A RETURN AUTHORIZATION<br />
NUMBER (RAN). THIS NUMBER MUST BE OBTAINED FROM THE DYMAX CUSTOMER SERVICE CENTER.<br />
TM-060 PN 39957 <strong>Porta</strong>-<strong>Ray</strong> <strong>400</strong> Focused Beam<br />
Rev 08/15/07 18<br />
Blaze Technology Pte Ltd Tel: 65 6270 2188 Fax: 65 6270 9188 www.blaze.com.sg email: sales@blaze.com.sg
BLAZE TECHNOLOGY PTE LTD<br />
9 SPARE PARTS<br />
ITEM<br />
PART#<br />
Lamp, Metal Halide <strong>400</strong> Watt <strong>UV</strong> (Standard)* 38560<br />
Lamp, Mercury Vapor <strong>400</strong> Watt <strong>UV</strong> (Optional) 36970<br />
Face Shield 35186<br />
Safety Glasses 35285<br />
* Recommended spare parts<br />
10. DEFINITION OF TERMS<br />
Flood Lamp System - Set of components arranged to generate, collect, condition and direct <strong>UV</strong> radiant energy to<br />
perform curing of engineering adhesives, coatings, and inks within a safe and controlled process. It includes a Lamp<br />
Housing and Power Supply and may also include a Shutter, and Workstation, <strong>UV</strong> Enclosure, or Dymax ® Lightshield,<br />
and accessories.<br />
Lamp - Light source (bulb or burner) generating Ultraviolet, Visible, and Infrared radiant energy from burning matter<br />
stimulated by electrical power conditioned by a proper power supply which is an integral part of a Lamp. A light source<br />
is usually placed into a reflector (of various geometry) to increase light source efficiency by collecting and directing<br />
radiant energy of selected spectra (for a given curing process).<br />
Intensity - a measure of light energy over the unit of surface area (usually surface at the specified working distance<br />
from the bottom of a reflector housing) in W/cm 2 or mW/cm 2 . For the <strong>UV</strong> portion of light, this measure is often called in<br />
literature “irradiance”, i.e. radiant energy arriving at a point on a surface per unit area.<br />
Brightness, also known as Luminance - description of energy in the visible region of the spectrum (approximately<br />
from <strong>400</strong> to 700 nm) and recorded in photometric units. “Intensity” (see below) of visible light energy is called<br />
Illuminance.<br />
Illuminance - luminous flux (energy of visible light) incident per unit area, and measured in Lx (lux) or Lumen/cm 2 .<br />
Ultraviolet (<strong>UV</strong>) - The invisible region of the spectrum just beyond the violet end of the visible region. Wavelength<br />
ranges in general from 1.0 to <strong>400</strong> nm. Dymax ® bulbs (burners) do not radiate energy in deep Ultraviolet; there are very<br />
minute amounts below 220 nm and practically nothing can be sensed below 200 nm. This is due to the use of an<br />
ozone blocking quartz bulb envelope (See Ozone).<br />
Ultraviolet is used beneficially in various fields of industry and medicine. In order to standardize Light Sources used in<br />
medicine, in Copenhagen in 1932, The International Congress on Light recommended dividing the ultraviolet spectrum<br />
into three spectral parts:<br />
1. Ultraviolet A (<strong>UV</strong>-A) - <strong>UV</strong> of long wavelength from within approximately <strong>400</strong> to 320nm of the spectral band (<strong>400</strong>0<br />
to 3200⊕) - predominately produced by Dymax Flood Lamps.<br />
2. Ultraviolet B (<strong>UV</strong>-B) - <strong>UV</strong> of medium wavelength from within approximately 320 to 280nm - Dymax Flood Lamps<br />
produce some amount of their energy within this bandwidth.<br />
3. Ultraviolet C (<strong>UV</strong>-C) - <strong>UV</strong> of short wavelength below 280nm (we say from 280 to 200nm) – a large amount of this<br />
energy is present in the Sunlight.<br />
Dose - is irradiance integrated over time, or Irradiance (W/cm 2 ) x Time (s) = Dose (Joules/cm 2 ). Note: Watt is the<br />
power that gives rise to the production of energy at the rate of 1-joule (J) per second (s).<br />
TM-060 PN 39957 <strong>Porta</strong>-<strong>Ray</strong> <strong>400</strong> Focused Beam<br />
Rev 08/15/07 19<br />
Blaze Technology Pte Ltd Tel: 65 6270 2188 Fax: 65 6270 9188 www.blaze.com.sg email: sales@blaze.com.sg
BLAZE TECHNOLOGY PTE LTD<br />
Ozone - oxidizing agent (O 3 ) produced by the action of Ultraviolet radiant energy (below 185 nm) or electrical corona<br />
discharge of oxygen on air.<br />
OSHA 1910.145: “Regulation of Accident prevention Signs and Tags” defines the following headers as:<br />
WARNING – is used when there is a hazardous situation that has some probability of severe injury.<br />
CAUTION - is used to indicate a hazardous situation that may result in minor or moderate injury.<br />
NOTICE - is used to convey a message related directly or indirectly to the safety of personnel, or protection of<br />
property.<br />
TM-060 PN 39957 <strong>Porta</strong>-<strong>Ray</strong> <strong>400</strong> Focused Beam<br />
Rev 08/15/07 20<br />
Blaze Technology Pte Ltd Tel: 65 6270 2188 Fax: 65 6270 9188 www.blaze.com.sg email: sales@blaze.com.sg
BLAZE TECHNOLOGY PTE LTD<br />
11. WARRANTY<br />
CAUTION!<br />
DYMAX ® CORPORATION RESERVES THE RIGHT TO INVALIDATE ANY WARRANTIES, EXPRESSED OR<br />
IMPLIED, DUE TO ANY REPAIRS PERFORMED OR ATTEMPTED ON DYMAX EQUIPMENT WITHOUT WRITTEN<br />
AUTHORIZATION FROM DYMAX. THOSE CORRECTIVE ACTIONS LISTED BELOW ARE LIMITED TO THIS<br />
AUTHORIZATION.<br />
WARRANTY CARD MUST BE RETURNED OR WARRANTY WILL BE VOID.<br />
Dymax ® offers a one-year warranty against defects in material and workmanship on all system components with proof<br />
of purchase date. Unauthorized repair, modification, or improper use of equipment may void warranty. The use of<br />
aftermarket replacement parts not supplied or approved by Dymax ® Corporation, will void any effective warranties and<br />
may result in damage to the equipment.<br />
The data contained in this bulletin is furnished for information only and is believed to be reliable. We cannot assume responsibility<br />
for results obtained by others over whose methods we have no control. It is the user’s responsibility to determine suitability for the<br />
user’s purpose of any product or methods mentioned herein and to adopt such precautions as may be advisable for the protection<br />
of property and persons against any hazards that may be involved in the handling and use thereof. Nothing in this bulletin is to be<br />
interpreted as a representation of freedom from domination of patents owned by others or a license under a Dymax ® Corporation<br />
patent. We recommend that each prospective user test his proposed application before repetitive use, using the data as a guide.<br />
TM-060 PN 39957 <strong>Porta</strong>-<strong>Ray</strong> <strong>400</strong> Focused Beam<br />
Rev 08/15/07 21<br />
Blaze Technology Pte Ltd Tel: 65 6270 2188 Fax: 65 6270 9188 www.blaze.com.sg email: sales@blaze.com.sg