Hydronic Towel Warmer Installation - Homeclick
Hydronic Towel Warmer Installation - Homeclick
Hydronic Towel Warmer Installation - Homeclick

Create successful ePaper yourself
Turn your PDF publications into a flip-book with our unique Google optimized e-Paper software.
2<br />
____________________________________________________________________________________________________________<br />
STEP 2: INSPECT MYSON TOWEL WARMER<br />
(Note: Replacement parts are available for purchase should a part become damaged or lost during installation.)<br />
A. Unpack the Myson <strong>Towel</strong> <strong>Warmer</strong> carefully to avoid any damage or loss of any part. When opening the box and<br />
unwrapping the <strong>Towel</strong> <strong>Warmer</strong>, be sure that the parts that come with the <strong>Towel</strong> <strong>Warmer</strong>, (i.e. brackets, flanges, air vent<br />
key, Loctite 565, and #10 mounting screws), are not accidentally discarded.<br />
B. It is your responsibility to immediately inspect the <strong>Towel</strong> <strong>Warmer</strong> for any damage. Shipping damage should be reported<br />
immediately to your place of purchase.<br />
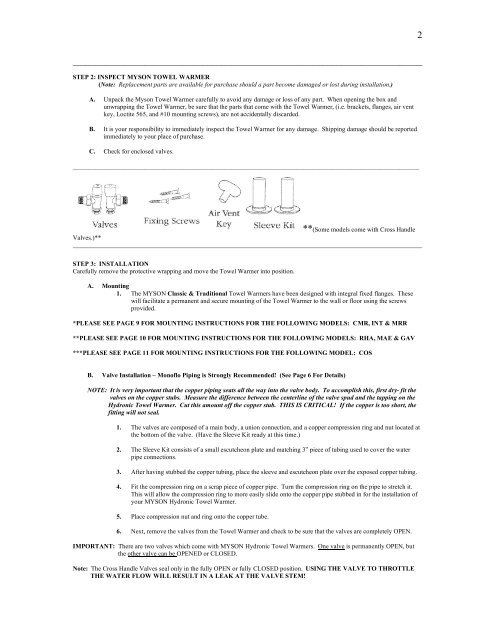
C. Check for enclosed valves.<br />
___________________________________________________________________________________________________________<br />
Valves.)**<br />
**(Some models come with Cross Handle<br />
STEP 3: INSTALLATION<br />
Carefully remove the protective wrapping and move the <strong>Towel</strong> <strong>Warmer</strong> into position.<br />
A. Mounting<br />
1. The MYSON Classic & Traditional <strong>Towel</strong> <strong>Warmer</strong>s have been designed with integral fixed flanges. These<br />
will facilitate a permanent and secure mounting of the <strong>Towel</strong> <strong>Warmer</strong> to the wall or floor using the screws<br />
provided.<br />
*PLEASE SEE PAGE 9 FOR MOUNTING INSTRUCTIONS FOR THE FOLLOWING MODELS: CMR, INT & MRR<br />
**PLEASE SEE PAGE 10 FOR MOUNTING INSTRUCTIONS FOR THE FOLLOWING MODELS: RHA, MAE & GAV<br />
***PLEASE SEE PAGE 11 FOR MOUNTING INSTRUCTIONS FOR THE FOLLOWING MODEL: COS<br />
B. Valve <strong>Installation</strong> – Monoflo Piping is Strongly Recommended! (See Page 6 For Details)<br />
NOTE: It is very important that the copper piping seats all the way into the valve body. To accomplish this, first dry- fit the<br />
valves on the copper stubs. Measure the difference between the centerline of the valve spud and the tapping on the<br />
<strong>Hydronic</strong> <strong>Towel</strong> <strong>Warmer</strong>. Cut this amount off the copper stub. THIS IS CRITICAL! If the copper is too short, the<br />
fitting will not seal.<br />
1. The valves are composed of a main body, a union connection, and a copper compression ring and nut located at<br />
the bottom of the valve. (Have the Sleeve Kit ready at this time.)<br />
2. The Sleeve Kit consists of a small escutcheon plate and matching 3” piece of tubing used to cover the water<br />
pipe connections.<br />
3. After having stubbed the copper tubing, place the sleeve and escutcheon plate over the exposed copper tubing.<br />
4. Fit the compression ring on a scrap piece of copper pipe. Turn the compression ring on the pipe to stretch it.<br />
This will allow the compression ring to more easily slide onto the copper pipe stubbed in for the installation of<br />
your MYSON <strong>Hydronic</strong> <strong>Towel</strong> <strong>Warmer</strong>.<br />
5. Place compression nut and ring onto the copper tube.<br />
6. Next, remove the valves from the <strong>Towel</strong> <strong>Warmer</strong> and check to be sure that the valves are completely OPEN.<br />
IMPORTANT: There are two valves which come with MYSON <strong>Hydronic</strong> <strong>Towel</strong> <strong>Warmer</strong>s. One valve is permanently OPEN, but<br />
the other valve can be OPENED or CLOSED.<br />
Note: The Cross Handle Valves seal only in the fully OPEN or fully CLOSED position. USING THE VALVE TO THROTTLE<br />
THE WATER FLOW WILL RESULT IN A LEAK AT THE VALVE STEM!