S2-AM121 - DDKS Industries, hydraulic components distributor
S2-AM121 - DDKS Industries, hydraulic components distributor
S2-AM121 - DDKS Industries, hydraulic components distributor

You also want an ePaper? Increase the reach of your titles
YUMPU automatically turns print PDFs into web optimized ePapers that Google loves.
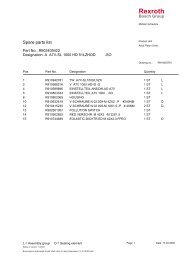
Assembly Procedures Continued Series 24, 30<br />
Barrel, Cam to Mounting Flange<br />
Figure 2<br />
3. Position the mounting flange (8) with the large open end<br />
facing up and install two dowel pins (7) in the cradle mounting<br />
surface and one-3/8" (9.52 mm) dia. dowel pin (11) in<br />
the outer edge of the flange.<br />
4. Install the cam (6) over the dowel pins (7) in the mounting<br />
flange. Position cam so that the thick part of the cam is<br />
on the same side as the 3/8" (9.52 mm) dowel (11).<br />
5. With cam installed, tilt mounting flange on its side and<br />
secure with two Soc. Hd. cap screws (10). Torque to 50 ft.-<br />
lbs. (67.8 N•m).<br />
6. Insert plugs (12) with o-rings (9) into Soc. Hd. cap screw<br />
(9) c'bores. Be sure tapped hole in plug (12) is visible after<br />
installation, this is used for removal.<br />
7 Install shaft and bearing assembly (1) Figure 6 (either<br />
splined or keyed as specified) by inserting shaft through<br />
bores, a few light taps are required on the bearing outer<br />
race to completely engage and seat bearing.<br />
NOTE: Do not tap on end of shaft.<br />
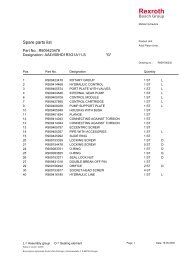
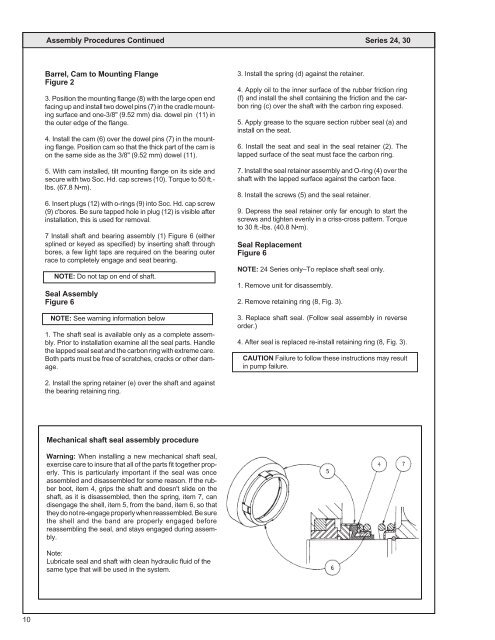
Seal Assembly<br />
Figure 6<br />
NOTE: See warning information below<br />
1. The shaft seal is available only as a complete assembly.<br />
Prior to installation examine all the seal parts. Handle<br />
the lapped seal seat and the carbon ring with extreme care.<br />
Both parts must be free of scratches, cracks or other damage.<br />
3. Install the spring (d) against the retainer.<br />
4. Apply oil to the inner surface of the rubber friction ring<br />
(f) and install the shell containing the friction and the carbon<br />
ring (c) over the shaft with the carbon ring exposed.<br />
5. Apply grease to the square section rubber seal (a) and<br />
install on the seat.<br />
6. Install the seat and seal in the seal retainer (2). The<br />
lapped surface of the seat must face the carbon ring.<br />
7. Install the seal retainer assembly and O-ring (4) over the<br />
shaft with the lapped surface against the carbon face.<br />
8. Install the screws (5) and the seal retainer.<br />
9. Depress the seal retainer only far enough to start the<br />
screws and tighten evenly in a criss-cross pattern. Torque<br />
to 30 ft.-lbs. (40.8 N•m).<br />
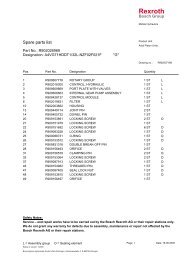
Seal Replacement<br />
Figure 6<br />
NOTE: 24 Series only–To replace shaft seal only.<br />
1. Remove unit for disassembly.<br />
2. Remove retaining ring (8, Fig. 3).<br />
3. Replace shaft seal. (Follow seal assembly in reverse<br />
order.)<br />
4. After seal is replaced re-install retaining ring (8, Fig. 3).<br />
CAUTION Failure to follow these instructions may result<br />
in pump failure.<br />
2. Install the spring retainer (e) over the shaft and against<br />
the bearing retaining ring.<br />
Mechanical shaft seal assembly procedure<br />
Warning: When installing a new mechanical shaft seal,<br />
exercise care to insure that all of the parts fit together properly.<br />
This is particularly important if the seal was once<br />
assembled and disassembled for some reason. If the rubber<br />
boot, item 4, grips the shaft and doesn't slide on the<br />
shaft, as it is disassembled, then the spring, item 7, can<br />
disengage the shell, item 5, from the band, item 6, so that<br />
they do not re-engage properly when reassembled. Be sure<br />
the shell and the band are properly engaged before<br />
reassembling the seal, and stays engaged during assembly.<br />
Note:<br />
Lubricate seal and shaft with clean <strong>hydraulic</strong> fluid of the<br />
same type that will be used in the system.<br />
10