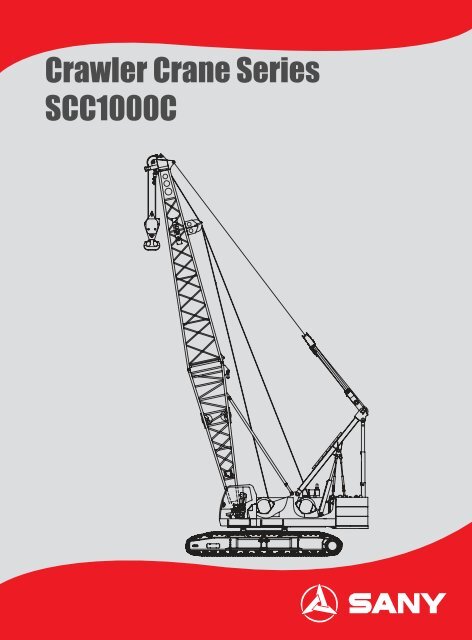
Crawler Crane Series SCC1000C - Sany
Crawler Crane Series SCC1000C - Sany
Crawler Crane Series SCC1000C - Sany

Create successful ePaper yourself
Turn your PDF publications into a flip-book with our unique Google optimized e-Paper software.
Remove the lifting arm<br />
3385<br />
Basic arm 1800,longest arm 7200<br />
1195<br />
3530<br />
7200<br />
4450<br />
6350<br />
7780<br />
1180
Remove the lifting arm<br />
3385<br />
Basic arm 1800,longest arm 7200<br />
1195<br />
3530<br />
7200<br />
4450<br />
6350<br />
7780<br />
1180
Remove the lifting arm<br />
3385<br />
Basic arm 1800,longest arm 7200<br />
1195<br />
3530<br />
7200<br />
4450<br />
6350<br />
7780<br />
1180
6140<br />
3140<br />
7730<br />
2030<br />
1830<br />
1830<br />
10920<br />
2240<br />
1200<br />
7800<br />
9500<br />
16000<br />
3200<br />
3200
1170<br />
1830<br />
1120<br />
9140<br />
9140<br />
5360<br />
5110<br />
3080<br />
6080<br />
2120<br />
830<br />
1980<br />
830<br />
830
1600<br />
690<br />
930<br />
2240<br />
1790<br />
1990<br />
4200<br />
1190<br />
1000<br />
930<br />
840 890<br />
490 850<br />
360<br />
850<br />
<br />
360 360
Upper pulley frame Pull plate<br />
Power box<br />
<br />
Step 1 Step 2<br />
Step 3<br />
Backup<br />
Press bolt<br />
Counterweight<br />
Draw cord group (2)<br />
Draw cord group (2)<br />
Counterweight (after midline incision)<br />
Connection pin of counterweight<br />
and main platform 6<br />
Step 4 Step 5 Step 6<br />
<br />
Step 1<br />
Step 2
Jib tip (5m)<br />
<br />
<br />
<br />
Jib 6m arm (2)<br />
Jib 3m arm (1)<br />
Jib base (5m)<br />
Included angle between<br />
boom and jib (15 o , 30 o )<br />
<br />
Boom arm (39-63m)
Lifting height (m)<br />
<br />
Operating range (m)
Lifting height (m)<br />
<br />
Operating range (m)
Lifting height (m)<br />
<br />
Operating range (m)
Lifting height (m)<br />
<br />
Operating range (m)
Lifting height (m)<br />
<br />
Operating range (m)
Lifting height (m)<br />
<br />
Operating range (m)
Shanghai <strong>Sany</strong> Science&Technology Co.,Ltd.<br />
No.319, Chuanda Rd, Chuansha Economic Park, Pudong District,Shanghai 201200.P.R.China<br />
Tel:0086-021-58595081(Sales) 0086-021-58593139(Service)<br />
Fax:0086-021-58595081<br />
Website: www.sanygroup.com<br />
<br />
Materials and specifications are subject to change without further notice in accordance with constant technical innovations.<br />
Photos may include additional equipment.<br />
Copyright @2010 SANY Group Co.,Ltd. All rights reserved.