5.3 Cleaning the Printer - KYOCERA Document Solutions
5.3 Cleaning the Printer - KYOCERA Document Solutions
5.3 Cleaning the Printer - KYOCERA Document Solutions

You also want an ePaper? Increase the reach of your titles
YUMPU automatically turns print PDFs into web optimized ePapers that Google loves.
<strong>5.3</strong> <strong>Cleaning</strong> <strong>the</strong> <strong>Printer</strong><br />
4<br />
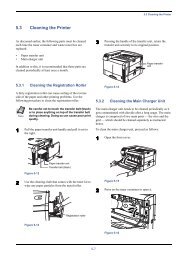
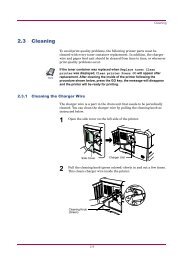
Attach <strong>the</strong> grid cleaner to <strong>the</strong> printer with <strong>the</strong> pad facing up.<br />
Grid Cleaner<br />
Figure 5-18<br />
5<br />
While pushing <strong>the</strong> main charger unit lock lever upward as shown in Figure 5-19,<br />
slightly lift <strong>the</strong> main charger unit, and gently pull <strong>the</strong> gray-colored main charger<br />
handle out and push it back in. Repeat this 2 to 3 times. These movements clean <strong>the</strong><br />
grid.<br />
Lock Lever<br />
Main Charger Unit<br />
Figure 5-19<br />
6<br />
After cleaning is finished, remove <strong>the</strong> grid cleaner from <strong>the</strong> printer and discard it.<br />
The grid cleaner cannot be reused. Close <strong>the</strong> front cover.<br />
Note<br />
If <strong>the</strong> front cover does not fully close, although <strong>the</strong> printer shows Ready, open <strong>the</strong> front<br />
cover and push <strong>the</strong> main charger unit until it is fully inserted in <strong>the</strong> printer.<br />
5-13