5.3 Cleaning the Printer - KYOCERA Document Solutions
5.3 Cleaning the Printer - KYOCERA Document Solutions
5.3 Cleaning the Printer - KYOCERA Document Solutions

You also want an ePaper? Increase the reach of your titles
YUMPU automatically turns print PDFs into web optimized ePapers that Google loves.
<strong>5.3</strong> <strong>Cleaning</strong> <strong>the</strong> <strong>Printer</strong><br />
<strong>5.3</strong> <strong>Cleaning</strong> <strong>the</strong> <strong>Printer</strong><br />
As discussed earlier, <strong>the</strong> following parts must be cleaned each time <strong>the</strong> toner container and<br />
waste toner box are replaced:<br />
• Paper transfer unit<br />
• Main charger unit<br />
In addition to this, it is recommended that <strong>the</strong>se parts are cleaned periodically at least once a<br />
month.<br />
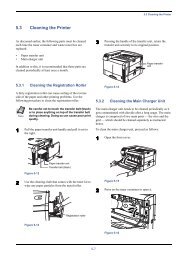
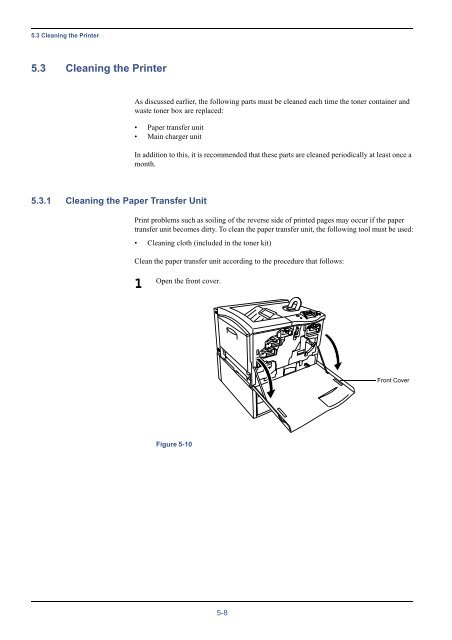
<strong>5.3</strong>.1 <strong>Cleaning</strong> <strong>the</strong> Paper Transfer Unit<br />
Print problems such as soiling of <strong>the</strong> reverse side of printed pages may occur if <strong>the</strong> paper<br />
transfer unit becomes dirty. To clean <strong>the</strong> paper transfer unit, <strong>the</strong> following tool must be used:<br />
• <strong>Cleaning</strong> cloth (included in <strong>the</strong> toner kit)<br />
Clean <strong>the</strong> paper transfer unit according to <strong>the</strong> procedure that follows:<br />
1<br />
Open <strong>the</strong> front cover.<br />
Front Cover<br />
Figure 5-10<br />
5-8
<strong>5.3</strong> <strong>Cleaning</strong> <strong>the</strong> <strong>Printer</strong><br />
2<br />
Grasp handle on <strong>the</strong> paper transfer unit and slowly pull it out.<br />
Paper Transfer Unit<br />
Figure 5-11<br />
3<br />
Clean <strong>the</strong> registration roller (metal) using <strong>the</strong> cleaning cloth.<br />
Be careful not to touch <strong>the</strong> transfer belt (brown) during cleaning as<br />
this may adversely affect print quality.<br />
Note<br />
Registration<br />
Roller [Metal]<br />
Transfer Belt<br />
Figure 5-12<br />
5-9
<strong>5.3</strong> <strong>Cleaning</strong> <strong>the</strong> <strong>Printer</strong><br />
4<br />
Clean <strong>the</strong> rubber belts (black) using <strong>the</strong> cleaning cloth.<br />
Rubber Belts<br />
Transfer Belt<br />
Figure 5-13<br />
5<br />
Push <strong>the</strong> paper transfer unit back in completely.<br />
Paper Transfer Unit<br />
Figure 5-14<br />
5-10
<strong>5.3</strong> <strong>Cleaning</strong> <strong>the</strong> <strong>Printer</strong><br />
6<br />
Close <strong>the</strong> front cover.<br />
Front Cover<br />
Figure 5-15<br />
5-11
<strong>5.3</strong> <strong>Cleaning</strong> <strong>the</strong> <strong>Printer</strong><br />
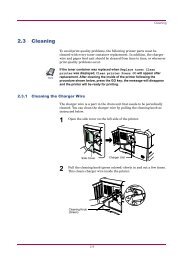
<strong>5.3</strong>.2 <strong>Cleaning</strong> <strong>the</strong> Main Charger Unit<br />
The main charger unit needs to be cleaned periodically as it gets contaminated with dioxide<br />
after a long usage. The main charger is comprised of two main parts — <strong>the</strong> wire and <strong>the</strong> grid<br />
— which should be cleaned separately as instructed below.<br />
To clean <strong>the</strong> main charger unit, proceed as follows:<br />
1<br />
2<br />
Open <strong>the</strong> front cover.<br />
First we clean <strong>the</strong> main charger wire. Grasp <strong>the</strong> tab of <strong>the</strong> cleaning knob<br />
(green-colored). Gently pull <strong>the</strong> cleaning bar out and push it back in. Repeat this 3 to<br />
5 times.<br />
<strong>Cleaning</strong> knob<br />
Figure 5-16<br />
3<br />
Next, we clean <strong>the</strong> main charger grid. Take <strong>the</strong> grid cleaner out of <strong>the</strong> toner kit. Take<br />
<strong>the</strong> grid cleaner out of <strong>the</strong> protective bag and remove <strong>the</strong> cap.<br />
Cap<br />
Grid Cleaner<br />
Figure 5-17<br />
Note<br />
The pad of <strong>the</strong> grid cleaner contains water. Clean <strong>the</strong> grid quickly so<br />
that <strong>the</strong> pad may not dry off.<br />
5-12
<strong>5.3</strong> <strong>Cleaning</strong> <strong>the</strong> <strong>Printer</strong><br />
4<br />
Attach <strong>the</strong> grid cleaner to <strong>the</strong> printer with <strong>the</strong> pad facing up.<br />
Grid Cleaner<br />
Figure 5-18<br />
5<br />
While pushing <strong>the</strong> main charger unit lock lever upward as shown in Figure 5-19,<br />
slightly lift <strong>the</strong> main charger unit, and gently pull <strong>the</strong> gray-colored main charger<br />
handle out and push it back in. Repeat this 2 to 3 times. These movements clean <strong>the</strong><br />
grid.<br />
Lock Lever<br />
Main Charger Unit<br />
Figure 5-19<br />
6<br />
After cleaning is finished, remove <strong>the</strong> grid cleaner from <strong>the</strong> printer and discard it.<br />
The grid cleaner cannot be reused. Close <strong>the</strong> front cover.<br />
Note<br />
If <strong>the</strong> front cover does not fully close, although <strong>the</strong> printer shows Ready, open <strong>the</strong> front<br />
cover and push <strong>the</strong> main charger unit until it is fully inserted in <strong>the</strong> printer.<br />
5-13