2.3 Cleaning - KYOCERA Document Solutions
2.3 Cleaning - KYOCERA Document Solutions
2.3 Cleaning - KYOCERA Document Solutions

You also want an ePaper? Increase the reach of your titles
YUMPU automatically turns print PDFs into web optimized ePapers that Google loves.
<strong>Cleaning</strong><br />
<strong>2.3</strong> <strong>Cleaning</strong><br />
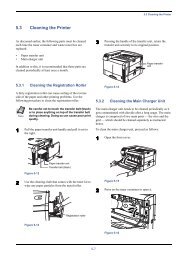
To avoid print quality problems, the following printer parts must be<br />
cleaned with every toner container replacement. In addition, the charger<br />
wire and paper feed unit should be cleaned from time to time, or whenever<br />
print quality problems occur.<br />
Note<br />
If the toner container was replaced when Replace toner Clean<br />
printer was displayed, Clean printer Press GO will appear after<br />
replacement. After cleaning the inside of the printer following the<br />
procedure shown below, press the GO key; the message will disappear<br />
and the printer will be ready for printing.<br />
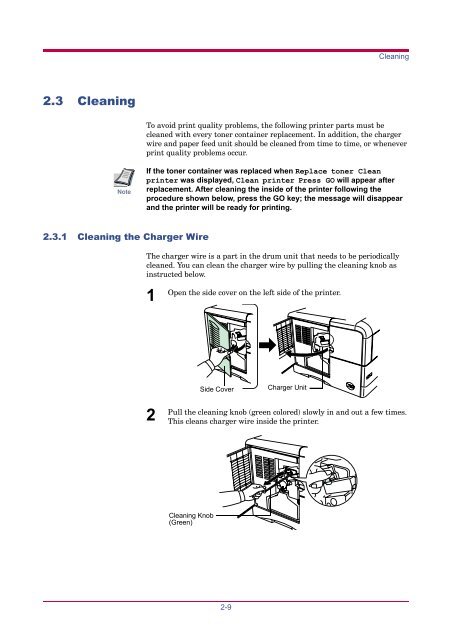
<strong>2.3</strong>.1 <strong>Cleaning</strong> the Charger Wire<br />
The charger wire is a part in the drum unit that needs to be periodically<br />
cleaned. You can clean the charger wire by pulling the cleaning knob as<br />
instructed below.<br />
1<br />
Open the side cover on the left side of the printer.<br />
Side Cover<br />
Charger Unit<br />
2<br />
Pull the cleaning knob (green colored) slowly in and out a few times.<br />
This cleans charger wire inside the printer.<br />
<strong>Cleaning</strong> Knob<br />
(Green)<br />
2-9
<strong>Cleaning</strong><br />
<strong>2.3</strong>.2 <strong>Cleaning</strong> the Charger Grid<br />
The charger grid is a part located at the bottom of the charger unit, which<br />
also needs to be cleaned. You should use a grid cleaner attaching it to the<br />
printer and pull out the charger unit as instructed below.<br />
1<br />
Take the grid cleaner from protective bag in the new toner kit, and<br />
remove the cap.<br />
Protective Bag<br />
Cap<br />
Grid Cleaner<br />
Note<br />
The grid cleaner pad is supplied with water soaked. Perform the<br />
following procedure before the pad dries.<br />
2<br />
Attach the grid cleaner to the printer with the pad at the top, as<br />
shown in the figure.<br />
Grid Cleaner<br />
2-10
<strong>Cleaning</strong><br />
3<br />
Slowly pull out and then push back in the charger unit at least 5<br />
times. It is easier to pull out the charger unit for the first time if it is<br />
raised slightly, as shown in the figure.<br />
This cleans grid part underneath the charger unit.<br />
(1)<br />
(3)<br />
(2)<br />
Charger Unit<br />
4<br />
Remove the grid cleaner from the printer and dispose of it. The grid<br />
cleaner is not re-usable.<br />
2-11
<strong>Cleaning</strong><br />
5<br />
After cleaning the charger wire and grid, push the charger unit all<br />
the way in and close the side cover.<br />
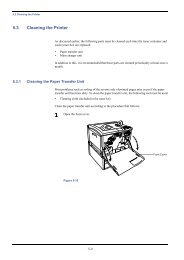
<strong>2.3</strong>.3 Paper Feed Unit<br />
To avoid print quality problems due to paper dust and debris, clean the<br />
paper feed unit in the following manner.<br />
1<br />
While pulling the paper feed unit release lever, pull out the paper<br />
feed unit.<br />
Paper Feed Unit Release Lever<br />
Paper Feed<br />
Unit<br />
2-12
<strong>Cleaning</strong><br />
2<br />
Wipe away the paper dust on the registration roller and the paper<br />
ramp using the wiper cloth included in the toner kit.<br />
Transfer Roller [Black]<br />
See Note below.<br />
Wiper Cloth<br />
Paper Ramp<br />
Registration Roller [Metal]<br />
Paper Feed Unit<br />
Note<br />
Be careful not to touch the transfer roller (the black roller) during<br />
cleaning as this may adversely affect print quality.<br />
2-13