KS810 Quick Installation Guide EN - KeyScan
KS810 Quick Installation Guide EN - KeyScan
KS810 Quick Installation Guide EN - KeyScan

Create successful ePaper yourself
Turn your PDF publications into a flip-book with our unique Google optimized e-Paper software.
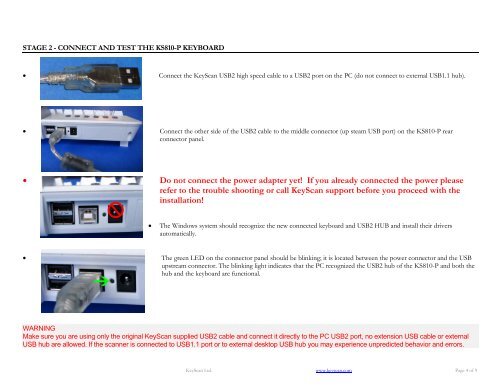
STAGE 2 - CONNECT AND TEST THE <strong>KS810</strong>-P KEYBOARD<br />
Connect the <strong>KeyScan</strong> USB2 high speed cable to a USB2 port on the PC (do not connect to external USB1.1 hub).<br />
Connect the other side of the USB2 cable to the middle connector (up steam USB port) on the <strong>KS810</strong>-P rear<br />
connector panel.<br />
<br />
Do not connect the power adapter yet! If you already connected the power please<br />
refer to the trouble shooting or call <strong>KeyScan</strong> support before you proceed with the<br />
installation!<br />
<br />
The Windows system should recognize the new connected keyboard and USB2 HUB and install their drivers<br />
automatically.<br />
The green LED on the connector panel should be blinking; it is located between the power connector and the USB<br />
upstream connector. The blinking light indicates that the PC recognized the USB2 hub of the <strong>KS810</strong>-P and both the<br />
hub and the keyboard are functional.<br />
WARNING<br />
Make sure you are using only the original <strong>KeyScan</strong> supplied USB2 cable and connect it directly to the PC USB2 port, no extension USB cable or external<br />
USB hub are allowed. If the scanner is connected to USB1.1 port or to external desktop USB hub you may experience unpredicted behavior and errors.<br />
<strong>KeyScan</strong> Ltd. www.keyscan.com Page 4 of 9