HI 96761C Total Chlorine Meter - Hanna Instruments
HI 96761C Total Chlorine Meter - Hanna Instruments
HI 96761C Total Chlorine Meter - Hanna Instruments

Create successful ePaper yourself
Turn your PDF publications into a flip-book with our unique Google optimized e-Paper software.
Instruction Manual<br />
<strong>HI</strong> <strong>96761C</strong><br />
<strong>Total</strong> <strong>Chlorine</strong> <strong>Meter</strong><br />
for the analysis of<br />
trace <strong>Total</strong> <strong>Chlorine</strong> concentrations<br />
www.hannainst.com<br />
This Instrument is in<br />
Compliance with the CE Directives<br />
1
Dear Customer,<br />
Thank you for choosing a <strong>Hanna</strong> product. This manual will provide you with the necessary<br />
information for the correct use of the instrument. Please read it carefully before using the meter. If<br />
you need additional technical information, do not hesitate to e-mail us at tech@hannainst.com.<br />
This instrument is in compliance with directives.<br />
TABLE OF CONTENTS<br />
PRELIMINARY EXAMINATION .............................................................................................. 3<br />
GENERAL DESCRIPTION ...................................................................................................... 4<br />
ABBREVIATIONS ................................................................................................................ 4<br />
SPECIFICATIONS ................................................................................................................ 5<br />
PRECISION AND ACCURACY ................................................................................................. 5<br />
PRINCIPLE OF OPERATION .................................................................................................. 6<br />
FUNCTIONAL DESCRIPTION ................................................................................................ 7<br />
ERRORS AND WARNINGS .................................................................................................. 9<br />
GENERAL TIPS FOR AN ACCURATE MEASUREMENT ........................................................... 11<br />
STARTUP...................................................................................................................12<br />
MEASUREMENT PROCEDURE ........................................................................................... 13<br />
VALIDATION PROCEDURE ................................................................................................. 15<br />
CALIBRATION PROCEDURE ............................................................................................... 17<br />
GLP...........................................................................................................................20<br />
BATTERY MANAGEMENT .................................................................................................. 21<br />
BATTERY REPLACEMENT .................................................................................................. 22<br />
ACCESSORIES ................................................................................................................. 22<br />
WARRANTY ................................................................................................................. 23<br />
All rights are reserved. Reproduction in whole or in part is prohibited without the written consent of the copyright owner,<br />
<strong>Hanna</strong> <strong>Instruments</strong> Inc., Woonsocket, Rhode Island, 02895 , USA.<br />
2
PRELIMINARY EXAMINATION<br />
Please examine this product carefully. Make sure that the instrument is not damaged. If any<br />
damage occurred during shipment, please notify your Dealer.<br />
Each <strong>HI</strong> 96761 Ion Selective <strong>Meter</strong> is supplied complete with:<br />
• Two Sample Cuvets and Caps<br />
• 9V Battery<br />
• Scissors<br />
• Tissue for wiping cuvets<br />
• Instrument quality certificate<br />
• Instruction Manual<br />
• Rigid carrying case<br />
Note: Save all packing material until you are sure that the instrument works correctly. Any<br />
defective item must be returned in its original packing.<br />
3
GENERAL DESCRIPTION<br />
The <strong>HI</strong> 96761 is an auto diagnostic portable microprocessor meter that benefits from <strong>Hanna</strong>’s<br />
years of experience as a manufacturer of analytical instruments. It has the advanced optical<br />
system based on a special tungsten lamp and a narrow band interference filter that allows most<br />
accurate and repeatable readings. All instruments are factory calibrated and the electronic and<br />
optical design minimizes the need of frequent calibration.<br />
With the powerful CAL CHECK TM validation function, you are able to validate good performance<br />
of your instrument at any time. The validation procedure is extremely user friendly. Just use the<br />
exclusive HANNA ready-made, NIST traceable standards to verify the performance of the<br />
instrument and recalibrate if necessary.<br />
All instruments are splash waterproof and the lamp and filter units are protected from dust or dirt<br />
by a transparent cup. This makes the instruments fulfill field applications. Display messages aid<br />
the user in routine operation. The meter has an auto-shut off feature that will turn off the<br />
instrument after 10 minutes of non use in measurement mode or after 1 hour if left in<br />
calibration mode.<br />
The meter uses an exclusive positive-locking system to ensure that the cuvet is in the same<br />
position every time it is placed into the measurement cell. It is designed to fit a cuvet with a<br />
larger neck making it easier to add both sample and reagents. The cuvet is made from special<br />
optical glass to obtain best results.<br />
The <strong>HI</strong> 96761 meter measures the total chlorine (Cl 2<br />
) content in water samples in the 0.000 to<br />
0.500 mg/L (ppm) range. The method is an adaptation of the Standard Method 4500-Cl G for<br />
drinking water.<br />
The reagent is in powder form and is supplied in packets. The amount of reagent is precisely<br />
dosed to ensure the maximum repeatability.<br />
ABBREVIATIONS<br />
°C:<br />
USEPA:<br />
°F:<br />
mg/L:<br />
mL:<br />
mV:<br />
degree Celsius<br />
United States Environmental Protection Agency<br />
degree Fahrenheit<br />
milligrams per liter. mg/L is equivalent to ppm (part per million)<br />
milliliter<br />
millivolts<br />
4
SPECIFICATIONS<br />
Range<br />
0.000 to 0.500 mg/L<br />
Resolution<br />
0.001 mg/L<br />
Precision<br />
±0.004 mg/L @ 0.200 mg/L<br />
Typical EMC Deviation ±0.001 mg/L<br />
Light Source Tungsten lamp<br />
Light Detector Silicon Photocell with narrow band interference filter @ 525 nm<br />
Method<br />
Adaptation of the Standard Method 4500-Cl G. The reaction between<br />
the chlorine and the DPD reagent causes a pink tint in the sample.<br />
Environment 0 to 50°C (32 to 122°F); max 95% RH non-condensing<br />
Battery Type 1 x 9 volt<br />
Auto-Shut off After 10' of non-use in measurement mode;<br />
after 1 hour of non-use in calibration mode;<br />
with last reading reminder.<br />
Dimensions 192 x 102 x 67 mm (7.6 x 4 x 2.6")<br />
Weight<br />
290 g (10 oz.).<br />
REQUIRED REAGENTS<br />
Code Description Quantity/test<br />
<strong>HI</strong> 95761-0 DPD Powder Reagent 1 packet<br />
Precision is how closely repeated measurements<br />
agree with each other. Precision is usually<br />
expressed as standard deviation (SD).<br />
Accuracy is defined as the nearness of a test<br />
result to the true value.<br />
Although good precision suggests good accuracy,<br />
precise results can be inaccurate. The figure<br />
explains these definitions.<br />
In a laboratory using a standard solution of 0.200<br />
mg/L chlorine and a representative lot of reagent,<br />
an operator obtained with a single instrument a<br />
standard deviation of 0.004 mg/L.<br />
PRECISION AND ACCURACY<br />
5
PRINCIPLE OF OPERATION<br />
Absorption of Light is a typical phenomenon of interaction between electromagnetic radiation and<br />
matter. When a light beam crosses a substance, some of the radiation may be absorbed by<br />
atoms, molecules or crystal lattices.<br />
If pure absorption occurs, the fraction of light absorbed depends both on the optical path length<br />
through the matter and on the physical-chemical characteristics of the substance according to the<br />
Lambert-Beer Law:<br />
-log I/I o<br />
= ε λ<br />
c d<br />
or<br />
A = ε λ<br />
c d<br />
Where:<br />
-log I/I o<br />
= Absorbance (A)<br />
I o<br />
= intensity of incident light beam<br />
I = intensity of light beam after absorption<br />
ε λ<br />
= molar extinction coefficient at wavelength λ<br />
c = molar concentration of the substance<br />
d = optical path through the substance<br />
Therefore, the concentration "c" can be calculated from the absorbance of the substance as the<br />
other factors are known.<br />
Photometric chemical analysis is based on the possibility to develop an absorbing compound<br />
from a specific chemical reaction between sample and reagents. Given that the absorption of a<br />
compound strictly depends on the wavelength of the incident light beam, a narrow spectral<br />
bandwidth should be selected as well as a proper central wavelength to optimize measurements.<br />
The optical system of <strong>Hanna</strong>'s <strong>HI</strong> 96 series colorimeters is based on special subminiature<br />
tungsten lamps and narrow-band interference filters to guarantee both high performance and<br />
reliable results.<br />
<strong>HI</strong> 96 series block diagram (optical layout)<br />
6
A microprocessor controlled special tungsten lamp emits radiation which is first optically<br />
conditioned and beamed to the sample contained in the cuvet. The optical path is fixed by the<br />
diameter of the cuvet. Then the light is spectrally filtered to a narrow spectral bandwidth, to<br />
obtain a light beam of intensity I o<br />
or I.<br />
The photoelectric cell collects the radiation I that is not absorbed by the sample and converts<br />
it into an electric current, producing a potential in the mV range.<br />
The microprocessor uses this potential to convert the incoming value into the desired measuring<br />
unit and to display it on the LCD.<br />
The measurement process is carried out in two phases: first the meter is zeroed and then the<br />
actual measurement is performed.<br />
The cuvet has a very important role because it is an optical element and thus requires particular<br />
attention. It is important that both, the measurement and the calibration (zeroing) cuvets, are<br />
optically identical to provide the same measurement conditions. Whenever possible use the same<br />
cuvet for both. It is necessary that the surface of the cuvet is clean and not scratched. This to<br />
avoid measurement interference due to unwanted reflection and absorption of light. It is<br />
recommended not to touch the cuvet walls with hands.<br />
Furthermore, in order to maintain the same conditions during the zeroing and the measuring<br />
phases, it is necessary to close the cuvet to prevent any contamination.<br />
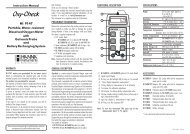
FUNCTIONAL DESCRIPTION<br />
INSTRUMENT DESCRIPTION<br />
1) GLP/ key<br />
2) CAL CHECK key<br />
3) ZERO/CFM key<br />
4) READ/ /TIMER key<br />
5) ON/OFF key<br />
6) Liquid Cristal Display (LCD)<br />
7) Cuvet alignment indicator<br />
8) Cuvet holder<br />
7
KEYPAD DESCRIPTION<br />
• ON/OFF: to turn the meter on and off.<br />
• ZERO/CFM: to zero the meter prior to measurement, to confirm edited values or to confirm<br />
factory calibration restore.<br />
• READ/ /TIMER: this is a multi-functional key. In measurement mode, press to make a<br />
measurement, or press and hold for three seconds to start a pre-programmed countdown prior<br />
to measurement. In GLP mode press to view the next screen.<br />
• CAL CHECK: this is a bi-functional key. Just press to perform the validation of the meter, or<br />
press and hold for three seconds to enter calibration mode.<br />
• GLP/ : this is a bi-functional key. Just press to enter GLP mode. In calibration mode press<br />
to edit the date and time.<br />
OPERATING MODES<br />
• Measurement mode: default operation mode, enables both validation and measurement.<br />
• Calibration mode: may be entered by keeping CAL CHECK pressed for three seconds (the<br />
“CAL” tag appears), it enables calibration of the instrument.<br />
• GLP mode may be entered by pressing GLP/ (“GLP” appears), it enables consulting of<br />
user calibration date or restore factory calibration.<br />
DISPLAY ELEMENTS DESCRIPTION<br />
5<br />
6<br />
7<br />
4<br />
3<br />
2<br />
1<br />
8<br />
9<br />
10<br />
1) The measuring scheme (lamp, cuvet, detector), appears during different phases of zero or<br />
reading measurement<br />
2) Error messages and warnings<br />
3) The battery icon shows the charging level of the battery<br />
4) The hourglass appears when an internal checking is in progress<br />
5) Status messages<br />
6) The chronometer appears when the reaction timer is running<br />
7) The month, day and date icons appear when a date is displayed<br />
8) Four digit main display<br />
9) Measuring units<br />
10) Four digit secondary display<br />
8
ERRORS AND WARNINGS<br />
The instrument shows clear messages when erroneous condition appears. Messages are also displayed<br />
when the obtained values are outside expected range. The beeper is playing a beep on errors.<br />
a) on zero reading<br />
Light High: There is too much light to perform a measurement.<br />
Please check the preparation of the zero cuvet.<br />
Light Low: There is not enough light to perform a measurement.<br />
Please check the preparation of the zero cuvet.<br />
No Light:The instrument cannot adjust the light level. Please<br />
check that the samples does not contain any debris.<br />
b) on sample reading<br />
Inverted cuvets: The sample and the zero cuvet are inverted.<br />
Zero: A zero reading was not taken. Follow the instructions of<br />
the measurement procedure for zeroing the meter.<br />
9
Under range: A blinking “0.000” indicates that the sample<br />
absorbs less light than the zero reference. Check the procedure<br />
and make sure you use the same cuvet for reference (zero) and<br />
measurement.<br />
Over Range: A flashing value of the maximum concentration<br />
indicates an over range condition. The concentration of the<br />
sample is beyond the programmed range: dilute the sample and<br />
re-run the test.<br />
c) during calibration procedure<br />
Standard Low: The standard reading is less than expected.<br />
Standard High: The standard reading is higher than expected.<br />
d) other errors and warnings<br />
Cap error: Appears when external light enters in the analysis<br />
cell. Assure that the cuvet cap is present.<br />
Cooling lamp: The instrument waits for the lamp to cool down.<br />
10
Battery low: The battery must be replaced soon.<br />
Dead battery: This indicates that the battery is dead and must<br />
be replaced. Once this indication is displayed, the meter will<br />
lock up. Change the battery and restart the meter.<br />
GENERAL TIPS FOR AN ACCURATE MEASUREMENT<br />
The instructions listed below should be carefully followed during testing to ensure best accuracy.<br />
• Color or suspended matter in large amounts may cause<br />
interference, therefore these should be removed by<br />
treatment with active carbon and by prior filtration.<br />
• For a correct filling of the cuvet: the liquid in the cuvet<br />
forms a concavity on the top; the bottom of this concavity<br />
must be at the same level of the 10 mL mark.<br />
• Proper use of the powder reagent packet:<br />
(a) use scissors to open the powder packet;<br />
(b) push the edges of the packet to form a spout;<br />
(c) pour out the content of the packet.<br />
• It is important that the sample does not contain any debris. This would corrupt the reading.<br />
• Each time the cuvet is used, the cap must be tightened to the same degree.<br />
11
• Whenever the cuvet is placed into the measurement cell, it<br />
must be dry outside, and completely free of fingerprints, oil<br />
or dirt. Wipe it thoroughly with <strong>HI</strong> 731318 or a lint-free<br />
cloth prior to insertion.<br />
• Shaking the cuvet can generate bubbles in the sample, causing higher readings. To obtain<br />
accurate measurements, remove such bubbles by swirling or by gently tapping the cuvet.<br />
• Do not let the reacted sample stand too long after reagent is added, or accuracy will be lost.<br />
• It is possible to take multiple readings in a row, but it is recommended to take a new zero<br />
reading for each sample and to use the same cuvet for zeroing and measurement.<br />
• After the reading it is important to discard immediately the sample, otherwise the glass<br />
might become permanently stained.<br />
• All the reaction times reported in this manual are referred to 20°C (68°F). As a general rule<br />
of thumb, they should be doubled at 10°C (50°F) and halved at 30°C (86°F).<br />
• In order to maximize accuracy, prior to a measurement follow the validation procedure to<br />
be sure that the instrument is properly calibrated. If necessary, calibrate the instrument.<br />
STARTUP<br />
Prepare the instrument for measurement as follows:<br />
• Unpack the instrument by removing the dust protection sleeve from the instrument cuvet holder.<br />
• Place the battery in the instrument as described in the “BATTERY REPLACEMENT” chapter.<br />
• Place the instrument on a flat table.<br />
• Do not place the instrument under direct sun light.<br />
12
To compensate the meter for the sample turbidity or color, the measurement takes place in two<br />
phases. First, the meter is zeroed using the unreacted sample. After the reagents are added the<br />
reacted sample is measured.<br />
• Turn the meter on by pressing ON/OFF.<br />
The display briefly shows all tags on.<br />
MEASUREMENT PROCEDURE<br />
• When the beeper sounds briefly and the<br />
LCD displays dashes, the meter is ready.<br />
The blinking “ZERO” indicates that the<br />
instrument needs to be zeroed first.<br />
• Fill the cuvet with 10 mL of unreacted<br />
sample, up to the mark, and replace the<br />
cap.<br />
• Place the cuvet into the cuvet holder and<br />
ensure that the notch on the cap is<br />
positioned securely into the groove.<br />
• Press ZERO/CFM and the lamp, cuvet<br />
and detector icons will appear on the<br />
display, depending on the measurement<br />
phase.<br />
• After a few seconds, the display will show<br />
“-0.0-”. The meter is now zeroed and<br />
ready for measurement.<br />
13
• Remove the cuvet.<br />
• Add the content of one packet of<br />
<strong>HI</strong> 95761-0 <strong>Total</strong> <strong>Chlorine</strong> Low Range<br />
reagent. Replace the cap and shake gently<br />
for 20 seconds.<br />
• Replace the cuvet into the cuvet holder<br />
and ensure that the notch on the cap is<br />
positioned securely into the groove.<br />
• Press and hold READ/ /TIMER for three<br />
seconds. The display will show the<br />
countdown prior to measurement. The<br />
beeper is playing a beep at the end of<br />
countdown period.<br />
Alternatively, wait for 2 minutes and 30<br />
seconds and just press READ/ /TIMER.<br />
In both cases, the lamp, cuvet and detector<br />
icons will appear on the display,<br />
depending on the measurement phase.<br />
• At the end of measurement, the instrument<br />
directly displays concentration in mg/L of<br />
copper on the LCD.<br />
.<br />
INTERFERENCES<br />
• Alkalinity:<br />
above 1,000 mg/L CaCO 3<br />
if present as bicarbonate<br />
(HCO 3<br />
sample pH < 8.3); above 25 mg/L CaCO 3<br />
if present as carbonate (CO 3<br />
2-<br />
, sample pH > 9.0).<br />
In both cases, it will not reliably developed the<br />
full amount of color or it may rapidly fade (negative<br />
14
error). To resolve this, neutralize the sample with<br />
diluted HCl.<br />
• Acidity:<br />
above 150 mg/L CaCO 3<br />
. May not be reliably<br />
develop the full amout of color or it may rapidly<br />
fade (negative error). To resolve this, neutralize<br />
the sample with diluted NaOH.<br />
• Hardness: in case of water with hardness greater than 500<br />
mg/L CaCO 3<br />
, shake the sample for approximately 2<br />
minutes after adding the powder reagent.<br />
• Bromine (Br 2<br />
):<br />
positive error.<br />
• Chloride dioxide (ClO 2<br />
):<br />
positive error.<br />
• Ozone (O 3<br />
):<br />
positive error.<br />
VALIDATION PROCEDURE<br />
Use the validation procedure to ensure that the instrument is properly calibrated.<br />
Warning: Do not validate the instrument with any standard solutions other than the HANNA CAL<br />
CHECK TM Standards, otherwise erroneous results will be obtained.<br />
• Turn the meter on by pressing ON/OFF.<br />
• When the beeper sounds briefly and the<br />
LCD displays dashes, the meter is ready.<br />
• Place the CAL CHECK TM Standard<br />
<strong>HI</strong> 95761-11 Cuvet A into the cuvet<br />
holder and ensure that the notch on the<br />
cap is positioned securely into the groove.<br />
• Press ZERO/CFM and the lamp, cuvet<br />
and detector icons will appear on the<br />
display, depending on the measurement<br />
phase.<br />
15
• After a few seconds, the display will<br />
show “-0.0-”. The meter is now zeroed<br />
and ready for validation.<br />
• Remove the cuvet.<br />
• Place the CAL CHECK TM Standard <strong>HI</strong> 95761-11<br />
Cuvet B into the cuvet holder and ensure that<br />
the notch on the cap is positioned securely<br />
into the groove.<br />
• Press CAL CHECK TM and the lamp, cuvet and<br />
detector icons together with “CAL CHECK” will<br />
appear on the display, depending on the<br />
measurement phase.<br />
• At the end of the measurement the display<br />
will show the validation standard value.<br />
The reading should be within specifications as reported in the CAL CHECK TM Standard<br />
Certificate. If the value is found out of the specifications, please check that the cuvets are free<br />
of fingerprints, oil or dirt and repeat validation. If results are still found out of specifications,<br />
then recalibrate the instrument.<br />
16
CALIBRATION PROCEDURE<br />
Note: It is possible to interrupt calibration procedure at any time by pressing CAL CHECK or<br />
ON/OFF keys.<br />
Warning: Do not calibrate the instrument with standard solutions other than the HANNA CAL<br />
CHECK TM Standards, otherwise erroneous results will be obtained.<br />
• Turn the meter on by pressing ON/OFF.<br />
• When the beeper sounds briefly and the<br />
LCD displays dashes, the meter is ready.<br />
• Press and hold CAL CHECK for three<br />
seconds to enter calibration mode. The<br />
display will show “CAL” during<br />
calibration procedure. The blinking<br />
“ZERO” asks for instrument zeroing.<br />
• Place the CAL CHECK TM Standard<br />
<strong>HI</strong> 95761-11 Cuvet A into the cuvet<br />
holder and ensure that the notch on the<br />
cap is positioned securely into the groove.<br />
• Press ZERO/CFM and the lamp, cuvet<br />
and detector icons will appear on the<br />
display, depending on the measurement<br />
phase.<br />
17
• After a few seconds the display will show<br />
“-0.0-”. The meter is now zeroed and ready<br />
for calibration. The blinking “READ” asks for<br />
reading calibration standard.<br />
• Remove the cuvet.<br />
• Place the CAL CHECK TM Standard <strong>HI</strong> 95761-11<br />
Cuvet B into the cuvet holder and ensure that<br />
the notch on the cap is positioned securely into<br />
the groove.<br />
• Press READ/ /TIMER and the lamp, cuvet<br />
and detector icons will appear on the display,<br />
depending on the measurement phase.<br />
• After measurement the instrument will show<br />
for three seconds the Cal Check Standard value.<br />
Note: If the display shows “STD <strong>HI</strong>GH”, the<br />
standard value was too high. If the display<br />
shows “STD LOW”, the standard value was<br />
too low. Verify that both CAL CHECK TM<br />
Standards <strong>HI</strong> 95761-11 Cuvets, A and B are<br />
free from fingerprints or dirt and that they are<br />
inserted correctly.<br />
Then the date of the last calibration (e.g.:<br />
”01.08.2005”) appears on the display, or<br />
“01.01.2005” if the factory calibration was<br />
selected before. In both cases the year number<br />
is blinking, ready for date input.<br />
18
DATE INPUT<br />
• Press GLP/ to edit the desired year<br />
(2000-2099). If the key is kept pressed,<br />
the year number is automatically<br />
increased.<br />
• When the correct year has been set, press<br />
ZERO/CFM or READ/ /TIMER to<br />
confirm. Now the display will show the<br />
month blinking.<br />
or<br />
• Press GLP/ to edit the desired month<br />
(01-12). If the key is kept pressed the<br />
month number is automatically increased.<br />
• When the correct month has been set,<br />
press ZERO/CFM or READ/ /TIMER<br />
to confirm. Now the display will show<br />
the day blinking.<br />
or<br />
• Press GLP/ to edit the desired day<br />
(01-31). If the key is kept pressed the<br />
day number is automatically increased.<br />
Note: It is possible to change the editing<br />
from day to year and to month by pressing<br />
READ/ /TIMER.<br />
• Press ZERO/CFM to save the calibration<br />
date.<br />
• The instrument displays “Stor” for one<br />
second and the calibration is saved.<br />
19
• The instrument will return automatically<br />
to the measurement mode by displaying<br />
dashes on the LCD.<br />
In the GLP mode, the last user calibration date can be consulted and the factory calibration can<br />
be restored.<br />
LAST CALIBRATION DATE<br />
To display the calibration date:<br />
• Press GLP/ to enter GLP mode. The<br />
calibration month and day will appear on<br />
the main display and the year on the<br />
secondary display.<br />
GLP<br />
• If no calibration was performed, the<br />
factory calibration message, “F.CAL” will<br />
appear on the main display and the<br />
instrument returns to measurement mode<br />
after three seconds.<br />
FACTORY CALIBRATION RESTORE<br />
It is possible to delete the calibration and<br />
restore factory calibration.<br />
• Press GLP/ to enter GLP mode.<br />
20
• Press READ/ /TIMER to enter in the<br />
factory calibration restore screen. The<br />
instrument asks for confirmation of user<br />
calibration delete.<br />
• Press ZERO/CFM to restore the factory<br />
calibration or press GLP/ again to<br />
abort factory calibration restore.<br />
• The instrument briefly notifies “done”<br />
when restores factory calibration and<br />
returns to measurement mode.<br />
BATTERY MANAGEMENT<br />
To save battery, the instrument shuts down after 10 minutes of non-use in measurement mode<br />
and after 1 hour of non-use in calibration mode.<br />
If a valid measurement was displayed before<br />
auto shut off, the value is displayed when<br />
the instrument is switched on. The blinking<br />
“ZERO” means that a new zero has to be<br />
performed.<br />
One fresh battery lasts for around 750 measurements, depending on the light level.<br />
The remaining battery capacity is evaluated at the instrument startup and after each measurement.<br />
The instrument displays a battery indicator with three levels as follows:<br />
• 3 lines for 100 % capacity<br />
• 2 lines for 66 % capacity<br />
• 1 line for 33 % capacity<br />
• Battery icon blinking if the capacity is under 10 %.<br />
If the battery is empty and accurate measurements can’t be taken anymore, the instrument<br />
shows “dead batt” and turns off.<br />
To restart the instrument, the battery must be replaced with a fresh one.<br />
21
BATTERY REPLACEMENT<br />
To replace the instrument’s battery, follow the steps:<br />
• Turn the instrument off by pressing ON/OFF.<br />
• Turn the instrument upside down and remove the battery cover by turning it counterclockwise.<br />
• Extract the battery from its location and replace it with a fresh one.<br />
• Insert back the battery cover and turn it clockwise to close.<br />
ACCESORIES<br />
REAGENT SET<br />
<strong>HI</strong> 95761-01<br />
<strong>HI</strong> 95761-03<br />
Reagents for 100 tests<br />
Reagents for 300 tests<br />
OTHER ACCESORIES<br />
<strong>HI</strong> 95761-11 CAL CHECK TM Standard Cuvets (1 set)<br />
<strong>HI</strong> 721310 9V battery (10 pcs.)<br />
<strong>HI</strong> 731318 Tissue for wiping cuvets (4 pcs.)<br />
<strong>HI</strong> 731331 Glass cuvets (4 pcs.)<br />
<strong>HI</strong> 731335 Caps for cuvets<br />
<strong>HI</strong> 93703-50 Cuvets cleaning solution (230 mL)<br />
22
WARRANTY<br />
<strong>HI</strong> 96761 is warranted for two years against defects in workmanship and materials when used<br />
for its intended purpose and maintained according to the instructions.<br />
This warranty is limited to repair or replacement free of charge.<br />
Damages due to accident, misuse, tampering or lack of prescribed maintenance are not covered.<br />
If service is required, contact your dealer. If under warranty, report the model number, date of<br />
purchase, serial number and the nature of the failure. If the repair is not covered by the warranty,<br />
you will be notified of the charges incurred.<br />
If the instrument is to be returned to <strong>Hanna</strong> <strong>Instruments</strong>, first obtain a Returned Goods Authorization<br />
Number from the Customer Service Department and then send it with shipment costs prepaid.<br />
When shipping any instrument, make sure it is properly packaged for complete protection.<br />
To validate your warranty, fill out and return the enclosed warranty card within 14 days from the<br />
date of purchase.<br />
Recommendations for Users<br />
Before using these products, make sure that they are entirely suitable for your specific application and for the environment in<br />
which they are used.<br />
Operation of these instruments may cause unacceptable interferences to other electronic equipments, this requiring the operator<br />
to take all necessary steps to correct interferences.<br />
Any variation introduced by the user to the supplied equipment may degrade the instruments' EMC performance.<br />
To avoid damages or burns, do not put the instrument in microwave oven. For yours and the instrument safety do not use or<br />
store the instrument in hazardous environments.<br />
<strong>Hanna</strong> <strong>Instruments</strong> reserves the right to modify the design, construction and appearance of its<br />
products without advance notice.<br />
23
MAN96761 03/06<br />
w w w . h a n n a i n s t . c o m<br />
24