Business VoiceEdge Quick Reference Guide - Comcast Business
Business VoiceEdge Quick Reference Guide - Comcast Business
Business VoiceEdge Quick Reference Guide - Comcast Business

Create successful ePaper yourself
Turn your PDF publications into a flip-book with our unique Google optimized e-Paper software.
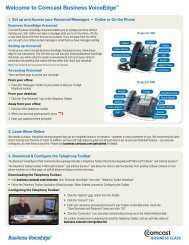
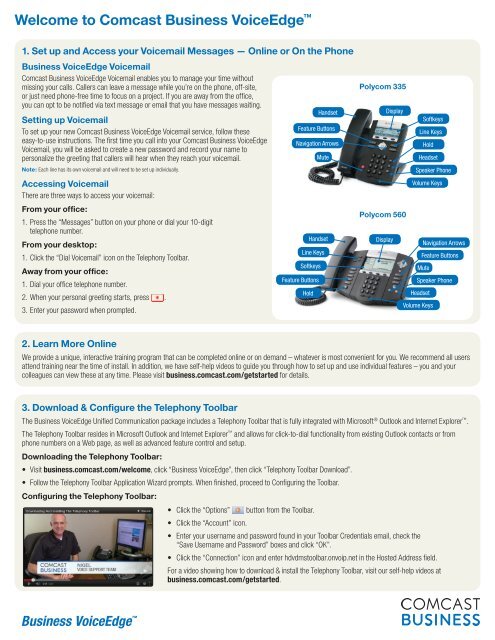
Welcome to <strong>Comcast</strong> <strong>Business</strong> <strong>VoiceEdge</strong> <br />
1. Set up and Access your Voicemail Messages — Online or On the Phone<br />
<strong>Business</strong> <strong>VoiceEdge</strong> Voicemail<br />
<strong>Comcast</strong> <strong>Business</strong> <strong>VoiceEdge</strong> Voicemail enables you to manage your time without<br />
missing your calls. Callers can leave a message while you’re on the phone, off-site,<br />
or just need phone-free time to focus on a project. If you are away from the office,<br />
you can opt to be notified via text message or email that you have messages waiting.<br />
Setting up Voicemail<br />
To set up your new <strong>Comcast</strong> <strong>Business</strong> <strong>VoiceEdge</strong> Voicemail service, follow these<br />
easy-to-use instructions. The first time you call into your <strong>Comcast</strong> <strong>Business</strong> <strong>VoiceEdge</strong><br />
Voicemail, you will be asked to create a new password and record your name to<br />
personalize the greeting that callers will hear when they reach your voicemail.<br />
Note: Each line has its own voicemail and will need to be set up individually.<br />
Accessing Voicemail<br />
There are three ways to access your voicemail:<br />
From your office:<br />
1. Press the “Messages” button on your phone or dial your 10-digit<br />
telephone number.<br />
From your desktop:<br />
1. Click the “Dial Voicemail” icon on the Telephony Toolbar.<br />
Away from your office:<br />
1. Dial your office telephone number.<br />
2. When your personal greeting starts, press .<br />
3. Enter your password when prompted.<br />
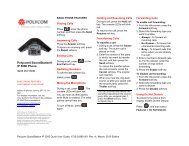
Handset<br />
Feature Buttons<br />
Navigation Arrows<br />
Mute<br />
Handset<br />
Line Keys<br />
Softkeys<br />
Feature Buttons<br />
Hold<br />
Polycom 335<br />
Display<br />
Softkeys<br />
Line Keys<br />
Hold<br />
Headset<br />
Speaker Phone<br />
Volume Keys<br />
Polycom 560<br />
Display<br />
Navigation Arrows<br />
Feature Buttons<br />
Mute<br />
Speaker Phone<br />
Headset<br />
Volume Keys<br />
2. Learn More Online<br />
We provide a unique, interactive training program that can be completed online or on demand – whatever is most convenient for you. We recommend all users<br />
attend training near the time of install. In addition, we have self-help videos to guide you through how to set up and use individual features – you and your<br />
colleagues can view these at any time. Please visit business.comcast.com/getstarted for details.<br />
3. Download & Configure the Telephony Toolbar<br />
The <strong>Business</strong> <strong>VoiceEdge</strong> Unified Communication package includes a Telephony Toolbar that is fully integrated with Microsoft ® Outlook and Internet Explorer .<br />
The Telephony Toolbar resides in Microsoft Outlook and Internet Explorer and allows for click-to-dial functionality from existing Outlook contacts or from<br />
phone numbers on a Web page, as well as advanced feature control and setup.<br />
Downloading the Telephony Toolbar:<br />
• Visit business.comcast.com/welcome, click “<strong>Business</strong> <strong>VoiceEdge</strong>”, then click “Telephony Toolbar Download”.<br />
• Follow the Telephony Toolbar Application Wizard prompts. When finished, proceed to Configuring the Toolbar.<br />
Configuring the Telephony Toolbar:<br />
• Click the “Options”<br />
• Click the “Account” icon.<br />
button from the Toolbar.<br />
• Enter your username and password found in your Toolbar Credentials email, check the<br />
“Save Username and Password” boxes and click “OK”.<br />
• Click the “Connection” icon and enter hdvdmstoolbar.onvoip.net in the Hosted Address field.<br />
For a video showing how to download & install the Telephony Toolbar, visit our self-help videos at<br />
business.comcast.com/getstarted.
Using the Telephony Toolbar<br />
1 2 3 4 5 6 7<br />
8 9 10 11 12 13 14<br />
15<br />
1. Connect: This button is red if you are not logged in; click to automatically<br />
log in.<br />
2. Options: Pre-configured general connection settings; where you enter<br />
login during initial setup.<br />
3. Services: Configure incoming call control features and/or voice<br />
messaging.<br />
4. Portal Login: Log on to the <strong>Business</strong> Voice Online Web portal from<br />
Internet Explorer or Firefox (it will not appear on the Microsoft Outlook<br />
version of the toolbar).<br />
5. Be Anywhere: Set up one number that rings all your phones; use the Be<br />
Anywhere voice portal to make and place calls using your office line while<br />
you are mobile.<br />
6. Remote Office: Enable a remote location to act as your work phone.<br />
7. Call Forwarding Always: Turn on/off the ability to send calls directly to<br />
a specified phone number.<br />
8. Call Forwarding No Answer: Turn on/off the ability to forward all<br />
incoming calls to a specified phone number if your phone isn’t answered.<br />
9. Call Forwarding Busy: Turn on/off the ability to forward all incoming<br />
calls if you are on a call.<br />
10. Do Not Disturb: Turn on/off the ability to send calls directly to voicemail<br />
(busy greeting).<br />
11. Speed Dial: Dial from the speed dial directory.<br />
12. Call History: View missed, dialed and received calls.<br />
13. Personal Directory: Access your personal directory.<br />
14. Group Directory: Access the company-wide group directory.<br />
15. Search: Enables you to search for a previously searched user/contact<br />
directly or to specify an ad hoc user/contact query.<br />
Call Controls<br />
1 2 3 4 5 6 7<br />
8 9<br />
1. Dial Connect: Click to dial an Outlook contact’s business, home or<br />
mobile phone number.<br />
2. Dial Other: Displays the last 10 dialed numbers for quick selection.<br />
3. Answer: Answer a call.<br />
4. Hold: Place a call on hold.<br />
5. Voicemail: Dial voicemail.<br />
6. Transfer: Transfer a call to another extension.<br />
7. 3-Way: Initiate a 3-way conference call.<br />
8. End: Terminate a call.<br />
9. Call Line: When a call is placed or received, the call line selector will<br />
automatically select a call and provide the name of the party (if available).<br />
<strong>Business</strong> Level Support<br />
Visit additional resources online at business.comcast.com/getstarted. In addition, our support team is available to assist you 24 hours a day,<br />
7 days a week at 800-472-4176.<br />
© 2013 <strong>Comcast</strong>. All rights reserved. GDE58064_3.13