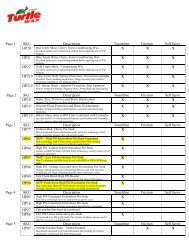
Lafferty Air Foamer Manual - Pumps & Pressure Inc.
Lafferty Air Foamer Manual - Pumps & Pressure Inc.
Lafferty Air Foamer Manual - Pumps & Pressure Inc.

You also want an ePaper? Increase the reach of your titles
YUMPU automatically turns print PDFs into web optimized ePapers that Google loves.
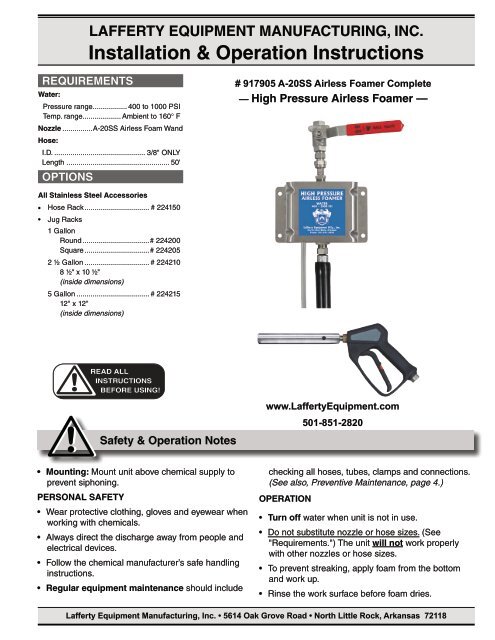
LAFFERTY EQUIPMENT MANUFACTURING, INC.<br />
Installation & Operation Instructions<br />
REQUIREMENTS<br />
Water:<br />
<strong>Pressure</strong> range................. 400 to 1000 PSI<br />
Temp. range................... Ambient to 160° F<br />
Nozzle................A-20SS <strong>Air</strong>less Foam Wand<br />
Hose:<br />
I.D............................................... 3/8" ONLY<br />
Length ................................................... 50'<br />
OPTIONS<br />
# 917905 A-20SS <strong>Air</strong>less <strong>Foamer</strong> Complete<br />
— High <strong>Pressure</strong> <strong>Air</strong>less <strong>Foamer</strong> —<br />
All Stainless Steel Accessories<br />
• Hose Rack................................. # 224150<br />
• Jug Racks<br />
1 Gallon<br />
Round..................................# 224200<br />
Square.................................# 224205<br />
2 ½ Gallon................................. # 224210<br />
8 ½" x 10 ½"<br />
(inside dimensions)<br />
5 Gallon..................................... # 224215<br />
12" x 12"<br />
(inside dimensions)<br />
www.<strong>Lafferty</strong>Equipment.com<br />
501-851-2820<br />
!Safety & Operation Notes<br />
• Mounting: Mount unit above chemical supply to<br />
prevent siphoning.<br />
Personal Safety<br />
• Wear protective clothing, gloves and eyewear when<br />
working with chemicals.<br />
• Always direct the discharge away from people and<br />
electrical devices.<br />
• Follow the chemical manufacturer’s safe handling<br />
instructions.<br />
• Regular equipment maintenance should include<br />
checking all hoses, tubes, clamps and connections.<br />
(See also, Preventive Maintenance, page 4.)<br />
OPERATION<br />
• Turn off water when unit is not in use.<br />
• Do not substitute nozzle or hose sizes. (See<br />
"Requirements.") The unit will not work properly<br />
with other nozzles or hose sizes.<br />
• To prevent streaking, apply foam from the bottom<br />
and work up.<br />
• Rinse the work surface before foam dries.<br />
<strong>Lafferty</strong> Equipment Manufacturing, <strong>Inc</strong>. • 5614 Oak Grove Road • North Little Rock, Arkansas 72118
Model # 917905 A-20SS <strong>Air</strong>less <strong>Foamer</strong> Complete<br />
Principles of Operation:<br />
For use with 400-1000 PSI water systems, <strong>Lafferty</strong> High <strong>Pressure</strong> <strong>Air</strong>less <strong>Foamer</strong>s<br />
are water-driven venturi systems that will draw chemical concentrates from any<br />
container, providing up to 21 different dilution ratios, and apply foam to any surface.<br />
Foam is created instantly in the venturi airless foam wand.<br />
TO INSTALL refer to diagram<br />
Read all Safety and Operational Precautions on page 1.<br />
1. Mount the unit above chemical supply to prevent siphoning.<br />
2. Connect the discharge hose assembly as shown in the diagram.<br />
3. Select and install metering tip into chemical check valve.<br />
Push the chemical tube over the check valve and immerse the chemical strainer<br />
into your chemical concentrate.<br />
How to Select the Correct Metering Tip<br />
• The dilution ratios provided in the Metering Tip Selection Chart, at right, are<br />
based on water-thin chemical with a water pressure of 700 PSI. Use the<br />
Metering Tip Selection Formula if you have water pressure other than 700<br />
PSI.<br />
• Due to varying chemical viscosities, you may need to increase the metering<br />
tip size. (See chemical label for dilution recommendation.)<br />
4. Connect water supply. (400 PSI water pressure minimum.)<br />
TO FOAM<br />
1. Open the water ball valve and move to the area to be cleaned.<br />
• Hold the trigger gun firmly and direct the discharge in a safe direction.<br />
• Pull the trigger and begin application. Observe foam quality.<br />
• If foam quality is poor, keep trying the next larger sized metering tip until the foam<br />
and cleaning results are acceptable.<br />
2. When foaming is completed, release the trigger. Return to the unit and close the<br />
inlet ball valve, then squeeze the trigger to relieve pressure in the hose. Rinse the<br />
work surface before the chemical dries.<br />
3. If <strong>Foamer</strong> will not be used for a period of time it is BEST to draw fresh water<br />
thru the pick up tube to prevent chemical from drying inside the check valve or<br />
<strong>Foamer</strong> body or <strong>Air</strong>less Foam Wand.<br />
Metering Tip<br />
Color<br />
Metering Tip Selection<br />
Oz.<br />
per<br />
Min.<br />
Example:<br />
Dilution Ratio<br />
@ 700 PSI<br />
A-20SS<br />
Brown .84 500:1<br />
Clear 1.16 362:1<br />
Bright Purple 1.4 300:1<br />
White 2.0 210:1<br />
Pink 2.7 155:1<br />
Corn Yellow 3.4 123:1<br />
Dark Green 4.0 105:1<br />
Orange 5.3 79:1<br />
Gray 6.1 69:1<br />
Light Green 7.0 60:1<br />
Med. Green 8.5 49:1<br />
Clear Pink 9.2 46:1<br />
Yellow Green 11.2 37:1<br />
Burgundy 12.5 34:1<br />
Pale Pink 12.9 33:1<br />
Light Blue 14.2 30:1<br />
Dark Purple 17.6 24:1<br />
Navy Blue 21.4 20:1<br />
Clear Aqua 30.2 14:1<br />
Black 40.4 10:1<br />
No Tip — 8:1<br />
The dilution ratios provided above are<br />
approximate values. Your actual dilution<br />
ratio may be higher or lower due to<br />
variation in chemical viscosity.<br />
Metering Tip Selection Formula<br />
(GPM x 128)<br />
÷<br />
=<br />
Dilution Ratio<br />
Oz. per Min.<br />
See chart below for<br />
GPM and convert to oz.<br />
per min.<br />
20:1, 30:1, etc.<br />
Match to nearest number<br />
in chart above.<br />
Water Flow Rate Chart<br />
Water <strong>Pressure</strong> Water Flow Rate<br />
PSI<br />
GPM<br />
A-20SS <strong>Air</strong>less <strong>Foamer</strong><br />
400 2.50<br />
500 2.76<br />
600 3.04<br />
700 3.28<br />
800 3.52<br />
900 3.71<br />
1000 3.90<br />
! Always turn off water when unit is not in use.<br />
– Page 2 –
Model # 917905 A-20SS <strong>Air</strong>less <strong>Foamer</strong> Complete<br />
– Page 3 –
Troubleshooting Guide<br />
Model # 917905 A-20SS <strong>Air</strong>less <strong>Foamer</strong> Complete<br />
PROBLEM<br />
Possible Cause / Solution Categories<br />
Startup<br />
Maintenance<br />
A) <strong>Foamer</strong> will not draw chemical. 1, 4, 5, 6, 7 8, 9, 10, 11, 12, 13<br />
B) Water backing up into chemical container. 8<br />
C) Dilution too strong. 3<br />
D) Foam does not clean/perform properly. 2<br />
E) Chemical solution backing up into water line. 13<br />
Possible Cause / Solution<br />
Startup<br />
1. Inlet ball valve or discharge ball valve not<br />
completely open<br />
• Completely open the water and discharge ball valves.<br />
2. Not enough chemical - metering tip too small<br />
• Install larger metering tip.<br />
3. No metering tip installed or metering tip too large<br />
• Install smaller metering tip.<br />
4. Chemical tube not immersed in chemical or<br />
chemical depleted<br />
• Immerse tube or replenish.<br />
5. Discharge hose too long or wrong size or kinked<br />
(SEE REQUIREMENTS)<br />
• Straighten the hose - Replace hose with correct size.<br />
6. Foam wand wrong size (SEE REQUIREMENTS)<br />
7. Water pressure too low or water volume too low/<br />
inlet piping too small<br />
• <strong>Inc</strong>rease water pressure or water volume (SEE<br />
REQUIREMENTS).<br />
Maintenance<br />
8. Chemical check valve stuck or failed<br />
• Clean or replace.<br />
9. Chemical strainer or metering tip partially blocked<br />
• Clean or replace chemical strainer and/or metering tip.<br />
10. Chemical tube stretched out or pin hole/cut in chemical<br />
tube (sucking air in)<br />
• Cut off end of tube or replace tube.<br />
11. Vacuum leak in chemical pick-up connection<br />
• Tighten the connection.<br />
12. Chemical build-up may have formed in the foamer body<br />
or airless foam wand, causing poor or no chemical pickup<br />
• Follow Preventive Maintenance instructions below, using hot<br />
water and/or descaling acid. When there is no draw at all,<br />
carefully remove fittings and soak entire body in descaling acid.<br />
13. No backflow preventer installed<br />
• Install appropriate backflow preventer into water line.<br />
PREVENTIVE MAINTENANCE: When the unit will be out of service for extended periods, remove chemical tube from<br />
chemical concentrate and place in water. Completely open the water and discharge ball valves for a few seconds to flush<br />
chemical and help prevent chemical build-up. Check and/or clean chemical strainer; replace if missing.<br />
03/04/09 – Page 4 –<br />
917905_A-20SS_AF_Complete