Post-oP ELBoW Bracing - Townsend Design
Post-oP ELBoW Bracing - Townsend Design
Post-oP ELBoW Bracing - Townsend Design

You also want an ePaper? Increase the reach of your titles
YUMPU automatically turns print PDFs into web optimized ePapers that Google loves.
<strong>Post</strong>-op ELBOW <strong>Bracing</strong><br />
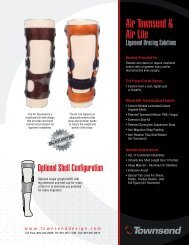
Initial Fitting Guide<br />
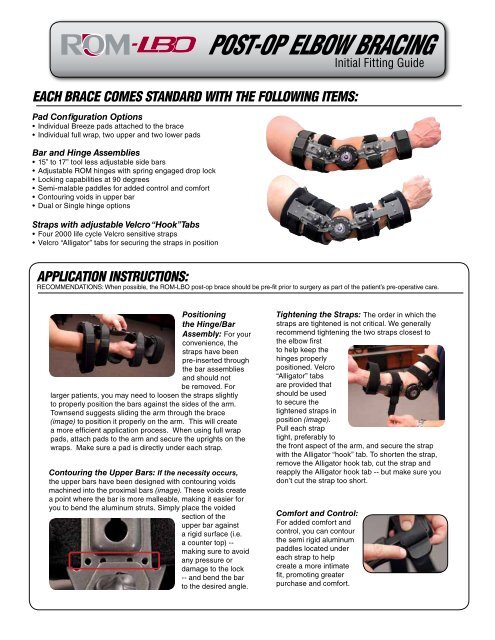
Each brace comes standard with the following items:<br />
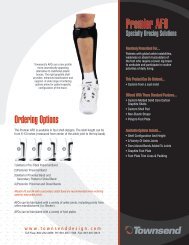
Pad Configuration Options<br />
• Individual Breeze pads attached to the brace<br />
• Individual full wrap, two upper and two lower pads<br />
Bar and Hinge Assemblies<br />
• 15” to 17” tool less adjustable side bars<br />
• Adjustable ROM hinges with spring engaged drop lock<br />
• Locking capabilities at 90 degrees<br />
• Semi-malable paddles for added control and comfort<br />
• Contouring voids in upper bar<br />
• Dual or Single hinge options<br />
Straps with adjustable Velcro “Hook” Tabs<br />
• Four 2000 life cycle Velcro sensitive straps<br />
• Velcro “Alligator” tabs for securing the straps in position<br />
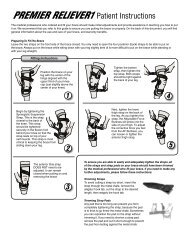
Application Instructions:<br />
RECOMMENDATIONS: When possible, the ROM-LBO post-op brace should be pre-fit prior to surgery as part of the patient’s pre-operative care.<br />
Positioning<br />
the Hinge/Bar<br />
Assembly: For your<br />
convenience, the<br />
straps have been<br />
pre-inserted through<br />
the bar assemblies<br />
and should not<br />
be removed. For<br />
larger patients, you may need to loosen the straps slightly<br />
to properly position the bars against the sides of the arm.<br />
<strong>Townsend</strong> suggests sliding the arm through the brace<br />
(image) to position it properly on the arm. This will create<br />
a more efficient application process. When using full wrap<br />
pads, attach pads to the arm and secure the uprights on the<br />
wraps. Make sure a pad is directly under each strap.<br />
Contouring the Upper Bars: If the necessity occurs,<br />
the upper bars have been designed with contouring voids<br />
machined into the proximal bars (image). These voids create<br />
a point where the bar is more malleable, making it easier for<br />
you to bend the aluminum struts. Simply place the voided<br />
section of the<br />
upper bar against<br />
a rigid surface (i.e.<br />
a counter top) --<br />
making sure to avoid<br />
any pressure or<br />
damage to the lock<br />
-- and bend the bar<br />
to the desired angle.<br />
Tightening the Straps: The order in which the<br />
straps are tightened is not critical. We generally<br />
recommend tightening the two straps closest to<br />
the elbow first<br />
to help keep the<br />
hinges properly<br />
positioned. Velcro<br />
“Alligator” tabs<br />
are provided that<br />
should be used<br />
to secure the<br />
tightened straps in<br />
position (image).<br />
Pull each strap<br />
tight, preferably to<br />
the front aspect of the arm, and secure the strap<br />
with the Alligator “hook” tab. To shorten the strap,<br />
remove the Alligator hook tab, cut the strap and<br />
reapply the Alligator hook tab -- but make sure you<br />
don’t cut the strap too short.<br />
Comfort and Control:<br />
For added comfort and<br />
control, you can contour<br />
the semi rigid aluminum<br />
paddles located under<br />
each strap to help<br />
create a more intimate<br />
fit, promoting greater<br />
purchase and comfort.
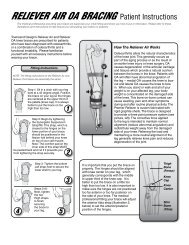
Hinge Settings<br />
<strong>Townsend</strong> ROM-LBO braces incorporate a simple quick dial hinge that enables medical<br />
professionals to set flexion and extension stops in 10 degree increments. As rehabilitation<br />
progresses, the setting can be quickly modified with the brace on the patient’s arm. A drop<br />
lock can be manually engaged and disengaged by the patient.<br />
The hinges should be pre-set to the desired flexion and extension setting before the brace<br />
is initially-applied to the arm.<br />
Engaging and Disengaging the Drop Lock: The drop lock engages at 90 degrees.<br />
Note: For the drop lock to engage, the flexion stop has to be set at 90 degrees or<br />
more in order for the drop lock to engage. To disengage the drop lock, simply pull up on<br />
the lock until it clicks into a free motion (unlocked) position. NOTE: The return button on<br />
the top of the lock should pop up when the lock is in the correct position. To return<br />
the drop lock to a locked position, push the return button at the top of the lock. Once the<br />
patient’s arm and brace reach 90 degrees, the lock will engage (image #1).<br />
To change the flexion or extension setting, follow these simple steps:<br />
Flexion Stops: Lift up and disengage the drop lock allowing you to rotate the hinge cover<br />
so the opening provides access to the locking arm that controls the flexion setting. Pull the<br />
locking arm straight out from the notched setting, bend the brace to the desired position,<br />
then rotate the cover and arm to the new flexion setting. Push the locking arm into the<br />
desired setting (image #2).<br />
Extension Stops: With the drop lock up and disengaged rotate the hinge cover so the<br />
opening allows access to the locking arm that controls the extension setting. Pull the<br />
locking arm straight out from the notched setting, bend or extend the brace to the desired<br />
position, then rotate the cover and arm to the new extension setting. Push the locking arm<br />
into the setting (image #2).<br />
Positioning the Hinge Cover: Return the hinge cover to neutral position with the<br />
opening at the top of the hinge between the flexion and extension settings. You will note<br />
the raised bump at the bottom of the hinge. This small notch prevents the hinge cover from<br />
rotating inadvertently while the brace is in a free motion position, keeping the range of<br />
motion stops positioned correctly (image #3).<br />
Length Adjustment:<br />
ROM-LBO bars are routinely pre-set at the factory to a 15 inch length. The length of<br />
the ROM-LBO can be adjusted by twisting the length adjustment button and sliding<br />
the extension bar to the desired length (adjustment lengths are in 1 inch increments).<br />
To shorten the length, simply follow the directions in reverse. NOTE: When adjusting<br />
the length, make sure you hear the button “click”, or lock into place.<br />
<strong>Townsend</strong> ROM braces are designed for short-term post-operative rehabilitation purposes only.<br />
ROM braces must be prescribed and fit by a medical professional, and are not reusable for multiple patients.<br />
The brace is covered by a 90 day warranty against defects in materials or craftsmanship.<br />
If you have questions regarding application instructions or product warranties,<br />
please speak with your local <strong>Townsend</strong> representative or call 800-432-3466.<br />
<strong>Townsend</strong> <strong>Design</strong><br />
4615 Shepard Street<br />
Bakersfield, CA 93313<br />
Tel 661.837.1795<br />
REV A 02/10