
Create successful ePaper yourself
Turn your PDF publications into a flip-book with our unique Google optimized e-Paper software.
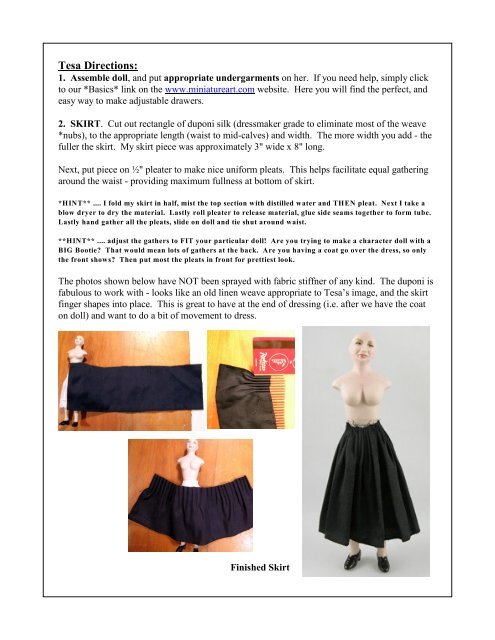
Tesa Directions:<br />
1. Assemble doll, and put appropriate undergarments on her. If you need help, simply click<br />
to our *Basics* link on the www.miniatureart.com website. Here you will find the perfect, and<br />
easy way to make adjustable drawers.<br />
2. SKIRT. Cut out rectangle of duponi silk (dressmaker grade to eliminate most of the weave<br />
*nubs), to the appropriate length (waist to mid-calves) and width. The more width you add - the<br />
fuller the skirt. My skirt piece was approximately 3" wide x 8" long.<br />
Next, put piece on ½" pleater to make nice uniform pleats. This helps facilitate equal gathering<br />
around the waist - providing maximum fullness at bottom of skirt.<br />
*HINT** .... I fold my skirt in half, mist the top section with distilled water and THEN pleat. Next I take a<br />
blow dryer to dry the material. Lastly roll pleater to release material, glue side seams together to form tube.<br />
Lastly hand gather all the pleats, slide on doll and tie shut around waist.<br />
**HINT** .... adjust the gathers to FIT your particular doll! Are you trying to make a character doll with a<br />
BIG Bootie? That would mean lots of gathers at the back. Are you having a coat go over the dress, so only<br />
the front shows? Then put most the pleats in front for prettiest look.<br />
The photos shown below have NOT been sprayed with fabric stiffner of any kind. The duponi is<br />
fabulous to work with - looks like an old linen weave appropriate to Tesa’s image, and the skirt<br />
finger shapes into place. This is great to have at the end of dressing (i.e. after we have the coat<br />
on doll) and want to do a bit of movement to dress.<br />
Finished Skirt
3. Dikki (faux Bodice). Cut out bodice pattern<br />
from silk. Turn the very bottom edge of hem<br />
under to wrong side and glue for finished edge.<br />
Lay bodice against your doll and check fit of<br />
torso, arms and neck hole placement (the most<br />
important). If all works, simply glue around<br />
torso and up over shoulders. If you wrap the<br />
bottom of bodice tightly, it nicely contains the<br />
raw edges of skirt top as shown to right.<br />
Remember Tesa gets a full length coat so nothing but the<br />
front of dress shows - hence the dikki approach. Lastly glue<br />
piece of lace around her neck to soften the harshness of dress.<br />
In the video she had a rounded neckline, but I liked the V<br />
shape to showcase the locket.<br />
*HINT** .... keep a sponge handy, and any flecks or piece of dried<br />
glue that shows up on your dress material can easily be taken off.<br />
*HINT** .... keep Q-tips handy and use them to evenly spread that<br />
glue over torso when gluing on the bodice. What I do ... is spread a<br />
thin layer of glue on torso, let get tacky, and then take the Q-tip to<br />
spread any last globs out so glue doesn’t bleed through bodice silk.<br />
*HINT** .... don’t worry about finding and keeping black lace in<br />
stock! I simply take my wide sharpie black marker, and color lace as<br />
desired. Permament, easy and cheap.<br />
Lastly, you can at this point do any other trins or lace embellishments you wish. Add rhinestone<br />
buttons (AT END of dressing) to avoid having them come off when putting her coat on.<br />
4. Coat. Cut out two front coat pieces and two back. Make sure to cut 1, flip and cut the other.<br />
Sew CB together then sew on one front<br />
piece to each side. Be sure and leave<br />
open the large sleeve opening. Sew or<br />
glue shoulder seam. Slide on doll to<br />
check fit.<br />
Next cut out two sleeve patterns, and<br />
with right sides together sew each from<br />
cuff to shoulder. Turn sleeve right side<br />
out, and gather top, put into coat sleeve<br />
hole, and sew sleeve to coat.
Carefully slide coat on<br />
doll, check fit and hold<br />
in place with pins.<br />
*NOTE** THE ARMS<br />
WILL BE OVERLY<br />
long - but I simply cut<br />
off excess length and the<br />
raw edges were covered<br />
by the trim. I did this<br />
because the length of<br />
arms vary if you bend<br />
the arm up, and you can<br />
ALWAYS cut off ... but<br />
can’t add on .<br />
At any rate, after coat fits nicely, glue the coat<br />
to doll around neck and a tiny bit at shoulders,<br />
let dry. Glue trim around front of coat for<br />
collar.<br />
Position doll and hand press any additional<br />
pleats or movement into the coat as desired.
Tesa in the Video is holding a special locket. I couldn’t come up with one that I liked.....tried<br />
several different methods, beads, fimo etc and ended up using a wonderful silver cross from<br />
KELL. I also didn’t have fine enough silver chain - so used 34 gauge silver wire which looks<br />
REALLY good in real life and holds the shape I wanted.<br />
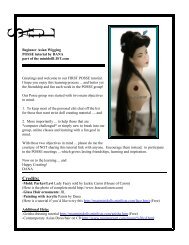
Additional Notes:<br />
1. I made a special class to do Tesa’s hair on Wed (9/10). If you are interested in taking it - or<br />
purchasing the notes/pdf - simply email me. I you are a former student - cost is only $5. There<br />
are 2 other how to’s along with Tesa’s hat hair.<br />
2. I have made up 5 special Tesa kits. This<br />
includes the super thin, drapable, glue friendly<br />
suede/velvet material I used for coat!.... painted<br />
doll, viscose, black duponi silk for dress, special<br />
trim for collar and cuffs, lace for dress collar and<br />
chain/cross. $45 plus $5 shipping US/$8 abroad to<br />
Dana@<strong>Mini</strong>atureart.com . If you already have<br />
something on order with me - no additional<br />
postage is required.<br />
3. All the info on making Tesa and participating in<br />
the MEMORIES video project can be found by<br />
clicking to the www.minidollPOSSE.com .<br />
Deadline isn’t until next year so you have plenty of<br />
time to join in.<br />
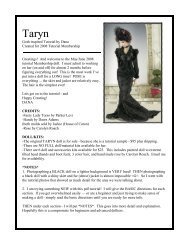
Tesa is the July/August 2008 tutorial<br />
membership pattern. Please respect my time<br />
and effort and DO NOT share this pdf.<br />
Any last questions - don’t hesitate to email me at:<br />
Dana@<strong>Mini</strong>atureart.com<br />
Happy CREATING!<br />
DANA<br />
PS - as you can tell from the different shades of black in the above photos — black silk, on black<br />
velvet with black trim and lace is almost impossible to photograph. Some of the photos are over<br />
exposed so you could see the detail about the step being discussed. I had to take weird angles<br />
just to get the shadows to fall right. The black materials used, are beautiful and all match in real<br />
life .