
You also want an ePaper? Increase the reach of your titles
YUMPU automatically turns print PDFs into web optimized ePapers that Google loves.
<strong>Allen</strong><br />
Model <strong>640RR</strong> Instructions<br />
English Instructions<br />
Pg. 1<br />
WARNING: Bikes or rack falling in road can cause serious accidents resulting in bodily injury - do not<br />
use rack on any vehicle on which it can not be properly mounted as described in this instruction sheet.<br />
• Rack should only be used on vehicles with 2” receiver hitches.<br />
• Bikes must be tied to rack using tie-downs, or additional straps if necessary.<br />
• Check periodically during use that all bolts and pins are tight, and that rack and bicycles are secure.<br />
• Never carry more than 4 bikes (max. capacity: 140 lb.) - no tandems, mopeds, or recumbents. Car tail lights must remain visible.<br />
• Never use on trailers or front of vehicle.<br />
• Drive conservatively, especially over bumps (never off-road).<br />
• Do not use if any part of rack is damaged or missing. Contact R. A. <strong>Allen</strong> Co., Inc. for replacement parts.<br />
Caution: Use <strong>Allen</strong> <strong>640RR</strong> only in accordance with local motor vehicle and traffic regulations.<br />
• Install rack and load bicycles only at a safe distance away from moving traffic.<br />
• Make sure that all of rack and bicycles are kept at a safe distance from road and hot exhaust.<br />
• Remove rack from car or fold carry arms down when not in use.<br />
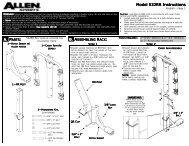
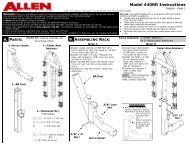
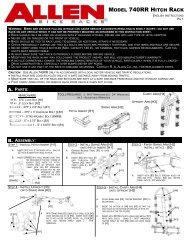
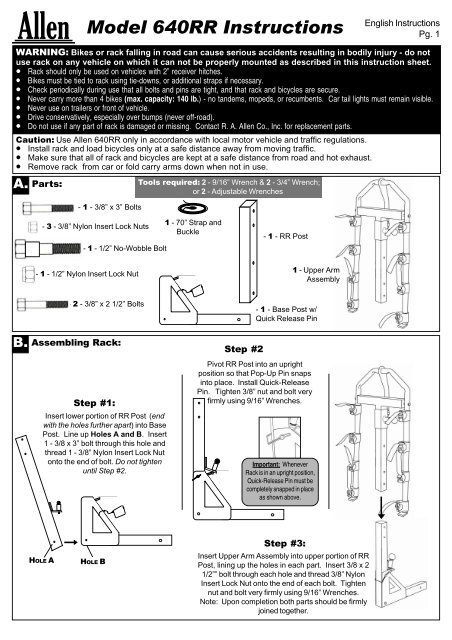
A.<br />
Parts:<br />
- 1 - 3/8” x 3” Bolts<br />
Tools required: 2 - 9/16” Wrench & 2 - 3/4” Wrench;<br />
or 2 - Adjustable Wrenches<br />
- 3 - 3/8” Nylon Insert Lock Nuts<br />
- 1 - 1/2” No-Wobble Bolt<br />
- 1 - 1/2” Nylon Insert Lock Nut<br />
1 - 70” Strap and<br />
Buckle<br />
- 1 - RR Post<br />
1 - Upper Arm<br />
Assembly<br />
- 2 - 3/8” x 2 1/2” Bolts<br />
- 1 - Base Post w/<br />
Quick Release Pin<br />
B.<br />
Assembling Rack:<br />
Step #1:<br />
Insert lower portion of RR Post (end<br />
with the holes further apart) into Base<br />
Post. Line up Holes A and B. Insert<br />
1 - 3/8 x 3” bolt through this hole and<br />
thread 1 - 3/8” Nylon Insert Lock Nut<br />
onto the end of bolt. Do not tighten<br />
until Step #2.<br />
Step #2<br />
Pivot RR Post into an upright<br />
position so that Pop-Up Pin snaps<br />
into place. Install Quick-Release<br />
Pin. Tighten 3/8” nut and bolt very<br />
firmly using 9/16” Wrenches.<br />
Important: Whenever<br />
Rack is in an upright position,<br />
Quick-Release Pin must be<br />
completely snapped in place<br />
as shown above.<br />
HOLE A<br />
HOLE B<br />
Step #3:<br />
Insert Upper Arm Assembly into upper portion of RR<br />
Post, lining up the holes in each part. Insert 3/8 x 2<br />
1/2”” bolt through each hole and thread 3/8” Nylon<br />
Insert Lock Nut onto the end of each bolt. Tighten<br />
nut and bolt very firmly using 9/16” Wrenches.<br />
Note: Upon completion both parts should be firmly<br />
joined together.
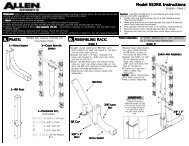
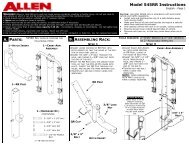
<strong>Allen</strong> Model <strong>640RR</strong> Bike Rack<br />
B.<br />
Installing Rack on Vehicle:<br />
<strong>640RR</strong> should only be used on 2”<br />
Receiver Hitches<br />
C.<br />
Folding up Arms:<br />
English Instructions<br />
Page 2.<br />
To fold up arms, pull out Pop-up Pin and swing carry arms into<br />
an upright position.<br />
1/2” Nylon Insert Nut<br />
Pop-up Pin<br />
No-Wobble Bolt<br />
IMPORTANT: Pop-up Pin must be<br />
fully engaged when arms and rack<br />
are in an upright position.<br />
1. With arms in the folded position, insert rack into receiver<br />
hitch. Line up hole in base with hole of receiver hitch.<br />
2. Insert No-Wobble Bolt into hole, making sure that the<br />
shoulder of the bolt comes up against receiver rack inside of<br />
hitch. Tighten firmly with 2 - 3/4” wrenches. There should not<br />
be any movement of the rack inside of the hitch when done.<br />
WRONG<br />
RIGHT<br />
If Pop-up Pin does not properly engage,<br />
call <strong>Allen</strong> Racks at (800) 722-5536<br />
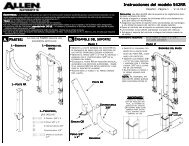
G. Loading bicycles onto rack:<br />
1. Remove all loose items from bikes (pumps, bags, etc.) and check that all quick-release hubs are tight.<br />
Never carry more than 4 bikes (max. capacity: 140 lb.). Car tail lights must remain visible.<br />
2. Load first bike with its chain and gears facing away from rack. Make sure that bikes do not<br />
come into contact with car (rotate inside pedal if necessary).<br />
3. Load subsequent bikes in alternating directions. For best weight distribution, load heaviest<br />
bikes first with lighter bikes on outside. Add padding between bike contact points, if necessary.<br />
4. After bikes are loaded, check that entire rack is secure and that No-Wobble Bolt is tight, making<br />
sure that rack is still firmly in place. Vision out of rear window may be restricted - use side<br />
mirrors accordingly, especially when backing up.<br />
H. Securing bikes to rack: All bikes must be securely tied to rack. Use individual bike tie-down straps or additional straps if necessary.<br />
1. Place bikes in tie-down<br />
cradles.<br />
WOMEN’S FRAMES<br />
Place one carry arm under<br />
front top tube. With other<br />
carry arm, rotate tie-down<br />
cradle and place carry arm<br />
behind seat tube and<br />
below rear down stay.<br />
2. Thread straps. 3. Pull tight.<br />
4. Use 70” Strap to secure all<br />
of the bikes together around<br />
bottom brackets.<br />
R. A. <strong>Allen</strong> Co., Inc.<br />
P. O. Box 221<br />
Lincoln, MA 01773<br />
U. S. Patents 4518108, 4709840, 5361959 - Foreign & Other Patents Pending<br />
© 2001 R. A. <strong>Allen</strong> Co., Inc., All Rights Reserved<br />
www.allenracks.com<br />
Tel: (800) 722-5536<br />
Fax: (781) 259-4116<br />
email:customerservice@allenracks.com