
You also want an ePaper? Increase the reach of your titles
YUMPU automatically turns print PDFs into web optimized ePapers that Google loves.
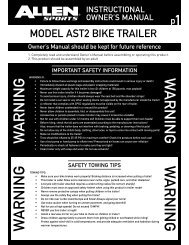
INSTRUCTIONALOWNER’S MANUALp 1MODEL <strong>AST100</strong> BIKE TRAILEROwner’s Manual should be kept for future reference1. Completely read and understand Owner’s Manual before assembling or operating this product.2. This product should be assembled by an adultWARNINGWARNINGIMPORTANT SAFETY INFORMATIONWarning #1:• Failure to follow these warnings and assembly instructions could result in serious injury or death!• Immediately discard all plastic bags and plastic wrapping materials!• Maximum weight capacity for this trailer is two (2) children at 100 pounds, max payload!• Never use this trailer/stroller if it becomes damaged!• To avoid serious injury, children should always wear the seat belt and the shoulder straps!• Do not install a car seat or any other seating device not approved by the manufacturer inside the trailer!• A reflector that complies with CPSC regulations must be visible on the rear of trailer.• Never leave children unattended in or around this product!• Never allow children to assemble, fold, or disassemble this unit!• Accessories or parcels placed in trailer/stroller may cause it to become unstable!• Not for use with children under 12 months old! Children must be able to support their own heads!• Before riding, check that all parts are assembled according to the manufacturer instructions!Also, ensure that the trailer does not interfere with braking, pedaling, or steering of the bicycle!• Do not allow any of the child’s body, clothing, shoe laces, or toys to come into contact with moving parts!• Make no modifications to the trailer!• Tires should be inflated to 25-35 PSI for maximum comfort! Check tire pressure before each use!• Use a foot pump or hand pump to inflate tires! Pressurized air hoses can cause over inflation!• Periodically re-check all fasteners to make sure they are tight!• Clean trailer only with soap and water. Do not use solvents!SAFETY TOWING TIPSTowing Tips:• Make sure your bike brakes work properly! Braking distance is increased when pulling a trailer!• This trailer is wide! Allow extra clearance near curbs, signs, parked cars, and other obstacles!• A bicycle with trailer attached requires a wide turning radius! Do not turn sharply!• Children must wear an approved safety helmet when using this product in trailer mode!• Never remove protective canopy when pulling children in the trailer!• Always use the safety flag when pulling this trailer!• Do not ride over curbs! Avoid bumps and holes! Always signal your turns!• Use extra caution when turning on uneven pavement, and going downhill!• Not for use at high speeds! Do not exceed 10 MPH!• NEVER use this trailer at night!• Install a rearview mirror on your bike to check on children in trailer!• Dress children appropriately to prevent them from getting chilled or overheated while riding!Protect against wind-chill in cold temperatures, and provide adequate ventilation and hydration duringwarmer temperatures.WARNINGWARNING
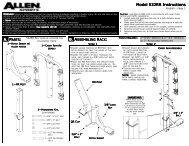
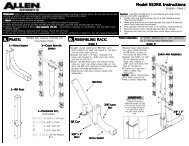
INSTRUCTIONALOWNER’S MANUALp 2FULLY ASSEMBLED TRAILERPARTS LISTQUANTITYDESCRIPTION1 Frame w/ Canopy, SlingSeat with 5 point safetyharness, tow bar, towbar coupler and rearwheel bracket attached2 16” Rear wheels1 Safety flag
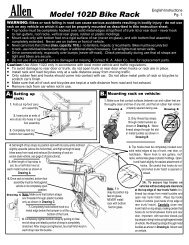
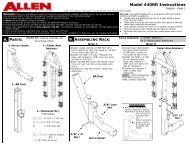
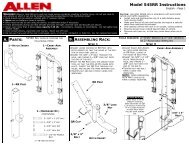
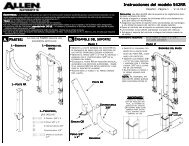
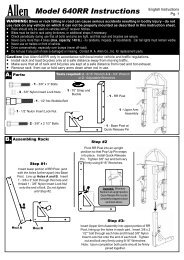
INSTRUCTIONALOWNER’S MANUALp 3TRAILER ASSEMBLY & OPERATING INSTRUCTIONSSTEP 1:Remove the trailer from the box and check contents against the parts list.NOTE(S): 1. Lay the trailer on the ground with the black fabric side down.2. Do not remove the white foam from the wheel axles until STEP 4FIGURE 1.FIGURE 1A.WARNING!:IMMEDIATELY DISCARD ALL PLASTIC BAGS AND WHEEL WRAPPING MATERIALS!STEP 2:OPEN FRAME -Unfold trailer by pulling the frame and remove all components from inside.A. Notch the small plastic “box” with red release latch on the rear of the front window frame tubes.B. Notch the small, round-tipped slide pin on the front of the rear window frame tubes.C. Lift both front and rear tubes at the same time, and insert the round-tipped slide pin into the slotin the bottom of the small plastic locking “box”.D. Lift up to pull the two parts together. When engaged, you will hear a small “click” noise. To release theframe for folding, simply press the red button on the side of the “box”, while at the same time, pushingdown on the rear window frame tube.FIGURE 2.FIGURE 2A.FIGURE 2B.WARNING!:The spring-release pins must be engaged for safe operation of the trailer. Failure to Assembleproperly may result in injury. If the spring-release pins do not engage properly, DO NOT USE.Call the customer service number as indicated in the attached literature for assembly assistance.STEP 3:RELEASE THE TOW BAR1. Turn the trailer on its side so the hitch arm is along the top edge [Fig. 3].2. Find the quick-release pin that holds the tow bar in place in the tow bar bracket [Fig. 3a]3. Open the loop of the quick-release pin and remove the pin.4. Rotate the hitch arm forward until it is seated in the U-channel [Fig. 3b]. Re-install pin in frontholes in the U-channel and close the snap pin so the loop of the pin lock is over the pin shaft.FIGURE 3.FIGURE 3A.FIGURE 3B.
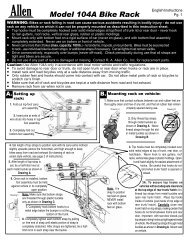
INSTRUCTIONALOWNER’S MANUALp 4Wheel InstallationWARNING!Remove the foam from the wheel axles and discard immediately. Do not remove washers.STEP 1:STEP 2:STEP 3:STEP 4:NOTE:Lift the trailer back so the right side is up, and locate the right wheel.Install the wheel axle by sliding the axle completely through the bracketin the frame as shown.Insert the Quick Release Pin (tethered to the trailer frame near the wheel bracket)through the hole in the axle and lock the clip to secure the pin.Repeat for the left wheel. When complete, give each of the wheels a tug to be surethat they are secure.Wheels must be properly installed with quick release pins closed andsnapped shut. If QR pins are not correctly attached, wheels may fall off.Do not use if QR pins are missing, or if the closure is damaged or missing.WARNING!:Check wheels periodically during and before each use to be sure that they have notbecome loose. Failure to do so could result in SERIOUS INJURY to you or trailer’s occupants.Attaching the Four Season CoverSTEP 1:STEP 2:STEP 3:STEP 4:STEP 5:NOTE:Position the four-season cover over the trailer where roll-up window is facing towards the front side of the trailer. (Fig.12).Wrap the Velcro backed fixing straps and secure the cover around the frame.Secure the Velcro material at the bottom front of the cover to the matching Velcro material onthe lower front fabric panel.Connect the slide release buckles affixed to the rear corners of the cover to the matching buckles sewnthe rear side of the trailer cabin (Fig 13).Connect the elastic cords on the rear cover to the D-Rings which are located on the bottom cabin cornersThe four-season cover is designed to keep passengers and cargo dry and warm in inclementweather. It also protects the passengers from flying debris. The four-season cover can berolled up to allow for added ventilation in hot weather. Velcro closures keep the four-seasoncover in place when rolled up.FIGURE 12. FIGURE 13.WARNING!:Never use the trailer without the four season cover. The front window or bug screen must beattached to protect children from flying objects.
INSTRUCTIONALOWNER’S MANUALp 5Safety Flag InstallationSTEP 1:NOTE:Assemble the flag and insert the end into the small sleeve on the side of the trailer skin.Reattach the Velcro to secure the cover.Flag should be removed before attempting to fold trailerWARNING!:This flag is meant for use only with the trailer. This flag is not a toy. Do not let your child playwith this flag at any time. Failure to comply with this warning could result in serious injuryof your child.WHEEL GUARD/PARKING BRAKE INSTALLATIONYour trailer is equipped with a combination wheel guard/parking brake for added safety. When loading or unloadingor parking your trailer, engage the parking brake to prevent the trailer from moving. The brake housinghelps to deflect the tire from obstructions that might stop the trailer and result in an accident.PARTS INCLUDE: 1 - Hex Key; 4 - Screws; 2 - Wheelguard/ BrakesSTEP 1:Unpack poly-bag and check that all parts are included.STEP 2:STEP 3:STEP 4:NOTE:STEP 5:Locate the 2 holes in the front of the side frame, just in front of the wheel.Place screws through holes in frame – from inside to outside, as shown.Place the Guard/Brake Assembly against the frame, and tighten the screws until snug.The nut is secured inside the plastic housing so you will not need a wrench or plier to hold thenut while tightening the fixing screw.To operate brake, simply move lever outward to contact tire, release by pushing the lever in toward frame.
INSTRUCTIONALOWNER’S MANUALp 6Attaching Trailer to BicycleWARNING!:Your trailer is designed to attach to most full-sized bicycles. The trailer’s hitch must beattached to the rear axle of the bike. Do not use trailer if the hitch can not be securelyattached to rear axle. It is recommended that the bicycle(s) to which the trailer will beattached undergo a safety check by a qualified bicycle mechanic before attaching trailer.This trailer should never be used with electric bicycles, or any motorcycle or any motorized vehicleSTEP 1:STEP 2:STEP 3:STEP 4:Loosen LEFT side rear axle to allow the trailer’s hitch to attach to frame.Position hitch over left rear axle of bicycle frame (Fig15).Tighten axle nut securely, testing to see that hitch is unable to pull loose (Fig16).Loop Safety Strap around frame and secure to D-ring on hitch arm (Fig 17).WARNING!:Safety strap must attach to the bike frame when using this product in trailer mode.FIGURE 15. FIGURE 16. FIGURE 17.Securing Child with 5-Point Safety HarnessFOR ONE CHILD:STEP 1:STEP 2:NOTE:Undo the lap belt buckle and seat the child in the CENTER of the trailer.Buckle the lap belt [A] over the child’s lap, and pull the strap until thebelt is tight.Place the two center shoulder straps [C] over the child’s shoulders,and clip both straps into “D” Ring [D] of the center crotch strap.Adjust shoulder strap height of the child, then pull the straps untilthey are snug.Clip the outer shoulder strap on either side into the “D” Ringof the outer crotch strap directly below. This will keep thestraps that are not in use out of the way.WARNING!To avoid serious injury, children should always wear the seat belt, shoulder strap, and a helmet!
INSTRUCTIONALOWNER’S MANUALp 7Securing Child with 5-Point Safety HarnessFOR TWO CHILDREN:STEP 1: Undo the lap belt buckle and seat the children in the Left & Right seatsof the trailer. Buckle the lap belt [A] over each child’s lap, and pull thestrap until the belt is tight.STEP 2: Place the two center shoulder straps [B] over each child’s shoulders,and clip both straps into “D” Ring [C] of the center crotch strap. Adjustshoulder strap height of the straps until they are snug - you should beable to fit two average adult fingers between the belt and the child.NOTE:The buckle should be centered in your child’s abdomen.Hook the shoulder straps to the D-rings on the buckle andadjust the ladder locks so they fit snugly.WARNING!:Adjust the straps so that the crotch strap and shoulder straps meet at the child’s stomach level,NOT at the chest level!REMOVAL OF TRAILERSTEP 1:STEP 2:STEP 3:STEP 4:Remove Safety strap by releasing D-RingRemove QR Snap from hitch connectionPull trailer arm away from black hitchBlack Hitch attached to axle can remain on the bicycle for easy reattachment of the trailer.Trailer MaintenanceYour trailer will give you many years of service with minimal care. To ensure safe and dependableoperation, we recommend the following regular maintenance. Before each ride:STEP 1:STEP 2:STEP 3:STEP 4:STEP 5:Check all fasteners to make sure that they are tight, and tighten or replace as needed.Make sure that wheels are fully secure on the frame. Wheels must be fully inserted to lock in place.Check tires for wear and proper inflation as listed on the tire sidewall. Use only hand-operatedpump to avoid tire damage. Under- or over inflation can result in unsafe handling.Double check hitch attachment, making sure that QR Pin is locked, and that safety strap is in place.Check harness strap for wear, and made sure that buckles lock properly.ANNUALLY:AS NEEDED:Once a year, or sooner if needed, have the trailer inspected by a qualified bicyclemechanic for signs of wear or needed adjustment.Trailer can be cleaned with a mild detergent and water. Do not remove seat or coverfor washing. Do not use harsh chemicals or water, as they may damage fabrics orthe frame materials or surfaces.
INSTRUCTIONALOWNER’S MANUALp 8Folding for Storage and TransportSTEP 1:STEP 2:STEP 3:Remove children and all cargo from inside the passenger compartment.Unclip the tow bar safety strap from the “D” ring, and remove pin to removehitch from frame.Clip the end of the strap back on to the tow bar “D” ring.STEP 4:STEP 5:STEP 6:STEP 7:STEP 8:STEP 9:Remove the flag and pole and separate the three sections.Remove the quick-release pins form the stub axles of the rear wheels.Remove the quick-release pin from the tow bar bracket at the front corner of the trailer.Fold the tow bar back under the trailer, and replace the quick-release pin throughthe tow bar and U-channelPlace wheels and flag inside the passenger compartment, and close the front cover.Fold upper cabin as shown above:a. Remove 4-season Rain coverb. Remove QR pin from both sides.c. Fold frame down as shown.d. Fold in until trailer is flatIMPORTANT:NOTE:Do not attempt to fold to the original pre-assembled size by folding side-to-side.Depressing spring-release locking pins may cause damage. These are not designed foreveryday use, and are part of the first-time assembly only. Further operation of the springreleaselocking pins may create an unsafe or unstable condition.Store trailer in a cool, dry environment, away from direct sunlight. After extended periods ofstorage, check tires for wear or cracking, and fabric and strapping for signs of wear.After extended periods of storage, it is recommended that the trailer is inspected by a qualifiedbicycle mechanic prior to use.WarrantyIF YOUR PRODUCT REQUIRES WARRANTY SERVICE, PLEASE DO NOT RETURN IT TO RETAIL STORE.PLEASE CONTACT:ALLEN SPORTS <strong>USA</strong>(800) 722-5536 ~ CUSTOMERSERVICE@ALLENRACKS.COMPlease note that all returns and exchanges are subject to the return policy of the retailer wherethe product was originally purchasedR. A. ALLEN CO., INC. - 505 BEACHLAND BLVD. - STE. 5 - VERO BEACH, FL 32963Product designed in <strong>USA</strong>, Made in Ningbo, China