AST2 - Allen Sports USA
AST2 - Allen Sports USA
AST2 - Allen Sports USA

Create successful ePaper yourself
Turn your PDF publications into a flip-book with our unique Google optimized e-Paper software.
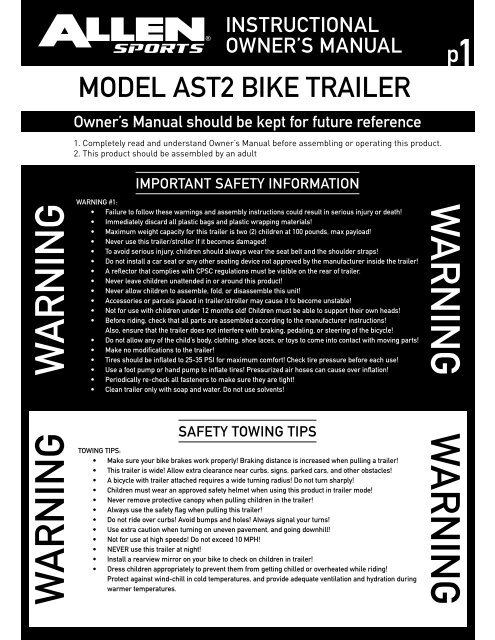
INSTRUCTIONAL<br />
OWNER’S MANUAL<br />
p 1<br />
MODEL <strong>AST2</strong> BIKE TRAILER<br />
Owner’s Manual should be kept for future reference<br />
1. Completely read and understand Owner’s Manual before assembling or operating this product.<br />
2. This product should be assembled by an adult<br />
WARNING<br />
WARNING<br />
IMPORTANT SAFETY INFORMATION<br />
Warning #1:<br />
• Failure to follow these warnings and assembly instructions could result in serious injury or death!<br />
• Immediately discard all plastic bags and plastic wrapping materials!<br />
• Maximum weight capacity for this trailer is two (2) children at 100 pounds, max payload!<br />
• Never use this trailer/stroller if it becomes damaged!<br />
• To avoid serious injury, children should always wear the seat belt and the shoulder straps!<br />
• Do not install a car seat or any other seating device not approved by the manufacturer inside the trailer!<br />
• A reflector that complies with CPSC regulations must be visible on the rear of trailer.<br />
• Never leave children unattended in or around this product!<br />
• Never allow children to assemble, fold, or disassemble this unit!<br />
• Accessories or parcels placed in trailer/stroller may cause it to become unstable!<br />
• Not for use with children under 12 months old! Children must be able to support their own heads!<br />
• Before riding, check that all parts are assembled according to the manufacturer instructions!<br />
Also, ensure that the trailer does not interfere with braking, pedaling, or steering of the bicycle!<br />
• Do not allow any of the child’s body, clothing, shoe laces, or toys to come into contact with moving parts!<br />
• Make no modifications to the trailer!<br />
• Tires should be inflated to 25-35 PSI for maximum comfort! Check tire pressure before each use!<br />
• Use a foot pump or hand pump to inflate tires! Pressurized air hoses can cause over inflation!<br />
• Periodically re-check all fasteners to make sure they are tight!<br />
• Clean trailer only with soap and water. Do not use solvents!<br />
SAFETY TOWING TIPS<br />
Towing Tips:<br />
• Make sure your bike brakes work properly! Braking distance is increased when pulling a trailer!<br />
• This trailer is wide! Allow extra clearance near curbs, signs, parked cars, and other obstacles!<br />
• A bicycle with trailer attached requires a wide turning radius! Do not turn sharply!<br />
• Children must wear an approved safety helmet when using this product in trailer mode!<br />
• Never remove protective canopy when pulling children in the trailer!<br />
• Always use the safety flag when pulling this trailer!<br />
• Do not ride over curbs! Avoid bumps and holes! Always signal your turns!<br />
• Use extra caution when turning on uneven pavement, and going downhill!<br />
• Not for use at high speeds! Do not exceed 10 MPH!<br />
• NEVER use this trailer at night!<br />
• Install a rearview mirror on your bike to check on children in trailer!<br />
• Dress children appropriately to prevent them from getting chilled or overheated while riding!<br />
Protect against wind-chill in cold temperatures, and provide adequate ventilation and hydration during<br />
warmer temperatures.<br />
WARNING<br />
WARNING
INSTRUCTIONAL<br />
OWNER’S MANUAL<br />
p 2<br />
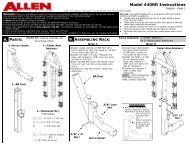
FULLY ASSEMBLED TRAILER<br />
PARTS LIST<br />
QUANTITY<br />
DESCRIPTION<br />
1 Frame w/ Canopy, Sling<br />
Seat with 5 point safety<br />
harness, tow bar, tow<br />
bar coupler and rear<br />
wheel bracket attached<br />
2 16” Rear wheels<br />
1 Safety flag
INSTRUCTIONAL<br />
OWNER’S MANUAL<br />
p 3<br />
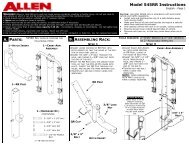
TRAILER ASSEMBLY & OPERATING INSTRUCTIONS<br />
STEP 1:<br />
Remove the trailer from the box and check contents against the parts list.<br />
NOTE(S): 1. Lay the trailer on the ground with the black fabric side down.<br />
2. Do not remove the white foam from the wheel axles until STEP 4<br />
WARNING!:<br />
FIGURE 1.<br />
FIGURE 1A.<br />
IMMEDIATELY DISCARD ALL PLASTIC BAGS AND WHEEL WRAPPING MATERIALS!<br />
STEP 2:<br />
OPEN FRAME<br />
Remove trailer and all components from carton. Unfold trailer by pulling the frame and remove all components from<br />
inside (Fig. 2).<br />
A. Lift both side panels into an upright position (Fig 2b).<br />
B. Insert QR Snap Pins through hole in frame and close the snap pin so the loop of the pin is over the pin shaft.<br />
WARNING!:<br />
FIGURE 2.<br />
FIGURE 2B.<br />
The spring-release pins must be engaged for safe operation of the trailer. Failure to Assemble<br />
properly may result in injury. If the spring-release pins do not engage properly, DO NOT USE.<br />
Call the customer service number as indicated in the attached literature for assembly assistance.<br />
STEP 3:<br />
RELEASE THE TOW BAR<br />
1. Turn the trailer on its side so the hitch arm is along the top edge [Fig. 3].<br />
2. Find the quick-release pin that holds the tow bar in place in the tow bar bracket [Fig. 3a]<br />
3. Open the loop of the quick-release pin and remove the pin.<br />
4. Rotate the hitch arm forward until it is seated in the U-channel [Fig. 3b]. Re-install pin in front<br />
holes in the U-channel and close the snap pin so the loop of the pin lock is over the pin shaft.<br />
FIGURE 3.<br />
FIGURE 3A.<br />
FIGURE 3B.
INSTRUCTIONAL<br />
OWNER’S MANUAL<br />
p 4<br />
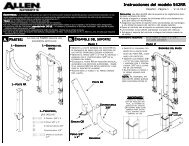
Wheel Installation<br />
WARNING!<br />
Remove the foam from the wheel axles and discard immediately. Do not remove washers.<br />
STEP 1:<br />
STEP 2:<br />
STEP 3:<br />
STEP 4:<br />
Lift the trailer back so the right side is up, and locate the right wheel.<br />
Install the wheel axle by sliding the axle completely through the bracket<br />
in the frame as shown.<br />
Insert the Quick Release Pin (tethered to the trailer frame near the wheel bracket)<br />
through the hole in the axle and lock the clip to secure the pin.<br />
Repeat for the left wheel. When complete, give each of the wheels a tug to be sure<br />
that they are secure.<br />
NOTE:<br />
Wheels must be properly installed with quick release pins closed and<br />
snapped shut. If QR pins are not correctly attached, wheels may fall off.<br />
Do not use if QR pins are missing, or if the closure is damaged or missing.<br />
WARNING!:<br />
Check wheels periodically during and before each use to be sure that they have not<br />
become loose. Failure to do so could result in SERIOUS INJURY to you or trailer’s occupants.<br />
Attaching the Four Season Cover<br />
STEP 1:<br />
STEP 2:<br />
STEP 3:<br />
STEP 4:<br />
STEP 5:<br />
Position the four-season cover over the trailer where roll-up window is facing towards the front side of the trailer. (Fig.12).<br />
Wrap the Velcro backed fixing straps and secure the cover around the frame.<br />
Secure the Velcro material at the bottom front of the cover to the matching Velcro material on<br />
the lower front fabric panel.<br />
Connect the slide release buckles affixed to the rear corners of the cover to the matching buckles sewn<br />
the rear side of the trailer cabin (Fig 13).<br />
Connect the elastic cords on the rear cover to the D-Rings which are located on the bottom cabin corners<br />
FIGURE 12. FIGURE 13.<br />
NOTE:<br />
The four-season cover is designed to keep passengers and cargo dry and warm in inclement weather. It also protects<br />
the passengers from flying debris. The four-season cover can be rolled up to allow for added ventilation in hot weather.<br />
Velcro closures keep the four-season cover in place when rolled up.<br />
WARNING!:<br />
Never use the trailer without the four season cover. The front window or bug screen must be<br />
attached to protect children from flying objects.
INSTRUCTIONAL<br />
OWNER’S MANUAL<br />
p 5<br />
Safety Flag Installation<br />
STEP 1:<br />
Assemble the flag and insert the end into the small sleeve on the side of the trailer<br />
skin. Reattach the Velcro to secure the cover.<br />
NOTE:<br />
Flag should be removed before attempting to fold trailer<br />
WARNING!:<br />
This flag is meant for use only with the trailer. This flag is not a toy. Do not let your child play<br />
with this flag at any time. Failure to comply with this warning could result in serious injury<br />
of your child.<br />
Attaching Trailer to Bicycle<br />
WARNING!:<br />
Your trailer is designed to attach to most full-sized bicycles. The trailer’s hitch must be<br />
attached to the rear axle of the bike. Do not use trailer if the hitch can not be securely<br />
attached to rear axle. It is recommended that the bicycle(s) to which the trailer will be<br />
attached undergo a safety check by a qualified bicycle mechanic before attaching trailer.<br />
This trailer should never be used with electric bicycles, or any motorcycle or any motorized vehicle<br />
STEP 1:<br />
STEP 2:<br />
STEP 3:<br />
STEP 4:<br />
Loosen LEFT side rear axle to allow the trailer’s hitch to attach to frame.<br />
Position hitch over left rear axle of bicycle frame (Fig15).<br />
Tighten axle nut securely, testing to see that hitch is unable to pull loose (Fig16).<br />
Loop Safety Strap around frame and secure to D-ring on hitch arm (Fig 17).<br />
FIGURE 15.<br />
FIGURE 16. FIGURE 17.<br />
WARNING!:<br />
Safety strap must attach to the bike frame when using this product in trailer mode.
INSTRUCTIONAL<br />
OWNER’S MANUAL<br />
p 6<br />
Securing Child with 5-Point Safety Harness<br />
FOR ONE CHILD:<br />
STEP 1:<br />
WARNING!<br />
To avoid serious injury, children should always wear the seat belt, shoulder strap, and a helmet!<br />
Undo the lap belt buckle and seat the child in the CENTER of the trailer.<br />
Buckle the lap belt [A] over the child’s lap, and pull the strap until the belt is<br />
ONE CHILD:<br />
STEP 2:<br />
NOTE:<br />
Place the two center shoulder straps [C] over the child’s shoulders, and<br />
clip both straps into “D” Ring [D] of the center crotch strap. Adjust shoulder<br />
strap height of the child, then pull the straps until they are snug.<br />
Clip the outer shoulder strap on either side into the “D” Ring of the outer<br />
crotch strap directly below. This will keep the straps that are not<br />
FOR TWO CHILDREN:<br />
STEP 1:<br />
STEP 2:<br />
Undo the lap belt buckle and seat the children in the Left & Right seats of the<br />
trailer. Buckle the lap belt [A] over each child’s lap, and pull the strap until<br />
the belt is tight.<br />
Place the two center shoulder straps [B] over each child’s shoulders, and clip<br />
both straps into “D” Ring [C] of the center crotch strap. Adjust shoulder strap<br />
height of the straps until they are snug - you should be able to fit two average<br />
adult fingers between the belt and the child.<br />
TWO CHILDREN:<br />
NOTE:<br />
The buckle should be centered in your child’s abdomen. Hook the shoulder<br />
straps to the D-rings on the buckle and adjust the ladder locks so they fit snugly.<br />
WARNING!:<br />
STEP 1:<br />
Adjust the straps so that the crotch strap and shoulder straps meet at the child’s stomach level,<br />
NOT at the chest level!<br />
REMOVAL OF TRAILER<br />
Remove Safety strap by releasing D-Ring<br />
STEP 2:<br />
STEP 3:<br />
STEP 4:<br />
STEP 1:<br />
STEP 2:<br />
STEP 3:<br />
STEP 4:<br />
STEP 5:<br />
ANNUALLY:<br />
AS NEEDED:<br />
Remove QR Snap from hitch connection<br />
Pull trailer arm away from black hitch<br />
Black Hitch attached to axle can remain on the bicycle for easy reattachment of the trailer.<br />
Trailer Maintenance<br />
Your trailer will give you many years of service with minimal care. To ensure safe and dependable operation, we recommend<br />
the following regular maintenance. Before each ride:<br />
Check all fasteners to make sure that they are tight, and tighten or replace as needed.<br />
Make sure that wheels are fully secure on the frame. Wheels must be fully inserted to lock in place.<br />
Check tires for wear and proper inflation as listed on the tire sidewall. Use only hand-operated pump to avoid tire damage.<br />
Under- or over inflation can result in unsafe handling.<br />
Double check hitch attachment, making sure that QR Pin is locked, and that safety strap is in place.<br />
Check harness strap for wear, and made sure that buckles lock properly.<br />
Once a year, or sooner if needed, have the trailer inspected by a qualified bicycle mechanic for signs of wear or needed adjustment.<br />
Trailer can be cleaned with a mild detergent and water. Do not remove seat or cover for washing. Do not use harsh chemicals or water,<br />
as they may damage fabrics or the frame materials or surfaces.
INSTRUCTIONAL<br />
OWNER’S MANUAL<br />
p 7<br />
Folding for Storage and Transport<br />
STEP 1:<br />
STEP 2:<br />
STEP 3:<br />
Remove children and all cargo from inside the passenger compartment.<br />
Unclip the tow bar safety strap from the “D” ring, and remove pin to remove hitch<br />
from frame.<br />
Clip the end of the strap back on to the tow bar “D” ring.<br />
STEP 4:<br />
STEP 5:<br />
STEP 6:<br />
STEP 7:<br />
STEP 8:<br />
STEP 9:<br />
NOTE:<br />
Remove the flag and pole and separate the three sections.<br />
Remove the quick-release pins form the stub axles of the rear wheels.<br />
Remove the quick-release pin from the tow bar bracket at the front corner of the trailer.<br />
Fold the tow bar back under the trailer, and replace the quick-release pin through<br />
the tow bar and U-channel<br />
Place wheels and flag inside the passenger compartment, and close the front cover.<br />
Fold upper cabin as shown above:<br />
a. Remove 4-season Rain cover<br />
b. Remove QR pin from both sides.<br />
c. Fold frame down as shown.<br />
d. Fold in until trailer is flat<br />
Store trailer in a cool, dry environment, away from direct sunlight. After extended periods of storage, check tires for<br />
wear or cracking, and fabric and strapping for signs of wear.<br />
After extended periods of storage, it is recommended that the trailer is inspected by a qualified bicycle mechanic<br />
prior to use.<br />
Warranty<br />
IF YOUR PRODUCT REQUIRES WARRANTY SERVICE, PLEASE DO NOT RETURN IT TO RETAIL STORE.<br />
PLEASE CONTACT:<br />
ALLEN SPORTS <strong>USA</strong><br />
(800) 722-5536 ~ CUSTOMERSERVICE@ALLENRACKS.COM<br />
Please note that all returns and exchanges are subject to the return policy of the retailer where<br />
the product was originally purchased<br />
R. A. ALLEN CO., INC. - 505 BEACHLAND BLVD. - STE. 5 - VERO BEACH, FL 32963<br />
Product designed in <strong>USA</strong>, Made in Ningbo, China