Phoenix Multi - Victron Energy
Phoenix Multi - Victron Energy
Phoenix Multi - Victron Energy

You also want an ePaper? Increase the reach of your titles
YUMPU automatically turns print PDFs into web optimized ePapers that Google loves.
1.3 Requirements<br />
• Philips screwdriver (PH2) for removing the front.<br />
• Flat screwdriver (0.6x3.5) for connecting the AC leads.<br />
• Insulated box spanner (13 mm) for securing the terminal nuts and the fuse.<br />
• Two battery cables (maximum length 6 meters) including battery terminals and cable ends.<br />
• Three-wire cable.<br />
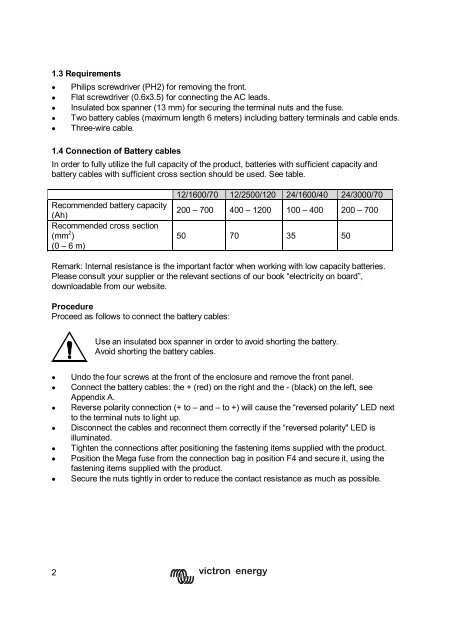
1.4 Connection of Battery cables<br />
In order to fully utilize the full capacity of the product, batteries with sufficient capacity and<br />
battery cables with sufficient cross section should be used. See table.<br />
Recommended battery capacity<br />
(Ah)<br />
Recommended cross section<br />
(mm 2 )<br />
(0 – 6 m)<br />
12/1600/70 12/2500/120 24/1600/40 24/3000/70<br />
200 – 700 400 – 1200 100 – 400 200 – 700<br />
50 70 35 50<br />
Remark: Internal resistance is the important factor when working with low capacity batteries.<br />
Please consult your supplier or the relevant sections of our book “electricity on board”,<br />
downloadable from our website.<br />
Procedure<br />
Proceed as follows to connect the battery cables:<br />
Use an insulated box spanner in order to avoid shorting the battery.<br />
Avoid shorting the battery cables.<br />
• Undo the four screws at the front of the enclosure and remove the front panel.<br />
• Connect the battery cables: the + (red) on the right and the - (black) on the left, see<br />
Appendix A.<br />
• Reverse polarity connection (+ to – and – to +) will cause the “reversed polarity” LED next<br />
to the terminal nuts to light up.<br />
• Disconnect the cables and reconnect them correctly if the “reversed polarity" LED is<br />
illuminated.<br />
• Tighten the connections after positioning the fastening items supplied with the product.<br />
• Position the Mega fuse from the connection bag in position F4 and secure it, using the<br />
fastening items supplied with the product.<br />
• Secure the nuts tightly in order to reduce the contact resistance as much as possible.<br />
2