Owners Manual - MotorGuide
Owners Manual - MotorGuide
Owners Manual - MotorGuide

You also want an ePaper? Increase the reach of your titles
YUMPU automatically turns print PDFs into web optimized ePapers that Google loves.
MAINTENANCE<br />
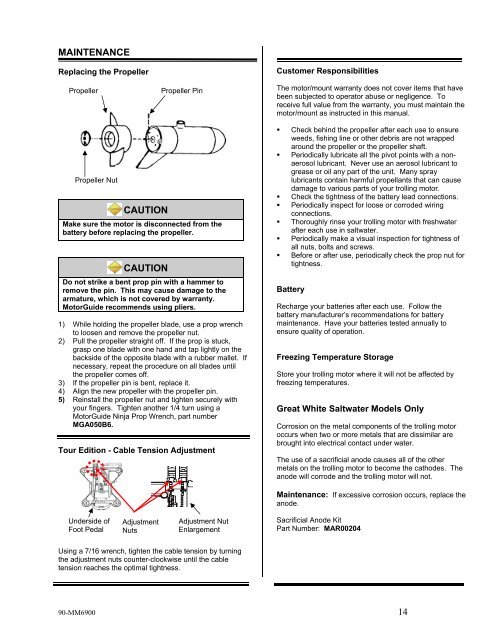
Replacing the Propeller<br />
Propeller<br />
Propeller Pin<br />
Customer Responsibilities<br />
The motor/mount warranty does not cover items that have<br />
been subjected to operator abuse or negligence. To<br />
receive full value from the warranty, you must maintain the<br />
motor/mount as instructed in this manual.<br />
Propeller Nut<br />
CAUTION<br />
Make sure the motor is disconnected from the<br />
battery before replacing the propeller.<br />
CAUTION<br />
Do not strike a bent prop pin with a hammer to<br />
remove the pin. This may cause damage to the<br />
armature, which is not covered by warranty.<br />
<strong>MotorGuide</strong> recommends using pliers.<br />
1) While holding the propeller blade, use a prop wrench<br />
to loosen and remove the propeller nut.<br />
2) Pull the propeller straight off. If the prop is stuck,<br />
grasp one blade with one hand and tap lightly on the<br />
backside of the opposite blade with a rubber mallet. If<br />
necessary, repeat the procedure on all blades until<br />
the propeller comes off.<br />
3) If the propeller pin is bent, replace it.<br />
4) Align the new propeller with the propeller pin.<br />
5) Reinstall the propeller nut and tighten securely with<br />
your fingers. Tighten another 1/4 turn using a<br />
<strong>MotorGuide</strong> Ninja Prop Wrench, part number<br />
MGA050B6.<br />
Tour Edition - Cable Tension Adjustment<br />
• Check behind the propeller after each use to ensure<br />
weeds, fishing line or other debris are not wrapped<br />
around the propeller or the propeller shaft.<br />
• Periodically lubricate all the pivot points with a nonaerosol<br />
lubricant. Never use an aerosol lubricant to<br />
grease or oil any part of the unit. Many spray<br />
lubricants contain harmful propellants that can cause<br />
damage to various parts of your trolling motor.<br />
• Check the tightness of the battery lead connections.<br />
• Periodically inspect for loose or corroded wiring<br />
connections.<br />
• Thoroughly rinse your trolling motor with freshwater<br />
after each use in saltwater.<br />
• Periodically make a visual inspection for tightness of<br />
all nuts, bolts and screws.<br />
• Before or after use, periodically check the prop nut for<br />
tightness.<br />
Battery<br />
Recharge your batteries after each use. Follow the<br />
battery manufacturer’s recommendations for battery<br />
maintenance. Have your batteries tested annually to<br />
ensure quality of operation.<br />
Freezing Temperature Storage<br />
Store your trolling motor where it will not be affected by<br />
freezing temperatures.<br />
Great White Saltwater Models Only<br />
Corrosion on the metal components of the trolling motor<br />
occurs when two or more metals that are dissimilar are<br />
brought into electrical contact under water.<br />
The use of a sacrificial anode causes all of the other<br />
metals on the trolling motor to become the cathodes. The<br />
anode will corrode and the trolling motor will not.<br />
Maintenance: If excessive corrosion occurs, replace the<br />
anode.<br />
Underside of<br />
Foot Pedal<br />
Adjustment<br />
Nuts<br />
Adjustment Nut<br />
Enlargement<br />
Sacrificial Anode Kit<br />
Part Number: MAR00204<br />
Using a 7/16 wrench, tighten the cable tension by turning<br />
the adjustment nuts counter-clockwise until the cable<br />
tension reaches the optimal tightness.<br />
90-MM6900 14