Owners Manual - MotorGuide
Owners Manual - MotorGuide
Owners Manual - MotorGuide

You also want an ePaper? Increase the reach of your titles
YUMPU automatically turns print PDFs into web optimized ePapers that Google loves.
Bow Mount Installation<br />
Rubber<br />
Isolator<br />
07 Standard bow mount<br />
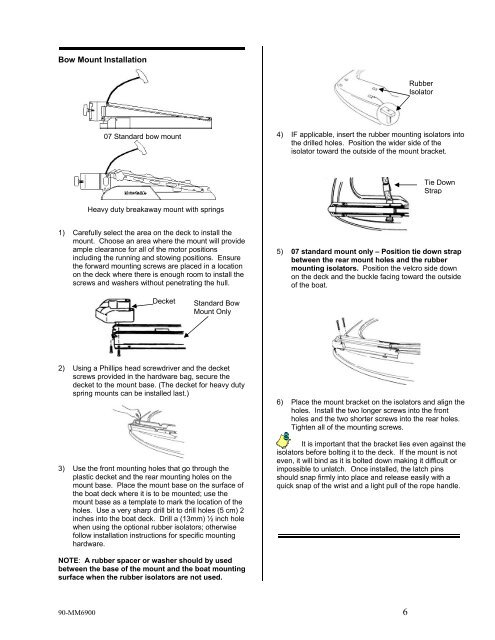
4) IF applicable, insert the rubber mounting isolators into<br />
the drilled holes. Position the wider side of the<br />
isolator toward the outside of the mount bracket.<br />
Tie Down<br />
Strap<br />
Heavy duty breakaway mount with springs<br />
1) Carefully select the area on the deck to install the<br />
mount. Choose an area where the mount will provide<br />
ample clearance for all of the motor positions<br />
including the running and stowing positions. Ensure<br />
the forward mounting screws are placed in a location<br />
on the deck where there is enough room to install the<br />
screws and washers without penetrating the hull.<br />
5) 07 standard mount only – Position tie down strap<br />
between the rear mount holes and the rubber<br />
mounting isolators. Position the velcro side down<br />
on the deck and the buckle facing toward the outside<br />
of the boat.<br />
Decket<br />
Standard Bow<br />
Mount Only<br />
2) Using a Phillips head screwdriver and the decket<br />
screws provided in the hardware bag, secure the<br />
decket to the mount base. (The decket for heavy duty<br />
spring mounts can be installed last.)<br />
3) Use the front mounting holes that go through the<br />
plastic decket and the rear mounting holes on the<br />
mount base. Place the mount base on the surface of<br />
the boat deck where it is to be mounted; use the<br />
mount base as a template to mark the location of the<br />
holes. Use a very sharp drill bit to drill holes (5 cm) 2<br />
inches into the boat deck. Drill a (13mm) ½ inch hole<br />
when using the optional rubber isolators; otherwise<br />
follow installation instructions for specific mounting<br />
hardware.<br />
6) Place the mount bracket on the isolators and align the<br />
holes. Install the two longer screws into the front<br />
holes and the two shorter screws into the rear holes.<br />
Tighten all of the mounting screws.<br />
It is important that the bracket lies even against the<br />
isolators before bolting it to the deck. If the mount is not<br />
even, it will bind as it is bolted down making it difficult or<br />
impossible to unlatch. Once installed, the latch pins<br />
should snap firmly into place and release easily with a<br />
quick snap of the wrist and a light pull of the rope handle.<br />
NOTE: A rubber spacer or washer should by used<br />
between the base of the mount and the boat mounting<br />
surface when the rubber isolators are not used.<br />
90-MM6900 6