MegaGrow Greenhouse Manual - International Greenhouse Company
MegaGrow Greenhouse Manual - International Greenhouse Company
MegaGrow Greenhouse Manual - International Greenhouse Company

You also want an ePaper? Increase the reach of your titles
YUMPU automatically turns print PDFs into web optimized ePapers that Google loves.
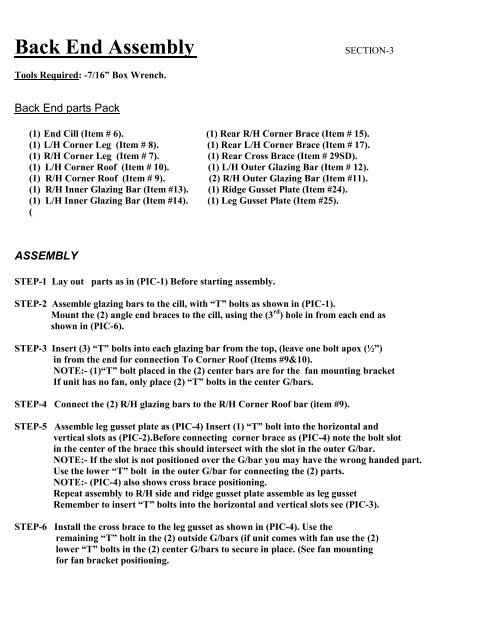
Back End Assembly<br />
SECTION-3<br />
Tools Required: -7/16” Box Wrench.<br />
Back End parts Pack<br />
(1) End Cill (Item # 6). (1) Rear R/H Corner Brace (Item # 15).<br />
(1) L/H Corner Leg (Item # 8). (1) Rear L/H Corner Brace (Item # 17).<br />
(1) R/H Corner Leg (Item # 7). (1) Rear Cross Brace (Item # 29SD).<br />
(1) L/H Corner Roof (Item # 10). (1) L/H Outer Glazing Bar (Item # 12).<br />
(1) R/H Corner Roof (Item # 9). (2) R/H Outer Glazing Bar (Item #11).<br />
(1) R/H Inner Glazing Bar (Item #13). (1) Ridge Gusset Plate (Item #24).<br />
(1) L/H Inner Glazing Bar (Item #14). (1) Leg Gusset Plate (Item #25).<br />
(<br />
ASSEMBLY<br />
STEP-1 Lay out parts as in (PIC-1) Before starting assembly.<br />
STEP-2 Assemble glazing bars to the cill, with “T” bolts as shown in (PIC-1).<br />
Mount the (2) angle end braces to the cill, using the (3 rd ) hole in from each end as<br />
shown in (PIC-6).<br />
STEP-3 Insert (3) “T” bolts into each glazing bar from the top, (leave one bolt apox (½”)<br />
in from the end for connection To Corner Roof (Items #9&10).<br />
NOTE:- (1)“T” bolt placed in the (2) center bars are for the fan mounting bracket<br />
If unit has no fan, only place (2) “T” bolts in the center G/bars.<br />
STEP-4 Connect the (2) R/H glazing bars to the R/H Corner Roof bar (item #9).<br />
STEP-5 Assemble leg gusset plate as (PIC-4) Insert (1) “T” bolt into the horizontal and<br />
vertical slots as (PIC-2).Before connecting corner brace as (PIC-4) note the bolt slot<br />
in the center of the brace this should intersect with the slot in the outer G/bar.<br />
NOTE:- If the slot is not positioned over the G/bar you may have the wrong handed part.<br />
Use the lower “T” bolt in the outer G/bar for connecting the (2) parts.<br />
NOTE:- (PIC-4) also shows cross brace positioning.<br />
Repeat assembly to R/H side and ridge gusset plate assemble as leg gusset<br />
Remember to insert “T” bolts into the horizontal and vertical slots see (PIC-3).<br />
STEP-6 Install the cross brace to the leg gusset as shown in (PIC-4). Use the<br />
remaining “T” bolt in the (2) outside G/bars (if unit comes with fan use the (2)<br />
lower “T” bolts in the (2) center G/bars to secure in place. (See fan mounting<br />
for fan bracket positioning.