Configuring Abbyy Finereader 8 - mits07
Configuring Abbyy Finereader 8 - mits07
Configuring Abbyy Finereader 8 - mits07

You also want an ePaper? Increase the reach of your titles
YUMPU automatically turns print PDFs into web optimized ePapers that Google loves.
<strong>Configuring</strong> <strong>Abbyy</strong> <strong>Finereader</strong> 8<br />
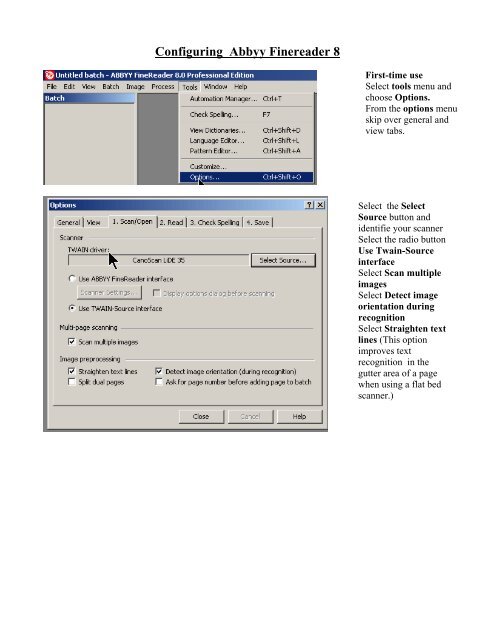
First-time use<br />
Select tools menu and<br />
choose Options.<br />
From the options menu<br />
skip over general and<br />
view tabs.<br />
Select the Select<br />
Source button and<br />
identifie your scanner<br />
Select the radio button<br />
Use Twain-Source<br />
interface<br />
Select Scan multiple<br />
images<br />
Select Detect image<br />
orientation during<br />
recognition<br />
Select Straighten text<br />
lines (This option<br />
improves text<br />
recognition in the<br />
gutter area of a page<br />
when using a flat bed<br />
scanner.)
Read Tab<br />
Select English as your<br />
recognition language<br />
Recognition mode Select<br />
thorough .<br />
Select Highlight hyperlinks<br />
and<br />
Do not use user patterns<br />
Save Tab<br />
Leave the Fonts as they<br />
are<br />
Select the Format<br />
Settings button
PDF tab<br />
Select keep original image size<br />
Text over the page image<br />
Enable tagged PDF<br />
(Tagging is important for text<br />
and screen readers to function<br />
properly for users with Visual<br />
Impairments. It is also required<br />
if Commenting will be used)<br />
Picture and Fonts settings<br />
medium quality<br />
standard fonts<br />
automatic format<br />
Rich Text/Doc/Word XML<br />
Retain original Layout<br />
Default paper size –Letter<br />
Check the following<br />
Increase paper size<br />
Keep line breaks<br />
Retain text color<br />
Enable compatibility with<br />
MS Word 95<br />
Keep Pictures.<br />
choose OK<br />
Close the options window
The First Scan with <strong>Abbyy</strong> FineReader 8.0<br />
After configuring the software for your scanner, load the<br />
document feeder with 50 pages. Select Scan and Read from the<br />
Wizard Tool bar. If Scan and Read does not appear select it<br />
from the drop down menu.<br />
All window properties can be adjusted from the View Menu. Reducing some toolbars shown will<br />
provide a larger work area. Adjusting the scale of view in each window can make work easier. You<br />
may prefer to change position of the Batch (View) the following illustrates the Zoom being hidden to<br />
allow for more space to view the image and text windows.
<strong>Abbyy</strong> FineReader Window<br />
Image tools<br />
Wizard Tool Bar<br />
Wizard tool bar<br />
Batch Window<br />
Text Window<br />
Thumbnail<br />
view<br />
Fixing recognition errors for text, pictures or tables are done in the Batch Window<br />
Editing text is done in the Text Window.<br />
The Thumbnail View allows access to the scanned pages
Saving the results of your Editing<br />
Saving Your Work<br />
From the File Menu Choose<br />
Save Results<br />
Select Save Pages<br />
From the Save Pages<br />
Window<br />
Name the File and Specify<br />
the Type of File.<br />
(Textbooks with Pictures,<br />
Save As a Portable<br />
Document Format or PDF.<br />
Trade Books or Paperback<br />
Books without Images<br />
Save As Rich Text.)<br />
Be Sure You Save All<br />
Selected Pages<br />
Create a single file for<br />
All Pages and if you wish<br />
you can select the Open<br />
Document after Saving<br />
Option.
The Red (Picture), Blue (Table), and Green (Text) blocks. Notice their effect on the Text Window. As the<br />
software encounters a greater mix of text and graphics, automatic recognition becomes less accurate. Select the<br />
offending block in the Image window, dragging the handles or sides of the block, will allow the reshaping of the<br />
block. Recognition mistakes may cause some blocks to appear in the wrong place, select them and Delete them,<br />
by using the Tool bar, right clicking, or the Delete key.
The Scanner Interface<br />
All scanner interfaces are different, refer to your scanner documentation, however you must<br />
follow some common rules<br />
Scan in gray scale or color, a minimum of 300 dpi. 300 dpi works well for text sizes on 10 and<br />
up. If you have documents with text sized under 10, a suggested size would be 600 dpi. Most scanning<br />
interfaces have a preview option, Use this to define the area of the document. This will speed the actual<br />
scan as the scanner will only cover the defined area, the finished document will be properly sized with<br />
no extra space around the text and pictures.<br />
Most scanner interfaces will allow the user to create custom settings that may be saved and used<br />
repeatedly. This makes it easier and saves time as the use can select a pre defined scan setting (ie. 300<br />
dpi, color auto contrast and intensity) and scan away. Below is the interface for a Visioneer Scanner<br />
Resolution (dpi)<br />
Option to save<br />
a custom<br />
setting<br />
Image window<br />
It has a Preview option<br />
Allow the scanner to process all of the documents in the Automatic Document Feeder, when finished<br />
select Done and you will return to <strong>Abbyy</strong> <strong>Finereader</strong> to begin the editing process. The group of pages<br />
scanned are called Batches. To start with keep your batch files equal to the capacity of your ADF.<br />
When in <strong>Abbyy</strong> <strong>Finereader</strong>, save your results as soon as you are finished scanning and prior to editing.<br />
<strong>Abbyy</strong> will autosave all editing changes from that point on.
FineReader Toolbars<br />
mk:@MSITStore:C:\Program%20Files\ABBYY%20FineReader%208.0%20Professional...<br />
Page 1 of 4<br />
4/30/2006<br />
ABBYY FineReader Toolbars<br />
There are four toolbars in ABBYY FineReader: Standard, Image Tools,<br />
Formatting and WizardBar. These toolbars provide quick and convenient access<br />
to the functions of the application. However, you can also access the same<br />
functions using the menus or hot keys. Allowing the mouse pointer to hover over a<br />
toolbar button displays the function of that button. The button's tooltip will be<br />
displayed, and the status bar will display additional button details.<br />
The WizardBar<br />
The buttons on the WizardBar launch the main ABBYY FineReader functions:<br />
Scanning, Reading, Checking and Saving recognition results. The numbers on<br />
the buttons indicate the order in which the document input actions should be<br />
performed. You may perform each action separately or combine them into a single<br />
action by clicking the Scan&Read Wizard button to perform the full document<br />
processing cycle automatically.<br />
Each button offers several function modes. Click the small downward-pointing<br />
arrow located at the right side of each button and select the mode of your choice<br />
in that local menu. The button icon automatically displays the previously selected<br />
mode. Click the button itself to run this mode again.<br />
Button name<br />
Scan&Read<br />
1-Scan<br />
Button description<br />
Scan&Read Wizard - launches Scan&Read mode.<br />
ABBYY FineReader guides you through the document<br />
processing steps and helps you to obtain the desired<br />
result.<br />
Scan&Read - scans and reads a document using the<br />
current options.<br />
Open&Read - opens and reads the images selected in<br />
the Open dialog.<br />
The list of the available ABBYY FineReader automated<br />
tasks :<br />
PDF/Images To Word<br />
Scan To Word<br />
Scan To PDF<br />
Automation Manager - opens the runs automated<br />
tasks, to create and modify automated tasks, and delete<br />
custom automated tasks which you no longer use.<br />
Open Image - adds images to the batch. Each added<br />
image is copied to the batch folder.
FineReader Toolbars<br />
mk:@MSITStore:C:\Program%20Files\ABBYY%20FineReader%208.0%20Professional...<br />
Page 2 of 4<br />
4/30/2006<br />
Scan Image - scans an image.<br />
Options - opens the Scan/Open tab (Options dialog)<br />
to allow you to set scanning options.<br />
2-Read<br />
Read - reads the open batch page.<br />
Read All - reads all unrecognized batch pages.<br />
Options - opens the Read tab (Options dialog) to allow<br />
you to set document recognition options.<br />
3-Check Spelling<br />
Check Spelling - searches the text for misspelt and<br />
uncertain words (i.e. those words where character<br />
recognition was uncertain).<br />
Options - opens the Check Spelling tab (Options<br />
dialog) to allow you to set spelling checker options.<br />
4-Save<br />
The Standard toolbar<br />
Save Wizard - opens the Save Wizard to allow you to<br />
select saving options and the destination application.<br />
Save Pages - saves the recognized text to a file.<br />
Send Selected Pages To - allows you to export only<br />
selected batch pages when you select the desired pages<br />
and export destination application. ABBYY FineReader will<br />
export the pages to the application of your choice<br />
without saving the text first. Click the button itself to run<br />
this mode again.<br />
Send All Pages To - exports all recognized pages to the<br />
application of your choice without saving the text first.<br />
Options - opens the Save tab (Options dialogue) to<br />
allow you to set saving options.<br />
The Standard toolbar features file and image tools (e.g. undo/redo an action,<br />
scroll the batch pages, clean and rotate the image) and the list of Recognition<br />
Languages.
FineReader Toolbars<br />
mk:@MSITStore:C:\Program%20Files\ABBYY%20FineReader%208.0%20Professional...<br />
Page 3 of 4<br />
4/30/2006<br />
The Formatting toolbar<br />
The Formatting toolbar features various text-formatting tools. You can edit and<br />
format text in the Text window.<br />
The Image toolbar<br />
The Image toolbar features page layout<br />
analysis (e.g. block creation and editing)<br />
tools, as well as tools for scaling<br />
(increasing/decreasing the size) and<br />
editing (e.g. erasing portion of an image,<br />
for example) images.
FineReader Toolbars<br />
mk:@MSITStore:C:\Program%20Files\ABBYY%20FineReader%208.0%20Professional...<br />
Page 4 of 4<br />
4/30/2006<br />
Note: Block creation and editing buttons can be used both in the Zoom and in the<br />
Image windows.<br />
Setting up the toolbar<br />
Note: Low monitor resolution may limit the number of buttons displayed on<br />
ABBYY FineReader’s toolbars. Although all of ABBYY FineReader’s functionality is<br />
available through the program menus, you must increase the monitor’s resolution<br />
to display all available buttons.<br />
ABBYY FineReader allows you to customize the Standard, Image and<br />
Formatting toolbars by removing or adding application command buttons.<br />
Each menu item has its own icon. You can access the full list of commands and<br />
their respective buttons in the Customize (Tools>Customize menu) dialog in<br />
the Commands list.<br />
To add a button to a toolbar:<br />
1. Select a category in the Categories field.<br />
Note: The commands are grouped according to menu item, and the choice of<br />
category will affect the list of commands displayed in the Commands list.<br />
2. Select the toolbar in the Toolbars field where you want to add a button.<br />
3. Select a command in the Commands list and click the (>>) button.<br />
The selected command will be added to the list of toolbar commands and<br />
displayed on the chosen toolbar in the main window.<br />
To remove a button from a toolbar:<br />
• Select the button you wish removed in the Toolbar buttons list and click the<br />
(
Drawing and Editing Blocks Manually<br />
mk:@MSITStore:C:\Program%20Files\ABBYY%20FineReader%208.0%20Professional...<br />
Page 1 of 4<br />
4/30/2006<br />
Drawing and Editing Blocks Manually<br />
How to:<br />
• Create a new block<br />
• Modify blocks<br />
• Edit a table<br />
To create a new block:<br />
1. Select one of the following tools:<br />
- to draw a recognition area;<br />
- to draw a text block;<br />
- to draw a picture block;<br />
- to draw a table block.<br />
2. Position the mouse at the point where you want a corner of your block to be.<br />
Hold down the left mouse button and drag the mouse pointer to the point<br />
where you want the opposite block corner to be.<br />
3. Release the mouse button.<br />
A frame will enclose the selected image area.<br />
You may change the drawn block type to any of the following: Recognition Area,<br />
Text, Table, Picture, or Barcode. To change a block type:<br />
• Right-click the block and select the Change Block Type item followed by the<br />
corresponding block type in the local menu.
Drawing and Editing Blocks Manually<br />
mk:@MSITStore:C:\Program%20Files\ABBYY%20FineReader%208.0%20Professional...<br />
Page 2 of 4<br />
4/30/2006<br />
Modifying blocks<br />
To move block borders:<br />
1. Click the block border and hold down the left mouse button. The<br />
mouse pointer will become a two-headed arrow.<br />
2. Drag the pointer in the desired direction.<br />
3. Release the mouse button.<br />
Note: If you click a block corner, you can move both horizontal and<br />
vertical borders of the block simultaneously.<br />
To add a rectangular block part:<br />
1. Select the tool.<br />
2. Click the block you wish to add to. Press and hold down the left<br />
mouse button and drag the mouse pointer diagonally. Select the<br />
desired image area and release the button. The resulting rectangle<br />
will be added to the block.<br />
3. If necessary, move the block border.<br />
To cut out a portion of a rectangular block:<br />
1. Select the tool.<br />
2. Click on the portion of the block you wish to cut. Press and hold<br />
down the left mouse button then drag the mouse pointer<br />
diagonally. Select the desired area and release the button. The<br />
selected rectangle will be cut from the block.<br />
3. If necessary, move the block border.<br />
Note:<br />
1. You can alter block borders by adding new nodes (splitting points).<br />
Use the mouse to move split border segments in any direction.<br />
To add a new node, press SHIFT, place the mouse pointer to where<br />
you want a new node (the pointer will become a cross) and click on<br />
the border. A new node will be created.<br />
2. ABBYY FineReader imposes certain limitations on block form. To be<br />
successfully recognized, text lines within blocks must be unbroken.<br />
To enforce these requirements, ABBYY FineReader automatically<br />
corrects block borders as parts are added or deleted. For example,
Drawing and Editing Blocks Manually<br />
mk:@MSITStore:C:\Program%20Files\ABBYY%20FineReader%208.0%20Professional...<br />
Page 3 of 4<br />
4/30/2006<br />
if you delete a portion from the top or bottom of a block, a whole<br />
block corner will automatically be cut. Similarly, if you try to cut off<br />
a part from between the two upper or lower corners, the application<br />
will cut the right block corner (upper or lower) as well. The program<br />
will also forbid operations that involve moving the segments that<br />
form the block borders.<br />
To select a block or a group of blocks:<br />
• Select the tool and click on the desired block or press the left<br />
mouse button and draw a rectangle around all the blocks you want<br />
to select.<br />
Note: You can select one or more blocks using the block drawing tools.<br />
To select several blocks at once hold down SHIFT or CTRL with one of<br />
the following tools activated: , , or . Drag the arrow over the<br />
blocks you want to select. To invert the selection (i.e. to select an<br />
unselected block or vice versa), hold down the CTRL key while one of<br />
the following tools is activated: , , or and drag the arrow<br />
over the desired blocks.<br />
To move blocks:<br />
• Hold down ALT with one of the following tools activated: , ,<br />
, or and move the blocks.<br />
To renumber blocks:<br />
1. Select the tool.<br />
2. Click the blocks in the desired order. The contents of blocks will be<br />
displayed in the output text in the same order.<br />
Note: If you renumber blocks on a previously recognized image, the<br />
recognized text in the draft mode of Text window will be re-arranged to<br />
reflect the new numbering.<br />
To delete a block:<br />
• Select the<br />
tool and click the block you wish to delete, or<br />
• Select the blocks you wish to delete and press DEL on the<br />
keyboard.<br />
Note: If you delete a previously recognized block, its associated text in
Drawing and Editing Blocks Manually<br />
mk:@MSITStore:C:\Program%20Files\ABBYY%20FineReader%208.0%20Professional...<br />
Page 4 of 4<br />
4/30/2006<br />
the Text window will be deleted as well.<br />
To delete all image blocks:<br />
• Select the Delete ALL Blocks and Text item in the Image menu.<br />
Note: If you delete blocks on an image that has already been<br />
recognized, the recognized text in the Text window will also be deleted.<br />
Editing a table<br />
To edit a table, select one of the following tools on the Image toolbar:<br />
- to add a vertical separator;<br />
- to add a horizontal separator;<br />
- to remove a separator.<br />
To merge several cells:<br />
• Select the Merge Cells item in the Image>Table Cells menu.<br />
To split previously merged cells:<br />
• Select the Split Cells item in the Image>Table Cells menu.<br />
To merge table rows (the division into columns is retained)<br />
• Select the Merge Rows item in the Image>Table Cells menu.<br />
Manual table layout analysis<br />
Block types<br />
Using block templates
ABBYY FineReader Tutorial<br />
mk:@MSITStore:C:\Program%20Files\ABBYY%20FineReader%208.0%20Professional...<br />
Page 1 of 4<br />
4/30/2006<br />
ABBYY FineReader Tutorial<br />
It provides a step-by-step tutorial on how to convert a<br />
paper document into editable formats and how to use<br />
the program<br />
Quick Start Samples Tips<br />
Contents<br />
Quick Start<br />
Samples<br />
Tips<br />
Tips<br />
• Scanning settings<br />
Use 300 dpi resolution for regular texts (font size 10pts. or<br />
greater) and 400-600 dpi resolution for texts set in smaller<br />
font sizes (9pts. or less). Scanning in grayscale mode is best<br />
for recognition purposes. If you scan your images in<br />
grayscale, brightness is adjusted automatically. If you wish<br />
to see the Scanner Settings dialog in Use FineReader<br />
interface mode, select the Display options dialog before<br />
scanning item on the Scan/Open tab (Tools>Options).<br />
• Open Image Files or ABBYY FineReader Batches<br />
Directly from Windows Explorer<br />
Right-click the image file or the FineReader batch you wish<br />
to open and select Open with FineReader in the local<br />
menu.<br />
• Page Layout Analysis<br />
Page layout analysis can be carried out both automatically<br />
and manually. In most cases, FineReader manages the<br />
complex task of page layout analysis by itself. Start<br />
automatic analysis by clicking on the 2-Read button.<br />
Recognition and layout analysis are performed<br />
simultaneously.<br />
If the application has drawn some blocks incorrectly, it is<br />
often faster to edit the incorrect blocks using the block<br />
editing tools than to delete the blocks and draw them<br />
manually again.<br />
In some cases automatic layout analysis quality may be<br />
improved by altering the page layout analysis options. To<br />
view the current layout analysis options: Read tab,<br />
Tools>Options menu.<br />
• Using Blocks Templates<br />
If you are processing a large number of documents with an<br />
identical layout, you can create a block template (lmage><br />
Save Blocks Template menu) (i.e. a standard "set" of<br />
blocks that conforms to the layout of your document) and<br />
apply this template to all pages with the same layout you<br />
wish to recognize (lmage>Load Blocks Template menu).<br />
• Improve the Recognition Quality of Double Page<br />
Images<br />
To increase recognition quality, split scanned images so that
ABBYY FineReader Tutorial<br />
mk:@MSITStore:C:\Program%20Files\ABBYY%20FineReader%208.0%20Professional...<br />
Page 2 of 4<br />
4/30/2006<br />
a batch page is created for each page of a double page<br />
image. Images can be split both automatically and<br />
manually. To split images automatically, before you add<br />
them to the batch check Split dual pages on the<br />
Scan/Open tab.<br />
To split images manually, select the Split image item in the<br />
Image menu. Deskewing, layout analysis and recognition<br />
will then be performed separately for each page.<br />
When scanning very thick books, the text close to the<br />
binding may be distorted. To remedy such distortions, select<br />
Tools>Options and click the Scan/Open tab. Under<br />
Image processing, select Straighten text lines.<br />
• Recognition Speed<br />
The recognition speed depends on different parameters:<br />
processor speed, size of RAM, type of image, etc.<br />
If you wish to process a large amount of documents with<br />
simple layout and good image quality, you can use a special<br />
recognition mode - Fast recognition. To turn on this mode,<br />
go to the Read tab in the Options dialog (menu<br />
Tools>Options) and select the Fast item in the<br />
Recognition mode group.<br />
On multiprocessor machines, you can increase the<br />
recognition speed of large batches by turning on the<br />
"Background recognition" mode (Corporate Edition only).<br />
• Advanced Search in Recognized Documents<br />
You can search through all the recognized pages for words<br />
in all of their grammatical forms. The search pattern can be<br />
one or several words. To do this, select Advanced search<br />
in the Edit menu or press ALT+F3.<br />
• Characters are Displayed Incorrectly<br />
If the ABBYY FineReader Text window does not display<br />
characters correctly (i.e. "?" or "□" can be seen in place of<br />
some or all of the letters), this means that your current font<br />
does not support your recognition language alphabet in full.<br />
Select a font that supports your entire recognition set (for<br />
example, Arial Unicode or Bitstream Cyberbit) on the Save<br />
tab (Tools>Options menu) in the Fonts group, and<br />
recognize the document again.<br />
• Editing the Recognized Text in Microsoft Word<br />
If you prefer editing the recognized text in Microsoft Word<br />
rather than in the ABBYY FineReader text window, you may<br />
still have uncertain characters highlighted. On the<br />
RTF/DOC/Word XML tab in the Format Settings dialog,<br />
select the Highlight uncertain characters items in the<br />
Text settings group. The saved file will have all the<br />
uncertain characters highlighted with the same color that is<br />
used in the ABBYY FineReader Text window. You can change<br />
this color on the View tab of the Options dialog box<br />
(Tools>Options).<br />
• Reducing Document Size<br />
If the recognized document contains many pictures, you can
ABBYY FineReader Tutorial<br />
mk:@MSITStore:C:\Program%20Files\ABBYY%20FineReader%208.0%20Professional...<br />
Page 3 of 4<br />
4/30/2006<br />
reduce the size of the document when saving in RTF, DOC,<br />
Word XML, PDF, HTML, or PPT formats: select the desired<br />
picture quality and format in the Picture settings group on<br />
the corresponding tabs in the Format Settings dialog.<br />
• Editing Hyperlinks<br />
ABBYY FineFeader 8.0 can recognize hyperlinks to files, filetransfer<br />
protocols, Web sites and e-mail addresses. ABBYY<br />
FineReader will recognize the text of a hyperlink and<br />
recreate its destination address in the output document.<br />
Recognized hyperlinks are displayed in blue and underlined.<br />
You can edit the text and address of a hyperlink. You can<br />
also change the color of a hyperlink on the Read tab in the<br />
Options dialog.<br />
• Saving batch settings<br />
To save batch settings in a file, click the Save Options<br />
button on the General tab (Tools>Options menu). A Save<br />
Options As dialog will open. Enter the file name. The<br />
following settings will be saved: the Read, Scan/Open,<br />
Save, and Check Spelling tab settings, as well as all<br />
Formats Settings dialog tab settings. User languages, user<br />
language groups and user patterns will also be saved in this<br />
file.<br />
• User Languages and Language Groups<br />
In addition to the built-in languages and language groups,<br />
you may also create a new language or make up a new<br />
language group (from languages supported by ABBYY<br />
FineReader) and use it for recognition.<br />
• Customize ABBYY FineReader Toolbars<br />
You can add/remove the buttons that provide access to any<br />
command of the application to/from the Standard, Image<br />
and Formatting toolbars in the Customize dialog<br />
(Tools>Customize menu).<br />
• Document with dark borders<br />
Sometimes a scanned image may have dark borders. You<br />
can crop the unwanted black areas before running OCR.<br />
To crop the image:<br />
1. Select the Crop Image command from the Image<br />
menu.<br />
2. The image will be displayed in a Crop Image window<br />
and its borders indicated by black lines.<br />
3. Rest the mouse cursor on the color border and drag it<br />
to the desired location. Alternatively, you can rest the<br />
mouse cursor in one of the corners and drag it<br />
diagonally. The part of the image that will be<br />
removed will be displayed in gray. Click the Crop<br />
button.<br />
You can also use the Crop Image tool to reduce the image<br />
to a standard paper size, such as A4 or A5. In order to do<br />
this, select the desired paper size in the Crop to drop-down<br />
list and click Crop.
ABBYY FineReader Tutorial<br />
mk:@MSITStore:C:\Program%20Files\ABBYY%20FineReader%208.0%20Professional...<br />
Page 4 of 4<br />
4/30/2006<br />
office@abbyy.com<br />
© 1996-2005 ABBYY Software House