- Page 2 and 3:
HTML5 Step by Step Faithe Wempen
- Page 4:
To Margaret iii
- Page 7 and 8:
vi Contents 2 Setting Up the Docume
- Page 9 and 10:
viii Contents Part 3 9 Displaying G
- Page 11 and 12:
x Contents Embedding Video Clips .
- Page 14:
Acknowledgments Thank you to the wo
- Page 17 and 18:
xvi Introduction (Please note that
- Page 19 and 20:
xviii Introduction A new browser wi
- Page 21 and 22:
xx What Is HTML? To understand how
- Page 23 and 24:
xxii What Is HTML? Simply put, it
- Page 25 and 26:
xxiv What Is HTML? A slightly longe
- Page 27 and 28:
xxvi Using the Practice Files Chapt
- Page 29 and 30:
Getting Help Every effort has been
- Page 31 and 32:
xxx Conventions and Features in Thi
- Page 33 and 34:
Chapter at a Glance Open a Web page
- Page 35 and 36:
4 Chapter 1 Note You may run into v
- Page 37 and 38:
6 Chapter 1 SET UP Open Notepad. 1.
- Page 39 and 40:
8 Chapter 1 For beginners, though,
- Page 41 and 42:
10 Chapter 1 The file opens in Inte
- Page 43 and 44:
Chapter at a Glance Create the HTML
- Page 45 and 46:
14 Chapter 2 Specifying the Documen
- Page 47 and 48:
16 Chapter 2 2. In the Notepad wind
- Page 49 and 50:
18 Chapter 2 Note In XHTML, the lin
- Page 51 and 52:
20 Chapter 2 Note Not all search en
- Page 53 and 54:
22 Chapter 2 Publishing a File to a
- Page 55 and 56:
Chapter at a Glance Create headings
- Page 57 and 58:
26 Chapter 3 This chapter introduce
- Page 59 and 60:
28 Chapter 3 Dog Agility Club of In
- Page 61 and 62:
30 Chapter 3 Note HTML also allows
- Page 63 and 64:
32 Chapter 3 CLEAN UP Close the Not
- Page 65 and 66:
34 Chapter 3 The tag can also come
- Page 67 and 68:
36 Chapter 3 10. Close the poemtext
- Page 69 and 70:
38 Chapter 3 The tag has a cite=
- Page 71 and 72:
40 Chapter 3 CLEAN UP Close the Not
- Page 73 and 74:
42 Chapter 3 6. On the General tab,
- Page 75 and 76:
44 Chapter 3 11. Open the poem file
- Page 77 and 78:
Chapter at a Glance Create bulleted
- Page 79 and 80:
48 Chapter 4 divisions in Chapter 1
- Page 81 and 82:
50 Chapter 4 On a Web page, it woul
- Page 83 and 84:
52 Chapter 4 3. After the first ite
- Page 85 and 86:
54 Chapter 4 Creating Definition Li
- Page 87 and 88:
56 Chapter 4 name or an entity numb
- Page 89 and 90:
58 Chapter 4 To add a horizontal li
- Page 91 and 92:
60 Chapter 4 Choosing Background an
- Page 93 and 94:
62 Chapter 4 SET UP Use the foliage
- Page 95 and 96:
64 Chapter 4 If you specify a backg
- Page 97 and 98:
Chapter at a Glance Hyperlink to a
- Page 99 and 100:
68 Chapter 5 Practice Files Before
- Page 101 and 102:
70 Chapter 5 When creating a link t
- Page 103 and 104:
72 Chapter 5 E-mail hyperlinks are
- Page 105 and 106:
74 Chapter 5 Note The full text of
- Page 107 and 108:
76 Chapter 5 To refer to the anchor
- Page 109 and 110:
78 Chapter 5 Hyperlinking to Other
- Page 111 and 112:
80 Chapter 5 4. In Internet Explore
- Page 114 and 115:
Part 2 Style Sheets and Graphics 6
- Page 116 and 117:
6 Introduction to Style Sheets In t
- Page 118 and 119:
Constructing Style Rules 87 ul { l
- Page 120 and 121:
Constructing Style Rules 89 2. In N
- Page 122 and 123:
Creating Styles for Nested Tags 91
- Page 124 and 125:
Creating Classes and IDs for Applyi
- Page 126 and 127:
Creating Classes and IDs for Applyi
- Page 128 and 129:
Applying Styles to Hyperlinks 97 Yo
- Page 130 and 131:
Creating and Linking to External St
- Page 132 and 133:
Key Points 101 ●● ●● ●●
- Page 134 and 135:
7 Formatting Text by Using Style Sh
- Page 136 and 137:
Specifying a Font Family 105 Note I
- Page 138 and 139:
Specifying a Font Size and Color 10
- Page 140 and 141:
Specifying a Font Size and Color 10
- Page 142 and 143:
Applying Bold and Italics 111 6. Sa
- Page 144 and 145:
Applying Bold and Italics 113 In th
- Page 146 and 147:
Applying Strikethrough and Underlin
- Page 148 and 149:
Creating Inline Spans 117 Creating
- Page 150 and 151:
Adjusting Spacing Between Letters 1
- Page 152 and 153:
Adjusting Spacing Between Letters 1
- Page 154 and 155:
Key Points 123 Key Points ●●
- Page 156 and 157:
8 Formatting Paragraphs by Using St
- Page 158 and 159:
Indenting Paragraphs 127 In contras
- Page 160 and 161:
Indenting Paragraphs 129 It is inde
- Page 162 and 163:
Applying a Border to a Paragraph 13
- Page 164 and 165:
Applying a Border to a Paragraph 13
- Page 166 and 167:
Specifying the Horizontal Alignment
- Page 168 and 169:
Specifying Vertical Space within a
- Page 170 and 171:
Key Points 139 Key Points ●●
- Page 172 and 173:
9 Displaying Graphics In this chapt
- Page 174 and 175:
Preparing Graphics for Web Use 143
- Page 176 and 177:
Inserting Graphics 145 To refer to
- Page 178 and 179:
Arranging Elements on the Page 147
- Page 180 and 181:
Controlling Image Size and Padding
- Page 182 and 183:
Controlling Image Size and Padding
- Page 184 and 185:
Hyperlinking from Graphics 153 Note
- Page 186 and 187:
Using Thumbnail Graphics 155 Mouse
- Page 188 and 189:
Using Thumbnail Graphics 157 2. S
- Page 190 and 191:
Adding Figure Captions 159 If the b
- Page 192:
Key Points 161 Key Points ●●
- Page 195 and 196:
Chapter at a Glance Create a text-b
- Page 197 and 198:
166 Chapter 10 Planning Your Site
- Page 199 and 200: 168 Chapter 10 Tip When you place a
- Page 201 and 202: 170 Chapter 10 7. Set the margin fo
- Page 203 and 204: 172 Chapter 10 button you like, and
- Page 205 and 206: 174 Chapter 10 Creating an Image Ma
- Page 207 and 208: 176 Chapter 10 287,71 188,267 314,4
- Page 209 and 210: 178 Chapter 10 Just as with hyperli
- Page 211 and 212: 180 Chapter 10 Note Even thou
- Page 213 and 214: 182 Chapter 10 After five seconds,
- Page 215 and 216: Chapter at a Glance Create division
- Page 217 and 218: 186 Chapter 11 Practice Files Befor
- Page 219 and 220: 188 Chapter 11 Creating Divisions Y
- Page 221 and 222: 190 Chapter 11 Creating an HTML5 Se
- Page 223 and 224: 192 Chapter 11 Positioning Division
- Page 225 and 226: 194 Chapter 11 You can combine posi
- Page 227 and 228: 196 Chapter 11 9. (Optional) Experi
- Page 229 and 230: 198 Chapter 11 There are several pr
- Page 231 and 232: 200 Chapter 11 5. In the default.cs
- Page 233 and 234: 202 Chapter 11 12. Save the file. 1
- Page 235 and 236: Chapter at a Glance Create a table,
- Page 237 and 238: 206 Chapter 12 The most popular use
- Page 239 and 240: 208 Chapter 12 The number of column
- Page 241 and 242: 210 Chapter 12 5. Save the file, an
- Page 243 and 244: 212 Chapter 12 Alternatively, you c
- Page 245 and 246: 214 Chapter 12 An alternative appro
- Page 247 and 248: 216 Chapter 12 9. Save the file, an
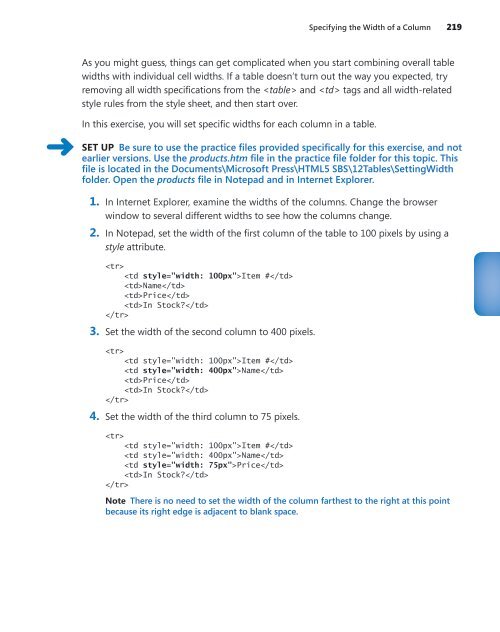
- Page 249: 218 Chapter 12 You can also specify
- Page 253 and 254: 222 Chapter 12 The preceding code c
- Page 255 and 256: 224 Chapter 12 CLEAN UP Close the N
- Page 257 and 258: 226 Chapter 12 2. In Notepad, inser
- Page 259 and 260: 228 Chapter 12 CLEAN UP Close the N
- Page 261 and 262: Chapter at a Glance Apply table bor
- Page 263 and 264: 232 Chapter 13 Applying Table Borde
- Page 265 and 266: 234 Chapter 13 As shown in the foll
- Page 267 and 268: 236 Chapter 13 that govern all inst
- Page 269 and 270: 238 Chapter 13 3. Open products.htm
- Page 271 and 272: 240 Chapter 13 9. Remove the border
- Page 273 and 274: 242 Chapter 13 If the image is smal
- Page 275 and 276: 244 Chapter 13 4. In Notepad, in th
- Page 277 and 278: 246 Chapter 13 Setting Cell Padding
- Page 279 and 280: 248 Chapter 13 Note Notice that whe
- Page 281 and 282: Chapter at a Glance Create a basic
- Page 283 and 284: 252 Chapter 14 Caution Many Web des
- Page 285 and 286: 254 Chapter 14 You can specify a wi
- Page 287 and 288: 256 Chapter 14 Many Web designers f
- Page 289 and 290: 258 Chapter 14 8. Add another row a
- Page 291 and 292: 260 Chapter 14 By default, check bo
- Page 293 and 294: 262 Chapter 14 6. Fill out the form
- Page 295 and 296: 264 Chapter 14 If the list’s choi
- Page 297 and 298: 266 Chapter 14 7. After the closing
- Page 299 and 300: 268 Chapter 14 Understanding CGI an
- Page 301 and 302:
Chapter at a Glance Play a video, p
- Page 303 and 304:
272 Chapter 15 What’s New with Au
- Page 305 and 306:
274 Chapter 15 There is also a new
- Page 307 and 308:
276 Chapter 15 Note A compression a
- Page 309 and 310:
278 Chapter 15 Not surprisingly, yo
- Page 311 and 312:
280 Chapter 15 SET UP Use the winte
- Page 313 and 314:
282 Chapter 15 Note If a security w
- Page 315 and 316:
284 Chapter 15 SET UP Use the index
- Page 317 and 318:
Chapter at a Glance Add JavaScript
- Page 319 and 320:
288 Chapter 16 You add a canvas ele
- Page 321 and 322:
290 Chapter 16 SET UP Open Notepad.
- Page 323 and 324:
292 Chapter 16 Keeping JavaScript A
- Page 325 and 326:
294 Chapter 16 However, as just not
- Page 327 and 328:
296 Chapter 16 You can also select
- Page 329 and 330:
298 Chapter 16 You call the functio
- Page 331 and 332:
300 Chapter 16 Validating a Web For
- Page 333 and 334:
302 Chapter 16 The CSS style might
- Page 335 and 336:
304 Chapter 16 To draw on the canva
- Page 337 and 338:
306 Chapter 16 Viewing this page in
- Page 339 and 340:
308 Chapter 16 }); for (i = 0; i
- Page 341 and 342:
310 Chapter 16 Including External C
- Page 344 and 345:
Part 4 Other Ways to Create HTML Co
- Page 346 and 347:
17 HTML and Microsoft Expression We
- Page 348 and 349:
Exploring the Expression Web Interf
- Page 350 and 351:
Exploring the Expression Web Interf
- Page 352 and 353:
Creating Web Sites and Web Pages 32
- Page 354 and 355:
Creating Web Sites and Web Pages 32
- Page 356 and 357:
Create a Page by Using a CSS Templa
- Page 358 and 359:
Create a Page by Using a CSS Templa
- Page 360 and 361:
Insert Graphics 329 the site. One e
- Page 362 and 363:
Insert Graphics 331 Drag each butto
- Page 364 and 365:
Formatting Text 333 Note The Masthe
- Page 366 and 367:
Formatting Text 335 5. In the Prope
- Page 368 and 369:
Formatting Text 337 19. Click OK to
- Page 370 and 371:
Formatting a Division 339 4. Drag t
- Page 372 and 373:
Inserting Hyperlinks 341 ●● ●
- Page 374:
Key Points 343 14. Click OK. The hy
- Page 378 and 379:
A Designing for Usability Although
- Page 380 and 381:
Designing a Consistent Page Templat
- Page 382:
Performing Usability Testing 351
- Page 385 and 386:
354 Appendix B To plan for these li
- Page 387 and 388:
356 Appendix B ●● ●● Ensure
- Page 389 and 390:
358 Appendix B ●● ●● ●●
- Page 391 and 392:
360 Appendix B Guideline 12: Provid
- Page 394 and 395:
C Tags Added and Removed in HTML5 T
- Page 396 and 397:
Glossary absolute path Paths that c
- Page 398 and 399:
Glossary 367 logical tag See descri
- Page 400 and 401:
Index Symbols ¢ (cent) 56 £ (poun
- Page 402 and 403:
compiled programming languages 371
- Page 404 and 405:
.flv file extension 373 block-level
- Page 406 and 407:
images. See graphics (images) 375 d
- Page 408 and 409:
navigational aids 377 K tag about
- Page 410 and 411:
tag 379 paragraphs. See also tag a
- Page 412 and 413:
text boxes 381 style sheets. See al
- Page 414 and 415:
word spacing 383 VLC media player 2
- Page 416 and 417:
About the Author Faithe Wempen, M.A