2007 Portable Spa, Family Fun - Cal Spas
2007 Portable Spa, Family Fun - Cal Spas
2007 Portable Spa, Family Fun - Cal Spas

You also want an ePaper? Increase the reach of your titles
YUMPU automatically turns print PDFs into web optimized ePapers that Google loves.
LTR<strong>2007</strong>1004, Rev. A<br />
12/15/06
This manual applies to the following spa models:<br />
<strong>Family</strong> <strong>Fun</strong><br />
FF90<br />
FF100<br />
Copyright 2006-<strong>2007</strong> <strong>Cal</strong>ifornia Acrylic Industries, Inc. All rights reserved. Duplication without<br />
written consent is strictly prohibited.<br />
<strong>Cal</strong> <strong>Spa</strong>s, Adjustable Therapy System, ATS, Bio-Clean, <strong>Cal</strong> Balance, <strong>Cal</strong><br />
Entertainment System, <strong>Cal</strong> Zone Quest 1000 and <strong>Cal</strong> Zone Quest 2000, <strong>Cal</strong> Sweep,<br />
<strong>Cal</strong> Select, Fitness <strong>Spa</strong> Series, <strong>Spa</strong> <strong>Cal</strong>, and XL Heat Exchanger are registered<br />
trademarks.<br />
Due to continuous improvement programs, all models, operation, and/or specifications are<br />
subject to change without prior notice.<br />
LTR<strong>2007</strong>1004, Rev. A<br />
12/15/06<br />
CONTACT INFORMATION<br />
For customer service, please contact<br />
your authorized dealer immediately. If<br />
you need additional information and/<br />
or assistance, please contact:<br />
C.A.I. Customer Service Department<br />
1462 East Ninth Street<br />
Pomona, CA 91766.<br />
Toll Free: 1-800-CAL-SPAS<br />
Fax: 1-909-629-3890
Read This First!<br />
Important Safety Instructions . . . . . . . . . . . . . . 2<br />
Basic <strong>Spa</strong> Information . . . . . . . . . . . . . . . . . . . . 3<br />
Preparing for Your New <strong>Portable</strong> <strong>Spa</strong><br />
Planning the Best Location. . . . . . . . . . . . . . . . 4<br />
Preparing a Good Foundation . . . . . . . . . . . . . 4<br />
Electrical Set-up Before Delivery of Your <strong>Spa</strong>. 5<br />
Filling and Powering Up Your <strong>Portable</strong> <strong>Spa</strong> . . 8<br />
Operating Your <strong>Spa</strong><br />
1500 Electronic Control Operation. . . . . . . . . . 9<br />
Diverter Knobs . . . . . . . . . . . . . . . . . . . . . . . . . 11<br />
Air Venturis. . . . . . . . . . . . . . . . . . . . . . . . . . . . 11<br />
Draining Your <strong>Portable</strong> <strong>Spa</strong>. . . . . . . . . . . . . . . 11<br />
Winterizing (Cold Climate Draining). . . . . . . . 12<br />
<strong>Spa</strong> Cover . . . . . . . . . . . . . . . . . . . . . . . . . . . . . 12<br />
Water Quality Maintenance<br />
<strong>Cal</strong> <strong>Spa</strong>s Clear Water Plan . . . . . . . . . . . . . . . 13<br />
Chemical Descriptions . . . . . . . . . . . . . . . . . . 15<br />
Traditional Chemical Start Up. . . . . . . . . . . . . 17<br />
Cleaning and Maintenance<br />
Cleaning and Replacing the Filter . . . . . . . . . 19<br />
Cleaning the Cover, Shell and Pillows . . . . . . 20<br />
Appendix<br />
Replacement Parts. . . . . . . . . . . . . . . . . . . . . . 22<br />
<strong>Cal</strong> <strong>Spa</strong>s Chemicals . . . . . . . . . . . . . . . . . . . 26<br />
<strong>2007</strong> Warranty Information . . . . . . . . . . . . . . . 28<br />
Table of Contents<br />
<strong>2007</strong> <strong>Family</strong> <strong>Fun</strong> <strong>Spa</strong> Owner’s Manual Page <br />
LTR<strong>2007</strong>1004, Rev. A
Read This First!<br />
Read This First!<br />
Important Safety Instructions<br />
When installing and using this electrical equipment,<br />
always follow basic safety precautions. Following these<br />
instructions will help make your first spa session a<br />
pleasurable one.<br />
READ AND FOLLOW ALL INSTRUCTIONS<br />
All 120V spas require a DEDICATED 20 AMP GFCI<br />
SERVICE. Do not use extension cords.<br />
NOTE: A licensed electrician may be required to<br />
upgrade your standard receptacle and/or circuit<br />
breaker.<br />
All 240V spas require a DEDICATED 50 AMP GFCI<br />
SERVICE WITH FOUR #6 AWG COPPER WIRES.<br />
DANGER -- RISK OF ACCIDENTAL DROWNING:<br />
Do not allow children to be in or around a spa unless<br />
a responsible adult supervises them. Keep the spa<br />
cover on and locked when not in use. See instructions<br />
enclosed with your cover for locking procedures.<br />
DANGER -- RISK OF INJURY: The suction fittings<br />
in this spa are sized to match the specific water flow<br />
created by the pump. Should the need arise to replace<br />
the suction fittings, or the pump, be sure the flow rates<br />
are compatible.<br />
DANGER -- RISK OF INJURY: Never operate the<br />
spa if the suction fitting or filter baskets are broken or<br />
missing.<br />
DANGER -- RISK OF INJURY: Never replace a suction<br />
fitting with one that is rated less than the flow rate<br />
marked on the original suction fitting.<br />
DANGER -- RISK OF ELECTRIC SHOCK: Install the<br />
spa at least 5 feet (1.5 meters) from all metal surfaces.<br />
As an alternative, a spa may be installed within 5 feet<br />
of metal surfaces if each metal surface is permanently<br />
bonded by a minimum #8 AWG solid copper conductor<br />
to the outside of the spa’s control box.<br />
DANGER -- RISK OF ELECTRIC SHOCK: Do not<br />
permit any external electrical appliances, such as<br />
lights, telephones, radios, televisions, and etc., within 5<br />
feet (1.5 meters) of the spa. Never attempt to operate<br />
any electrical device from inside the spa. This does not<br />
apply to lights, stereos and televisions that are built in<br />
to the spa as factory options from <strong>Cal</strong> <strong>Spa</strong>s.<br />
WARNING -- RISK OF INJURY<br />
•<br />
•<br />
•<br />
•<br />
•<br />
The spa water should never exceed 104˚F (40˚C).<br />
Water temperatures between 100˚F (38˚C) and<br />
104˚F (40˚C) are considered safe for a healthy<br />
adult. Lower water temperatures are recommended<br />
for young children and when spa use exceeds 10<br />
minutes.<br />
High water temperatures have a high potential for<br />
causing fetal damage during pregnancy. Women<br />
who are pregnant, or who think they are pregnant,<br />
should always check with their physician prior to<br />
spa usage.<br />
The use of alcohol, drugs or medication before or<br />
during spa use may lead to unconsciousness, with<br />
the possibility of drowning.<br />
Persons suffering from obesity, a medical history<br />
of heart disease, low or high blood pressure,<br />
circulatory system problems or diabetes should<br />
consult a physician before using the spa.<br />
Persons using medications should consult a<br />
physician before using the spa since some<br />
medications may induce drowsiness while<br />
others may affect heart rate, blood pressure and<br />
circulation.<br />
Hyperthermia Danger<br />
Prolonged exposure to hot air or water can induce<br />
hyperthermia. Hyperthermia occurs when the internal<br />
temperature of the body reaches a level 3˚F to 6˚F<br />
above the normal body temperature of 98.6˚F (or 2˚C to<br />
4˚C above 37˚C). While hyperthermia has many health<br />
benefits, it is important not to allow your body’s core<br />
temperature to rise above 103˚F (39.5˚C). Symptoms<br />
of excessive hyperthermia include dizziness, lethargy,<br />
drowsiness and fainting. The effects of excessive<br />
hyperthermia may include:<br />
• Failure to perceive heat<br />
• Failure to recognize the need to exit spa or hot tub<br />
• Unawareness of impending hazard<br />
• Fetal damage in pregnant women<br />
• Physical inability to exit the spa<br />
• Unconsciousness<br />
WARNING: The use of alcohol, drugs, or medication<br />
can greatly increase the risk of fatal hyperthermia.<br />
Page <br />
<strong>2007</strong> <strong>Family</strong> <strong>Fun</strong> <strong>Spa</strong> Owner’s Manual<br />
LTR<strong>2007</strong>1004, Rev. A
Basic <strong>Spa</strong> Information<br />
The following operating and maintenance instructions<br />
are very important and must be followed carefully. With<br />
the proper care and maintenance, your <strong>Cal</strong> <strong>Spa</strong> will<br />
provide you with years of satisfaction and performance.<br />
Do not be afraid to push buttons or turn knobs to<br />
learn about your new <strong>Cal</strong> <strong>Spa</strong>, as it is built with quality<br />
materials and excellent craftsmanship.<br />
Your new <strong>Cal</strong> <strong>Spa</strong> has been engineered with a highpowered<br />
water pump that pushes water through<br />
various therapy jets, which will relax even the tightest<br />
muscles. In addition to the water pressure, you can add<br />
air into the spa water with air venturi handles located<br />
seat-side that increase the intensity of your massage.<br />
The filtering of this spa is very important. It will<br />
minimize cleaning time and the amount of chemicals<br />
needed to keep your spa water balanced. The two daily<br />
pre-programmed filter cycles of two hours in duration<br />
can be increased to six hour cycles if the need arises.<br />
This can be accomplished through the topside control<br />
panel.<br />
IMPORTANT: Keep the spa covered when not in use!<br />
•<br />
•<br />
•<br />
•<br />
Covered spas use less electricity while maintaining<br />
a set temperature.<br />
Covering your spa will protect your spa’s finish<br />
from the sun’s ultraviolet rays.<br />
You are required to keep the spa covered to<br />
maintain warranty coverage.<br />
Covering your spa helps prevent children from<br />
drowning in the spa.<br />
Your new <strong>Cal</strong> <strong>Spa</strong> comes equipped with an electric<br />
heater. Following the directions listed below will ensure<br />
the most efficient operation:<br />
NOTE: This method is only for spa usage under two<br />
hours a week.<br />
•<br />
•<br />
Read This First!<br />
Keep the spa’s operating temperature 5˚F below<br />
the desired usage temperature when not in use.<br />
One or two hours before use, set the temperature<br />
to the desired temperature.<br />
If the spa usage exceeds two hours a week, the set<br />
temperature should remain at the desired usage<br />
temperature.<br />
• The air venturis should be used sparingly. When<br />
open, water temperature drops quite rapidly and<br />
can also dissipate chemicals.<br />
Allowing the water temperature to lower more than<br />
10˚F below the desired usage temperature and<br />
reheating it prior to usage will cause the heater to<br />
operate longer than it normally would maintaining the<br />
desired temperature. Doing this will increase your<br />
operating cost and makes your heater work more than<br />
necessary.<br />
The filter needs to be cleaned or changed on a regular<br />
basis. This process takes only a few minutes and<br />
the result is increased water clarity and equipment<br />
longevity.<br />
Water level is very important to the operation of your<br />
spa. If the water level is too low or too high, your spa<br />
will not operate properly. The water level should be to<br />
the middle of the skimmer area when the spa is not<br />
being used.<br />
We recommend that your spa water be changed every<br />
4 to 6 months. You may find the need to change your<br />
spa water more frequently with heavy use. When<br />
empty, your spa should be cleaned with a non-abrasive<br />
cleaner, such as <strong>Cal</strong> <strong>Spa</strong>s All Surface Cleaner, and<br />
then rinsed thoroughly.<br />
See the section “Cleaning and Maintaining Your <strong>Spa</strong>”<br />
for instructions on draining your spa.<br />
When filling your spa, always fill through the skimmer<br />
filter canister. Use only regular tap water.<br />
WARNING: DO NOT USE SOFT WATER.<br />
<strong>2007</strong> <strong>Family</strong> <strong>Fun</strong> <strong>Spa</strong> Owner’s Manual Page <br />
LTR<strong>2007</strong>1004, Rev. A
Preparing for Your New <strong>Portable</strong> <strong>Spa</strong><br />
Preparing for Your New <strong>Portable</strong> <strong>Spa</strong><br />
Most cities and counties require permits for exterior<br />
construction and electrical circuits. In addition, some<br />
communities have codes requiring residential barriers<br />
such as fencing and/or self-closing gates on property<br />
to prevent unsupervised access to the property by<br />
children. Your dealer can provide information on which<br />
permits may be required and how to obtain them prior<br />
to the delivery of your <strong>Cal</strong> <strong>Spa</strong>.<br />
Planning the Best Location<br />
Here are some of the things that you will need to<br />
consider when determining where to place your new<br />
spa.<br />
Safety First<br />
Do not place your spa within 10 feet (3 m) of overhead<br />
power lines.<br />
Make sure the spa is positioned so that access to the<br />
equipment compartment and all side panels will not be<br />
blocked. Be certain that your installation will meet all<br />
city and local safety codes and requirements.<br />
Consider How You Will Use Your <strong>Spa</strong><br />
How you intend to use your spa will help you determine<br />
where you should position it. For example, will you use<br />
your spa for recreational or therapeutic purposes? If<br />
your spa is mainly used for family recreation, be sure<br />
to leave plenty of room around it for activity. If you will<br />
use it for relaxation and therapy, you’ll probably want to<br />
create a specific mood around it.<br />
Plan for Your Environment<br />
If you live in a region where it snows in the winter or<br />
rains frequently, place the spa near a house entry. By<br />
doing this, you will have a place to change clothes and<br />
not be uncomfortable.<br />
Consider Your Privacy<br />
In a cold-weather climate, bare trees won’t provide<br />
much privacy. Think of your spa’s surroundings during<br />
all seasons to determine your best privacy options.<br />
Consider the view of your neighbors as well when you<br />
plan the location of your spa.<br />
Provide A View With Your <strong>Spa</strong><br />
Think about the direction you will be facing when sitting<br />
in your spa. Do you have a special landscaped area in<br />
your yard that you find enjoyable? Perhaps there is an<br />
Page <br />
area that catches a soothing breeze during the day or a<br />
lovely sunset in the evening.<br />
Keep Your <strong>Spa</strong> Clean<br />
Prevent dirt and contaminants from being tracked into<br />
your spa by placing a foot mat at the spa’s entrance<br />
where the bather’s can clean their feet before entering<br />
your spa. You may also consider keeping a small<br />
water-filled basin nearby for bathers to rinse their feet<br />
before enter your spa.<br />
In planning your spa’s location, consider a location<br />
where the path to and from the house can be kept<br />
clean and free of debris.<br />
Allow For Service Access<br />
Many people choose to install a decorative structure<br />
around their spa. If you are installing your spa with any<br />
type of structure on the outside, such as a gazebo,<br />
remember to allow access for service. It is always best<br />
to design special installations so that the spa can still<br />
be moved, or lifted off the ground.<br />
Preparing a Good Foundation<br />
Your spa needs a solid and level foundation. The area<br />
that it sits on must be able to support the weight of the<br />
spa and the occupants who use it. If the foundation<br />
is inadequate, it may shift or settle after the spa is in<br />
place, causing stress that could damage your spa shell<br />
or finish.<br />
Damage caused by inadequate or improper foundation<br />
support is not covered by the warranty. It is the<br />
responsibility of the spa owner to provide a proper<br />
foundation for the spa. We strongly recommended that<br />
you have a qualified, licensed contractor prepare the<br />
foundation for your spa.<br />
Place the spa on a level foundation (preferably a 4”<br />
concrete slab). If you are installing the spa indoors,<br />
pay close attention to the flooring beneath it. Choose<br />
flooring that will not be damaged or stained.<br />
If you are installing your spa on an elevated wood<br />
deck or other structure, consult a structural engineer<br />
or a contractor to ensure the structure will support the<br />
weight of 150 pounds per square foot.<br />
Your <strong>Cal</strong> <strong>Spa</strong>s retailer can help you with your<br />
foundation and more. Your retailer has a wealth of<br />
information and experience about how to get the most<br />
out of your spa and can provide you with a full line of<br />
<strong>2007</strong> <strong>Family</strong> <strong>Fun</strong> <strong>Spa</strong> Owner’s Manual<br />
LTR<strong>2007</strong>1004, Rev. A
Preparing for Your New <strong>Portable</strong> <strong>Spa</strong><br />
accessories that are designed to compliment your spa<br />
and increase your enjoyment.<br />
Electrical Set-up Before<br />
Delivery of Your <strong>Spa</strong><br />
When installed in the United States, the electrical wiring<br />
of this spa must meet the requirements of National<br />
Electric Code, ANSI/NFPA 70-1999 and any applicable<br />
state or local codes. The electrical circuit must be<br />
installed by an electrical contractor and approved by a<br />
local building / electrical inspector.<br />
All 240V spas must be permanently connected (hard<br />
wired) to the power supply. 120V spas may use a<br />
GFCI cord, plugged into a dedicated grounded outlet.<br />
Supplying power to a spa that is not in accordance with<br />
these instructions will void both the independent testing<br />
agency listing and the manufacturer’s warranty.<br />
•<br />
Use only a dedicated electrical line with a 20-amp<br />
breaker.<br />
• Cord-and-plug connections may not use a cord<br />
longer than 15 feet (4.6 m) and must be plugged<br />
into a dedicated 20-amp GFCI connection (NEC<br />
680.42(A)(2)). Do not use extension cords!<br />
• Always use a weatherproof-covered receptacle.<br />
• Receptacle shall be located not less than 5 feet<br />
(1.5 m) from and not exceeding 10 feet (3.0 m)<br />
from the inside wall of the spa. (NEC 680.43(A))<br />
• Do not bury the power cord.<br />
• If your cord becomes damaged, replace it before<br />
next usage.<br />
All 120V spas must have a GFCI. This can be either a<br />
20-amp GFCI receptacle or a 20-amp GFCI cord and<br />
plug kit (CKIT110 - P/N ELE09700086).<br />
The power supplied to the spa must be on a dedicated<br />
GFCI protected circuit with no other appliances or lights<br />
sharing the power.<br />
To determine the current, voltage, and wire size<br />
required for the spa configuration to be connected,<br />
refer to the following:<br />
•<br />
•<br />
Wire size must comply with NEC and/or local<br />
codes.<br />
Wire size is determined by length of run from<br />
breaker box to spa and maximum current draw.<br />
•<br />
We recommend copper wire with THHN insulation.<br />
•<br />
All wiring must be copper to ensure adequate<br />
connections. Do not use aluminum wire.<br />
•<br />
When NEC requires the use of wires larger than<br />
#6 (10mm²), install a junction box near the spa and<br />
use #6 (10mm²) wire between the junction box and<br />
the spa.<br />
IMPORTANT: A clearly labeled emergency shutoff<br />
or control switch for the purpose of disconnecting<br />
all electrical power to the spa including the motors,<br />
recirculation system and jet system shall be installed at<br />
a point readily accessible to the users and not less than<br />
5 feet (1.5 m) away, adjacent to, and within sight of the<br />
spa. (NEC 680.41)<br />
The electrical circuit for the spa must include a suitable<br />
GFCI as required by NEC 680.42.<br />
120 Volt Electrical Installation Guidelines<br />
Always follow applicable local, state and federal codes<br />
and guidelines.<br />
Test the GFCI plug prior to first use and periodically<br />
when the spa is powered. To test the GFCI plug<br />
version, follow these instructions. (<strong>Spa</strong> should already<br />
be plugged in and operational.)<br />
1. Press the TEST button on the GFCI. The GFCI will<br />
trip and the spa will stop operating.<br />
2. Press the RESET button on the GFCI. The GFCI<br />
will reset and the spa will turn back on.<br />
The spa is now safe to use.<br />
If the GFCI trips while the spa is in use, press the<br />
RESET button. If the GFCI does not reset, unplug the<br />
spa and call your local <strong>Cal</strong> <strong>Spa</strong>s dealer for service. DO<br />
NOT USE THE SPA!<br />
<strong>2007</strong> <strong>Family</strong> <strong>Fun</strong> <strong>Spa</strong> Owner’s Manual Page <br />
LTR<strong>2007</strong>1004, Rev. A
Preparing for Your New <strong>Portable</strong> <strong>Spa</strong><br />
240 Volt Electrical Installation<br />
All 240V spas are required to have a dedicated 50-amp<br />
GFCI breaker and should only be wired by a licensed<br />
electrician. GFCI breakers vary in appearance and wire<br />
locations. Before wiring load and feed wires to breaker<br />
verify they are being connected to the proper poles.<br />
Always follow applicable local, state, and federal codes<br />
and guidelines.<br />
Your new 240V <strong>Cal</strong> <strong>Spa</strong> requires a dedicated, 50-amp<br />
GFCI Service with four #6 AWG copper wires. This will<br />
include a black and a red wire for your incoming power,<br />
a white wire used for your neutral, and a green wire for<br />
your ground.<br />
You can use #6 AWG wire for a distance of up to 85 ft.<br />
Wire run over 85 feet must increase to #4 gauge. This<br />
is the only acceptable electrical wiring procedure. <strong>Spa</strong>s<br />
wired in any other way will void your warranty and may<br />
result in serious injury.<br />
Installing a GFCI breaker in the main electrical panel<br />
is not recommended. The further away a GFCI is<br />
installed from the spa, the higher the risk of false<br />
tripping of the GFCI breaker.<br />
Test the GFCI breaker prior to first use and periodically<br />
when the spa is powered. To test the GFCI breaker<br />
follow these instructions. (<strong>Spa</strong> should be operating.)<br />
1.<br />
2.<br />
Press the TEST button on the GFCI. The GFCI will<br />
trip and the spa will shut off.<br />
Reset the GFCI breaker by switching the breaker<br />
to the full off position, wait a moment then turn<br />
the breaker back on. The spa should have power<br />
again.<br />
Your spa is now safe to use.<br />
Page <br />
<strong>2007</strong> <strong>Family</strong> <strong>Fun</strong> <strong>Spa</strong> Owner’s Manual<br />
LTR<strong>2007</strong>1004, Rev. A
Preparing for Your New <strong>Portable</strong> <strong>Spa</strong><br />
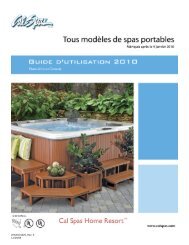
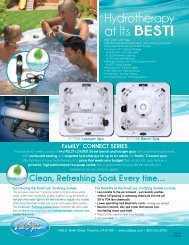
GFCI Hook-Up<br />
<strong>2007</strong> <strong>Family</strong> <strong>Fun</strong> <strong>Spa</strong> Owner’s Manual Page <br />
LTR<strong>2007</strong>1004, Rev. A
Preparing for Your New <strong>Portable</strong> <strong>Spa</strong><br />
Filling and Powering Up Your<br />
<strong>Portable</strong> <strong>Spa</strong><br />
Never fill your spa with soft water. Soft water makes<br />
it impossible to maintain the proper water chemistry<br />
and may cause the water to foam, which will ultimately<br />
harm the finish of the spa and void your warranty.<br />
1.<br />
2.<br />
3.<br />
4.<br />
5.<br />
Once the spa has been placed on an approved<br />
surface and has been correctly wired by a licensed<br />
electrician, inspect all plumbing connections in the<br />
equipment area of your spa. Ensure that these<br />
connections are secure and that they did not<br />
loosen during shipment.<br />
If equipped, open all gate valves in the equipment<br />
area. Before operating the spa, these valves must<br />
be in the up or “open” position.<br />
Remove the filter basket and cartridge from<br />
skimmer/filter canister.<br />
Place a garden hose in the skimmer/filter canister<br />
and fill your spa with regular tap water to the proper<br />
water level (halfway up the skimmer area).<br />
(For owners of the automatic bromine generator)<br />
Make sure the dial on the face of the bromine<br />
generator unit is turned to the “OFF” position.<br />
6.<br />
7.<br />
Open the air relief valve (located next to the two<br />
filters, if equipped) after the air bubbles stop<br />
coming out of it. Close the valve hand-tight.<br />
Once the water is at the correct level and air is<br />
bled, turn on the power at the GFCI breaker.<br />
(Ensure that the 120V spas are connected to the<br />
proper electrical outlet.)<br />
Depending on the model, when the power is turned on<br />
to the spa, the controls will perform a diagnostic check<br />
for approximately five minutes. When the diagnostic<br />
is complete, the spa will automatically operate at<br />
filter speed and continue heating until the spa water<br />
temperature reaches the default temperature of 100˚F.<br />
8.<br />
9.<br />
If no water is flowing when the pump is running<br />
there could be an air pocket at the suction side of<br />
the pump. Shut off power to the spa and loosen<br />
the pump union on the suction side of the pump to<br />
bleed the air. When air is bled, turn power back on.<br />
Re-install the filter and the filter basket into the<br />
skimmer/filter canister.<br />
The spa is now ready for use.<br />
NOTE: Never run the spa with the gate valves closed<br />
or without water circulating for long periods of time. Be<br />
careful not to over-tighten the plumbing fittings.<br />
Page <br />
<strong>2007</strong> <strong>Family</strong> <strong>Fun</strong> <strong>Spa</strong> Owner’s Manual<br />
LTR<strong>2007</strong>1004, Rev. A
Operating Your <strong>Spa</strong><br />
Operating Your <strong>Spa</strong><br />
1500 Electronic Control<br />
Operation<br />
Temperature Adjustment<br />
Range 80°F to 104°F<br />
The 1500 electronic control panel displays the<br />
actual water temperature in Fahrenheit.<br />
To set the water temperature:<br />
•<br />
•<br />
•<br />
Press the TEMPERATURE button. The<br />
temperature setting will flash.<br />
While the display is flashing, each time you press<br />
the TEMPERATURE button the set temperature will<br />
increase one degree.<br />
Allow the display to revert back to the actual water<br />
temperature.<br />
• Press the TEMPERATURE button again.<br />
•<br />
While the display is flashing, each time you press<br />
the TEMPERATURE button the set temperature will<br />
decrease by one degree.<br />
Standard and Economy Modes<br />
Your new spa is equipped with a heating feature that<br />
gives you complete control of the heating system.<br />
When the spa is powered up, it will automatically<br />
start in the standard heating mode. In this mode, the<br />
heating system will automatically activate whenever the<br />
water temperature drops more than one degree below<br />
the set temperature. In the economy-heating mode,<br />
the heating system will only activate during filtration<br />
times.<br />
To switch from the standard heating mode to the<br />
economy-heating mode, press the “Jets/Light” button<br />
followed by the “Temp.” then press the “Jets/Light”<br />
button. Press the same sequence to switch back to the<br />
standard heating mode. Once in the economy-heating<br />
mode, Ec will display in the center of the control panel<br />
and flash alternately with the water temperature.<br />
NOTE: There is no control panel message displayed<br />
while in the standard heating mode; only the actual<br />
water temperature is displayed.<br />
Jet / Light Controls<br />
Press the JETS button:<br />
• Once to activate the spa light<br />
• Once to activate the pump at low speed<br />
•<br />
•<br />
Twice to activate the spa light and run the pump at<br />
high speed<br />
Three times to run the pump at high speed with the<br />
spa light off<br />
• Four times to turn the pump off<br />
Setting Filtration Cycles<br />
Your spa will automatically filter itself twice a day. To set<br />
the filtration time, turn off the power to the spa at the<br />
GFCI Breaker and turn it back on at the time of day you<br />
would like the filtration cycles to start.<br />
Example: If you power-up your spa at 12 Noon, your<br />
filtration cycles will start at 12 noon and 12 Midnight.<br />
The first cycle will start after the spa is powered up.<br />
The second filtration cycle will begin twelve hours later.<br />
The filter cycle duration is preset for two hours. If spa<br />
usage is heavy, your <strong>Cal</strong> <strong>Spa</strong>s authorized service<br />
technician can reconfigure your system to run two five<br />
hour filter cycles.<br />
120V/240V Conversion<br />
The 1500 series spa is a convertible system. The<br />
conversion from 120 Volts to 240 Volts must be<br />
performed by a licensed/bonded electrician. See 120 to<br />
240 Volt conversion instructions, located on the inside<br />
cover of the control box.<br />
Note: Only spas equipped with 1.5 BHP pumps may be<br />
converted to 120 Volts. <strong>Spa</strong>s with 2.0 BHP pumps or<br />
larger can only be operated on 240 volt services.<br />
120 Volt Heater Operation<br />
When connected as a 120-Volt spa, the heater will only<br />
operate when the spa motor is on low speed or filtration<br />
speed. Once the high-speed motor is engaged, the<br />
heater will automatically disengage.<br />
<strong>2007</strong> <strong>Family</strong> <strong>Fun</strong> <strong>Spa</strong> Owner’s Manual Page <br />
LTR<strong>2007</strong>1004, Rev. A
Operating Your <strong>Spa</strong><br />
Automatic Time Outs<br />
These features will automatically turn themselves off<br />
after periods of continuous use:<br />
•<br />
•<br />
Low-speed pump<br />
High-speed pump<br />
4 hours<br />
After 30 minutes<br />
• <strong>Spa</strong> light<br />
Diagnostic Messages<br />
4 hours<br />
Message<br />
OH<br />
FL<br />
Sn<br />
Ec<br />
Meaning<br />
Overheat protection (spa is shutdown) DO NOT ENTER THE WATER! If the spa has reached<br />
112˚F (45˚C), remove the spa cover to cool the water. Overheating may occur if the filter cycle<br />
is set too long. At 110˚F (43˚C), the spa should reset itself. If the high-limit sensor detects 118˚F<br />
(48˚C) at the heater, the spa will shut down. When the heater cools down to 110˚F (43˚C), press<br />
any button to reset the spa. If the spa will not reset, then shut the power off to the spa and call<br />
your dealer of service organization.<br />
Flow Detection Switch. Pressure switch is not working correctly. <strong>Cal</strong>l your dealer or service<br />
organization.<br />
Sensor (<strong>Spa</strong> is shut down). The high limit or water temperature sensor is not working correctly.<br />
<strong>Cal</strong>l your dealer or service organization.<br />
Economy mode. <strong>Spa</strong> will only heat when filtration cycle is on.<br />
Adjustable Jets<br />
Almost all of the jets in your spa are adjustable.<br />
Rotating the face of an adjustable jet to the left<br />
(counter-clockwise) will decrease the amount of water<br />
flow through the jet. Rotating the face of an adjustable<br />
jet to the right (clockwise) will increase the amount<br />
of water flow through the jet. (See example shown at<br />
right.)<br />
Neck jets adjust in the opposite directions (counterclockwise<br />
to increase, clockwise to decrease).<br />
Page 10<br />
<strong>2007</strong> <strong>Family</strong> <strong>Fun</strong> <strong>Spa</strong> Owner’s Manual<br />
LTR<strong>2007</strong>1004, Rev. A
Diverter Knobs<br />
Air Venturis<br />
Operating Your <strong>Spa</strong><br />
Diverter knobs are 1” and<br />
2” knobs located around<br />
the top of your spa. They<br />
allow you to divert water<br />
through jets from one side<br />
of the spa to the other, or<br />
in most cases from floor<br />
jets to wall jets. This is<br />
accomplished by rotating<br />
the diverter knob to the<br />
left (counterclockwise), decreasing the amount of water<br />
flow through a section of jets. To increase the amount<br />
of water flow through the other section of jets, rotate<br />
the handle to the right (clockwise).<br />
Air venturis are the 1”<br />
knobs located around<br />
the top of your spa. They<br />
can also be distinguished<br />
from diverter knobs by<br />
the arrows and the words<br />
“OFF”, “ON” and “AIR”<br />
marked on them. Each one<br />
will let you add a mixture<br />
of air with the jet pressure.<br />
This is accomplished by rotating the air venturi knob<br />
to the left (counter-clockwise) to increase the amount<br />
of airflow through the jets. To decrease the amount of<br />
airflow through the jets, rotate the handle to the right<br />
(clockwise).<br />
Draining Your <strong>Portable</strong> <strong>Spa</strong><br />
Your spa should be drained every four to six months,<br />
and refilled with fresh tap water. The following is the<br />
recommended method for draining your spa.<br />
1.<br />
2.<br />
3.<br />
4.<br />
Turn off the power at the breaker.<br />
Remove all filters.<br />
Using a Phillips screwdriver, remove the screws to<br />
the access panel and open it.<br />
Locate hose ending with the 3/4 inch hose-bib<br />
fixture.<br />
5.<br />
6.<br />
7.<br />
8.<br />
9.<br />
Hook up the female end of a garden hose to the<br />
drain fitting.<br />
Place the other end of the garden hose where you<br />
would like the water to drain to.<br />
Twist the hose-bib fixture counterclockwise and pull<br />
to open the drain.<br />
Let spa drain completely, then remove garden<br />
hose.<br />
Twist the hose-bib fixture clockwise to close it.<br />
<strong>2007</strong> <strong>Family</strong> <strong>Fun</strong> <strong>Spa</strong> Owner’s Manual Page 11<br />
LTR<strong>2007</strong>1004, Rev. A
Operating Your <strong>Spa</strong><br />
Winterizing (Cold Climate<br />
Draining)<br />
In many areas of the country, the temperature drops<br />
below 32˚F (0°C). We recommend that you always<br />
have your spa full of water and running at normal spa<br />
temperatures (80˚F to 100˚F, 26.7°C to 37.8°C). This<br />
will help reduce the risk of freezing in your spa and<br />
your spa’s equipment.<br />
Warning: If you find the need to drain your spa,<br />
please be aware of the potential of freezing in<br />
your spas equipment and plumbing. Even if the<br />
directions below are followed perfectly, there is<br />
no guarantee that your spa will not suffer freeze<br />
damage.<br />
Freeze damage is not covered by your warranty.<br />
1. Open all filter covers.<br />
2. Remove the filter baskets and filters.<br />
3. Drain your spa completely as described in the<br />
instructions above.<br />
4. Remove drain plugs from the front of the pumps.<br />
5. Disconnect the unions from both sides of the pump.<br />
6. Use a wet/dry vacuum to blow any remaining water<br />
out of the jets and equipment area.<br />
Cover your spa with a good spa cover and an allweather<br />
tarp to ensure that neither rain nor snow enters<br />
the spa.<br />
<strong>Spa</strong> Cover<br />
Important! Keep the spa covered when not in use!<br />
• Covered spas will use less electricity in maintaining<br />
your set temperature.<br />
• Covering your spa will protect your spa’s finish<br />
from the sun’s ultraviolet rays.<br />
• You are required to keep the spa covered to<br />
maintain warranty coverage.<br />
• Covering your spa helps prevent children from<br />
drowning in the spa.<br />
See the manual enclosed with your cover for<br />
instructions on mounting the locks and how to lock and<br />
unlock the cover.<br />
In addition, while the spa cover is rigid, it is not<br />
designed to support any weight. Therefore, as a safety<br />
precaution and to preserve the life of your cover, you<br />
must not sit, stand, or lie on it; nor should you place<br />
objects of any kind on top of it.<br />
Page 12<br />
<strong>2007</strong> <strong>Family</strong> <strong>Fun</strong> <strong>Spa</strong> Owner’s Manual<br />
LTR<strong>2007</strong>1004, Rev. A
Water Quality Maintenance<br />
<strong>Cal</strong> <strong>Spa</strong>s Clear Water Plan<br />
Great spa water is easily achieved when the right<br />
chemicals and / or systems are used and the <strong>Cal</strong> <strong>Spa</strong>s<br />
“Clear Water Plan” is implemented. The key to clean,<br />
clear, and safe water is to fully understand how spa<br />
water reacts to users, system operation and chemical<br />
use. The “Clear Water Plan” will help give you that<br />
understanding.<br />
The first thing to understand about taking care of your<br />
spa water is that preventive actions are much easier to<br />
do than correcting water quality issues. For this reason,<br />
we offer the “Clear Water Plan” as a simple, easy to<br />
follow guide to clean, safe spa water.<br />
Follow the Right Plan<br />
You will need to decide which chemical plan or<br />
alternative sanitation option works best for your spa<br />
water. Consult your <strong>Cal</strong> <strong>Spa</strong>s dealer for the right<br />
decision with regards to your lifestyle and spa usage.<br />
Whichever plan you decide on, follow it completely and<br />
don’t take shortcuts. These plans will provide you with<br />
clean, safe, clear spa water with a minimum of effort.<br />
Traditional Chemical Options<br />
Choose from either Bromine tablets or Chlorinating<br />
granules as your sanitizer of choice. Both work well<br />
when the appropriate “Clear Water Plan” is followed.<br />
Make sure you follow all instructions and use only <strong>Cal</strong><br />
<strong>Spa</strong>s brand chemicals.<br />
Before You Begin<br />
Before you begin a “Clear Water Plan”, you should<br />
understand that chemicals or systems alone will not<br />
take care of your spa water. Other factors such as<br />
Filtration and Bather Load also play an important part.<br />
Filtration<br />
The filter is the part of your spa that removes the<br />
debris from the water. Even though <strong>Cal</strong> <strong>Spa</strong>s uses the<br />
advanced Bio Clean filter cartridge that protects itself<br />
from bacterial growth, the filter still needs to be cleaned<br />
on a regular basis to maximize your spa’s filtering<br />
performance and heating efficiency.<br />
In addition to spraying off the filter weekly to remove<br />
surface debris, your filter should be deep cleaned<br />
periodically to dissolve scale and other contaminants<br />
that get lodged deep within the filter fibers and impede<br />
the filtration process. Even if the filter looks clean, the<br />
Water Quality Maintenance<br />
contaminants can clog the fibers and prevent water<br />
from flowing through the filter resulting in the most<br />
common spa problem—no heat, caused by a dirty filter.<br />
Filter Cleaning<br />
•<br />
Place the dirty filter into a bucket of water deep<br />
enough to cover the filter. Add 8oz of <strong>Cal</strong> <strong>Spa</strong>s<br />
“Liquid Filter Cleaner” to the bucket of water.<br />
Note: It is a good idea to keep a spare filter to be deep<br />
cleaned while the regular filter is in the spa. This way,<br />
you can rotate the filters and both will last longer.<br />
• Soak the filter for a minimum of 24 hours.<br />
•<br />
•<br />
Remove the filter and spray clean with a water<br />
hose. Spray each pleat carefully.<br />
Allow filter to dry completely (a minimum of 2 days<br />
drying time is recommended).<br />
• Reinstall filter as described in the “Clear Water<br />
Plan”.<br />
Filtration Cycles<br />
The filtration cycle of your spa is the process that<br />
allows the water to flow through the filter. Your spa<br />
will filter automatically twice each day. The factory set<br />
default time for filtration is usually enough for normal<br />
use, however heavy bather load or frequent use may<br />
require longer filtration times or more frequent filtration<br />
cycles to keep the spa water clean. Consult your<br />
Owner’s Manual for setting your spa’s filtration times.<br />
Bather Load<br />
“Bather Load” is the term used to describe the number<br />
of people using a spa, combined with the length of<br />
usage, and the frequency of usage. All these factors<br />
have a great effect on the spa water. The higher the<br />
bather load, the more chemicals need to be added and<br />
a longer filtration time will be needed.<br />
All versions of the <strong>Cal</strong> <strong>Spa</strong>s “Clear Water Plan” are<br />
designed for spas with average bather load. (3-4<br />
people, 15 minutes of usage, 3 times a week at 100<br />
degrees) If your bather load exceeds these guidelines,<br />
and you experience water quality problems, increase<br />
the amount of filtration first, (go to the next higher<br />
filtration number) then if water quality is still not<br />
adequate, consult the advise of your <strong>Cal</strong> <strong>Spa</strong>s dealer<br />
for additional chemical or system recommendations. Be<br />
sure to give them your bather load information.<br />
Chemical Overview<br />
The following information is intended for use with <strong>Cal</strong><br />
<strong>Spa</strong>s chemicals only. Other brands of chemicals may<br />
<strong>2007</strong> <strong>Family</strong> <strong>Fun</strong> <strong>Spa</strong> Owner’s Manual Page 13<br />
LTR<strong>2007</strong>1004, Rev. A
Water Quality Maintenance<br />
have similar names and/or usage descriptions but due<br />
to manufacturing differences, use of other chemicals<br />
can increase the likelihood of under or over-dosing<br />
the spa chemicals. Damage to the spa or spa’s<br />
components from improper chemicals or chemical<br />
usage is not covered under the spa’s warranty.<br />
Chemical Safety<br />
•<br />
•<br />
•<br />
Failure to follow chemical directions may result in<br />
serious injury, sickness, or even death.<br />
Read and follow all printed instructions listed on<br />
bottles, packages and in your owner’s manual.<br />
Do not exceed chemical dosages as recommended<br />
in the “Clear Water Plan”, or on chemical bottles<br />
and packages. (Most chemical instructions are<br />
figured for a 500 gallon spa however, most spas<br />
hold less than 500 gallons, consult your Owner’s<br />
Manual for the approximate gallons of your spa)<br />
• Never mix chemicals together.<br />
•<br />
•<br />
Never change chemical brands or types without<br />
completely draining, flushing and thoroughly<br />
cleaning the spa and cover first.<br />
Always protect your eyes while introducing<br />
chemicals into the spa. Wear protective eyeglasses<br />
to prevent powdered chemicals from blowing into<br />
the eyes or liquid chemicals from splashing into the<br />
eyes.<br />
•<br />
In the event of overdosing a sanitizing chemical<br />
(chorine or bromine), immediately turn off the<br />
power to the spa and drain water to a safe and<br />
approved area. Refill with fresh water and proceed<br />
with the “Clear Water Plan” start up.<br />
Physical Chemical Hazards<br />
•<br />
•<br />
•<br />
•<br />
Do not allow chemicals to come in contact with<br />
skin, eyes or clothing.<br />
Always wear rubber gloves, protective eye wear<br />
and clothing to reduce the risk of chemical contact<br />
and irritation.<br />
Remove and wash clothing that may have been<br />
exposed to chemical contact prior to wearing them<br />
again.<br />
Inhaling or ingesting chemicals will cause serious<br />
injury, sickness, or even death.<br />
• Do not mix chemicals. Mixing chemicals together<br />
can cause dangerous chemical reactions including<br />
the release of toxic gas, fire and explosions.<br />
Chemical Storage<br />
Chemicals must be stored completely out of the reach<br />
of children in an area that is well vented, cool, and dry.<br />
Failure to provide a proper area for chemical storage<br />
may result in serious injury, sickness, fire explosion<br />
and even death. Do not store your chemicals inside the<br />
equipment area of your spa.<br />
Page 14<br />
<strong>2007</strong> <strong>Family</strong> <strong>Fun</strong> <strong>Spa</strong> Owner’s Manual<br />
LTR<strong>2007</strong>1004, Rev. A
Chemical Descriptions<br />
Water Quality Maintenance<br />
The following descriptions and recommendations are intended for use with <strong>Cal</strong> <strong>Spa</strong>s chemicals only. Many of<br />
these chemicals will be used with alternative sanitation systems as well.<br />
Test Strips -- Bromine<br />
Provides accurate spa water testing for<br />
Bromine, pH, and total Alkalinity.<br />
For use with bromine “Clear Water Plan”.<br />
Chlorinating Granules<br />
Quick acting sanitizer / disinfectant for spa<br />
water.<br />
For use with chlorine “Clear Water Plan”.<br />
Test Strips -- Sodium Bromide<br />
Provides accurate spa water testing for<br />
Sodium Bromide.<br />
For use with <strong>Cal</strong> Clarity Automatic<br />
Bromine Generator “Clear Water Plan”.<br />
Oxidizer Shock<br />
Destroys ammonia, organic<br />
contaminants, and odor causing wastes<br />
in spa water.<br />
Use with any “Clear Water Plan”.<br />
Test Strips – Chlorine<br />
Provides accurate spa water testing for<br />
Bromine, pH, and total Alkalinity.<br />
For use with chlorine “Clear Water Plan”.<br />
Iron Out<br />
Helps prevent metals in water from<br />
staining spa.<br />
Use during start up.<br />
Use with any “Clear Water Plan”<br />
Go Brom<br />
Establishes a bromide reserve in spa water.<br />
Use during start up.<br />
For use with bromine “Clear Water Plan”.<br />
Stain And Scale Defense<br />
Helps prevent minerals from damaging<br />
spa components.<br />
Use with any “Clear Water Plan”.<br />
Brominating Tablets<br />
Long lasting sanitizer / disinfectant for spa<br />
water.<br />
Add to bromine floater.<br />
Ph / Alkalinity Up<br />
Raises pH and alkalinity levels in spa<br />
water.<br />
Use with any “Clear Water Plan”.<br />
For use with bromine “Clear Water Plan”.<br />
<strong>2007</strong> <strong>Family</strong> <strong>Fun</strong> <strong>Spa</strong> Owner’s Manual Page 15<br />
LTR<strong>2007</strong>1004, Rev. A
Water Quality Maintenance<br />
Ph / Alkalinity Down<br />
Raises pH and alkalinity levels in spa<br />
water.<br />
Use with any “Clear Water Plan”<br />
Filter Cartridge Cleaner<br />
Deep cleans filter cartridge. Dissolves scale<br />
and removes imbedded organic contaminants<br />
from filter cartridge fibers.<br />
Use with any “Clear Water Plan”<br />
Enzyme Formula<br />
Liquid Hardness Increaser<br />
Helps reduce foaming and corrosion by<br />
increasing hardness levels in spa water.<br />
Use with any “Clear Water Plan”.<br />
Biodegrades body oils, suntan lotions,<br />
and organic contaminants in spa water.<br />
Do not on same day as adding Chlorine<br />
Granules.<br />
Use with any “Clear Water Plan”.<br />
<strong>Spa</strong> Brite<br />
Helps to quickly clear up cloudy spa<br />
water.<br />
Use with any “Clear Water Plan”.<br />
Multi-Purpose Cleaner<br />
Special formula designed to clean spa<br />
surfaces without leaving foam-causing<br />
residue.<br />
Use with any “Clear Water Plan”.<br />
Vinyl And Leather Cleaner<br />
Foam Gone<br />
Quickly breaks up existing foam on spa water.<br />
Use with any “Clear Water Plan”<br />
Specifically designed to clean and protect<br />
spa covers and pillows from chemical and<br />
ultraviolet damage. Use with any “Clear<br />
Water Plan”.<br />
Fast Sheen<br />
Water based, reactive, silicone polish that<br />
seals, shines, and protects spa acrylic<br />
surfaces.<br />
Use with any “Clear Water Plan”.<br />
<strong>Cal</strong> Balance Magnetic Water Stabilizer<br />
Promotes clean water naturally by<br />
organizing water molecules into<br />
appositive charge. Helps coagulate<br />
debris for improved filtration, and also<br />
traps calcium and scale into a<br />
suspension that gives spa water a soft, silky feel. Use<br />
with any “Clear Water Plan”.<br />
Page 16<br />
<strong>2007</strong> <strong>Family</strong> <strong>Fun</strong> <strong>Spa</strong> Owner’s Manual<br />
LTR<strong>2007</strong>1004, Rev. A
Water Quality Maintenance<br />
Traditional Chemical Start Up<br />
Prior to filling a spa for the first time, or after a routine<br />
draining, you will want to follow this start-up plan to<br />
extend water life and performance. If you are following<br />
either the Bromine or Chlorine “Clear Water Plans”,<br />
you will notice that both start-up processes are the<br />
same with the exception of Step 7. As with all chemical<br />
dosages listed in these “Clear Water Plans”, start-up<br />
dosages are intended for 500-gallon spas. Please<br />
adjust the chemical dosages to the capacity of your<br />
particular spa.<br />
Start Up<br />
1. Clean surface of spa with <strong>Cal</strong> <strong>Spa</strong>s “Multi-Purpose<br />
Cleaner”.<br />
2. Apply a protective coat of <strong>Cal</strong> <strong>Spa</strong>s “Fast Sheen” to<br />
the acrylic surface.<br />
3. Fill spa to proper water level with normal tap water<br />
(Do not use soft water)<br />
4. Use test strip and balance the spa water:<br />
5. Adjust total alkalinity (acceptable range is 80-<br />
120ppm),<br />
6. Then adjust pH if necessary. (between 7.2 to 7.8)<br />
7. Pour in 16 oz of <strong>Cal</strong> <strong>Spa</strong>s “Metal Protector” to<br />
center of spa.<br />
8. Add either Bromine or Chlorine (According to your<br />
preferred plan)<br />
Bromine: Add 2 oz of <strong>Cal</strong> <strong>Spa</strong>s “Go Brom” to<br />
establish a bromine base.<br />
Add 2 <strong>Cal</strong> <strong>Spa</strong>s “Bromine Tablets” to<br />
Bromine Floater.<br />
Set floater opening at #2.<br />
Chlorine: Add two tablespoons of <strong>Cal</strong> <strong>Spa</strong>s<br />
“Chorine Granules” to the spa water.<br />
9. Sprinkle 2 oz of <strong>Cal</strong> <strong>Spa</strong>s “Oxidizer Shock” in the<br />
center of the spa and turn on jets for 15 minutes.<br />
Leave spa uncovered during this time.<br />
10. Put cover on spa and allow to heat up to desired<br />
temperature.<br />
Bromine Clear Water Plan<br />
This plan and its chemical dosages are intended for<br />
<strong>Cal</strong> <strong>Spa</strong>s chemicals only. Most chemical manufacturers<br />
use different chemical formulas and strengths. Only<br />
<strong>Cal</strong> spas chemicals are specially formulated to provide<br />
chemical balance at lower dosages. Always read and<br />
follow printed instructions on chemical bottles and<br />
packages.<br />
Day One (Monday)<br />
1. Test spa water using “Bromine Test Strips”.<br />
2. Based on the Test Strip readings:<br />
• Adjust total alkalinity first (acceptable range of<br />
80-120 ppm)<br />
• Then adjust the pH if needed. (range is<br />
between 7.2 to 7.8)<br />
• Add “Bromine Tablet(s)” if needed. (Do not add<br />
more than 2)<br />
• The recommended level of bromine is 3-5 ppm.<br />
3. Add 2 oz of “Stain and Scale Defense”.<br />
4. Remove dirty filter from the spa and rinse off. Allow<br />
to dry.<br />
5. Place your extra clean filter cartridge back into the<br />
spa.<br />
6. Vacuum debris from the bottom of your spa with<br />
the “<strong>Spa</strong> Vacuum”.<br />
Day Two (Wednesday)<br />
1. Test spa water using Bromine Test Strips.<br />
2. Based on the Test Strip reading: Adjust total<br />
alkalinity, then the pH if needed.<br />
Day Three (Friday)<br />
1. Test spa water using Bromine Test Strips.<br />
2. Based on the Test Strip reading:<br />
• Adjust total alkalinity, then the pH if needed.<br />
• Add one Bromine Tablet (if needed).<br />
3. Add 2 oz of Oxidizer Shock to spa. Run <strong>Spa</strong> for 15<br />
minutes with cover off.<br />
4. Replace cover.<br />
Chlorine Clear Water Plan<br />
This plan and its chemical dosages are intended for<br />
<strong>Cal</strong> <strong>Spa</strong>s chemicals only. Most chemical manufacturers<br />
use different chemical formulas and strengths. Only<br />
<strong>Cal</strong> spas chemicals are specially formulated to provide<br />
chemical balance at lower dosages. Always read and<br />
follow printed instructions on chemical bottles and<br />
packages.<br />
Day One (Monday)<br />
1. Test spa water using “Chlorine Test Strips”.<br />
<strong>2007</strong> <strong>Family</strong> <strong>Fun</strong> <strong>Spa</strong> Owner’s Manual Page 17<br />
LTR<strong>2007</strong>1004, Rev. A
Water Quality Maintenance<br />
2.<br />
3.<br />
4.<br />
5.<br />
6.<br />
Based on the Test Strip readings:<br />
First adjust total alkalinity (acceptable range of<br />
80-120 ppm)<br />
Then adjust the pH if needed. (range is<br />
between 7.2 to 7.8)<br />
• Add 2 tablespoons of Chlorine Granules.<br />
The recommended level of Chlorine is 3-5<br />
ppm.<br />
Add 2 oz of “Stain and Scale Defense”.<br />
Remove dirty filter from the spa and rinse off.<br />
Place your extra clean filter cartridge back into the<br />
spa.<br />
Vacuum debris from the bottom of your spa with<br />
the “<strong>Spa</strong> Vacuum”.<br />
Day Two (Wednesday)<br />
1.<br />
2.<br />
Test spa water using Chlorine Test Strips.<br />
Based on the Test Strip reading: Adjust total<br />
alkalinity, then the pH if needed.<br />
Day Three (Friday)<br />
1.<br />
2.<br />
•<br />
•<br />
•<br />
Test spa water using Chlorine Test Strips.<br />
Based on the Test Strip reading:<br />
• Adjust total alkalinity, then the pH if needed.<br />
•<br />
Add 2 tablespoons of Chlorine Granules. (if<br />
needed)<br />
Every Month<br />
1.<br />
2.<br />
3.<br />
4.<br />
Deep clean your spa’s filter. (Follow “filter cleaning”<br />
instruction at beginning of “Clear Water Plan”)<br />
Check inside the equipment area for leaks,<br />
rodents, and insects.<br />
If a leak is discovered, contact your <strong>Cal</strong> <strong>Spa</strong>s<br />
dealer for service.<br />
If you see evidence of rodents or insects, take<br />
necessary actions to remove them and precautions<br />
to prevent them from returning.<br />
Every 3 To 4 Months<br />
1.<br />
2.<br />
3.<br />
4.<br />
Drain and clean your spa with “Multi-Purpose<br />
Cleaner”.<br />
Polish the acrylic surface with “Fast Sheen”.<br />
Clean and treat spa cover, pillows, and <strong>Cal</strong> Select<br />
cabinet (if equipped) with “Cover Protector”.<br />
When re-filling your spa, follow your specific “Clear<br />
Water Plan” Start Up procedures.<br />
Once A Year<br />
1.<br />
2.<br />
Clean and treat redwood spa cabinets and<br />
gazebos with “Nu-<strong>Spa</strong> Redwood Stain Renew and<br />
Brightener”.<br />
Check the filter cartridge pleats. If they are frayed,<br />
replace the cartridge.<br />
3.<br />
4.<br />
Add 2 oz of Oxidizer Shock to spa. Run <strong>Spa</strong> for 15<br />
minutes with cover off.<br />
Replace cover.<br />
Maintenance<br />
Regardless of which “Clear Water Plan” you are using,<br />
you should also do the following:<br />
Page 18<br />
<strong>2007</strong> <strong>Family</strong> <strong>Fun</strong> <strong>Spa</strong> Owner’s Manual<br />
LTR<strong>2007</strong>1004, Rev. A
Cleaning and Maintenance<br />
Cleaning and Replacing the<br />
Filter<br />
Filtration<br />
Filtration is one of the most important steps you can<br />
take to ensure clean, clear water. Regardless of what<br />
some people may think, it is far less expensive to fix<br />
water clarity problems by filtering your spa than by<br />
using excessive amounts of chemicals, excessive<br />
filtration times, or by water replacement.<br />
<strong>Cal</strong> <strong>Spa</strong>s filtration system draws contaminated water<br />
through the exclusive Bio-Clean filter removing<br />
debris from the water. It then pumps the newly cleaned<br />
water back into the spa through various jets. Filtration<br />
also ensures that chemicals are mixed thoroughly<br />
through the water, increasing performance.<br />
Filtration starts on electronically controlled spas as<br />
soon as the pumps are primed and water flow is<br />
steady. As the flow of water goes through the filter, dirt<br />
and debris is removed and accumulated in the filter<br />
cartridge. As the filter cartridge accumulates dirt and<br />
debris, water flow is restricted and jet performance is<br />
reduced. This can cause your spa to not run or heat<br />
effectively.<br />
Clean your filter regularly and replace as needed.<br />
Filter Cleaning<br />
Your new <strong>Cal</strong> <strong>Spa</strong> has been designed for quick and<br />
easy filter maintenance. The filter cartridge should be<br />
cleaned once a week. These instructions apply to both<br />
dual and single filtration systems.<br />
1.<br />
2.<br />
3.<br />
4.<br />
5.<br />
Cleaning and Maintenance<br />
Turn the power off at the breaker.<br />
Remove the filter cover (if applicable) by rotating<br />
the cover counterclockwise and lifting it off..<br />
Remove the filter basket. With some types you may<br />
need to align the flat areas on the filter basket and<br />
the canister.<br />
Remove the filter by turning it counterclockwise<br />
and unscrewing the bottom threads. Then pull it up<br />
and out.<br />
Clean the filter with a garden hose as follows:<br />
a.<br />
b.<br />
c.<br />
d.<br />
e.<br />
Hold the filter vertically.<br />
Spray the filter cartridges with a pressure<br />
nozzle, starting from the top and spraying down<br />
each pleat.<br />
Turn the filter cartridge over and repeat Step<br />
5b.<br />
Reinstall the filter cartridge in reverse order of<br />
removal.<br />
Deep clean filter cartridge every month. Use<br />
only a <strong>Cal</strong> <strong>Spa</strong>s-approved filter-cleaning<br />
chemical.<br />
Exclusive Bio-Clean Filter Cartridge<br />
The filter cartridge is designed to remove dirt, sand,<br />
minerals, phosphates, bather waste and other solids<br />
from the spa. Unfortunately, some spa owners fail<br />
to include filter cleaning as part of their chemical<br />
maintenance plan. Filters accumulate debris and<br />
become prime areas for bacteria growth.<br />
The <strong>Cal</strong> <strong>Spa</strong>s exclusive Bio-Clean Filter is the only<br />
antibacterial filter cartridge on the market today. Having<br />
a filter cartridge that prevents bacteria growth is added<br />
protection for those times you forget to clean the filter.<br />
We recommend that you only replace your spa’s filter<br />
cartridge with a Bio-Clean filter cartridge for ensured<br />
protection and peace of mind.<br />
<strong>2007</strong> <strong>Family</strong> <strong>Fun</strong> <strong>Spa</strong> Owner’s Manual Page 19<br />
LTR<strong>2007</strong>1004, Rev. A<br />
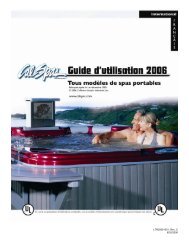
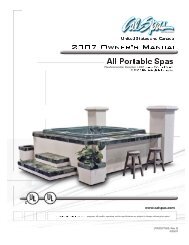
Filtration System<br />
35 Sq. Ft. System
Cleaning and Maintenance<br />
Cleaning the Cover, Shell and<br />
Pillows<br />
Due to the constant punishment your spa cover and<br />
pillows receive, you should protect them by applying<br />
Vinyl and Leather Cleaner as part of your monthly<br />
maintenance plan. <strong>Cal</strong> <strong>Spa</strong>s Vinyl and Leather<br />
Cleaner is specifically designed to protect spa covers<br />
and pillows from chemical and ultraviolet light damage.<br />
It accomplishes this without leaving an oily residue<br />
behind that is normally associated with common<br />
automotive vinyl protectants.<br />
Use of Vinyl and Leather Cleaner<br />
<strong>Cal</strong> <strong>Spa</strong>s Vinyl and Leather Cleaner should be used<br />
sparingly. Incorrect usage may cause water clarity<br />
issues.<br />
<strong>Spa</strong> Covers<br />
1.<br />
2.<br />
3.<br />
4.<br />
5.<br />
Remove spa cover from<br />
spa.<br />
Allow spa cover to dry<br />
completely.<br />
Spray Vinyl and Leather<br />
Cleaner to cover evenly<br />
and wipe dry.<br />
Allow spa cover to dry<br />
completely.<br />
Pillows<br />
1.<br />
2.<br />
3.<br />
4.<br />
Reinstall cover on spa.<br />
Wipe pillows dry with a soft<br />
cloth.<br />
Carefully spray Vinyl and<br />
Leather Cleaner directly<br />
onto pillow.<br />
Wipe pillows dry.<br />
Allow pillows to dry<br />
completely.<br />
All-Purpose Cleaner (<strong>Spa</strong> finish cleaning)<br />
<strong>Cal</strong> <strong>Spa</strong>s All-Purpose Cleaner is an<br />
essential part of maintaining your spa’s<br />
finish. Through normal use, the spa’s<br />
finish can accumulate dirt, oil, and calcium<br />
causing a rough feel and unsightly scum<br />
lines. <strong>Cal</strong> <strong>Spa</strong>s All-Purpose Cleaner is a<br />
low detergent, non-abrasive cleaner<br />
specifically formulated to clean the spa<br />
without damaging its acrylic finish.<br />
The most effective solution to minimize cleaning time<br />
is prevention. When the following steps are followed,<br />
the spa’s finish will actually start to resist most of the<br />
elements that cause calcium build-up and make scum<br />
line clean up easier.<br />
Prior to <strong>Spa</strong> Start-Up and Refilling<br />
1.<br />
2.<br />
3.<br />
4.<br />
5.<br />
6.<br />
7.<br />
8.<br />
Spray <strong>Cal</strong> <strong>Spa</strong>s Multi-Purpose Cleaner directly<br />
on to the spa’s finish.<br />
Wipe clean with a clean soft cloth.<br />
Repeat on heavily calcified areas.<br />
Wipe spa thoroughly with a wet sponge, rinsing<br />
often with a bucket of clean water.<br />
Allow spa to dry completely.<br />
Apply a coat of <strong>Cal</strong> <strong>Spa</strong>s Fast Sheen to the spa’s<br />
entire finish with a soft towel or sponge.<br />
Allow Fast Sheen to dry until white and powdery.<br />
Buff clean with a soft cloth, rotating frequently.<br />
Periodic Maintenance<br />
1.<br />
2.<br />
3.<br />
Spray <strong>Cal</strong> <strong>Spa</strong>s Multi-Purpose Cleaner directly to<br />
the spa’s finish.<br />
Wipe clean with a clean soft cloth.<br />
Wipe spa thoroughly with a wet sponge, rinsing<br />
often in a bucket of clean water.<br />
<strong>Cal</strong> <strong>Spa</strong>s Multi-Purpose Cleaner should not be<br />
sprayed directly into the spa water. Incorrect usage of<br />
this product will cause water clarity issues.<br />
Warning: Do not use automotive vinyl protectants on<br />
spa covers or pillows. These products are generally<br />
oil-based and will cause severe water clarity issues that<br />
are difficult to correct.<br />
Page 20<br />
<strong>2007</strong> <strong>Family</strong> <strong>Fun</strong> <strong>Spa</strong> Owner’s Manual<br />
LTR<strong>2007</strong>1004, Rev. A
Cleaning and Maintenance<br />
Fast Sheen (<strong>Spa</strong> finish protecting wax)<br />
<strong>Cal</strong> <strong>Spa</strong>s Fast Sheen is an<br />
essential part of maintaining your<br />
spa’s finish. Through normal use,<br />
the spa’s finish can accumulate<br />
dirt, oil, and calcium, causing a<br />
rough feel and unsightly scum lines.<br />
<strong>Cal</strong> <strong>Spa</strong>s Fast Sheen is a nonoil<br />
based wax that is specifically<br />
formulated to protect the spa’s finish<br />
from the chemicals and minerals<br />
associated with normal spa use.<br />
The most effective solution to<br />
minimize cleaning time is prevention.<br />
When the following steps are<br />
followed, the spa’s finish will actually<br />
start to resist most of the elements<br />
that cause calcium build-up and<br />
make scum line clean-up easier.<br />
Prior to <strong>Spa</strong> Start-Up and Refilling<br />
1.<br />
2.<br />
3.<br />
4.<br />
5.<br />
6.<br />
7.<br />
8.<br />
Spray <strong>Cal</strong> <strong>Spa</strong>s Multi-Purpose Cleaner directly to<br />
the spa’s finish.<br />
Wipe clean with a soft cloth.<br />
Repeat on heavily calcified areas.<br />
Wipe spa thoroughly with a wet sponge, rinsing<br />
often in a bucket of clean water.<br />
Allow the spa to dry completely.<br />
Apply a coat of <strong>Cal</strong> <strong>Spa</strong>s Fast Sheen to the spa’s<br />
entire finish with a soft cloth or sponge.<br />
Allow Fast Sheen to dry until white and powdery.<br />
Buff clean with a soft cloth, rotating frequently.<br />
IMPORTANT: <strong>Cal</strong> <strong>Spa</strong>s Fast Sheen should not be<br />
used on spas full of water. Only apply to clean, cool,<br />
dry surfaces. Incorrect product usage may cause water<br />
clarity issues.<br />
<strong>2007</strong> <strong>Family</strong> <strong>Fun</strong> <strong>Spa</strong> Owner’s Manual Page 21<br />
LTR<strong>2007</strong>1004, Rev. A
Appendix<br />
Appendix<br />
Replacement Parts<br />
Jets<br />
PLU21703420<br />
(EPW) 2” INTERNAL CLUSTER<br />
STORM, PULSATOR (EURO)<br />
PLU21703431<br />
(MFRW) 3.25” STORM JET, MAXI<br />
FLOW WITH DARK EYEBALL<br />
PLU21702721<br />
JET EURO BODY<br />
PLU21703000<br />
JET BODY MINI STORM 1/2S X 3/8B<br />
PLU21703005<br />
JET BODY POLY STORM 1/2S X 3/8B<br />
PLU21703432<br />
(MFW) 3.25”, STORM JET, MICRO<br />
FLOW W/DRK EYEBALL<br />
PLU21703433<br />
(MSRW) 3”, STORM JET, MICRO<br />
SWIRL W/DRK EYEBALL<br />
Page 22<br />
<strong>2007</strong> <strong>Family</strong> <strong>Fun</strong> <strong>Spa</strong> Owner’s Manual<br />
LTR<strong>2007</strong>1004, Rev. A
Valves<br />
PLU21300052<br />
DIVERTER VALVE 1” (2 WAY) SILVER,<br />
TEARDROP HANDLE (2 TONE)<br />
PLU21300062<br />
DIVERTER VALVE 2” (2 WAY) SILVER,<br />
TEARDROP HANDLE (2 TONE)<br />
PLU2170350<br />
OFF / OFF DRAIN VALVE<br />
Appendix<br />
PLU21700378<br />
VENT, 1” AIR CONTROL SILVER,<br />
TEARDROP (2 TONE)<br />
Pillows<br />
ACC01400479<br />
PILLOW, FLOATING, GREY<br />
ACC01400481<br />
BOOSTER SEAT, GREY<br />
<strong>2007</strong> <strong>Family</strong> <strong>Fun</strong> <strong>Spa</strong> Owner’s Manual Page 23<br />
LTR<strong>2007</strong>1004, Rev. A
Appendix<br />
Drains<br />
PLU21400132<br />
MAIN DRAIN, SUPER HI FLO<br />
SUCTION 2” SILVER<br />
PLU21400197<br />
BOTTOM DRAIN STAR SUCTION<br />
COVER<br />
Lights<br />
LIT16100153 WALLFITTING, CLEAR LENS CAP, JUMBO SPA LIGHT, 5”<br />
LIT16100155 RED LENS INSERT, JUMBO SPA LIGHT<br />
LIT16100156 BLUE LENS INSERT, JUMBO SPA LIGHT,<br />
Filters<br />
FIL11100193<br />
FIL11100106<br />
FIL11700138<br />
FILTER CARTRIDGE, 35 SQ FT. ANTI-BACTERIAL WHITE<br />
FILTER CANISTER DYNAFLO ANTI-BACTERIAL 35 SQ FT<br />
FILTER SKIM DYNAFLO, TOP MT BASKET ASSY<br />
Pumps<br />
PUM22000031 PUM 1.5 HP 2 SP 2” WET END 120V -<br />
Cover Lifts<br />
ACC01600116<br />
Hand Rails<br />
FIX12400002<br />
FIX12400003<br />
COVER LIFT KIT, BOTTOM MOUNTING<br />
SWIVEL HAND RAIL<br />
SWIVEL HAND RAIL (BLACK)<br />
Equipment<br />
ELE09000199 CONTROL BOX 1500 W/HEA14100041-KW4.4 HEATER<br />
ELE09200074 TOPSIDE CONTROL PANEL 1500<br />
ELE09500203 PRESSURE SWITCH CALIBRATED<br />
ELE09900310 SENSOR ASSEMBLY<br />
Accessories<br />
HAR13000011 TRIM LOCK FACEPLATE<br />
HAR13000060 LIP GUARD CHROME 7/16”<br />
Page 24<br />
<strong>2007</strong> <strong>Family</strong> <strong>Fun</strong> <strong>Spa</strong> Owner’s Manual<br />
LTR<strong>2007</strong>1004, Rev. A
Appendix<br />
Covers<br />
Basic Rust 2” Flat<br />
Part No. Description Series<br />
ACC01000953 SPA COVER BASIC FF90<br />
ACC01000563 SPA COVER BASIC FF100<br />
Basic Grey 2” Flat<br />
Part No. Description Series<br />
ACC01000954 SPA COVER BASIC FF90<br />
ACC01000564 SPA COVER BASIC FF100<br />
Basic Slate 2” Flat<br />
Part No. Description Series<br />
ACC01000955 SPA COVER BASIC FF90<br />
ACC01000565 SPA COVER BASIC FF100<br />
Basic Rust 4” x 2”<br />
Part No. Description Series<br />
SPA COVER BASIC FF90<br />
SPA COVER BASIC FF100<br />
Basic Grey 4” x 2”<br />
Part No. Description Series<br />
SPA COVER BASIC FF90<br />
SPA COVER BASIC FF10<br />
Basic Slate 4” x 2”<br />
Part No. Description Series<br />
ACC01000962 SPA COVER BASIC FF90<br />
ACC01000955 SPA COVER BASIC FF100<br />
<strong>2007</strong> <strong>Family</strong> <strong>Fun</strong> <strong>Spa</strong> Owner’s Manual Page 25<br />
LTR<strong>2007</strong>1004, Rev. A
Appendix<br />
Cabinets - FF90<br />
WOO27513054<br />
WOO27513055<br />
WOO27504382<br />
WOO27513056<br />
WOO27513057<br />
Cabinets - FF100<br />
WOO27500484<br />
WOO27100583<br />
WOO27407880<br />
WOO27500402<br />
CAB DOOR PNL 26 X 35 3/8 CAL WOOD<br />
CAB FRONT PNL 26 X 1 1/2 CAL WOOD<br />
CAB CORNER PNL 26 12” CAL WOOD<br />
CAB SIDE PNL 26 X 62 1/2 CAL WOOD<br />
CAB BACK PNL 26 X 38 1/2 CAL WOOD<br />
CAB DOOR PNL 30 X 30 1/4 CAL WOOD, ROUND<br />
1 X 2 X 30” DOOR MOLDING CAL WOOD<br />
1/2 X 1 1/2 X 25 CURVED TRIM<br />
CAB SIDE PNL 30 X 30 1/4 CAL WOOD, ROUND<br />
Page 26<br />
<strong>2007</strong> <strong>Family</strong> <strong>Fun</strong> <strong>Spa</strong> Owner’s Manual<br />
LTR<strong>2007</strong>1004, Rev. A
<strong>Cal</strong> <strong>Spa</strong>s Chemicals<br />
Appendix<br />
<strong>2007</strong> <strong>Family</strong> <strong>Fun</strong> <strong>Spa</strong> Owner’s Manual Page 27<br />
LTR<strong>2007</strong>1004, Rev. A
Appendix<br />
<strong>2007</strong> Warranty Information<br />
See your <strong>Cal</strong> <strong>Spa</strong>s dealer for a copy of the applicable warranty, details, and any questions you may have<br />
regarding the warranty coverage on your spa.<br />
Warranty Limitations<br />
The <strong>2007</strong> <strong>Family</strong> <strong>Fun</strong> Series Limited Warranty is void if the spa has been subject to negligence, alteration,<br />
misuse, abuse, repairs by non-C.A.I. authorized representatives, incorrect electrical installation, acts of God and<br />
any other cases beyond the control of C.A.I. Examples of common acts invalidating this warranty include, but are<br />
not limited to:<br />
•<br />
•<br />
•<br />
•<br />
•<br />
•<br />
•<br />
•<br />
•<br />
Use of spa in a non-residential application.<br />
Scratches caused by normal use.<br />
Operation of spas water temperature out of the normal operating range of 32˚F (0°C) to 118˚F (47.8°C).<br />
Damage caused by incorrect water level (low, overflow, etc.).<br />
Damage caused by extreme weather conditions (hot, cold, etc.).<br />
Damage caused by dirt, sand and calcium.<br />
Damage caused by clogged filter cartridges. See filter cleaning recommendations in this Owner’s Manual.<br />
Damage caused by continued operation of this spa with either a known or an unknown problem.<br />
Damage caused by tri-chlor, acids, chlorine tablets, and any other spa chemicals not authorized by C.A.I.<br />
•<br />
Damage caused by improper water chemistry. (High levels of chlorine, bromine, calcium, pH and other<br />
excessive chemical levels.)<br />
•<br />
•<br />
Damage caused by direct sunlight. <strong>Spa</strong>s should always be covered when not in use.<br />
Damage caused as a result of failure to follow operating instructions as defined within this Owner’s Manual.<br />
•<br />
Damage caused by incorrect electrical installation, electrical brownout, voltage spikes, or operation of spa out<br />
of voltage range by more than ±10%.<br />
• <strong>Spa</strong>s improperly installed or placed on non-approved surfaces.<br />
The Limited Warranty applies only to spas normally used for personal, family or household purposes.<br />
Warranty Exclusions<br />
Replaceable service items such as filters, light bulbs, pillows, jet inserts, spa covers, and filter covers are<br />
specifically excluded from the limited warranty.<br />
<strong>Spa</strong> covers are delivered with their own manufacturer’s warranty. For more info, please see the warranty in the<br />
owner’s information package that was delivered with your spa for more information.<br />
Equipment adjustments (such as pressure switch adjustments) are specifically excluded from this warranty.<br />
Page 28<br />
<strong>2007</strong> <strong>Family</strong> <strong>Fun</strong> <strong>Spa</strong> Owner’s Manual<br />
LTR<strong>2007</strong>1004, Rev. A
Locating the product serial number<br />
The serial number of your <strong>Cal</strong> <strong>Spa</strong> is located on a metal plate attached to<br />
the lower right front panel of the spa.You will need this number to properly<br />
register your grill or cart and activate coverage. Write this information in<br />
the space provided below.<br />
<strong>Cal</strong> <strong>Spa</strong> Model: _______________________________________________<br />
<strong>Cal</strong> <strong>Spa</strong> Serial Number: ________________________________________<br />
Date Purchased: _____________________________________________<br />
Date Installed: _______________________________________________<br />
<strong>Cal</strong> <strong>Spa</strong> Dealer’s Phone Number: _ _______________________________<br />
<strong>Cal</strong> <strong>Spa</strong> Dealer’s Address: ______________________________________<br />
CONTACT INFORMATION<br />
For customer service, please contact your authorized dealer immediately. If you need additional information and/<br />
or assistance, please contact:<br />
C.A.I. Customer Service Department<br />
1462 East Ninth Street<br />
Pomona, CA 91766.<br />
Toll Free: 1-800-CAL-SPAS<br />
Fax: 1-909-629-3890<br />
www.calspas.com