October 2012 - MicrobeHunter.com
October 2012 - MicrobeHunter.com
October 2012 - MicrobeHunter.com

Create successful ePaper yourself
Turn your PDF publications into a flip-book with our unique Google optimized e-Paper software.
Plant Leaves<br />
OBSERVATIONS<br />
2<br />
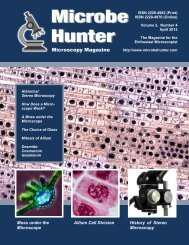
Figure 2: Some clear nail polish is<br />
applied to the bottom side of a leaf<br />
and allowed to dry over night. I applied<br />
the nail polish several times<br />
over each other, in order to make the<br />
film of thicker and more stable. Painting<br />
over the leaf veins makes removal<br />
difficult, however.<br />
Figure 3: The dried nail polish is<br />
carefully removed by first lifting the<br />
corner with a knife and then peeling it<br />
off using your fingers.<br />
Figure 4: The nail polish in oblique<br />
illumination. Stomata are clearly visible.<br />
3 4<br />
Making leaf impressions<br />
Some glue or clear nail polish is<br />
applied to the bottom side of a leaf and<br />
allowed to dry <strong>com</strong>pletely. One should<br />
not apply the glue over the leaf veins, as<br />
this makes it more difficult for the glue<br />
to be separated after drying. The film is<br />
allowed to dry <strong>com</strong>pletely (one day)<br />
and then carefully peeled off and<br />
mounted on a slide for microscopic investigation.<br />
It may be necessary to use<br />
a sharp object to start peeling away the<br />
nail polish, the rest of the dried nail<br />
polish should <strong>com</strong>e off quite easily as<br />
the waxy cuticle on the surface of the<br />
leaves prevents the nail polish adhering<br />
to the cells. it goes without saying, that<br />
the solvent in the nail polish harms the<br />
leaves so that it is advisable to use the<br />
fallen leaves from a tree. Alternatively<br />
one can use water-based white wood<br />
glue, which should be less problematic<br />
in this respect. I found out that the white<br />
wood glue is more flexible than the nail<br />
polish and may deform more during the<br />
peeling process.<br />
The thin film of nail polish is then<br />
carefully pressed against the glass slide<br />
to reduce warping. It is then observed<br />
microscopically in the form of a dry<br />
mount.<br />
Making leaf impressions, while<br />
much easier than trying to cut the leaf<br />
into thin sections, does have the disadvantage<br />
that individual cell organelles,<br />
such as the green chloroplasts in the<br />
guard cells, naturally are not visible.<br />
Leaf impressions that are obtained<br />
this way are, naturally, low in contrast<br />
and require you to close the condenser<br />
aperture diaphragm. The leaf-impressions<br />
are, however, very suitable for<br />
observation in oblique illumination.<br />
This technique allows light to strike the<br />
specimen (i.e. the piece of glue carrying<br />
the leaf impression) only from one side,<br />
resulting in a characteristic 3-dimensional<br />
appearance (figure 4).<br />
The next obvious step would be the<br />
making of a permanent mount of the<br />
nail polish impressions. This is likely to<br />
be difficult, as the organic solvent of<br />
mounting media is likely to soften or<br />
<strong>MicrobeHunter</strong> Microscopy Magazine - <strong>October</strong> <strong>2012</strong> - 13