2451A Photoelectronic Plug-in Smoke Detectors - System Sensor ...
2451A Photoelectronic Plug-in Smoke Detectors - System Sensor ...
2451A Photoelectronic Plug-in Smoke Detectors - System Sensor ...

Create successful ePaper yourself
Turn your PDF publications into a flip-book with our unique Google optimized e-Paper software.
Disconnect power from <strong>in</strong>itiat<strong>in</strong>g-device circuits before <strong>in</strong>stall<strong>in</strong>g<br />
detectors.<br />
1. Install detectors:<br />
a. Place the detector <strong>in</strong>to the detector base<br />
b. Turn the detector clockwise until the detector drops<br />
<strong>in</strong>to place.<br />
c. Cont<strong>in</strong>ue turn<strong>in</strong>g detector clockwise to lock it <strong>in</strong><br />
place.<br />
2. Tamper-proof Feature<br />
The detector bases <strong>in</strong>clude a feature that, when activated,<br />
prevents removal of the detector without the use<br />
of a tool. See the <strong>in</strong>stallation <strong>in</strong>struction manual of the<br />
detector base for details <strong>in</strong> us<strong>in</strong>g this feature.<br />
3. Afer all detectors have been <strong>in</strong>stalled, apply power to<br />
the control unit.<br />
4. Test the detector us<strong>in</strong>g the magnet or the test card as<br />
described under TESTING.<br />
Dust covers can be used to help limit dust entry to the<br />
detector, but they are not a substitute for remov<strong>in</strong>g the<br />
detector dur<strong>in</strong>g build<strong>in</strong>g construction. Remove any dust<br />
covers before plac<strong>in</strong>g system <strong>in</strong> service.<br />
Test<strong>in</strong>g<br />
Before test<strong>in</strong>g, notify the proper authorities that the smoke<br />
detector system is undergo<strong>in</strong>g ma<strong>in</strong>tenance and will temporarily<br />
be out of service. Disable the zone or system undergo<strong>in</strong>g<br />
ma<strong>in</strong>tenance to prevent unwanted alarms.<br />
<strong>Detectors</strong> must be tested after <strong>in</strong>stallation and periodic<br />
ma<strong>in</strong>tenance. To test the <strong>2451A</strong>:<br />
NOTE: Before test<strong>in</strong>g the detector, check to ensure that<br />
the LEDs are bl<strong>in</strong>k<strong>in</strong>g. If they are not, the detector<br />
has lost power (check the wir<strong>in</strong>g) or it is defective<br />
(return for repair).<br />
A. Test Magnet (<strong>System</strong> <strong>Sensor</strong> model no. M02-04-00)<br />
5. Reset the detector at the system control panel.<br />
6. Notify the proper authorities that the system is back on<br />
l<strong>in</strong>e.<br />
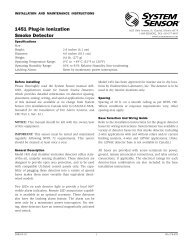
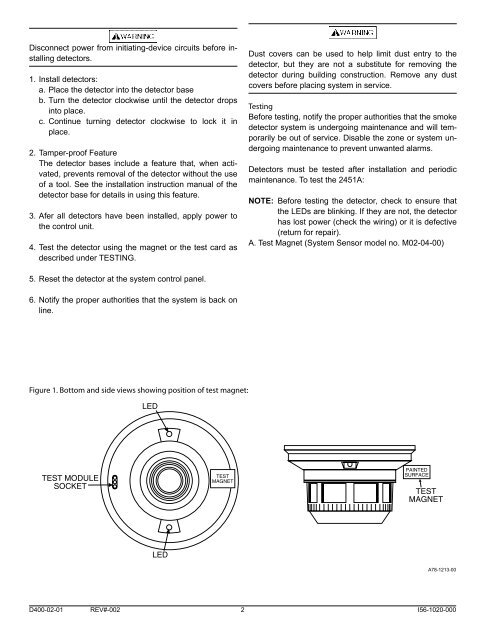
Figure 1. Bottom and side views show<strong>in</strong>g position of test magnet:<br />
LED<br />
TEST MODULE<br />
SOCKET<br />
TEST<br />
MAGNET<br />
PAINTED<br />
SURFACE<br />
TEST<br />
MAGNET<br />
LED<br />
A78-1213-00<br />
D400-02-01 REV#-002 2 I56-1020-000