Create successful ePaper yourself
Turn your PDF publications into a flip-book with our unique Google optimized e-Paper software.
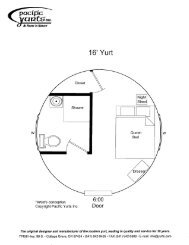
1<br />
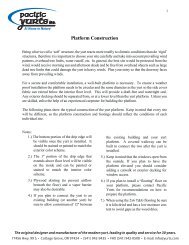
<strong>Platform</strong> <strong>Construction</strong><br />
Being what we call a ‘soft’ structure, the yurt reacts more readily to climatic conditions than do ‘rigid’<br />
structures, therefore it is important to choose your site carefully and take into account prevailing wind<br />
patterns, overhead tree limbs, water runoff, etc. In general, the best site would be protected from the<br />
wind, would receive morning sun and afternoon shade and be free from overhead objects such as large<br />
dead tree limbs that could damage the yurt in heavy winds. Plan your entry so that the doorway faces<br />
away from prevailing winds.<br />
For a secure and comfortable installation, a well-built platform is necessary. To ensure a weather<br />
proof installation the platform needs to be circular and the same diameter as the yurt so the side cover<br />
fabric can extend below the interior floor level. This will provide a draft-free and watertight seal.<br />
Any exterior decking should be separated from, or at a lower level than the yurt platform. Unless you<br />
are skilled, enlist the help of an experienced carpenter for building the platform.<br />
The following plans show the typical construction of the yurt platform. Keep in mind that every site<br />
will be different, so the platform construction and footings should reflect the conditions of each<br />
individual site.<br />
Notes:<br />
1.) The bottom portion of the drip edge will<br />
be visible once the yurt is installed. It<br />
should be stained or painted to match the<br />
exterior color scheme.<br />
2.) The 1" portion of the drip edge that<br />
extends above floor level will be visible<br />
on the inside and can be painted or<br />
stained to match the interior color<br />
scheme.<br />
3.) Plywood skirting (to prevent airflow<br />
beneath the floor) and a vapor barrier<br />
may also be desirable.<br />
4.) If you plan to connect the yurt to an<br />
existing building (or another yurt) be<br />
sure to allow a minimum of 12" between<br />
the existing building and your yurt<br />
platform. A covered walkway can be<br />
built to connect the two after the yurt is<br />
installed.<br />
5.) Keep in mind that the windows open from<br />
the outside. If you plan to have the<br />
platform elevated you should consider<br />
adding a catwalk or exterior decking for<br />
window access.<br />
6.) If you plan to install a “floating” floor on<br />
your platform, please contact <strong>Pacific</strong><br />
<strong>Yurts</strong> for recommendations on how to<br />
prepare the platform.<br />
7.) When using the 2x6 T&G flooring be sure<br />
it is kiln dried and has a low moisture content<br />
to avoid gaps as the wood dries.<br />
The original designer and manufacturer of the modern yurt, leading in quality and service for 30 years.<br />
77456 Hwy. 99 S. • Cottage Grove, OR 97424 • (541) 942-9435 • FAX (541) 942-0508 • E-mail: info@yurts.com
2<br />
<strong>Platform</strong> <strong>Construction</strong> Overview<br />
1.) Lay out pier blocks according<br />
to framing plan and level.<br />
Poured concrete footings may be substituted<br />
for pre-cast pier blocks.<br />
2.) Cut 4x6 beams to length, level them,<br />
and fasten onto pier blocks.<br />
3.) Cut 2x6 perimeter blocking<br />
and fasten to 4x6 beams.<br />
4.) Install floor insulation (optional).<br />
Notes:<br />
Diagram assumes level site. On sloping terrain<br />
vertical support posts and cross bracing may be necessary.<br />
If 1 8" plywood flooring is used we recommend adding<br />
2x6 blocking between beams (four feet on center).<br />
If you plan to purchase the cable tie-down option an extra<br />
4x6 block will be needed in the center of the platform.<br />
5.) Fasten flooring (1 1 8" plywood or 2x6 T&G) onto 4x6<br />
beams.<br />
6.) Cut flooring into circle with diameter matching that of the yurt.<br />
7.) Staple 2" wide strips of tar paper onto edge of cut flooring (or use<br />
caulking) to provide a seal between flooring and drip edge.<br />
8.) Cut 3 8<br />
" exterior plywood (OSB is best for small yurts) into<br />
strips of desired width (at least 8") and fasten around<br />
perimeter of flooring so that 1" protrudes above floor level.<br />
This is the plywood drip edge.<br />
77456 Hwy. 99 S. • Cottage Grove, OR 97424 • (541) 942-9435 • FAX (541) 942-0508 • E-mail: info@yurts.com
3<br />
Typical 12' <strong>Platform</strong> Framing Plan<br />
T&G flooring may cantilever off edge<br />
of beam without additional support.<br />
1'<br />
Stairs<br />
3'<br />
2'<br />
6' 4x6 Beam<br />
2x6 perimeter blocking.<br />
Connect to beam with<br />
Simpson A35.<br />
Entry Deck<br />
12' (Before adding drip edge)<br />
4'<br />
4'-7"<br />
Center Line<br />
11' 2" 4x6 Beam<br />
Additional blocking may need to<br />
be nailed alongside perimeter<br />
blocking to support platform edge.<br />
3'<br />
1'<br />
Pier block locations<br />
6' 4x6 Beam<br />
11' 2" 4x6 Beam<br />
3<br />
8<br />
" x 8" exterior plywood drip edge attached to edge<br />
of platform. Top of drip edge to be 1" above floor level.<br />
Notes:<br />
1.) <strong>Platform</strong> construction and footings should<br />
reflect conditions of each individual site.<br />
2.) 2x6 T&G or 1 1 8<br />
" plywood flooring to be laid<br />
perpendicular to 4x6 beams and trimmed to<br />
the same diameter as that of the yurt.<br />
Main platform<br />
Simpson A35<br />
each side<br />
Plywood<br />
drip edge<br />
Joist hanger<br />
4x4 post<br />
Porch<br />
decking<br />
Simpson EPB 44<br />
post base or equiv.<br />
TYPICAL ELEVATION<br />
Entry deck should be below the floor level of<br />
the yurt platform so as not to interfere with drip edge.<br />
77456 Hwy. 99 S. • Cottage Grove, OR 97424 • (541) 942-9435 • FAX (541) 942-0508 • E-mail: info@yurts.com
4<br />
Entry deck<br />
4x4 Posts<br />
Grade<br />
Typical 2x4 bracing<br />
16" Concrete piers<br />
Note: <strong>Platform</strong> and footings should be designed<br />
according to the conditions of each individual<br />
site and local building requirements.<br />
Typical <strong>Platform</strong> Elevation<br />
77456 Hwy. 99 S. • Cottage Grove, OR 97424 • (541) 942-9435 • FAX (541) 942-0508 • E-mail: info@yurts.com
5<br />
2x6 T&G Layout - 12' Yurt<br />
Often 2x6 T&G is used for open beam ceilings and may have a V-groove which<br />
should face down so as not to catch debris and make floor sweeping difficult.<br />
12'<br />
12'<br />
12'<br />
12'<br />
12'<br />
12'<br />
12'<br />
12'<br />
12'<br />
12'<br />
12'<br />
12'<br />
12'<br />
12'<br />
12'<br />
12'<br />
10' 10' 10'<br />
10'<br />
10'<br />
10'<br />
8' 8'<br />
8'<br />
8'<br />
6'<br />
6'<br />
4'<br />
4'<br />
Radius 6'<br />
Center<br />
4x6 Beam<br />
2x6 Perimeter<br />
blocking<br />
1.) Make a compass using a board or non-stretch<br />
string and a nail at the center to mark radius.<br />
2.) Using a sharp circular saw carefully cut the<br />
platform to exactly 12 feet in diameter.<br />
77456 Hwy. 99 S. • Cottage Grove, OR 97424 • (541) 942-9435 • FAX (541) 942-0508 • E-mail: info@yurts.com
6<br />
Plywood Layout - 12' Yurt<br />
Note: Due to the tongue and groove on 1-1/8" plywood you may need to laminate<br />
a small piece of scrap to one edge in order to achieve the full diameter.<br />
2x6 blocking<br />
4' on center<br />
Radius 6'<br />
Center<br />
4x6 Beam<br />
2x6 Perimeter<br />
blocking<br />
1.) Make a compass using a board or non-stretch<br />
string and a nail at the center to mark radius.<br />
2.) Using a sharp circular saw carefully cut the<br />
platform to exactly 12 feet in diameter.<br />
77456 Hwy. 99 S. • Cottage Grove, OR 97424 • (541) 942-9435 • FAX (541) 942-0508 • E-mail: info@yurts.com
7<br />
Plywood drip edge<br />
2x6 Perimeter blocking<br />
4x6 Beam<br />
Pier block<br />
Screws through drip edge into flooring<br />
Plan View<br />
2x6 T&G flooring<br />
1"<br />
4x6 Beam<br />
Plywood<br />
drip edge<br />
Pier block<br />
Elevation<br />
77456 Hwy. 99 S. • Cottage Grove, OR 97424 • (541) 942-9435 • FAX (541) 942-0508 • E-mail: info@yurts.com
8<br />
12' Diameter Yurt<br />
<strong>Platform</strong> Materials – 2x6 T&G Flooring Option<br />
Material Quantity Use<br />
2x6 Kiln Dried<br />
T&G ‘Select Deck’<br />
17 @ 12'<br />
6 @ 10'<br />
5 @ 8'<br />
<strong>Platform</strong> Flooring<br />
2x6 Standard & Better 3 @ 8' Perimeter Blocking<br />
4x6 Standard & Better 3 @ 12' Beams<br />
3/8" Exterior Plywood Siding (no groove) 1 Sheet (4' x 8') Plywood Drip Edge<br />
16" Concrete Pier Block with Post Base<br />
Bracket<br />
10 Footing<br />
12' Diameter Yurt<br />
<strong>Platform</strong> Materials – 1-1/8" Plywood Flooring Option<br />
Material Quantity Use<br />
1-1/8" T&G Plywood 5 Sheets (4' x 8') <strong>Platform</strong> Flooring<br />
2x6 Standard & Better 6 @ 8' Blocking<br />
4x6 Standard & Better 3 @ 12' Beams<br />
3/8" Exterior Plywood Siding (no groove) 1 Sheet (4' x 8') Plywood Drip Edge<br />
16" Concrete Pier Block with Post Base<br />
Bracket<br />
10 Footing<br />
Note: This material list represents the minimum amount of lumber, etc required for a basic<br />
circular platform on flat level ground. It does not include any exterior deck/porch materials. For<br />
sloped sites or to elevate the platform you will need to add 4x4 posts and cross bracing.<br />
77456 Hwy. 99 S. • Cottage Grove, OR 97424 • (541) 942-9435 • FAX (541) 942-0508 • E-mail: info@yurts.com