You also want an ePaper? Increase the reach of your titles
YUMPU automatically turns print PDFs into web optimized ePapers that Google loves.
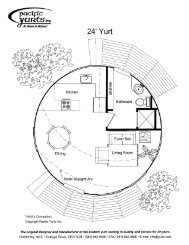
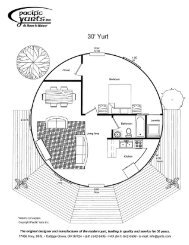
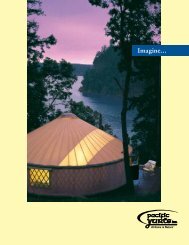
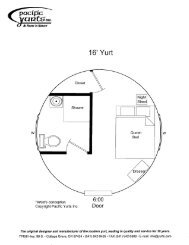
1<strong>Platform</strong> ConstructionBeing what we call a ‘soft’ structure, the yurt reacts more readily to climatic conditions than do ‘rigid’structures, therefore it is important to choose your site carefully and take into account prevailing windpatterns, overhead tree limbs, water runoff, etc. In general, the best site would be protected from thewind, would receive morning sun and afternoon shade and be free from overhead objects such as largedead tree limbs that could damage the yurt in heavy winds. <strong>Plan</strong> your entry so that the doorway facesaway from prevailing winds.For a secure and comfortable installation, a well-built platform is necessary. To ensure a weatherproof installation the platform needs to be circular and the same diameter as the yurt so the side coverfabric can extend below the interior floor level. This will provide a draft-free and watertight seal.Any exterior decking should be separated from, or at a lower level than the yurt platform. Unless youare skilled, enlist the help of an experienced carpenter for building the platform.The following plans show the typical construction of the yurt platform. Keep in mind that every sitewill be different, so the platform construction and footings should reflect the conditions of eachindividual site.Notes:1.) The bottom portion of the drip edge willbe visible once the yurt is installed. Itshould be stained or painted to match theexterior color scheme.2.) The 1" portion of the drip edge thatextends above floor level will be visibleon the inside and can be painted orstained to match the interior colorscheme.3.) Plywood skirting (to prevent airflowbeneath the floor) and a vapor barriermay also be desirable.4.) If you plan to connect the yurt to anexisting building (or another yurt) besure to allow a minimum of 12" betweenthe existing building and your yurtplatform. A covered walkway can bebuilt to connect the two after the yurt isinstalled.5.) Keep in mind that the windows open fromthe outside. If you plan to have theplatform elevated you should consideradding a catwalk or exterior decking forwindow access.6.) If you plan to install a “floating” floor onyour platform, please contact <strong>Pacific</strong><strong>Yurts</strong> for recommendations on how toprepare the platform.7.) When using the 2x6 T&G flooring be sureit is kiln dried and has a low moisture contentto avoid gaps as the wood dries.The original designer and manufacturer of the modern yurt, leading in quality and service for 30 years.77456 Hwy. 99 S. • Cottage Grove, OR 97424 • (541) 942-9435 • FAX (541) 942-0508 • E-mail: info@yurts.com
2<strong>Platform</strong> Construction Overview1.) Lay out pier blocks accordingto framing plan and level.Note:Poured concrete footings may be substitutedfor pre-cast pier blocks.2.) Cut 4x6 beams to length, level them,and fasten onto pier blocks.3.) Cut 2x6 perimeter blockingand fasten to 4x6 beams.4.) Install floor insulation (optional).Notes:Diagram assumes level site. On sloping terrainvertical support posts and cross bracing may be necessary.If 1 8" plywood flooring is used we recommend adding2x6 blocking between beams (four feet on center).If you plan to purchase the cable tie-down option an extra4x6 block will be needed in the center of the platform.5.) Fasten flooring (1 1 8" plywood or 2x6 T&G) onto 4x6beams.6.) Cut flooring into circle with diameter matching that of the yurt.7.) Staple 2" wide strips of tar paper onto edge of cut flooring (or usecaulking) to provide a seal between flooring and drip edge.8.) Cut 3 8 " exterior plywood (OSB is best for small yurts) intostrips of desired width (at least 8") and fasten aroundperimeter of flooring so that 1" protrudes above floor level.This is the plywood drip edge.77456 Hwy. 99 S. • Cottage Grove, OR 97424 • (541) 942-9435 • FAX (541) 942-0508 • E-mail: info@yurts.com
3Typical 16' <strong>Platform</strong> Framing <strong>Plan</strong>T&G flooring may cantilever off edgeof beam without additional support.1'3'2'-6"7' 2-1/4" 4x6 Beam2x6 perimeter blocking.Connect to beam withSimpson A35.Stairs5'-10"13' 8" 4x6 Beam(Before adding drip edge)16'4'7'Center Line16' 4x6 BeamEntry Deck4'3'Pier block locations13' 8" 4x6 Beam7' 2-1/4" 4x6 BeamMain platformPlywooddrip edgePorchdecking1'38 " x 8" exterior plywood drip edge attached to edgeof platform. Top of drip edge to be 1" above floor level.Notes:1.) <strong>Platform</strong> construction and footings shouldreflect conditions of each individual site.2.) 2x6 T&G or 1 1 8 " plywood flooring to be laidperpendicular to 4x6 beams and trimmed tothe same diameter as that of the yurt.Simpson A35each sideJoist hanger4x4 postSimpson EPB 44post base or equiv.TYPICAL ELEVATIONEntry deck should be below the floor level ofthe yurt platform so as not to interfere with drip edge.77456 Hwy. 99 S. • Cottage Grove, OR 97424 • (541) 942-9435 • FAX (541) 942-0508 • E-mail: info@yurts.com
4Entry deck4x4 PostsGradeTypical 2x4 bracing16" Concrete piersNote: <strong>Platform</strong> and footings should be designedaccording to the conditions of each individualsite and local building requirements.Typical <strong>Platform</strong> Elevation77456 Hwy. 99 S. • Cottage Grove, OR 97424 • (541) 942-9435 • FAX (541) 942-0508 • E-mail: info@yurts.com
Radius 8'510'14' 14'14' 14'2x6 T&G Layout - 16' YurtOften 2x6 T&G is used for open beam ceilings and may have a V-groove whichshould face down so as not to catch debris and make floor sweeping difficult.8'4'8'4'8' 8'4' 4'8'4'8' 8' 8' 8'4' 4' 4' 4'12' 12'12' 12'12'12'8'14' 14'14' 14'10'8'8'6'6'Center4x6 Beam8'4'8'4'8' 8'4' 4'1.) Make a compass using a board or non-stretchstring and a nail at the center to mark radius.8'4'8' 8' 8' 8'4' 4' 4' 4'2x6 Perimeterblocking2.) Using a sharp circular saw carefully cut theplatform to exactly 16 feet in diameter.77456 Hwy. 99 S. • Cottage Grove, OR 97424 • (541) 942-9435 • FAX (541) 942-0508 • E-mail: info@yurts.com8'
6Plywood Layout - 16' YurtNote: Due to the tongue and groove on 1-1/8" plywood you may need to laminatea small piece of scrap to one edge in order to achieve the full diameter.2x6 blocking4' on centerRadius 8'Center4x6 Beam2x6 Perimeterblocking1.) Make a compass using a board or non-stretchstring and a nail at the center to mark radius.2.) Using a sharp circular saw carefully cut theplatform to exactly 16 feet in diameter.77456 Hwy. 99 S. • Cottage Grove, OR 97424 • (541) 942-9435 • FAX (541) 942-0508 • E-mail: info@yurts.com
7Plywood drip edge2x6 Perimeter blocking4x6 BeamPier blockScrews through drip edge into flooring<strong>Plan</strong> View2x6 T&G flooring1"4x6 BeamPlywooddrip edgePier blockElevation77456 Hwy. 99 S. • Cottage Grove, OR 97424 • (541) 942-9435 • FAX (541) 942-0508 • E-mail: info@yurts.com
816' Diameter Yurt<strong>Platform</strong> Materials – 2x6 T&G Flooring OptionMaterial Quantity Use2x6 Kiln DriedT&G ‘Select Deck’8 @ 14'7 @ 12'2 @ 10'40 @ 8'2x6 Standard & Better 2 @ 10'2 @ 8'4x6 Standard & Better 1 @ 16'2 @ 14'2 @ 8'<strong>Platform</strong> FlooringPerimeter BlockingBeams3/8" Exterior Plywood Siding (no groove) 2 Sheets (4' x 8') Plywood Drip Edge16" Concrete Pier Block with Post BaseBracket13 Footing16' Diameter Yurt<strong>Platform</strong> Materials – 1-1/8" Plywood Flooring OptionMaterial Quantity Use1-1/8" T&G Plywood 8 Sheets (4' x 8') <strong>Platform</strong> Flooring2x6 Standard & Better 2 @ 10'Blocking8 @ 8'4x6 Standard & Better 1 @ 16'Beams2 @ 14'2 @ 8'3/8" Exterior Plywood Siding (no groove) 2 Sheets (4' x 8') Plywood Drip Edge16" Concrete Pier Block with Post BaseBracket13 FootingNote: This material list represents the minimum amount of lumber, etc required for a basiccircular platform on flat level ground. It does not include any exterior deck/porch materials. Forsloped sites or to elevate the platform you will need to add 4x4 posts and cross bracing.77456 Hwy. 99 S. • Cottage Grove, OR 97424 • (541) 942-9435 • FAX (541) 942-0508 • E-mail: info@yurts.com