MILAN User Guide PDF | 1.7 MB - BEA Industrial
MILAN User Guide PDF | 1.7 MB - BEA Industrial
MILAN User Guide PDF | 1.7 MB - BEA Industrial

You also want an ePaper? Increase the reach of your titles
YUMPU automatically turns print PDFs into web optimized ePapers that Google loves.
Please keep for further use<br />
Designed for colour printing<br />
Other use of the device is outside the permitted purpose and can not be<br />
guaranteed by the manufacturer.<br />
The manufacturer cannot be held responsible for incorrect installations or<br />
inappropriate adjustments of the sensor.<br />
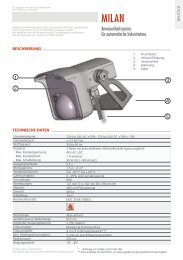
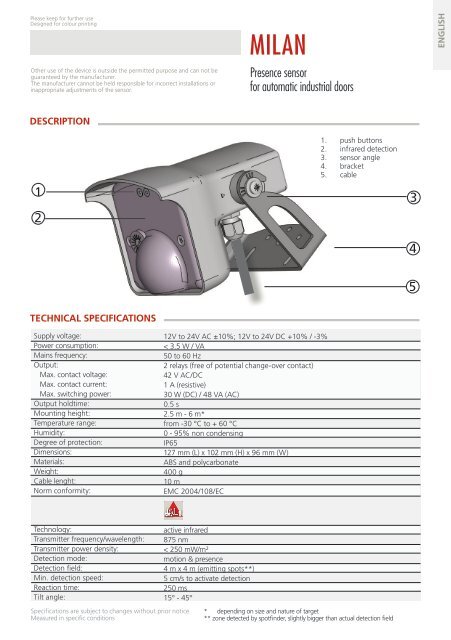
<strong>MILAN</strong><br />
Presence sensor<br />
for automatic industrial doors<br />
ENGLISH<br />
DESCRIPTION<br />
1<br />
2<br />
1. push buttons<br />
2. infrared detection<br />
3. sensor angle<br />
4. bracket<br />
5. cable<br />
3<br />
4<br />
5<br />
TECHNICAL SPECIFICATIONS<br />
Supply voltage:<br />
Power consumption:<br />
Mains frequency:<br />
Output:<br />
Max. contact voltage:<br />
Max. contact current:<br />
Max. switching power:<br />
Output holdtime:<br />
Mounting height:<br />
Temperature range:<br />
Humidity:<br />
Degree of protection:<br />
Dimensions:<br />
Materials:<br />
Weight:<br />
Cable lenght:<br />
Norm conformity:<br />
12V to 24V AC ±10%; 12V to 24V DC +10% / -3%<br />
< 3.5 W / VA<br />
50 to 60 Hz<br />
2 relays (free of potential change-over contact)<br />
42 V AC/DC<br />
1 A (resistive)<br />
30 W (DC) / 48 VA (AC)<br />
0.5 s<br />
2.5 m - 6 m*<br />
from -30 °C to + 60 °C<br />
0 - 95% non condensing<br />
IP65<br />
127 mm (L) x 102 mm (H) x 96 mm (W)<br />
ABS and polycarbonate<br />
400 g<br />
10 m<br />
EMC 2004/108/EC<br />
Technology:<br />
Transmitter frequency/wavelength:<br />
Transmitter power density:<br />
Detection mode:<br />
Detection field:<br />
Min. detection speed:<br />
Reaction time:<br />
Tilt angle:<br />
Specifications are subject to changes without prior notice.<br />
Measured in specific conditions<br />
active infrared<br />
875 nm<br />
< 250 mW/m²<br />
motion & presence<br />
4 m x 4 m (emitting spots**)<br />
5 cm/s to activate detection<br />
250 ms<br />
15° - 45°<br />
* depending on size and nature of target<br />
** zone detected by spotfinder, slightly bigger than actual detection field<br />
1
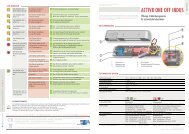
LED- SIGNAL<br />
Output 1<br />
Value indication<br />
Output 2<br />
Parameter indication<br />
LED flashes<br />
LED flashes quickly<br />
Setup<br />
LED is off<br />
DIMENSIONS (in mm)<br />
Wall mounting Ceiling mounting Bracket dimensions<br />
SAFETY INSTRUCTIONS<br />
Only trained and<br />
qualified personnel<br />
may install and setup<br />
the sensor.<br />
After installation,<br />
save an access code<br />
to lock the sensor.<br />
Test the good functioning<br />
of the installation before<br />
leaving the premises.<br />
The warranty is void if<br />
unauthorized repairs<br />
are made or attempted<br />
by unauthorized<br />
personnel.<br />
The manufacturer of the door system is responsible for carrying out a risk assessment and installing the sensor and<br />
the door system in compliance with applicable national and international regulations and standards on door safety.<br />
MOUNTING TIPS<br />
Do not cover the<br />
sensor.<br />
Avoid extreme<br />
vibrations.<br />
Avoid proximity to neon<br />
lamps or moving objects.<br />
Avoid exposing the<br />
sensor to sudden<br />
temperature changes.<br />
2
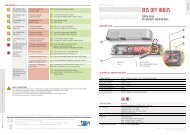
HOW TO USE THE REMOTE CONTROL<br />
After unlocking, the red LED<br />
flashes and the sensor can be<br />
adjusted by remote control.<br />
If the red LED flashes quickly after unlocking, enter an<br />
access code from 1 to 4 digits.<br />
If you do not know the access code, cut and restore<br />
the power supply. During 1 minute, you can access<br />
the sensor without introducing any access code.<br />
ADJUSTING ONE OR MORE PARAMETERS<br />
CHECKING A VALUE<br />
x<br />
The number of flashes<br />
indicates the value of<br />
the chosen parameter.<br />
RESTORING TO FACTORY VALUES<br />
SAVING AN ACCESS CODE<br />
The access code is recommended for sensors installed close to each other.<br />
DELETING AN ACCESS CODE<br />
If you do not know the access code, cut and restore the power supply.<br />
During 1 minute, you can access the sensor without introducing any access code.<br />
3
<strong>MILAN</strong><br />
1<br />
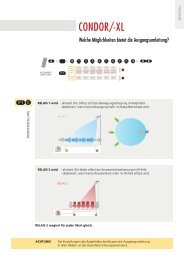
MOUNTING<br />
1 2<br />
Remove the bracket from the sensor.<br />
Drill 2 holes accordingly.<br />
Fix the bracket firmly.<br />
Position the sensor on the<br />
bracket and fasten the screws.<br />
2<br />
WIRING<br />
GN<br />
BN<br />
12-24 V<br />
AC-DC<br />
POWER SUPPLY<br />
Connect the wires to the door controller.<br />
Choose between NO and NC contact.<br />
WH<br />
YE<br />
GY<br />
COM<br />
NO<br />
NC<br />
IR OUTPUT 1<br />
Presence or<br />
pulse signal<br />
NO POWER<br />
NO DETECTION<br />
DETECTION<br />
ACTIVE<br />
PK<br />
VT<br />
BK<br />
COM<br />
NC<br />
NO<br />
IR OUTPUT 2<br />
Presence signal<br />
NO POWER<br />
NO DETECTION<br />
DETECTION<br />
PASSIVE<br />
3<br />
SENSOR ANGLE<br />
1<br />
CEILING<br />
2<br />
WALL<br />
Adjust the angle of the sensor to position the detection fields.<br />
Tighten the screws firmly.<br />
15° 30° 45°<br />
RECOMMENDED<br />
NOT RECOMMENDED<br />
4<br />
All detection field dimensions are measured in specific conditions (mounting height: 5 m).<br />
Infrared field = emitting spots detectable by Spotfinder. The actual detection field is slightly smaller and influenced by external factors.
5<br />
SETUP<br />
<strong>MILAN</strong><br />
15-20 s 3 s<br />
Launch a setup to make a reference picture.<br />
Step out of the detection field and do not leave any tools inside the detection field.<br />
After first power on, the sensor launches a setup and after each power cut a short setup is launched.<br />
POSSIBLE REMOTE CONTROL SETTINGS<br />
OUTPUT<br />
REDIRECTION<br />
presence<br />
ir entry<br />
pulse<br />
presence presence<br />
ir exit<br />
pulse<br />
frontal<br />
ir entry<br />
pulse<br />
frontal<br />
ir exit<br />
pulse<br />
presence presence presence<br />
RELAY 1<br />
RELAY 2<br />
FREQUENCY<br />
A<br />
B<br />
MAX. PRESENCE<br />
DETECTION TIME<br />
30 s 1 min 2 min 5 min 10 min 20 min 1 h 1 h 30 2 h<br />
∞*<br />
* not guaranteed<br />
IR-CURTAIN<br />
IMMUNITY<br />
low normal high<br />
MIN. SIZE<br />
OF TARGET<br />
The position of the<br />
target in the field is<br />
random.<br />
IR-DETECTION FIELD<br />
FACTORY VALUES<br />
RESETTING TO FACTORY VALUES:<br />
IMPORTANT:<br />
Test the good functioning of the installation before leaving the premises.<br />
Always finish an adjustment session by launching a setup.<br />
5
TROUBLESHOOTING<br />
The door remains<br />
closed and the LED<br />
is OFF.<br />
The sensor power is off.<br />
1<br />
Check the wiring and the power supply.<br />
The infrared sensor<br />
does not react.<br />
The infrared power emission<br />
is too low according to the<br />
mounting height.<br />
1<br />
Launch a new setup.<br />
Step out of the detection field!<br />
The door opens<br />
and closes<br />
constantly.<br />
The sensor is disturbed<br />
by the door motion or<br />
vibrations caused by the<br />
door motion.<br />
1<br />
2<br />
3<br />
Make sure the sensor is fixed properly.<br />
Increase the sensor angle and/or radar angle.<br />
Reduce the field size.<br />
Sporadic presence<br />
detections for no<br />
reason.<br />
The presence detection is<br />
disturbed by rain or lamps.<br />
1<br />
Set the IR-curtain immunity to value 3.<br />
The sensor is not installed<br />
properly.<br />
1<br />
Fasten the sensor firmly.<br />
The red LED is<br />
permanently ON<br />
after a setup.<br />
The sensor has failed the<br />
IR-setup.<br />
1<br />
Launch a new setup.<br />
Step out of the detection field!<br />
The setup lasts more<br />
than 30 seconds.<br />
The setup is disturbed.<br />
1<br />
Make sure the detection field is clear and<br />
launch a new setup.<br />
Another sensor causes<br />
interferences.<br />
1<br />
Select a different frequency for each sensor.<br />
The sensor does not<br />
unlock and the red<br />
LED flashes quickly.<br />
The sensor needs an access<br />
code to unlock.<br />
1<br />
2<br />
Enter the right access code.<br />
If you do not know the access code, cut the power<br />
supply and restore it to access the sensor and<br />
change the access code or delete it.<br />
The sensor does<br />
not respond to the<br />
remote control.<br />
The remote control<br />
batteries are weak or<br />
improperly installed.<br />
1<br />
Check the batteries and change them<br />
if necessary.<br />
The remote control is badly<br />
pointed.<br />
1<br />
Point the remote control towards the sensor.<br />
The sensor is not powered.<br />
1<br />
Check the power supply of the sensor.<br />
6
©<strong>BEA</strong> | Original instructions | 42.7680 / V1 - 08.12<br />
<strong>BEA</strong> SA | LIEGE Science Park | ALLÉE DES NOISETIERS 5 - 4031 ANGLEUR [BELGIUM] | T +32 4 361 65 65 | F +32 4 361 28 58 | INFO@<strong>BEA</strong>.BE | WWW.<strong>BEA</strong>.BE<br />
<strong>BEA</strong> hereby declares that the <strong>MILAN</strong> is in conformity with the basic requirements and the<br />
other relevant provisions of the directive 2004/108/EC.<br />
Angleur, April 2011 Jean-Pierre Valkenberg, authorized representative<br />
The complete declaration of conformity is available on our website: www.bea-industrial.be<br />
Only for EC countries: According the European <strong>Guide</strong>line 2002/96/EC for Waste Electrical and Electronic Equipment (WEEE)