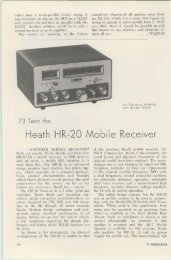
Tells All - The Heathkit HO-5404 Station Monitor - Nostalgic Kits ...
Tells All - The Heathkit HO-5404 Station Monitor - Nostalgic Kits ...
Tells All - The Heathkit HO-5404 Station Monitor - Nostalgic Kits ...

Create successful ePaper yourself
Turn your PDF publications into a flip-book with our unique Google optimized e-Paper software.
Heath <strong>HO</strong>·<strong>5404</strong> <strong>Station</strong> <strong>Monitor</strong><br />
by Marc Stern N1BLH<br />
Heath Company<br />
Dept. 011-442<br />
Benton Harbor MI 49022<br />
Price class: $250<br />
24 73 Amateur Radio • September, 1986<br />
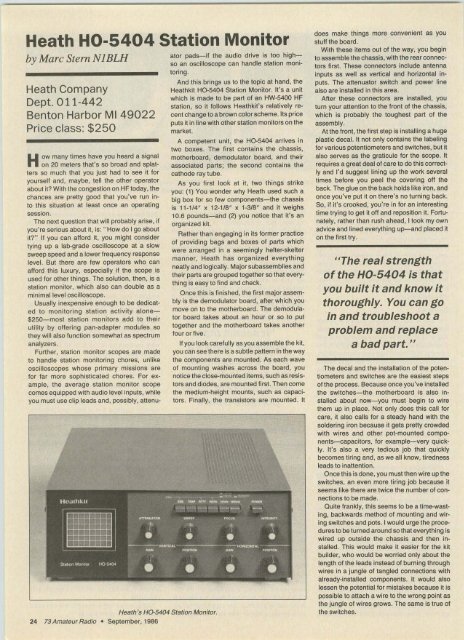
Heath's HG-<strong>5404</strong> <strong>Station</strong> <strong>Monitor</strong>.<br />
<strong>HO</strong>W many limes have you heard a signal<br />
on 20 meters that's $0 broad and splatters<br />
so much that you just had 10 see it for<br />
yourself and, maybe, tell the other operator<br />
about it? With the congestion on HF today, the<br />
chances are pretty good thai you've run into<br />
this situation at least once an operating<br />
session.<br />
<strong>The</strong> next question that will probably arise, if<br />
you're serious about it, is: " How do I go about<br />
it?" If you can afford it, you might consider<br />
tying up a lab-grade oscilloscope at a slow<br />
sweep speed and a lower frequency response<br />
level. But there are few operators who can<br />
afford this luxury, especially if the scope is<br />
used for other things. <strong>The</strong> solution, then , is a<br />
station monitor, which also can double as a<br />
minimal level oscilloscope.<br />
Usually inexpensive enough to be dedicat·<br />
ed to monitoring stalion activity alone<br />
$250-most station monitors add to their<br />
utility by ollering pan-adapter modules so<br />
they will also function somewhat as spectrum<br />
analyzers.<br />
Further, station monitor scopes are made<br />
to handle station monitoring chores, unlike<br />
oscilloscopes whose primary missions are<br />
for far more sophisticated chores. For example,<br />
the average station monitor scope<br />
comes equipped with audio level inputs, while<br />
you must use clip leads and, possibly, attenuator<br />
pads-if the audio drive is too highso<br />
an oscilloscope can handle station monitoring.<br />
And this brings us to the topic at hand, the<br />
<strong>Heathkit</strong> HD-<strong>5404</strong> <strong>Station</strong> <strong>Monitor</strong>. It's a unit<br />
which is made to be part of an HW-5400 HF<br />
station, so it follows <strong>Heathkit</strong>'s relatively recent<br />
change to a brown color scheme. Its price<br />
puts it in line with other station monitors on the<br />
market.<br />
A competent unit, the <strong>HO</strong>-<strong>5404</strong> arrives in<br />
two boxes. <strong>The</strong> first contains the chassis,<br />
motherboard, demodulator board. and their<br />
associated parts; the second contains the<br />
cathode ray tube.<br />
As you first look at it, two things strike<br />
you : (1) You wonder why Heath used such a<br />
big box for so few components-the chassis<br />
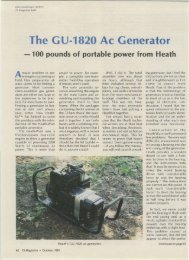
is 11_1I4 w x 12-118 " x 1-318" and it weighs<br />
10.6 pounds-and (2) you notice that it's an<br />
organized kit.<br />
Rather than engaging in its former practice<br />
of providing bags and boxes of parts which<br />
were arranged in a seemingly nener-sketter<br />
manner, Heath has organized everything<br />
neatly and logically. Major subassemblies and<br />
their parts are grouped together so that everything<br />
is easy to find and check.<br />
Once this is finished, the first major assembly<br />
is the demodulator board, after which you<br />
move on to the motherboard. <strong>The</strong> demodulator<br />
board takes about an hour or SO to put<br />
together and the motherboard takes another<br />
four or five.<br />
If you look carefully as you assemble the kit,<br />
you can see there is a subtle pattern in the way<br />
the components are mounted. As each wave<br />
of mounting washes across the board, you<br />
notice the close-mounted items, such as resistors<br />
and diodes, are mounted first. <strong>The</strong>n come<br />
the medium-height mounts, such as capacitors<br />
. Finally, the transistors are mounted. It<br />
does make things more convenient as you<br />
stull the board.<br />
With these items out of the way , you begin<br />
to assemble the chassis, with the rear connectors<br />
first. <strong>The</strong>se connectors include antenna<br />
inputs as well as vertical and horizontal inputs.<br />
<strong>The</strong> attenuator switch and power line<br />
also are installed in this area.<br />
After these connectors are installed, you<br />
turn your attention to the front of the chassis,<br />
which is probably the toughest part of the<br />
assembly.<br />
At the front , the first step is installing a huge<br />
plastic decal. It not only contains the labeling<br />
for various potentiometers and switches, but it<br />
also serves as the graticule for the scope. It<br />
requires a great deal of care to do this correctly<br />
and I'd suggest lining up the work several<br />
times before you peel the covering oil the<br />
back. <strong>The</strong> glue on the back holds like iron, and<br />
once you've put it on there's no turning back.<br />
So, if it's crooked, you're in for an interesting<br />
time trying to get it off and reposition it. Pcrtunatety,<br />
rather than rush ahead, I took my own<br />
advice and lined everything up-and placed it<br />
on the first try.<br />
"<strong>The</strong> real strength<br />
of the <strong>HO</strong>-<strong>5404</strong> is that<br />
you built it and know it<br />
thoroughly. You can go<br />
in and troubleshoot a<br />
problem and replace<br />
a bad part. "<br />
<strong>The</strong> decal and the installation of the potentiometers<br />
and switches are the easiest steps<br />
of the process. Because once you've installed<br />
the switches-the motherboard is also installed<br />
about now-you must begin to wire<br />
them up in place. Not only does this call for<br />
care, it also calls for a steady hand with the<br />
soldering iron because it gets pretty crowded<br />
with wires and other pot-mounted components-capacitors.<br />
for example-very quickly.<br />
It's also a very tedious job that quickly<br />
becomes tiring and, as we all know, tiredness<br />
leads to Inattention.<br />
Once this is done, you must then wire up the<br />
switches, an even more tiring job because it<br />
seems like there are twice the number of connections<br />
to be made.<br />
Quite frankly, this seems to be a time-wasting,<br />
backwards method of mounting and wiring<br />
switches and pots. I would urge the procedures<br />
to beturned around so that everything is<br />
wired up outside the chassis and then lnstalled.<br />
This would make it easier for the kit<br />
builder, who would be worried only about the<br />
length of the leads instead of burning through<br />
wires in a jungle of tangled connections with<br />
already-installed components. It would also<br />
lessen the potential for mistakes because it is<br />
possible to attach a wire to the wrong point as<br />
the jungle of wires grows. <strong>The</strong> same is true of<br />
the switches.
With all of this done, the final step is illstalling<br />
and wiring up the CRT and connector.<br />
This. again, is straightforward, althOugh it<br />
does pay to take care not to handle the CRT<br />
too roughly to limit chances of breaking it.<br />
At this point. you're ready for the turteUP<br />
which also is straightforward and simply illverses<br />
balancing the vertical and horizontal<br />
amplifier sections. This involves setting a couple<br />
01 pots on the motherboard so that the<br />
circuits are balanced at 80 volts. II was at this<br />
point that I began to go somewhat gray as I<br />
kept on trying to gel the vertical circuitry balanced<br />
and it woul dn't. Each time, one side<br />
would be at 80 and the other would be at 137,<br />
and when I adjusted the other side. the first<br />
woulcl be out 01 adjustment.<br />
Checking things cot. it looked as if one 01<br />
the driver transistors in the ampl ifier section<br />
was bad-Q104 and Q106-and I called customer<br />
assistance.<br />
As I explained what was going on to the<br />
customer assistance rep. he quickly diagnosed<br />
the problem-Q104-and translerred<br />
me to the parts department where he had already<br />
ordered the new part to replace the offender<br />
on the motherboard. Alii had to do was<br />
give my name and address. Less than a week<br />
later, the part arrived; I installed it, and everything<br />
was aligned quickly.<br />
<strong>The</strong> acid test came when I put it on a rig and<br />
fired it into the dummy load. After adjusting<br />
everything according 10 instructiOns, I keyed<br />
the microphone and everything appeared as<br />
the documentation said it woulcl.<br />
I then went on to monitor my radioteletype<br />
signals, packet signals (just to see what<br />
they looked like), CW signals. and phone signals.<br />
As I watched the phone signals, one<br />
thing became clear to me: Too many operators<br />
have their speech compressors cranked<br />
up way too high and their signals are splattering<br />
all over the place. Nearly every signal I<br />
looked at on 75 was Itat-topped and splattered<br />
everywhere.<br />
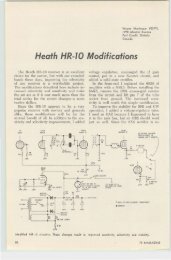
<strong>The</strong> strength of the <strong>Heathkit</strong> <strong>HO</strong>-<strong>5404</strong> <strong>Monitor</strong><br />
Scope isn't so much that it will serve as a<br />
good station monitor lor VHF (1.8 10 54 MHz)<br />
or even as a reasonable 5-MHz scope (10-40<br />
kHz vertical response and l 0-300-Hz horizontal<br />
response) lor bench purposes. It's a strong<br />
performer in both roles and is easy to use<br />
since there are only seven switches and eight<br />
pots in front. some of which you set once and<br />
forgel.<br />
<strong>The</strong> real strength 01 the HD-<strong>5404</strong> is thai you<br />
buill it and know it thoroughly. You can go in<br />
and troubleShOot a problem and replace a bad<br />
part. This is possible because the scope uses<br />
discrete components rather than Very large<br />
Scale Integration techniques. It is prObably<br />
one of the lew kits on the market that isn't<br />
stuffed full cues that you can't work on.<br />
Another real strength is its documentation.<br />
Not only does it lead you step-by-step through<br />
the scope's construction and alignment. but it<br />
also guides you through troubleshooting procedures<br />
and gives suggestiOns should a pr0blem<br />
arise. It also has a theory-of-operation<br />
section that explains precisely how the scope<br />
works. which is a refreshing Change in this day<br />
01 appliance manuals.<br />
Further, Ihe manual gives you valuable examples<br />
of the types of scope patterns you will<br />
see given a certain set 01 ccrcncee (chirping,<br />
splattering, lIat-topping, for example).<br />
Despite Ihese strengths. there is a sobering<br />
thought that occurs to me and that is cost .<br />
Operators used to build kits because they<br />
were tess-expensive alternatives to over-thecounter<br />
gear. But with <strong>Heathkit</strong>s costi ng nearly<br />
the same as lully assembled gear, it makes<br />
you wonder why an operator would build instead<br />
of buy.<br />
In my case, t tee! a sense 01 satisfaction, but<br />
I can't say that I've learned anything from it,<br />
other than how to stuff a board. I also am<br />
familiar with the innards of the gear and it is<br />
lairty easy to work on . But I can't say that this<br />
is the situation with the rest 01 the amateur<br />
world . Surely, there are many who agree with<br />
me , but there are many more who would<br />
prefer to plunk down their p1asfic and buy<br />
ready-made gear.<br />
And who's to say who's right? <strong>The</strong> only<br />
piece 01advice I have for Heath is to consider<br />
realigning the pricing structure 01their gear. If<br />
Ihey can afford to cut margins and make their<br />
equipment the low-cost alte rnative again,<br />
they'f stand a chance 01 revitalizing a whole<br />
marketplace. Heath's equipment is good and<br />
something you can get your hands on. Now,<br />
isn' t that something in this day of tiny rigs and<br />
tin ier parts? You bet it is! Reader service number<br />
151 .•<br />
PAC-CtJMM<br />
GIVES YOU MORE C<strong>HO</strong>ICES<br />
TNC·2QQ<br />
PTU·200<br />
Tired 01 tb tenin'll 10 all the chauer on ~oy r<br />
While waiting l or Ihal imporlanl call?<br />
lavorile VHF/UHF repeater<br />
._----<br />
•__TAPfl _<br />
.r__uo _<br />
. .,2'llI..__<br />
· t •.,-.zqo_......<br />
·__....RS-m_.._<br />
·II-,_ "" ,'" ......-.<br />
·CUOS_d<br />
...<br />
_,_.-.:IT_<br />
". _~<br />
" . -..~<br />
...... "',..., Pa->J<br />
PC_.-.:I ........... ..<br />
~ ""'....,. .,, ".. {l OO. _I<br />
CommonQ.l.IoIE to6COl.I0