UX Install & Operations Manual 2009_0.pdf - Hobart Food Equipment
UX Install & Operations Manual 2009_0.pdf - Hobart Food Equipment
UX Install & Operations Manual 2009_0.pdf - Hobart Food Equipment

You also want an ePaper? Increase the reach of your titles
YUMPU automatically turns print PDFs into web optimized ePapers that Google loves.
DEGBFNL2 AG-21213-F-09-09
ContentPage1 Important Notes ...................................................................... 42 <strong>Install</strong>ation .............................................................................. 52.1 Location ......................................................................................... 52.2 Electrical connection ....................................................................... 52.3 Water connection ............................................................................ 52.4 Steam connection (steam heated machines only) ............................... 62.5 Adjustment of shut-off valve for steam supply .................................... 62.6 Drain connection ............................................................................. 63 connecting of detergent pump ............................................. 74 controls ................................................................................... 95 Start-up ................................................................................... 105.1 Rinse aid ...................................................................................... 105.2 Detergent ..................................................................................... 105.3 Softener (only on option) ................................................................ 105.4 Filling of the rinse booster heater and pre-dosing ............................. 106 SEttings ................................................................................... 116.1 Adjustment of detergent dosage quantity ........................................ 116.2 Adjustment of rinse agent dosage quantity ...................................... 116.3 Adjustment of water hardness ....................................................... 116.4 Priming the suction hoses .............................................................. 126.5 Priming of suction hose rinse agent ................................................ 127 operation ................................................................................ 137.1 Preparation ................................................................................... 137.2 Run .............................................................................................. 148 pREVIEW of temperatures ...................................................... 159 Switch-off and cleaning the machine ................................ 159.1 Switch-off ..................................................................................... 159.2 Cleaning (daily) .............................................................................. 159.3 Cleaning (weekly) .......................................................................... 1511 Frost prevention ................................................................... 1612 Maintenance ........................................................................... 1613 Faults ....................................................................................... 1714 tRoubleshooting guide ......................................................... 18DEGBFNLAG-21213-F-09-09 3
DEGBFNL1 Important NotesUse in Accordance with RegulationsThis machine is exclusively to be used to wash ware such as pots and pans, baking sheets, cutlery, trays etc.Do not use for electrically heated cooking and heat conservation appliances.Do not put heavy objects on the top of the machine.SafetyDo not stand on the open front door of the machine.Never hose down the outside of the machine.The "Attention" symbol is shown beside instructions that are essential for the safe operationof the machine.Please read these passages thoroughly.Liability<strong>Install</strong>ations and repairs which are carried out by non authorized technicians or the use of other thanoriginal spare parts, and any technical alterations to the machine, may affect the warranty setout in the standard conditions of sale.Machine noise level:The machine noise level is 65 dB (A).Connecting voltage:The machine described in this operation manual has the following connecting voltage:400 V/50 Hz/3 Ph/N/PE.4 AG-21213-F-09-09
2 <strong>Install</strong>ation2.1 Location––Wall clearance is not required at the rear.––The lateral distance between machine and wall should be400 mm on one side.––To avoid damage of the feet, do not slide the machine on floor after theskid is removed.––Level machine by turning the feet.––Distribute machine weight equally onto all feet.DEGBFNL2.2 Electrical connectionMust be carried out by an authorized technician accordingto the local and national codes.––The electrical supply shall comply with the name-plate data.––Line fuses and cable cross section shall comply with the requirements.––A cut-off device shall be provided to connect the supply cord (isolatingswitch or accessible plug device).According to EN 60 335 the appliance must be connected to an equipotentialconductor. The connecting screw ( ) is located beside the cable inlet.A2.3 Water connectionMust be carried out by an authorized technician accordingto the national and local codes.The machine must be operated with potable water. For water withan extremely high mineral content an external demineralisation isstrongly recommended.––Machines without softener: Connect to soft and if possible warmwater (up to 4° Clark = 0.5 mmol/l, max. 60 °C).––Machines with softener: Connect to warm water (max. 60 °C) ifpossible.––Machines with heat recovery (drain / exhaust): Connect to coldwater (min. 10 °C) if possible.––Line flow pressure 0.5 – 10 bar.Important: the line flow pressure must not be less than 0.5 bar.––If the line flow pressure is above 10 bar provide pressure reducerat source.––Connect the union nut "A" ( 3 /4") of the water supply hose to the siteshut off valve.––Do not kink or cut the supply hose. If an extended supply hose isrequired, use one of the same specifications as the original.AG-21213-F-09-09 5
DEGBFNL2.4 Steam connection (steam heated machinesonly)Must be carried out by an authorized technician accordingto the local and national codes.––Connection to steam supply (DN 20),0.5 - 3.5 bar (max. 150°C) at the machine. See data plate!––Dimension of steam and condensate piping has to be according to therequirements.––The machine is equipped with all necessary fittings.––Make sure that permissible pressures and temperatures will not beexceeded.––All pipework has to be insulated with water and heat resistant material.2.5 Adjustment of shut-off valve for steamsSupplyA––The built-in shut-off valve is equipped with an adjustment device (A) tolimit the steam flow rate. A special tool is necessary foradjusting the valve-seat.––The correct adjustment is very important particularly for higher pressure,and therefore must be done by a HOBART trained service technicianat first installation or after any changes are done at the customersite.––The adjustment is correct if the heating-up time of the boiler is as longas the shortest wash cycle, while the valve is opened to maximum.––If adjusted too far open pressure shocks may occur when the solenoidvalve closes. This could cause damage at the installa tion. If adjustedtoo far close the required heating-power cannot be achieved.max. 800 mm30°-45°2.6 Drain connection––Connection between machine and site drain must not exceed max.height of 0.80 m.––Do not place the drain hose loosely on the floor (the hose could berubbed through). Fix it at site!––Do not kink the drain hose.6 AG-21213-F-09-09
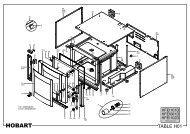
DEGBFNLTo connect a powder or solid detergent dispenser:––Remove the rear panel.––Drill a hole through the inner tank wall appropriate to the requiredconnection diameter (see fig.).––Screw up tightly the dosing connection with tank wall.C––Connect the plug (C) of the wire harness with the dosage pump(max. 100 VA).––Swing control box back into position and put panel(s) back into place.Switch on main switch at site or put the plug in.––Dispenser adjustment see chapter 6.1Conductivity probe:––Conductivity probe should be installed at the flat part of tank bottom(see fig.).––The hole size should be appropriate to the conductivity probe.8 AG-21213-F-09-09
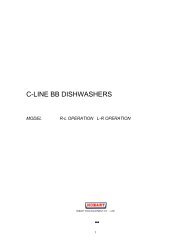
4 Controls86DEGBFNL3 1 7 4 2 5À Machine ON / OFF(illuminates duringoperation)Á Start buttonBy pushing this button the machine will be switched on.In case of emergency (e.g. faults), it is possible to switch off the machineimmediately without drain cycle, by pushing this button again.After switch off, the machine is not voltage free!By pushing this button the wash cycle will be started. Furthermore the buttonilluminates to indicate the mode of the machine.REDGREENBLUEGREENRED/BLUE(permanent)(permanent)(permanent)(flashing)(alternate flashing)= Machine fills and starts heating= Machine is ready for operation= Wash cycle is running= Wash cycle finished, exhaust heatrecovery is running (Option)= Blocked filter warning.Refer to "Faults" chapter 13Only for machines with switchable washing pressure (optional):High-pressure mode for a running cycle is activated by briefly pushing the blueilluminated Start button (not possible within the first 5 seconds after cycle start).By pushing the Start button and holding (3 sec.), high-pressure mode is permanentlyactivated. Drain button(illuminates duringoperation)à Program-buttonÄ Temperature indicatorWash (°C)Å Temperature indicatorRinse (°C)Æ Salt requiredÇ Service indicatorBy pushing and holding (2 sec.) this button, the drain and self cleaning cyclestarts. At the end of the cycle, the machine switches off automatically.After switch off, the machine is not voltage free!By pushing this button, it is possible to select between different pre-setprograms, according to the model and equipment. The program no. (e.g. P02)appears at the rinse temperature indicator Å.Indicates only on demand (see chapter 8).Indicates only on demand (see chapter 8).Indicates the need for regeneration salt to be added. (Only with built-in softener.)Indicates that the machine has a fault.AG-21213-F-09-09 9
6 settingsATTENTION:The machine has to be switched off.––Open the door, push Program button à and Drain button Âsimultaneously until "boF" appears at the temperature indicatorRinse Å.If the door is closed or if no button is pressed for 10 seconds,the indicator automatically switches off and the new settings aresaved.DEGBFNL6.1 Adjustment of detergent dosage quantity(delivery values are only valid with built-in HOBART detergent pump)The temperature indicator Rinse Å displays:"CH1" = adjustment of the detergent dosage quantity.The temperature indicator Wash Ä displays e.g.:"20" = pre-adjusted value of the detergent dosage time =20 sec. ≈ 3.0 g/l.––To adjust the detergent dosage time, push Start button Á repeatedlyuntil the desired value (0 - 50 sec. ≈ 0 - 7.6 g/l)appears at the Wash indicator Ä.Adjustment should be done in accordance with chemical suppliersrecommendations.6.2 Adjustment of rinse aid dosage quantityPush Program button à again.The temperature indicator Rinse Å displays:"CH2" = adjustment of the rinse aid dosage quantity.The temperature indicator Wash Ä displays e.g.:"24" = pre-adjusted value of the rinse aid dosage time =24 sec. ≈ 0.5 g/l.––To adjust the rinse aid dosage time, push Start button Árepeatedly, until the desired value (0 - 50 sec. ≈ 0 - 1.0 g/l) appears atthe Wash indicator Ä.Adjustment should be done in accordance with chemical suppliersrecommendations.6.3 Adjustment of water hardnessWith optional softener only.To adjust the softener to the local water hardness, (obtain details fromlocal water authority):––Push Program button à again.The temperature indicator Rinse Å displays:"H02" = adjustment of the softener (if built in)Push Start button Á repeatedly until the required value(H01 - H03) appears at the temperature indicator Rinse Å.H01 = up to 12° eh / H02 = 13 to 25° eh / H03 = 26 to 37° ehwater hardness (eh = Clark).AG-21213-F-09-09 11
DEGBFNLSettings6.4 Priming the suction hoses(only with built in detergent pump)To prime the detergent suction hose between the injector and container:––Close doorThe temperature indicator Rinse Å displays:"SF1" = Priming of detergent suction hose.––Push and hold Start button Á for approx. 1 minute.6.5 Priming of suction hose rinse aidTo prime the rinse aid suction hose between the injector andcontainer:––Push Program button à again.The temperature indicator Rinse Å displays:"SF2"= Priming of rinse aid suction hose.– – Push Start button Á and hold for approx. 3 minutes.If using a longer suction hose, hold the Start button Áfor about 6 minutes.12 AG-21213-F-09-09
DEGBFNLOperation7.2 Run––Put rack into the machine and close door.––Push the Start button Á. As long as the wash cycle is running, theStart button illuminates blue.––As soon as the Start button changes to green, the wash cycle is finished.––Machines with optional exhaust heat recovery: The Start button flashesgreen as long as the steam is exhausted.––Open door and take out rack.Allow washware to dry for approx 1 minute.––Select program:The machine operates automatically in the standard program. If needed,it is possible to select a shorter or longer program.To show the present program, push Program button à before startingthe wash cycle. To change the program, push Program button again.P 01 = Short cycle (for light/medium soiled washware)P 02 = Standard cycle (for medium/heavy soiled washware)P 03 = Long cycle (for dried on debris and containers)P 04 = Endless cycleAn endless cycle will be indicated by moving light points at thetemperature indicators.To stop the wash cycle, push Start button Á.(After 20 minutes, the machine will stop automatically.)After a short break, rinse starts automatically.The chosen cycle remains programmed until the machine isswitched off.Only for machines with switchable washing pressure (optional):Activation of the high-pressure mode for a running cycle is done bybriefly pressing the blue illuminated Start button (not possible withinthe first 5 seconds after cycle start).By pushing the Start button and holding (3 sec.), the high-pressuremode is permanently activated until the progam is changed or themachine is switched off.At the temperature indicator Rinse Å, "HP" appears.14 AG-21213-F-09-09
8 Preview of temperatures––Press the Program button à and hold (3 sec.) until the indicatorsWash Ä and Rinse Å show the actual temperatures (°C).The indicators go out 10 sec. after releasing Program button.Permanent temperature display can be activated on request by theservice technician.DEGBFNL9 Switch-off and cleaning the machine9.1 Switch-offATTENTION !Do not stand on the open front door of the machine.––Close door, push and hold Drain-button  for 2 secs.NOTE:During the drain cycle, the interior of the machine is cleanedautomatically. A final inspection is recommended to remove coarse soil.When Drain-button goes off:Switch off main switch or unplug and close shut off valve at site!9.2 Cleaning (daily)To clean the machine do not use any chloric, acidic orabrasive products and no metallic brushs.––Open the door, take out and clean strainers.––Clean interior of the machine.––Put strainers back into place.––Leave the door open for ventilation.9.3 Cleaning (weekly)2––Take out wash and rinse arms.Use the strainer as a spanner to loosen the hexagon screw (1) byturning it counter-clockwise (2).1––Open plugs of wash and rinse arms and flush.––Put all parts back into place.AG-21213-F-09-09 15
DEGBFNL10 Refilling the softener with saltOnly for machines with optional built-in softener.––When the Salt required Æ indicator illuminates, the softener has to befilled with regeneration salt.––Wait until the wash program is finished.––Open the door.––Unscrew the softener lid and fill the softener with 2 kg of "Granularregeneration salt" (do not use salt tablets).Clean seal and rim of softener lid carefully, before closing the lid.––Close lid and tighten.The Salt required indicator Æ goes off with delay.11 Frost preventionIn case of frost or longer operation pauses (e.g. for seasonal operations),the machine must be completely drained.This should be carried out by after sales service.––Machines with exhaust heat recovery: Drain both fill hoses andcondenser (optionally, use compressed-air to empty).Reset for operation:––Open the door, push Program button à and Drain button Âsimultaneously until "boF" appears at the temperature indicatorRinse Å.––Push Start button Á ("- - 1" appears at the temperature indicatorWash Ä) and hold until water comes out of the booster overflow.––Close the door.The machine switches off and is now ready for operation.12 MaintenanceFor trouble-free operation, we recommend you enter into a servicecontract with your local Service Office.16 AG-21213-F-09-09
13 faults––The Service indicator Ç illuminates and the temperatureindicator Rinse Å displays a code: e.g. "AL" = drain fault.Possible types of fault as follows (please report the code of faultto the service technician).DEGBFNLCODE POSSIBLE CAUSE MEASURESFIL Shut-off valve is closed. Open shut-off valve at site and switch on machine again.Fill valve or fill system defective..Call the after sales service.FIL + Exceeded fill time. Call the after sales service.AL Drain hose blocked. Clean drain hose and restart drain cycle.Drain system defective.Call the after sales service.UL Drain hose blocked. Clean drain hose and restart drain cycle.Fill system or drain system defectiveCall the after sales service.F01 Temperature probe "rinse booster" defective. Call the after sales service.F02 Temperature probe "tank" defective.. Call the after sales service.HEI Rinse booster heating defective. Maybe restricted operation possible – call the after salesservice.FlashingBLUE/REDStart buttonWash tank filters blocked.Remove and flush scrap basket and tank strainer.Replace in machine, close door and press start button torecommence wash cycle.AG-21213-F-09-09 17
DEGBFNL14 Troubleshooting guideTYPE OF FAILURE POSSIBLE CAUSE REMEDYPoor wash resultWashware is not clean.Washware does not dryproperly.Wash arms blocked (you should be ableto turn them easily by hand).Wash arm nozzles are clogged(visual check).Rinse arm nozzles are clogged(possibly by lime deposit)Detergent concentration is too low or toohigh.Coarse strainer soiled.Fine strainer soiled or obstructed bylime.Wrong program selected for heavilysoiled washware.Rinse aid concentration too low.Washware still greasy.Washware stays too long in the machineat the end of program.Take out wash arms and clean them thoroughly.Check water outlet from machine to wash arms isclear.Take out wash arm, remove cleaning cap and rinsewash arm thoroughly until soil is removed.Replace correctly.Remove rinse arms and decalcify them in separatecontainer.Check setting of detergent concentration.See also operating instructions point 6.1.Take out strainer, empty and clean it.Take out fine strainer. If heavily soiled soak in avinegar solution. Then clean it thoroughly until thepores are free.Cleaning is to be done daily (see operatinginstructions).Select program with longer wash cycle.Increase concentration.See also operating instructions point 6.2.1. Detergent concentration too low: increase(see instructions).2. Check if detergent is appropriate. If not choosea stronger one.3. Drain soiled water and refill machine.Check pre-scrapping procedure.Take out washware as soon as cycle is completed toenable them to dry.18 AG-21213-F-09-09
Troubleshooting guideTYPE OF FAILURE POSSIBLE CAUSE REMEDYPoor wash resultStripes and staines ondishes or glasses.Trouble with foamMachine gets much louderduring wash cycle.Other malfunctionsMachine suddenly stopsduring wash program.Rinse aid concentration too high.Hard water or high mineral content.Insufficient rinse aid concentrationcauses stainesMachine with softener:wrong type of salt used.Foam production above average causedby unsuitable detergent and rinse aid.Foam production above average causedby contact of foam producingsubstances (albumins etc.).Machine is connected to an energymanagement system which cuts out theenergy consumer at a given point, ormachine is interlocked with anotherenergy consumer unit.Blown site fuse.Reduce quantity (see instructions).Check water quality.Obtain details from local water authority.Recommended values:Ideal degree of hardness is 4° Clark.Ideal conductivity value for washware made of stainlesssteel max. 80 µS/cm and for dishes max. 400µS/cm.Increase quantity (see instructions)Use only granular regeneration salt.Use suitable detergent and rinse aid.Pre-clean washware.Connect machine separately (call electrician).Check site fuses.DEGBFNLIf no button is pressed, the machine automatically switches off after 6 hours without draining.Follow the description below during the next switch on:––Push the ON/OFF-button À.––Push the Drain-button  and wait until the machine is drained and switches off.––Restart the machine as described in chapter 7.AG-21213-F-09-09 19
As continued product improvement is a policy of HOBART, specifications are subject to change without notice.Printed in Germanyag-21213-F-09-09-PC