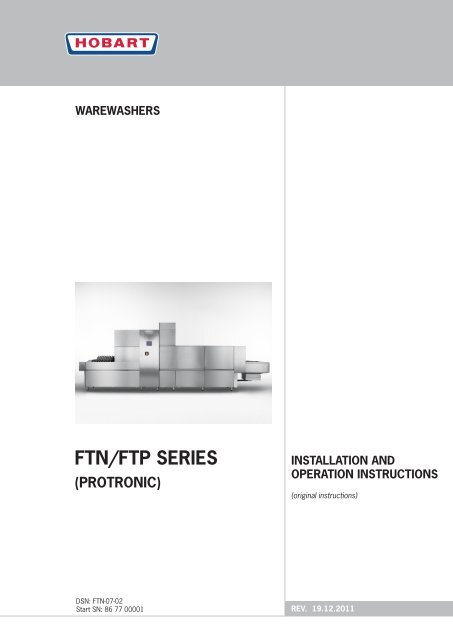
FTN_FTP_Install & Operations 0113.pdf - Hobart Food Equipment
FTN_FTP_Install & Operations 0113.pdf - Hobart Food Equipment
FTN_FTP_Install & Operations 0113.pdf - Hobart Food Equipment

You also want an ePaper? Increase the reach of your titles
YUMPU automatically turns print PDFs into web optimized ePapers that Google loves.
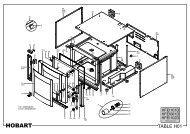
1. AssemblyGB1.1. Transport to <strong>Install</strong>ation Location––If possible in its packing and on skid.––Push on rollers.––Avoid damage to floor, doors.––Avoid damage to the machine.––Remove front covers.––If a fork lift is used, put a wooden frame under the machine.1.2. Remove Packing––Cut steel bands.––Remove outside carton.––Remove wooden skid.––Remove inside packing material and accessories from the machine.––Inspect machine for possible transport damage.1.3. Alignment at <strong>Install</strong>ation Location––According to the installation plan.––Observe wall clearance according to the installation plan.––Consider position of tabling, conveyors, etc.1.4. Adjusting Machine Height20––By turning the feet, set the height of the loading platform to920 mm or to the delivery height of the conveyor components.––Level out any unevenness in the floor.––Distribute machine weight equally onto all feet.1.5. Assembly of Modules––If the machine is delivered in separate modules, put largest modulein place first and align it.1.5.1. Sealing Tape––No 168 834-14 must be glued to one of the two connecting surfacesall the way around.––If there is old sealing on the surface (from the test run), it must beremoved first.––The ends of the sealing tape must overlap at the corners.ABBA-21853-003-GB 19.12.2011 5
GB 1. Assembly1.5.2. Adding next modules––Level the height (see section 1.4.)––Connect modules using screws M6 x 12 hex. head, washers, lockwashersand nuts (supplied).––Cut off protruding sealing tape with knife.––Connect drain pipes.If further conveyor elements are attached to the machine, itmust be ensured that no danger zones arise at the connectionpoints.CE DAB1.5.3. Tank connectionsConnect all washtanks with the overflow pipes.––Set gasket (A) on the overflow pipe (B).––Put the overflow (B) from the inside of the tank through the prepunchedhole and tighten it with the nut (C).––Push coupling (E) over the pipe (D). Attach the pipe to the overflow(B) and connect with the overflow pipe of the opposite wash tank.1.5.4. Transport feet (if fitted)Must be removed and returned to HOBART.1.6. Electrical CablesMust be unrolled and drawn through the front cable channel.––Connect wires to the terminals of the electrical components.––Follow the wiring diagram and the labels on wires and terminals.6 19.12.2011 BA-21853-003-GB
1. AssemblyGB1.7. Fitting the Conveyor Belt––Remove the chain between conveyor shaft and transport motor(end of the machine).––Place rolled conveyor belt on the exit end of the machine and drawit through the machine in the direction of the loading section.Direction of work––Connect the two conveyor ends using the conveyor rod.––Connect rollers at both ends and lock on with circlips.The conveyor belt shown here does not necessarily correspond in alldetails to the conveyor belt delivered to you, as different conveyor beltsmay be used depending on the specific application.––Tension the conveyor at the loading section equally on both sidesand lock the tension screws (A) with nuts (B).––Replace chain between conveyor shaft and transport motor.BABA-21853-003-GB 19.12.2011 7
GB2. Connection2.1. Electrical ConnectionMust be carried out by an authorized technician according tothe national and local codes.For Australia: in accordance with AS/NZS3500.12.1.1. Checking––Open the control box and take out wiring diagram from the inside ofthe door.––The electrical supply must correspond to the data on the nameplateand the wiring diagram.––Line fuses and cable cross section must comply with the requirements.––Supply disconnecting device (main switch with emergency stopfunction) adjacent to the machine (if not built in).2.1.2. Connecting––Draw mains cable (H07-RN-F) through cable gland at the bottom ofthe control box rear panel.––Connect wires to main terminals or to main switch (if built in).––Tighten all terminal screws in the control box (they may work looseduring transport).––Tighten all cable glands.Note:EN 60 335 stipulates that the appliance must be connected toan equipotential conductor. The connecting screw ( ) is locatedat the rear of control box beside the cable inlet.8 19.12.2011 BA-21853-003-GB
2. ConnectionGB2.2. Water ConnectionMust be carried out by an authorized technicianaccording to the national and local codes.The machine must be operated with potable water. For waterwith an extremely high mineral content, an external dematerializationunit is strongly recommended.2.2.1. General information––Connect water supply and drain pipes according to installation plan.––Line strainer and air gap are fitted to the machine as standard.2.2.2. Fresh water supply for rinsing––DN 20 (3/4")––Should be soft (up to 4° Clarke, resp. 0.5 mmol/l).––Conductance 80 - 120 µS/cm––Must be cold if condenser is fitted.––Line flow pressure 1.5 - 6 bar at ~ 500 l/hr.––Provide shut-off valve on site.2.2.3. Fresh water supply for tank filling––DN 20 (3/4")––Should be soft (up to 9° Clarke, resp. 1.2 mmol/l) and warm(50 - 60°C).––Conductance 150 - 400 µS/cm––Line flow pressure 1.5 - 6 bar.––Provide shut-off valve on site.2.2.4. Drain connectionTo be connected to site drain:––Common drain DN 50 (HT pipe).––Equip the floor drain of the scullery with an odor trap (siphon).BA-21853-003-GB 19.12.2011 9
GB2. Connection2.3. Steam or Hot Water ConnectionMust be installed by an authorized technician and in accordancewith local regulations.Note:On site, make sure that the pressures and temperatures forthe heating medium given in the installation plan cannot beexceeded.2.3.1. General information––Connect supply and return pipes according to installation plan.––All connections are equipped with necessary fittings and valves asstandard.2.3.2. Insulation––All pipes should be insulated.––Insulating material should be water, heat and shock proofed.2.3.3. Adjustment of manual shut-off valvewith flow reducer for steam and hot water supply––The built-in manual shut-off valve is equipped with an adjustmentdevice to limit the heating supply medium.A special tool is necessary for adjusting the valve-seat.––The correct adjustment is very important, particularly for higherpressures, and therefore must be carried out by a HOBART-trainedservice technician before first run or when changes are made tothe plant on-site.––The optimum adjustment is achieved when the nominal temperatureof the booster can just be held during continuous operation whilethe valve is opened to maximum.––If the valve is opened too far, pressure shocks may occur when thesolenoid valve closes. This could cause damage to the installation.––If the valve is closed too far, the required heating-power cannot beachieved.10 19.12.2011 BA-21853-003-GB
2. ConnectionGB2.4. Exhaust Connection––The responsible ventilation engineer must be consulted with regardto connection.––Please pay attention to notes on the service drawing.2.4.1. Exhaust pipework10 cm––Leave a distance (approx. 10 cm) between machine exhaust andsite channel or connect special exhaust stack (option).––Use additional ventilation fan, as the built-in ventilator has nocompression.––The volume of air to be evacuated from site has to be larger thanthe volume of air of the machine (see installation plan).––To prevent corrosion damage, provide exhaust channel in stainlesssteel or synthetic material.––In case of extremely low temperatures: Provide insulation and antifreezeshutter.CASE 1:With vent hood (available as an option from <strong>Hobart</strong>).Connected to site exhaust channel (see diagram). For suction values,see installation plan.250BCCASE 2:With vent hood (available as an option from <strong>Hobart</strong>).250A200Connected via horizontal piping to the outside (see diagram).––With built-in additional fan (A).––Provide a frost guard (B) (if required).––Provide a self closing louvre (C) at the outlet (if required).––The duct work should be made from CrNi or plastic material toprevent corrosion problems.––A voltage-free contact is provided in the machine control box tocontrol the external fan.BA-21853-003-GB 19.12.2011 11
GB 3. Description of the ControlDisplaySTART / Operating StatusConveyor ON: Push briefly.Speed selection: Push repeatedly.Machine OFF: Keep pressed for 3 seconds.The color of the START symbol changes depending on the operating status:GreenGREENBLUEBlueREDGREEN/REDBLUE/REDTemperature IndicationPrewash tankflashingflashingalternatelyalternately= Machine will be filled and/or heated= Machine is ready for operation (Stand-by)= Wash ON= Machine will be drained (drain cycle started)= Fault= Doors open / Table end switch activated= Temperatures below set value / Wash ONCurrent temperatureSymbol “blue” = activatedWash tank 1Wash tank 2Wash tank 3Pumped rinseFinal rinseDemi rinseCurrent temperatureCurrent temperature, if installedCurrent temperature, if installedCurrent temperature, <strong>FTP</strong> models onlyCurrent temperatureCurrent temperature, if installedDryerHeating onCurrent temperatureSymbolsFloat switchConveyor speed 1 / 2 / 3Filling ONFill level of tank / break tankDrain valve of prewash tank open / pumped rinse tank openAll drain valves openHygiene control activatedAutoStart activatedPots & Pans programAutomatic Glass and Cutlery Basket recognitionDoors openConnection failure Control - DisplayService interval reachedFault/AlarmPushing the symbol = Fault listing (customer menu)First run: Automatic check of most important functions in operation. <strong>FTP</strong> models only.Choice box Options „blue“ = activated (see section 5.5.)Clean AssistFault indication – dosing pumpPots & Pans program14 19.12.2011 BA-21853-003-GB
4. First RunGBMust be carried out by an authorized Service technicianto adjust and check machine functions!4.1. Preparation––Switch off main switch.––Make sure, detergent and rinse aid containers are filled.––Open water supply.––Open control box and switch on all circuit breakers and motorprotection switches.Exception: if an electrical rinse booster heater or a separate fillbooster (option) is installed, make sure that respective sealedprotection switch is switched off (see wiring diagram).––Close inspection doors.––Switch on main switch.4.2. Filling of Rinse Booster Heater andTank(s)Rinse booster:––Press the contactor for the pressure pump of fresh water storagetank until water sprays out of the rinse nozzles.––Check if all rinse jets spray correctly.If not: Remove rinse arms and clean nozzles.Separate Fill booster (Option):––Push the Menu button and choose “Service menu” (see section6.1.1.).––Choose “Configuration” and deactivate the Fill booster .––Switch on machine (push START button).––As soon as water flows from the water inlet into the wash tank,switch off machine (push START button for 3 seconds).––Reactivate the Fill booster .––Switch off main switch.Electrically heated machine:––Remove the red sticker from the protection switch of rinse boosterheater/separate fill booster (A) and switch on protection switch (B).Steam-/high pressure hot water heated machine:––Open shut-off valves.––Close control box.BA-21853-003-GB 19.12.2011 15
GB 4. First Run––Switch on main switch and push the Machine START button.After reaching the correct water level, filling switches off automaticallyand the tank heating(s) switch(es) on.When set temperatures are reached (the START symbol on the displayilluminates green), the machine is ready for operation.4.3. Fresh Water QuantityThe fresh water quantity is adjusted at the factory and may not bechanged.If a new adjustment is needed, please call the after-sales service.4.4. Checking––Direction of rotation of motors (see direction sign):• Drive motor• Pumps• Dryer (if fitted)• Extraction––If a motor runs against the indicated direction, interchange 2 of3 phases at the terminal.––Check and eliminate potential leakages.• Drain pipes• Heating pipes, water pipes• Machine housing, tank floor, extractor plant––Put all panels back into place.4.5. AutotimerPreset at the factory.Wash, rinse and dryer (if fitted) will only run if there is washware in themachine. These functions switch off automatically if no further washwarefollows.Exhaust air fan, dryer fan, and drive run on in a time-controlled manner.The delay times can be adjusted by authorized service technicians.4.6. Automatic StartingTime and “Switch-on” time will be pre-adjusted by the Service technicianduring installation.To change the “Switch-on” time:See menu „AutoStart“ (see section 6.3.).16 19.12.2011 BA-21853-003-GB
4. First RunGB4.7. Temperature AdjustmentTemperatures are pre-adjusted at the factory.If adjustment is needed, please call the after-sales service.4.8. Detergent and Rinse Aid AdjustmentShould be done by the detergent and rinse aid supplier.4.9. Timer “Fill” AdjustmentThe timer is pre-adjusted at the factory.If adjustment is needed, please call the after-sales service.4.10. Adjustment of Exhaust SystemThis work must be carried out by an authorized service technician!For details of the exhaust air quantity required on site, consult the installationplan.If adjustment is needed, please call the after-sales service.4.11. Pressure Switch Calibration (<strong>FTP</strong> Only)See service documentation, alternatively, enclosed service info.BA-21853-003-GB 19.12.2011 17
GB 5. Operation5.1. Start-up––Close the inspection doors.––Open water supply.––Switch on exhaust ventilation at site.––Switch on main switch.The Start Screen is displayed.––Switch on machine.Automatic fill starts.When the minimum tank water level is reached, the heating will start automatically.For <strong>FTP</strong> machines, an automatic check of the most importantfunctions is carried out (see section 5.1.1.).On the display appears:48°C65°C78°C64°C62°CThe START symbol flashes green.As soon as the symbol changes to a green steady light, the machineis ready to operate.On the display appears:48°C65°C78°C64°C62°C18 19.12.2011 BA-21853-003-GB
5. OperationGB5.1.1. Start-Up For <strong>FTP</strong>-ModelsThe machine automatically checks the most important functions.After the machine has been switched on, the automatic check starts.On the display appears:During inspection, the “Check” symbol is shown.Check running = green “Check” symbolFault found = red “Check” symbolIf no fault is detected and the START symbol changes to a green steadylight, the machine is ready to operate.If a fault is detected, an error message appears. Follow the instructionson the display and correct the fault (see also section 6.4.).5.1.2. Operating TemperaturesThe operating temperatures of <strong>FTP</strong> machines are significantly differentfrom those of <strong>FTN</strong> machines.<strong>FTN</strong><strong>FTP</strong>Prewash 45 − 55 °C 45 − 55 °CMain wash min. 60 °C 63 − 70 °CPumped rinse 60 − 65°C 70 − 80 °CFinal rinse 80 − 85 °C 62 − 65 °CBA-21853-003-GB 19.12.2011 19
GB 5. Operation5.2. Switching on the Conveyor/Speed SelectionCan be carried out via the buttons or via touch screen.––Briefly push the START button or the START symbol.Conveyor starts.Wash, rinse, and drying will automatically be switched on by incomingwashware (see customer menu „Autotimer function“ (see section6.6.3.)).48°C65°C78°C64°C62°CDepending on model, the dishwasher is provided with one, two or threeconveyor speeds.––To change the conveyor speed, push START button or START symbolrepeatedly.The selected speed is displayed on the screen.With the option “Transport speed locking”, the selected speed can belocked (see customer menu „Conveyor Speed“ (see section 6.6.5.)).5.3. Draining the Prewash TankIf the washware is heavily soiled, it may be necessary to drain theprewash tank only.––Push Drain button (approx. 2.5 seconds).The prewash tank and pumped rinse tank (if installed) will be emptied.On the display appears:48°C65°C78°C64°C62°CThe START symbol flashes blue during the drain cycle.After draining, the tanks will be re-filled automatically.20 19.12.2011 BA-21853-003-GB
5. OperationGB5.4. Switch-off the MachineWhen the last piece of washware leaves the machine, it can be switchedoff.––Push the Conveyor OFF button.Transportation, wash, rinse and drying will be switched off.––Push Drain button (approx. 5 seconds).All drain valves are opened for approx. 30 minutes, the machine will becompletely emptied.On the display appears:48°C65°C78°C64°C62°CThe START symbol flashes blue during the drain cycle.The drain valves close automatically after approx. 30 minutes and theSTART symbol goes out.On the display appears:48°C65°C78°C64°C62°CMachine can beswitched OFF––Switch off machine: Push the START button or START symbol for3 seconds.––Switch off main switch.If AutoStart is activated (see customer menu „AutoStart“ (seesection 6.3.)), the inspection doors must be closed, allpanels must be in place, the shut-off valve at site must beopen, and the main switch must be in “ON” position.BA-21853-003-GB 19.12.2011 21
6. Customer Menurt 1. AutoStart 2. AutoStart: 07 : 15 13 : 00: 00 : 00 00 : 00ay : 00 : 00 00 : 00y : 00 : 00 00 : 00: 00 : 00 00 : 00: 00 : 00 00 : 00: 00 : 00 00 : 001/26.3.2. Setting the clock/Summer and Wintertime––Push the + button at the bottom of the display (menu “AutoStart”).On the display appears e.g.:GBSummer-/ Wintertime Adjustment22 June 2009 10:11:412/2Date / Time settingBegin of the summertime:Date: last SundayMonth: 3Time (h:m): 2 : 00Begin of the wintertime:Date: last SundayMonth: 10Time (h:m): 3 : 00LOG OFFSummer-/ Wintertime Adjustment22 June 2009 10:11:41Setting the time and date manually:––Push the „Date/Time setting“ button.2/2Date / Time settingBegin of the summertime:Begin of the wintertime:Date: last SundayMonth: 3Time (h:m): 2 : 00Summer-/ Wintertime Adjustment22 June 2009 10:11:41Date: last SundayMonth: 10Time (h:m): 3 : 00LOG OFFYear (....)Month Day Hour Minute Second2009 June23 12 32 11 Set timeBegin of the summertime:Begin of the wintertime:––Touch the value to be changed; the screen keypad will be activated.2/2Date: last SundayMonth: 3Time (h:m): 2 : 00Date: last SundayMonth: 10Time (h:m): 3 : 00LOG OFF 32––Enter the new value and touch the button to confirm.r-/ Wintertime Adjustmente 2009 10:11:41)Month Day Hour Minute SecondJune23 12 32 11 Set timeof the summertime:Begin of the wintertime:2/2––To save the new value, push the “Set time” button.last SundayDate: lastSummer-/ Wintertime AdjustmentSunday3Month:22 June 2009 10:11:4110:m): 2 : 00Time (h:m): 3 : 00Date / Time settingLOG OFFBegin of the summertime:Begin of the wintertime:Date: last SundayDate: last SundayMonth: 3Month: 10Time (h:m): 2 : 00Time (h:m): 3 : 00LOG OFF2/2Setting Summer and wintertimeVia these parameters, the day, month, and time for the automatic switchingfrom winter to summer time and/or summer to winter time is specified.––Setting the “Month” input field to “0” disables the automatic switchover.To exit the menu:––Push “LOG OFF” or the Menu button.BA-21853-003-GB 19.12.2011 29
GB 6. Customer Menu6.4. FaultsIn order to correct the fault, follow the instructions shown. Ifno instructions are shown, please contact a qualified servicetechnician.In case of fault, the “Attention” symbol is displayed and the STARTsymbol illuminates red.48°C65°C78°C64°C62°C––Touch the “Attention” symbol or select “Faults” in the customermenu to see the recorded faults.Operating hours Total ShiftMachine : 0 [h] 0 [h]Transport : 0 [h] 0 [h]Wash : 0 [h] 0 [h]Water consumptionFill water : 0 [L] 0 [L]Rinse water : 0 [L] 0 [L]1/2On the display appears E.g.:Overview of faultsFaults are automatically differentiated as major or minor and are shownaccordingly via a color-coded fault window, as well as traffic lights.Major fault (red)Minor fault (yellow)The error messages are displayed in different colors, depending on theirstatus:redyellowgreenblueFault occurredFault acknowledgedFault is repaired, but not acknowledgedLine selected/activatedHelp text for the selected faultAcknowledge the message.30 19.12.2011 BA-21853-003-GB
6. Customer MenuGB––To correct the fault, information on the cause of the fault can beaccessed by pushing the Help button.On the display appears E.g.:––Correct fault according to help information.––After correcting the fault, close the help information.––Acknowledge the fault by pushing the Acknowledge button.The faults will be indicated until they are repaired and acknowledged.To exit the menu:––Push the Menu button.BA-21853-003-GB 19.12.2011 31
GB 6. Customer Menu6.4.1. Possible FaultsnumberH0000H0001H0002H0003H0004H0005H0006H0007H0008H0009H0100H0101H0102H0103H0104H0105H0106H0107H0108H0109S0000S0001S0002S0003S0004S0005S0006S0007S0008S0009S0010S0011S0012S0013S0014S0015S0201S0202S0203S0204S0240S0242S0243S0250S0260S0270S0271S0272MessageTemperature fault Pre-WashTemperature fault Wash 1Temperature fault Wash 2Temperature fault Wash 3Temperature fault Pumped RinseTemperature fault RinseTemperature fault DryerTemperature fault DemiTemperature fault Fill BoosterTemperature fault THDTemperature Control: Check Pre-WashTemperature Control: Check Wash 1Temperature Control: Check Wash 2Temperature Control: Check Wash 3Temperature Control: Check Pumped RinseTemperature Control: Check Final rinseTemperature Control: Check DryerTemperature Control: DemiTemperature Control: Fill BoosterTemperature Control: THDMotor protection switch pre-washMotor protection switch wash tank(s)Motor protection switch exhaust/externMotor protection switch blowerMotor protection switch pumped rinseMotor protection switch rinseMotor protection switch transportMotor protection compressor rinseMotor protection compressor tankMotor protection pressure pumpMotor protection tank circulationMotor protection ventilator tank circuit/externMotor protection ventilator rinse circuitMotor protection tray unloading / demagnetizerMotor protection lift up magnetMotor protection tray unloadingFlow rate control FillFlow rate control RinseFlow rate control DemiWaterflow Final RinseStacker full / exit section fullLoading trayStacker not OKTransport blockedEmergency SwitchExceeded fill time TankExceeded fill time boosterExceeded fill duo tank32 19.12.2011 BA-21853-003-GB
6. Customer MenuGBNumberS0280S0281S0290S0300S0301S0302S0303S0400S0401S0402S0403S0404S0405S0406S0410S0411S0412S0413S0414S0415S0416S0421S0422S0423S0424S0425S0426S0427S0428S0429S0440S0441S0442S0443S0444S0445S0446S0447S0448S0449S0450S0451S0452S0453S0454S0455S9992S9994S9995S9996S9997S9998MessageCleanAssist tank fillingCleanAssist dosingDoors open / Panels openLow pressure Refrigerant tank circuitHigh pressure Refrigerant tank circuitLow pressure Refrigerant rinse circuitHigh pressure Refrigerant rinse circuitPrewash system disturbedWash 1 system disturbedWash 1 DA system disturbedWash 2 system disturbedWash 3 system disturbedWash system pumped rinse disturbedRinse system disturbedPrewash system not readyWash system 1 not readyWash system 1 DA not readyWash system 2 not readyWash system 3 not readyWash system pumped rinse not readyRinse system not readyFailed heating element PrewashFailed heating element Wash 1Failed heating element Wash 2Failed heating element Wash 3Failed heating element Pumped RinseFailed heating element BoosterFailed heating element DryerFailed heating element Demi BoosterFailed heating element Filling BoosterLeakage on pre wash drainDrain pre wash does not openLeakage on wash 1 drainDrain wash 1 does not openLeakage on wash 2 drainDrain wash 2 does not openLeakage on wash 3 drainDrain wash 3 does not openLeakage on pumped rinse drainDrain pumped rinse does not openStrainer PrewashStrainer Wash 1Strainer Wash 2Strainer Wash 3Strainer RinseStrainer E-ScrapperPAC31xx: no data availableData errorDocutronic: NO CONNECTIONSensotronic: NO CONNECTION 2.CPUMMC Data ExportMMC Data ImportBA-21853-003-GB 19.12.2011 33
GB6. Customer Menu6.4.2. Connection interruptedIf the connection to the Protronic III control is interrupted, this isindicated on the display:If the dishwasher was switched on, it will be switched off.––Please call the after sales service.6.5. Information––Push the Menu button.––Select menu level “Information”.ng hours Total Shift: 0 [h] 0 [h]rt : 0 [h] 0 [h]: 0 [h] 0 [h]onsumptionr : 0 [L] 0 [L]ater : 0 [L] 0 [L]1/2On the display appears e.g.:Display of messages defined in the control system.BLUE Line selected/enabledTo exit the menu:––Push the Menu button.34 19.12.2011 BA-21853-003-GB
6. Customer MenuGB6.5.1. Possible Information messagesNumberI0009I0010I0011I0012I0014I0016I0017I0018I0400I0401I0402I0403I0404I0405I0406I0410I0411I0412I0413I0414I0415I0416I0421I0422I0423I0424I0425I0426I0427I0428I0429I0440I0441I0442I0443I0444I0445I0446I0447I0448I0449I0450I0451I0452I0453I0454I0455I0460MessageDrain valve pre-wash openDrain valve(s) wash tank(s) openService Interval reachedTransport End switch ExitCleanAssistWash ON without OKService Interval informationStacker fullPrewash system disturbedWash 1 system disturbedWash 1 DA system disturbedWash 2 system disturbedWash 3 system disturbedWash system pumped rinse disturbedRinse system disturbedPrewash system not readyWash system 1 not readyWash system 1 DA not readyWash system 2 not readyWash system 3 not readyWash system pumped rinse not readyRinse system not readyFailed heating element PrewashFailed heating element Wash 1Failed heating element Wash 2Failed heating element Wash 3Failed heating element Pumped RinseFailed heating element BoosterFailed heating element DryerFailed heating element Demi BoosterFailed heating element Filling BoosterLeakage on drain of pre washDrain valve pre wash does not openLeakage on drain of wash 1Drain valve wash 1 does not openLeakage on drain of wash 2Drain valve wash 2 does not openLeakage on drain of wash 3Drain valve wash 3 does not openLeakage on drain of pumped rinseDrain valve pumped rinse does not openStrainer PrewashStrainer Wash 1Strainer Wash 2Strainer Wash 3Strainer RinseStrainer E-ScrapperSoil SensorBA-21853-003-GB 19.12.2011 35
GB6. Customer Menu6.6. Options––Push the Menu button.––Touch menu level “Options”.ng hours Total Shift: 0 [h] 0 [h]rt : 0 [h] 0 [h]: 0 [h] 0 [h]onsumptionr : 0 [L] 0 [L]ater : 0 [L] 0 [L]1/2On the display appears:Operating hours Total ShiftMachine Log on: 0 [h] 0 [h]Transport : 0 [h] 0 [h]Wash User: : 0 [h] 0 [h]Water consumption Password:Fill water : 0 [L] 0 [L]Rinse water : OK 0 [L] Cancel 0 [L]1/2CUST––Enter user name and password.Log on––Push the OK button to confirm.User:Password:Customer********OKCancel––Touch menu level “Options” again.On the display appears:Display of user-definable options:disabled/unlockedenabled/lockedBy pushing the check box, the functionwill be activated or deactivated.36 19.12.2011 BA-21853-003-GB
6. Customer MenuGB6.6.1. Hygiene ControlTransport OFF with faultIn case of a fault, the transport will be switched off and can only berestarted after the fault is eliminated.Transport OFF without “OK”If temperatures fall below the preset values, the transport will be switchedoff and cannot be restarted until operation temperatures are reachedagain.Activated Hygiene Control is indicated by thescreen.symbol on the start6.6.2. Emergency modeIn case the temperatures fall below the preset values, e.g. heating defect,this function enables transport and washing to be started manually.After turning the machine off and on, the emergency mode is deactivated.Resultingly, please note that the machine functions are not completelyensured and the wash and rinsing performance are possibly impaired.6.6.3. Autotimer functionThe Autotimer function starts the wash, rinse, and drying cycles whenwashware is entered into the machine.This function an be deactivated in the customer menu.6.6.4. Transport reverseeControlrt OFFTransport reverseTransp. reverse: hold buttonltSpeed"OK"Transport locker functionerPasswordGroupLogoff time* * * * * * * * Controler 5LOG OFFIt could happen that washware gets jammed with the conveyor belt andthe transport switches off. If it is not possible to remove the blockage,the conveyor belt must be reversed manually––Transport reverse is activated by pressing and holding (approx.3 s.) the button “Transp. reverse: hold button” (switches off automatically).––Jammed washware can now be removed.––In order to reactivate the transport reverse, the conveyor must firstbe moved forward for a short moment.Attention: Risk of injury!Function can also be activated if doors are open.BA-21853-003-GB 19.12.2011 37
GB6. Customer Menu6.6.5. Conveyor speedIf the dishwasher has multiple speed options, the selected speed can belocked by activating this function.Until the speed is once again unlocked, the machine can only be operatedat the locked speed.6.6.6. User/PasswordUserThree user levels are specified:1. User: client password: 00002. User: view password: 00003. User: service password: ****HygieneControlTransport OFFwith faultwithout "OK"Autotimer functionAutotimerUser PasswordTransport reverseTransp. reverse: hold buttonSpeedTransport lockGroupClient * * * * * * * * Controler 5LOG OFFLogoff timePasswordThe password of the current user can be changed as follows:––Double-click the field below “Password”.On the display appears:Change passwordNew password:Confirmation:OKCancel––Touch the input field New password, the screen keypad will beactivated.****––Enter the user name and touch the button to confirm.Length of password min. 3, max. 24 characters. Spaces and specialcharacters *?.% ⁄ \‘ „ cannot be used.When entering password, please note that it is case-sensitive.––Touch the input field Confirmation and enter the new passwordagain.Change password––Push the OK button. The new password is saved.New password:Confirmation:OK****************Cancel38 19.12.2011 BA-21853-003-GB
6. Customer MenuGBieneControlsport OFFfaultout "OK"totimer functionotimerPasswordTransport reverseTransp. reverse: hold buttonSpeedTransport lockGroupt * * * * * * * * Controler 5LOG OFFLogoff timeLogoff timeWhen no operator actions occur and the logoff time has expired, the useris automatically logged off.––Touch the field below Logoff time, the screen keypad will beactivated.––Enter the new logoff time (minutes) and touch the button toconfirm.To exit the menu:––Push “LOG OFF” or the Menu button.BA-21853-003-GB 19.12.2011 39
GB7. PreparationPut curtains in place(see section 10.)Put the flat strainers in place.Put the strainer baskets in place.Place pump intake strainers inposition at the bottom of the tank(rinse section).Put the rinse strainer in place.Put the loading section strainer inplace.Put the dryer deflector pan in place.Set wash arms in place:Upper: Set wash arm in side guides,move over stop unit and click intoplace.Lower: Move wash arm in side guidesto end position and click into place.Set rinse arms in place:Upper: Set rinse arm in back opening,move from below into front guideand click into place.Lower: Move rinse arm in guides toend position and click into place.40 19.12.2011 BA-21853-003-GB
8. WashingGB8.1. Start MachineIClose inspection doors.Open shut-off valve at site.OTurn on main switch and turnON/OFF switch to "Filling“ position.Press START button ➀, tank is filled.Filling, extraction, and heaters startup automatically.Wait until the machine is ready foroperation (the START symbol on thedisplay illuminates GREEN).Push the START button or the STARTsymbol to start the conveyor.8.2. Load ConveyorNote:Remove coarse food soiling before washing.Use loading platform to stack plates.Load plates on conveyorLoad trays onto conveyor crosswise.Do not mix trays and plates(shadow zones).BA-21853-003-GB 19.12.2011 41
GB8. WashingPut soup cups with inclination to themachine on 2 pegs of conveyor.Do not place soup cups vertically onconveyor.Put glasses and cups with the openingdownward into the rack.Glasses should not touch each other(glass fracture). Use a suitable rack.Put cutlery vertically and unsortedwith handle downwards into cutleryracks.Set the cutlery rack on a utensil rackand place onto conveyor.Wash utensils in utensil rack.Check that no grips or handles protrudethrough the rack or conveyor.Put the rack on conveyor.Put gastronorm pan and other bowlswith openings downward on conveyorwith inclination to side.Washware may not exceed maximumloading height and width.Pass through insulated trays with theopenings downward and crosswise.Do not set the insulated trays withopenings upward on conveyor.Water would stay in the recesses.Let the washware be transportedclose to the end of the conveyor togive enough time to dry.42 19.12.2011 BA-21853-003-GB
9. CleaningGBNote:Please observe your company-internal hygiene regulations.Machine can beswitched OFFPush the Conveyor OFF button.Conveyor and wash stop.Push the Drain button for minimum 5seconds to empty the machine.Exhaust and heating will stop automatically.Switch off machine.Wait until all tanks are drained andthe DRAIN-Symbol goes out (approx.30 minutes).IOSet main switch to "0". Open inspection doors. Take out curtains(see section 10.)Remove strainer baskets. Remove flat strainers. Remove the rinse strainer.BA-21853-003-GB 19.12.2011 43
GB 9. CleaningRemove pump intake strainers (rinsesection).Remove strainer from the loadingsection.Pull out dryer deflector pan.Do not knock strainersto remove food residue !They could be damaged.Hose down and brush the strainers.Remove wash arms:Upper: lift wash arm over stop unitand pull out toward the front.Lower: lift wash arm to pull outtoward the front.Remove end caps to clean washarms.Remove rinse arms:Upper: pull spring toward the frontand remove rinse arm.Lower: lift rinse arm and pull outtoward the front.Check nozzle openings and clean ifnecessary.Do not use detergents containingchlorine, acid or metal additives toclean the machine; and do not usemetal brushes.Never hose down the outside ofthe machine with a hose or highpressurecleaner.Open the cover and hose down theinterior of the loading section.Remove the side panels of the exitand clean it.44 19.12.2011 BA-21853-003-GB
9. CleaningGBHose down and clean the interior ofthe machine.Clean (1 x per month)IORemove the front panel of thecondenser hood.Clean condensers(by spraying with a hose).To drain the tanks, switch on mainswitch andIOpush the Drain button (5 seconds).The drain valves will be openedagain. Wait until the tanks are completelyemptied.Switch off the main switch and closeshut-off valve(s) at site.Leave the inspection doors open forventilation.BA-21853-003-GB 19.12.2011 45
GB10. Position of curtainsNote:The working direction as shown is left/right.In working direction right/left, the position of the curtains is reversed.L-AS-AE-S-AS-DAL AN-RS AN-RIf necessary:Fold open curtains, place lengthwise on conveyor and clean.46 19.12.2011 BA-21853-003-GB
11. Heat pump FHP (Option)GBCleaning (half-yearly)Attention:Should be carried out by an authorized technician!––Switch off main switch!IOAttention:Parts of the heat pump can be hot.Caution!Fins are sharp. Cut-wounds possible.Wear protective gloves!––Open the top cover and remove the front panel of the heat pump.Note:Do not use a steam or high-pressure cleaner.Avoid damaging!––Hose down condensers and evaporator!––After cleaning, put the front panel back into place and close the topcover.BA-21853-003-GB 19.12.2011 47
GB12. Frost PreventionAttention:Must be carried out by an authorized service technician!Drain machine (start drain cycle).Set main switch to "0".Set protective switch for heater of the electrical rinse booster heater/separate fill booster (option) to "OFF!“All tanks, water pipes and armatures must be totally drained.––Close shut-off valve(s) at site.––Remove drain plug at the bottom of the fresh water tank.––Machines with separate fill booster (option):Remove plug at the bottom of the fill booster.––Loosen the union behind the non-return valve.––Drain site water pipe work.––Drain odor traps of drain system.––Steam or hot water heated machines:Drain all heating coils and pipes.––Machines with condenser:Condenser must be blown out with compressed air.––Reset for operation according to section 4.48 19.12.2011 BA-21853-003-GB
13. TroubleshootingGBFault Cause RemedyInitial booster fill not possible. Shut off valve at site closed. Open the shut off valve at site andrestart.Fill system defective.Call the after sales service.Tank fill too slow. Line strainer of fill clogged. Clean line strainer.Solenoid valve defective.Shut off valve at site is not correctlyopen.Call the after sales service.Open the shut off valve at site.Tank not filled to correct level. Fill cycle too short. Call the after sales service.Steam escapes from feeding or exitsection.Shut off valve at site is not correctlyopen.Exhaust extraction too low.Wrong position of curtains.Too much wash water sprayed intothe loading section.Dryer deflector blades misaligned.Open the shut off valve at site.Call the after sales service.Check curtains.Check wash arms, curtains anddeflector plates. Insert washwarecorrectly.Adjust the slide on the dryer jet.Temperatures too low. Too much exhaust extraction. Call the after sales service.Heaters defective.Check heaters.Call the after sales service.Washware not sufficiently clean Strainers wrongly positioned. Check strainers.Streaks and spots onwashware.Curtains not fitted or wrongly placed. Check curtains (see section 10.)Wash jets clogged.Too low detergent concentration.Too much foam.Excessive food debris enteringmachine.Temperatures too low.Conveyor speed too high.Strainers wrongly positioned.Wash water splashes into rinse section.Rinse jets clogged.Inadequate rinse agent dispensing.Too high mineral content of rinsewater.Remove wash arms and clean.Increase detergent dispensing.Use non-foaming detergent only.Check pre-scrapping procedure.Check heating system.Select lower speed.Check strainers.Check curtains (see section 10.)Clean rinse jets.Check the dispenser and have itadjusted.Use of demineralized water recommended.BA-21853-003-GB 19.12.2011 49
GB13. TroubleshootingFault Cause RemedyWashware does not dry.Incorrect temperature or humidity ofdrying air.Conveyor speed too high.Washware not properly degreased.Inadequate rinse agent concentration.Check heater and blower of dryingunit.Select lower speed.Increase amount of detergent added.Check concentration.Dishes tilt over. Pots & Pans program activated. Never use the Pots & Pans programfor cleaning glasses and light washware.Machine out of order,display switched off.Water pressure from below too high.Upper wash arms clogged.Main switch switched off, power supplycompletely cut off.Emergency switch cut-off, powersupply completely cut-off.Power failure.Call the after sales service.Remove wash arms and clean.Switch on main switch, re-startmachine.Switch on emergency switch, re-startmachine.Check fuses at site.50 19.12.2011 BA-21853-003-GB
14. MaintenanceGB14.1. GeneralIn order to maintain the warranty and a continued safe, efficient, andfault-free operation of the installation, it is necessary to perform the requiredmaintenance work professionally.For this reason, we recommend signing an inspection or maintenancecontract that ensures qualified support through a specially trainedcustomer service technician according to a schedule adapted to thecompany needs.14.2. Dishwashers with Heat PumpThe built-in heat pump of your dishwasher contains fluorinatedgreenhouse gases covered by the Kyoto Protocol, and therefore,falls within the scope of the EC Regulation 842/2006.As this is not a hermetically-sealed system and the refrigerant chargeis more than 3 kg, you are obligated as operator of the refrigerationequipment to carry out the following measures:––At suspicion of refrigerant charge loss, a leakage check by certifiedpersonnel has to be arranged as soon as possible, and if necessary,the repair.––<strong>Equipment</strong> containing the refrigerant has to be checked for leakageby certified personnel at least once every 12 months.––Any detected leakage must be repaired immediately by certifiedpersonnel.––After a leak has been repaired, the equipment has to be checkedagain for leakage within one month.––When putting the equipment out of operation, you are responsiblefor making sure that the refrigerant contained in the equipment isproperly disposed of by certified personnel.––The above-mentioned diagnoses and/or measures must be recorded.These records have to be kept at least 5 years and submittedto the competent authority on request.For keeping records of checks, diagnoses, and measures, werecommend using the following forms.BA-21853-003-GB 19.12.2011 51
Records about the results of the leakage checksManufacturer’s data:HOBART GmbH, Robert-Bosch-Straße 17, 77656 Offenburg, GermanyHeat pump Manufacturer, Type: HOBART HP- / FHP-Year of manufacture:Serial-No:Refrigerant:R134aRefrigerant charge heating circuit tank:kgRefrigerant charge heating circuit final rinse water:kgLeakage check done at manufacturer: Date: Inspector:Operators data:Name:Postal address:<strong>Install</strong>ation location:Telephone:Leakage checks and results of all regular routine tests, if necessary longer downtimes, final decommissioning /scrapping:InspectiondateDetected defectcheckedCompany Name SignatureNextinspectionATTention: These records have to be kept at least 5 years after the last entry and be submitted to thecompetent authority on request.
Noticed defects and their repairingInspectiondateDetected defectRepair – If necessary modification /replacement of components* Refrigerant R134a refilled,recovered, discharged (kg)* If necessary detailed information about refilled refrigerant: Kind of the refrigerant (new / reused / recyceltes).If necessary analysis of the reused refrigerant; if necessary origin of the reused refrigerant.ATTention: These records have to be kept at least 5 years after the last entry and be submitted to thecompetent authority on request.
HOBART GmbHRobert-Bosch-Str. 1777656 OffenburgTelefon +49(0)781.600-0Fax +49(0)781.600-23 19E-Mail: info@hobart.deInternet: www.hobart.dePrinted in GermanyHOBART reserves the right to change or enhance all productswithout prior notice.You will receive detailed information from yourretailer or under:SERVICE Tel. 01803 45 62 58Internet: www.hobart.deE-Mail: info@hobart.de (within Germany)54 19.12.2011 BA-21853-003-GB