Firebox SSL VPN Gateway Administration Guide - WatchGuard ...
Firebox SSL VPN Gateway Administration Guide - WatchGuard ...
Firebox SSL VPN Gateway Administration Guide - WatchGuard ...

You also want an ePaper? Increase the reach of your titles
YUMPU automatically turns print PDFs into web optimized ePapers that Google loves.
<strong>WatchGuard</strong> ® <strong>Firebox</strong> <strong>SSL</strong> <strong>VPN</strong><strong>Gateway</strong> <strong>Administration</strong> <strong>Guide</strong><strong>Firebox</strong> <strong>SSL</strong> <strong>VPN</strong> <strong>Gateway</strong>
Notice to UsersInformation in this guide is subject to change without notice. Companies, names, and data used in examplesherein are fictitious unless otherwise noted. No part of this guide may be reproduced or transmitted in anyform or by any means, electronic or mechanical, for any purpose, without the express written permission of<strong>WatchGuard</strong> Technologies, Inc.Copyright, Trademark, and Patent InformationUse of the product documented in this guide is subject to your prior acceptance of the <strong>WatchGuard</strong> End UserLicense Agreement applicable to this product. You will be prompted to read and accept the End User LicenseAgreement when you register your <strong>Firebox</strong> on the <strong>WatchGuard</strong> website.Copyright© 2005 Citrix Systems, Inc. All rights reserved.Copyright© 2005 <strong>WatchGuard</strong> Technologies, Inc. All rights reserved<strong>WatchGuard</strong>, <strong>Firebox</strong>, LiveSecurity and any other word listed as a trademark in the “Terms of Use” portion ofthe <strong>WatchGuard</strong> website that is used herein are registered trademarks or trademarks of <strong>WatchGuard</strong>Technologies, Inc. in the United States and/or other countries.Citrix is a registered trademark of Citrix Systems, Inc in the U.S.A. and other countries.Microsoft, Windows, and Windows NT are either registered trademarks or trademarks of MicrosoftCorporation in the United States and/or other countries.All other trade names referred to are the Servicemark, Trademark, or Registered Trademark of the respectivemanufacturers.The <strong>Firebox</strong> <strong>SSL</strong> Access <strong>Gateway</strong> software is distributed with source code covered under the GNU GeneralPublic License (GPL). To obtain source code covered under the GPL, please contact <strong>WatchGuard</strong> TechnicalSupport at:877.232.3531 in the United States and Canada+1.206.613.0456 in all other countriesThis source code is free to download. There is a $35 charge to ship the CD.See Appendix B, “Legal and Copyright Information” on page 157 of this guide for the complete text of theGPL.<strong>VPN</strong> <strong>Gateway</strong> Software: 4.9Document Version: 2201-000ADDRESS:505 Fifth Avenue SouthSuite 500Seattle, WA 98104SUPPORT:www.watchguard.com/supportsupport@watchguard.comU.S. and Canada +877.232.3531All Other Countries +1.206.613.0456SALES:U.S. and Canada +1.800.734.9905All Other Countries +1.206.521.8340ABOUT WATCHGUARD<strong>WatchGuard</strong> is a leading provider of network security solutions for small- to midsizedenterprises worldwide, delivering integrated products and services that arerobust as well as easy to buy, deploy and manage. The company’s <strong>Firebox</strong> X family ofexpandable integrated security appliances is designed to be fully upgradeable as anorganization grows and to deliver the industry’s best combination of security,performance, intuitive interface and value. <strong>WatchGuard</strong> Intelligent Layered Securityarchitecture protects against emerging threats effectively and efficiently and providesthe flexibility to integrate additional security functionality and services offeredthrough <strong>WatchGuard</strong>. Every <strong>WatchGuard</strong> product comes with an initial LiveSecurityService subscription to help customers stay on top of the security landscape withvulnerability alerts, software updates, expert security instruction and superiorcustomer care. For more information, please call (206) 521-8340 or visitwww.watchguard.com.ii<strong>Firebox</strong> <strong>SSL</strong> <strong>VPN</strong> <strong>Gateway</strong> <strong>Administration</strong> <strong>Guide</strong>
Using the Telnet 3270 Emulator Client ...........................67Using the VNC Client ..........................................................68To use the VNC client: .......................................................68CHAPTER 4 Configuring <strong>Firebox</strong> <strong>SSL</strong> Network Connections ..71Configuring Network Interfaces .......................................72Specifying DNS/WINS Settings .......................................74Configuring Routes ........................................................75Configuring Dynamic Routing ...........................................75Adding, Testing, and Removing a Static Route ...............77Static Route Example ........................................................78Configuring Failover <strong>Firebox</strong> <strong>SSL</strong>s ....................................80Configuring <strong>Firebox</strong> <strong>SSL</strong> Operation...................81CHAPTER 5Configuring Authentication, Authorization, and Local Users ...82About the Realm Named Default .....................................84Using a Local User List for Authentication .......................84Using LDAP Authorization with Local Authentication .....85Using RADIUS Servers for Authentication ........................88To specify RADIUS server settings: ..................................89Using LDAP Servers for Authentication and Authorization ..91To specify LDAP server settings: ......................................92Looking Up Attributes in your LDAP Directory .................94Using RSA SecurID for Authentication .............................95To generate a sdconf.rec file for the <strong>Firebox</strong> <strong>SSL</strong>: ..........96To enable RSA SecurID authentication for the <strong>Firebox</strong><strong>SSL</strong>: ................................................................................97Resetting the Node Secret ................................................99Removing an Authentication Realm ...............................100To remove an authentication realm: ..............................100Adding Local Users ......................................................100To create a user on the <strong>Firebox</strong> <strong>SSL</strong>: .............................101To delete a user from the <strong>Firebox</strong> <strong>SSL</strong>: .........................102Controlling Network Access ..........................................102Specifying Accessible Networks .....................................103Defining Network Resource Groups ...............................104<strong>Firebox</strong> <strong>SSL</strong> <strong>VPN</strong> <strong>Gateway</strong> <strong>Administration</strong> <strong>Guide</strong>
Denying Access to Groups with No ACL .........................107Customizing <strong>VPN</strong> Portal Pages ......................................108Downloading and Working with Portal Page Templates ......110Loading Custom Portal Files on the <strong>Firebox</strong> <strong>SSL</strong> .........113Disabling Portal Page Authentication .............................114Linking to the <strong>VPN</strong> Clients from Your Website ..............115Configuring Host Check Rules ......................................116Example Host Check Rules .............................................118Configuring Network Shares for Kiosk Sessions .............119Adding and Configuring User Groups .............................121Configuring Resource ACLs for a User Group ...............124Configuring Kiosk Operation for a Group ......................126Configuring a Host Check Policy for a Group ................128Choosing a Portal Page for a Group ...............................130Enabling IP Pooling ..........................................................131Setting the Priority of Groups .........................................132Enabling Split Tunneling ...............................................134Enabling Split DNS ......................................................135Enabling Session Timeout ............................................136Configuring Internal Failover .........................................137Forcing <strong>VPN</strong> User Re-login ............................................138Configuring Secure Access for Single Sign-on ................140APPENDIX A Logging, Monitoring, and Troubleshooting <strong>Firebox</strong><strong>SSL</strong> Operations143Viewing and Downloading System Message Logs ...........143Forwarding System Messages to a Syslog Server ........145Enabling and Viewing SNMP Logs .................................146MRTG Example .................................................................147Viewing System Statistics ............................................149Monitoring <strong>Firebox</strong> <strong>SSL</strong> Operations ...............................150Recovering from a Crash of the <strong>Firebox</strong> <strong>SSL</strong> ..................153To reinstall the <strong>Firebox</strong> <strong>SSL</strong> server software: ................154Troubleshooting ...........................................................154APPENDIX B Legal and Copyright Information ....................157vi<strong>Firebox</strong> <strong>SSL</strong> <strong>VPN</strong> <strong>Gateway</strong> <strong>Administration</strong> <strong>Guide</strong>
CHAPTER 1<strong>Firebox</strong> <strong>SSL</strong> OverviewThe <strong>WatchGuard</strong> <strong>Firebox</strong> <strong>SSL</strong> is a network appliance that providessecure remote access to network resources and all applications,including web, client-server, and peer-to-peer such asInstant Messaging (IM), video conferencing, and real-timeVoice over IP (VoIP) applications. Combining the advantages ofboth IP Security (IPSec) and Secure Socket Layer (<strong>SSL</strong>) VirtualPrivate Network (<strong>VPN</strong>) solutions, the <strong>Firebox</strong> <strong>SSL</strong> provides full,secure application access without requiring changes to applicationsor Domain Name Service (DNS).The <strong>Firebox</strong> <strong>SSL</strong> gives the remote user seamless, secure accessto authorized applications and network resources. Remoteusers can work with files on network drives, email, Intranetsites, and applications just as if they were working inside oftheir organization’s firewall.The <strong>Firebox</strong> <strong>SSL</strong> also provides clientless kiosk operation, whichopens a Virtual Network Computing (VNC) like connection forremote users who access the <strong>Firebox</strong> <strong>SSL</strong> from a non-securecomputer. Kiosk user access can include shared network drives,a variety of built-in clients, servers running Windows TerminalServices (Remote Desktop), VNC servers, and Citrix ICA.The following topics provide an overview to the <strong>Firebox</strong> <strong>SSL</strong>:• “Overview” on page 2<strong>Firebox</strong> <strong>SSL</strong> <strong>VPN</strong> <strong>Gateway</strong> <strong>Administration</strong> <strong>Guide</strong> 1
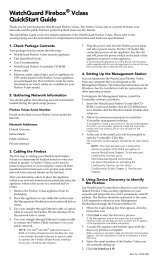
<strong>Firebox</strong> <strong>SSL</strong> OverviewOverview• “Feature Summary” on page 4• “The User Experience” on page 6• “Deployment and <strong>Administration</strong>” on page 7• “<strong>Firebox</strong> <strong>SSL</strong> Operation” on page 8• “Kiosk Operation” on page 13• “Deployment Options” on page 16<strong>WatchGuard</strong> provides other network appliance products. Forinformation, go to http://www.watchguard.com.The <strong>Firebox</strong> <strong>SSL</strong> installs into any network infrastructure withoutrequiring changes to the existing hardware or back-end software.The <strong>Firebox</strong> <strong>SSL</strong> sits in front of application and web serversand works with other networking products such as firewalls,server load balancers, cache engines, routers, and IEEE 802.11broadband wireless devices.The <strong>Firebox</strong> <strong>SSL</strong>, installed in the corporate DMZ, participates ontwo networks: a private network and a public network with apublicly routable IP address. The <strong>Firebox</strong> <strong>SSL</strong> can also partitionlocal area networks internally in the organization for accesscontrol and security between wired/wireless and data/voice networks.As shown in the following illustration, the <strong>Firebox</strong> <strong>SSL</strong> is appropriatefor employees accessing the organization remotely, Businessto Business (B2B) access and transactions, and intranetaccess from restricted LANs such as wireless networks.2 <strong>Firebox</strong> <strong>SSL</strong> <strong>VPN</strong> <strong>Gateway</strong> <strong>Administration</strong> <strong>Guide</strong>
OverviewAs shown in the following illustration, the <strong>Firebox</strong> <strong>SSL</strong> creates avirtual TCP circuit between the client computer running the<strong>WatchGuard</strong> Secure Access client and itself.The virtual TCP circuit is encrypted using proven technologiessuch as <strong>SSL</strong> and Transport Layer Security (TLS). All packets des-<strong>Firebox</strong> <strong>SSL</strong> <strong>VPN</strong> <strong>Gateway</strong> <strong>Administration</strong> <strong>Guide</strong> 3
<strong>Firebox</strong> <strong>SSL</strong> Overviewtined for the private network are transported over the virtualTCP circuit. The <strong>Firebox</strong> <strong>SSL</strong> is essentially acting as a low-levelpacket filter with encryption. It drops traffic which does nothave authentication or does not have permission for a particularnetwork.Feature SummaryMost of the features listed in the following table are implicitlysupported through the ability of the <strong>Firebox</strong> <strong>SSL</strong> to interceptevery network connection initiated on the client computer,whether TCP (connection-oriented applications) or UDP (voiceand video applications). The Secure Access client forwards all IPpackets over an <strong>SSL</strong> tunnel to the <strong>Firebox</strong> <strong>SSL</strong> based on dynamicallydetermined routing policies which are transparent to theremote user. The <strong>Firebox</strong> <strong>SSL</strong> retransmits these IP packets to theintended host.ApplicationsupportProtocolsupportPlatformsupportUnlike other <strong>VPN</strong> solutions, the <strong>Firebox</strong> <strong>SSL</strong> is applicationagnostic.The <strong>Firebox</strong> <strong>SSL</strong> operates more like an IPSec <strong>VPN</strong> thanan <strong>SSL</strong> <strong>VPN</strong>.Supports all applications (web, client-server, peer-to-peer, and realtime)without modification to the applications or DNS.Handles real-time traffic, such as voice (RTP/SIP), with minimalloss in performance.Supports IP.Supports PPPoE (Point-to-Point Protocol over Ethernet) and PPP.Supports Ethernet, including 802.11, and Remote Access Service(RAS) connections, including TCP, UDP, and Internet ControlMessage Protocol (ICMP).Supports computers running Windows 2000, Windows 2000Professional, Windows 2000 Server, Windows XP, Windows XPHome, Windows XP Professional, and all Linux 2.4 platforms(tested extensively with RedHat). Includes a client that supportscomputers, such as Macintosh, running Java Virtual Machine (JVM)version 1.4.2 or higher.4 <strong>Firebox</strong> <strong>SSL</strong> <strong>VPN</strong> <strong>Gateway</strong> <strong>Administration</strong> <strong>Guide</strong>
OverviewEase of use anddeploymentEase of use anddeployment(continued)<strong>VPN</strong> operationKiosk operationPerformanceAuthentication,authorization,and accesscontrolAutomatically updates the Secure Access client when a newversion is available on the <strong>Firebox</strong> <strong>SSL</strong>.The Secure Access client can go into a suspend state rather thantiming out so that the connection is always available and the userdoes not have to repeatedly log in. The Secure Access clientcontinues to run in memory even when the laptop or PC isdisconnected from the network. This functionality ensures securityover 802.11 networks without having to deploy and maintain aWEP environment.The Secure Access client can be configured for single sign-onoperation so that it starts automatically after a user logs in toWindows. A user’s Windows login credentials are passed to the<strong>Firebox</strong> <strong>SSL</strong> for authentication and then the <strong>VPN</strong> connection isautomatically established without user intervention. Windows loginscripts run after the <strong>VPN</strong> connection is established.Includes the option to use the default portal pages (Access Portal),to customize easy-to-use portal page templates, or to include linksto the clients directly on your website.Provides access to remote networks that have the samenumbering as the local subnet.Provides users with a desktop-like network experience. Throughthe <strong>VPN</strong> connection, users can:Map network drives just as they would from their in-officecomputer.Work with client applications, such as Microsoft Outlook or anyother application, in their native user interface. The remote userdoes not need to do any client application reconfiguration.<strong>VPN</strong> users can seamlessly access the <strong>Firebox</strong> <strong>SSL</strong> even if they arebehind another organization’s firewall.Provides, on a group basis, access to a private network from publiccomputers.Sends images, not data, to the kiosk. Because no temporary filesor cookies are downloaded to the remote computer, there is norisk of files remaining after the session.Opens a VNC-like window that is configurable by group. Optionalcomponents include a Mozilla browser window with a configurabledefault URL, network shares, and icons that provide one-clickaccess to Remote Desktop, VNC, Telnet 3270 emulator, SSH, andCitrix ICA clients.Supports up to 205 tunnelsProvides throughput of 75 MB per second.Supports HTTP 401 Basic, Digest, and Windows DomainAuthentication and RADIUS, LDAP, and RSA SecurID authenticationservers. User accounts can also be defined on the <strong>Firebox</strong> <strong>SSL</strong>.Supports realm-based authentication so that a single <strong>Firebox</strong> <strong>SSL</strong>can be used with multiple authentication servers.Supports LDAP or local user group authorization.Provides access control through the association of resources touser groups.<strong>Firebox</strong> <strong>SSL</strong> <strong>VPN</strong> <strong>Gateway</strong> <strong>Administration</strong> <strong>Guide</strong> 5
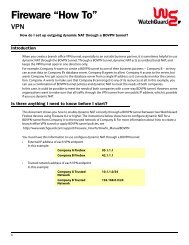
<strong>Firebox</strong> <strong>SSL</strong> OverviewSecuritySecurity(continued)Supports digital certificates in Privacy Enhanced Mail (PEM) formatthat include a private key. Notifies <strong>VPN</strong> users if the <strong>Firebox</strong> <strong>SSL</strong> towhich they connect does not have a certificate that is signed by aCertificate Authority, and therefore is not a trusted device.Redirects over a secure tunnel all network traffic (all IP packets)destined for certain private networks. Uses <strong>SSL</strong> (v1 and v2) andTLS <strong>SSL</strong> (v3) to encrypt every packet, including any headerinformation. This provides a very high level of security and doesnot provide anyone who gets access to the secure stream theability to reconstruct any useful information. Supports <strong>SSL</strong> withcompression.Supports 196-bit TLS <strong>SSL</strong> encryption, as well as lower and higherbit values defined in your certificate. You might prefer to lower theencryption if performance is more important than security.Supports all Open<strong>SSL</strong> ciphers: CAST, CAST5, DES, Triple-DES,IDEA, RC2, RC4, and RC5.Supports the 802.11 optional encryption scheme, WiredEquivalent Privacy (WEP).Requires only one available port: 443 (by default).Makes IP addresses either invisible or visible to accessed networkapplications, by application or host. When network IP addressesare hidden, the remote user’s <strong>VPN</strong> connection looks like a browsersession rather than an IP address and thus blocks worm traversal.Does not touch client-side route tables.Supports configurable host check rules to ensure that a <strong>VPN</strong>user’s computer meets the requirements of the rule. You canrequire that a connecting computer has a particular registry path,file, and/or active process. For example, host check rules enableyou to enforce real-time checking of the presence of firewall or antivirussoftware; if a <strong>VPN</strong> user stops the firewall or anti-virussoftware, the <strong>VPN</strong> tunnel is immediately frozen.The User ExperienceThe <strong>Firebox</strong> <strong>SSL</strong> provides users with the desk-like network experiencethat they have with an IPSec <strong>VPN</strong>, but does so withoutany need to configure a client. The user starts the Secure Accessclient by accessing a secure web URL through a standard webbrowser, and then providing authentication credentials.Because the <strong>Firebox</strong> <strong>SSL</strong> traverses all ports of firewalls, remoteusers can access the <strong>Firebox</strong> <strong>SSL</strong> regardless of their location. Fora more detailed description of the user experience, see “Connectingfrom a Private Computer” on page 56.The following illustration shows the default Windows version ofthe Access Portal.6 <strong>Firebox</strong> <strong>SSL</strong> <strong>VPN</strong> <strong>Gateway</strong> <strong>Administration</strong> <strong>Guide</strong>
OverviewNOTEThe portal page is customizable, as described in “Customizing<strong>VPN</strong> Portal Pages” on page 108. You can also include a link tothe clients on a website, as described in “Linking to the <strong>VPN</strong>Clients from Your Website” on page 115.After a successful login, the user can work with network sharesand run applications just as if the user were sitting inside of theorganization’s firewall.The remote user does not need to do any client applicationreconfiguration and works with client applications in theirnative user interface.Deployment and <strong>Administration</strong>The <strong>Firebox</strong> <strong>SSL</strong> is fast to deploy and simple to administer. Youinstall the <strong>Firebox</strong> <strong>SSL</strong> in your organization’s DMZ, giving itaccess to the external and internal networks. The most typicaldeployment configuration is to locate the <strong>Firebox</strong> <strong>SSL</strong> behindyour firewall or to straddle the firewall. More complex deployments,such as with a server load balancer, are also supportedand described in “Deployment Options” on page 16.The first-time that you start the <strong>Firebox</strong> <strong>SSL</strong>, you use the <strong>Firebox</strong><strong>SSL</strong> <strong>Administration</strong> Tool to configure the basic settings that<strong>Firebox</strong> <strong>SSL</strong> <strong>VPN</strong> <strong>Gateway</strong> <strong>Administration</strong> <strong>Guide</strong> 7
<strong>Firebox</strong> <strong>SSL</strong> Overvieware specific to your site, such as the <strong>Firebox</strong> <strong>SSL</strong> IP address, netmask,default gateway IP address, and DNS addresses. After youcomplete the basic connection, you then configure the settingsspecific to <strong>VPN</strong> operation, such as the options for authentication,authorization, and group-based access control, kiosk operation,host checking, portal pages, and IP pools.All <strong>Firebox</strong> <strong>SSL</strong> administration and monitoring is performedthrough the <strong>Firebox</strong> <strong>SSL</strong> Remote Admin Terminal window,which provides access to the <strong>Administration</strong> Tool and a varietyof standard network monitoring tools, including Ethereal NetworkMonitor, xNetTools, Traceroute, fnetload, and SystemMonitor. The <strong>Firebox</strong> <strong>SSL</strong> Remote Admin Terminal window alsoprovides access to the Real-time Monitor, where you can view alist of current <strong>VPN</strong> users and groups and close the <strong>VPN</strong> connectionfor any user or groupYou will need to provide remote <strong>VPN</strong> users with the URL of the<strong>Firebox</strong> <strong>SSL</strong> and a list of the resources that they can access.Remote users can log in with their usual credentials and do notneed to perform any configuration of the Secure Access client orany application clients, resulting in minimal user support.<strong>Firebox</strong> <strong>SSL</strong> OperationThe <strong>Firebox</strong> <strong>SSL</strong> performs the following functions:• Authentication• Termination of encrypted sessions• Access control (based on permissions)• Data traffic relay (when the first three functions are met)The <strong>Firebox</strong> <strong>SSL</strong> operates as follows:1 A remote user obtains the Secure Access client by accessinga secure web URL and providing authentication credentials.2 After a successful login, the <strong>Firebox</strong> <strong>SSL</strong> establishes a securetunnel.3 As the remote user attempts to access network resourcesacross the <strong>VPN</strong> tunnel, the <strong>Firebox</strong> <strong>SSL</strong> encrypts all networktraffic destined for the organization’s intranet and forwards8 <strong>Firebox</strong> <strong>SSL</strong> <strong>VPN</strong> <strong>Gateway</strong> <strong>Administration</strong> <strong>Guide</strong>
<strong>Firebox</strong> <strong>SSL</strong> Operationthe packets and user credentials over an HTTPS session tothe <strong>Firebox</strong> <strong>SSL</strong>.4 The <strong>Firebox</strong> <strong>SSL</strong> terminates the <strong>SSL</strong> tunnel and accepts anyincoming packets destined for the private network. Afterfixing the packets, the <strong>Firebox</strong> <strong>SSL</strong> injects them into theprivate network. The <strong>Firebox</strong> <strong>SSL</strong> sends traffic back to theremote computer over a secure tunnel.Those steps are detailed in the following sections:• “Starting the Secure Access Client” on page 9• “Establishing the Secure Tunnel” on page 10• “Tunneling Destination Private Address Traffic over <strong>SSL</strong> orTLS” on page 10• “Terminating the Secure Tunnel and Returning Packets tothe Client” on page 12Starting the Secure Access ClientA remote user obtains the Secure Access client by accessing asecure web URL, typically the public host name of the <strong>Firebox</strong><strong>SSL</strong>. The <strong>Firebox</strong> <strong>SSL</strong> prompts the user for authentication overHTTP 401 Basic or Digest. The <strong>Firebox</strong> <strong>SSL</strong> authenticates thecredentials with a corporate logon server (LDAP, RADIUS, RSAACE) and if the credentials are correct, finishes the handshakewith the client personal computer. This login step is requiredonly when the user initially downloads the Secure Access client.If the user is behind a proxy server, the user can specify theproxy server, and authentication credentials if required, beforelogging in by right-clicking the login dialog and choosingAdvanced Options.The Secure Access client is installed on the remote user’s computerand operates at Layer 2 (between Ethernet and IP). Afterthe first connection, the remote user can subsequently use adesktop shortcut to start the Secure Access client, thus bypassingthe portal page login step.Enabling Single Sign-On Operation for the SecureAccess ClientIf the Secure Access client is configured for single sign-on operation,it automatically starts after the user logs in to Windows.The user’s Windows login credentials are passed to the <strong>Firebox</strong><strong>Firebox</strong> <strong>SSL</strong> <strong>VPN</strong> <strong>Gateway</strong> <strong>Administration</strong> <strong>Guide</strong> 9
<strong>Firebox</strong> <strong>SSL</strong> Overview<strong>SSL</strong> for authentication. Enabling single sign-on for the SecureAccess client facilitates operations on the remote computer suchas installation scripts and automatic drive mapping.Establishing the Secure TunnelOnce the Secure Access client has been started, it establishes asecure tunnel over HTTPS port 443 (or any configured port onthe <strong>Firebox</strong> <strong>SSL</strong>) and sends authentication information to validatethe tunnel. Once the tunnel is established, the <strong>Firebox</strong> <strong>SSL</strong>sends configuration information to the Secure Access clientdescribing the networks to be secured and containing an IPaddress if you enabled IP address visibility.Tunneling Destination Private Address Traffic over<strong>SSL</strong> or TLSAfter the Secure Access client is authenticated and started, allnetwork traffic destined for certain private networks is capturedand redirected over the secure tunnel to the <strong>Firebox</strong> <strong>SSL</strong>.The <strong>Firebox</strong> <strong>SSL</strong> intercepts all network connections made by theclient computer and multiplexes/tunnels them over <strong>SSL</strong> to the<strong>Firebox</strong> <strong>SSL</strong>, where the traffic is de-multiplexed and the connectionsare forwarded to the correct host and port combination,determined by the client-server application in real time. TheSecure Access client streams any dynamic port traffic over <strong>SSL</strong>to the <strong>Firebox</strong> <strong>SSL</strong> where connections are re-established to theserver at its desired dynamic port. On both the <strong>Firebox</strong> <strong>SSL</strong> andthe Secure Access client, RTP packets are prioritized and processedbefore any other packets.The connections are subject to flexible administrative securitypolicies which can apply to a single application, a subset ofapplications, or an entire intranet. You use the <strong>Firebox</strong> <strong>SSL</strong><strong>Administration</strong> Tool to specify the resources (ranges of IPaddress/netmask pairs) that remote users can access through the<strong>VPN</strong> connection.All IP packets, regardless of protocol, are intercepted and transmittedover the secure link. This functionality is what providesIPSec equivalent functionality to the <strong>Firebox</strong> <strong>SSL</strong>. Consider TCPconnections, for example. Connections from local applicationson the client computer are securely tunneled over to the <strong>Firebox</strong><strong>SSL</strong>, which re-establishes the connections to the target server.10 <strong>Firebox</strong> <strong>SSL</strong> <strong>VPN</strong> <strong>Gateway</strong> <strong>Administration</strong> <strong>Guide</strong>
<strong>Firebox</strong> <strong>SSL</strong> OperationTarget servers view connections as originating from the local<strong>Firebox</strong> <strong>SSL</strong> on the private network, thus hiding client IP address(reverse NAT). Hiding IP addresses adds security to source locationsin B2B implementations and also secures the wireless networkin an organization for its users and visitors, providing aviable alternative to WEP.Locally, on the client computer, all connection-related traffic(such as SYN-ACK, PUSH, ACK and FIN packets) are recreated bythe Secure Access client to appear from the private server.Operation through NAT Firewalls and ProxiesUsers of the Secure Access client will sometimes be locatedinside of another organization’s firewall, as shown in the followingillustration.NAT firewalls maintain a NAT table that allows them to routesecure packets from the <strong>Firebox</strong> <strong>SSL</strong> back to the client computer.For circuit-oriented connections, the <strong>Firebox</strong> <strong>SSL</strong> maintainsa port-mapped, reverse NAT translation table. The reverseNAT translation table enables the <strong>Firebox</strong> <strong>SSL</strong> to match connectionsand send packets back over the tunnel to the client with<strong>Firebox</strong> <strong>SSL</strong> <strong>VPN</strong> <strong>Gateway</strong> <strong>Administration</strong> <strong>Guide</strong> 11
<strong>Firebox</strong> <strong>SSL</strong> Overviewthe correct port numbers so that the packets return to the correctapplication.The <strong>Firebox</strong> <strong>SSL</strong> tunnel is established using industry standardconnection establishment techniques such as HTTPS, ProxyHTTPS, and SOCKS. This operation makes the <strong>Firebox</strong> <strong>SSL</strong> firewallfriendly and thus allows remote computers to access privatenetworks from behind other organization firewalls without creatingany problems.For example, the connection can be made via an intermediateproxy, such as an HTTP proxy, by issuing a CONNECT HTTPScommand to the intermediate proxy. Any credentials requestedby the intermediate proxy, will be in turn obtained from theremote user (by using single signon information or by requestingthe information from the remote user) and presented to theintermediate proxy server. Once the HTTPS session is established,the payload of the session is encrypted and carries securepackets to the <strong>Firebox</strong> <strong>SSL</strong>.Terminating the Secure Tunnel and ReturningPackets to the ClientThe <strong>Firebox</strong> <strong>SSL</strong> terminates the <strong>SSL</strong> tunnel and accepts anyincoming packets destined for the private network. If the packetsmeet the authorization and access control criteria, the <strong>Firebox</strong><strong>SSL</strong> regenerates the packet IP headers so that they appearto originate from the <strong>Firebox</strong> <strong>SSL</strong>’s private network IP addressrange or the client-assigned private IP address. The <strong>Firebox</strong> <strong>SSL</strong>then injects the packets into the network.NOTEIf you run a packet sniffer such as Ethereal on the PC wherethe Secure Access client is running, you will see unencryptedtraffic that appears to be between the client and the <strong>Firebox</strong><strong>SSL</strong>. That unencrypted traffic, however, is not over the tunnelbetween the client and the <strong>Firebox</strong> <strong>SSL</strong> but rather the tunnelto the local applications.The Secure Access client maintains two tunnels: an <strong>SSL</strong>tunnel over which data is sent to the <strong>Firebox</strong> <strong>SSL</strong> (the snifferalso detects this tunnel) and a tunnel between the client andlocal applications. The encrypted data that arrives over the<strong>SSL</strong> tunnel is then decrypted before being sent to the localapplication over the second tunnel. The packet sniffer sees12 <strong>Firebox</strong> <strong>SSL</strong> <strong>VPN</strong> <strong>Gateway</strong> <strong>Administration</strong> <strong>Guide</strong>
Kiosk Operationthe second tunnel’s traffic, which appears to be from the<strong>Firebox</strong> <strong>SSL</strong>, after the traffic is already decrypted.When an application client connects to its application server,certain protocols may require that the application server in turnattempt to create a new connection with the client. In this case,the client sends its known local IP address to the server bymeans of a custom client-server protocol. For these applications,the Secure Access client is able to provide the local client applicationa private IP address representation, which the <strong>Firebox</strong> <strong>SSL</strong>will use on the internal network. Many real-time voice applicationsand FTP use this feature.Performance and Real-time TrafficReal-time applications, such as voice and video, are implementedover UDP (since TCP is not appropriate for real-timetraffic due to the delay introduced by acknowledgements andretransmission of lost packets). It is more important to deliverpackets in real time than to ensure that all packets are delivered.However, with any tunneling technology over TCP, such realtimeperformances cannot be met.The <strong>Firebox</strong> <strong>SSL</strong> overcomes this issue by routing UDP packetsover the secure tunnel as special IP packets that do not requireTCP acknowledgements. Even if the packets get lost in the network,there is no attempt made by either the client or the serverapplications to regenerate them, so real-time (UDP like) performanceis achieved over a secure TCP-based tunnel.Kiosk OperationThe <strong>Firebox</strong> <strong>SSL</strong> also provides secure access to a private networkfrom a public computer through optional kiosk operation. Whenremote users indicate that they are connecting from a publiccomputer, the <strong>Firebox</strong> <strong>SSL</strong> opens a Virtual Network Computing(VNC) like connection in a window.• For computers running Windows 2000 and above, kioskoperation is available through the Access Portal. The kiosklink can be removed from the Access Portal on a groupbasis.<strong>Firebox</strong> <strong>SSL</strong> <strong>VPN</strong> <strong>Gateway</strong> <strong>Administration</strong> <strong>Guide</strong> 13
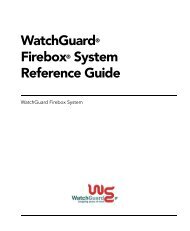
<strong>Firebox</strong> <strong>SSL</strong> Overview• For computers running a JVM 1.4.2 or higher (such asMacintosh or Windows 95/98 computers), kiosk operation isavailable through a Java applet. For Macintosh, Safari is thesupported browser.During kiosk operation, the <strong>Firebox</strong> <strong>SSL</strong> sends images only (nodata) over the <strong>VPN</strong> connection. As a result, there is no risk ofleaving temporary files or cookies on the public computer. Bothtemporary files and cookies are maintained on the <strong>Firebox</strong> <strong>SSL</strong>for the session.As shown in the following example, the <strong>Firebox</strong> <strong>SSL</strong> kiosk displaycan include a web browser, several applications, and networkshares.The browser defaults to a URL that is configured per groupthrough the <strong>Firebox</strong> <strong>SSL</strong> <strong>Administration</strong> Tool. The kiosk windowcan also include one-click access to Citrix ICA, Remote Desktop,14 <strong>Firebox</strong> <strong>SSL</strong> <strong>VPN</strong> <strong>Gateway</strong> <strong>Administration</strong> <strong>Guide</strong>
Kiosk OperationSSH, Telnet 3270 emulator, and VNC clients, through icons thatdisplay in the bottom-right corner of the window. You specifyfor each group the applications to be included.The kiosk window also provides one-click access to shared networkdrives, through icons such as the one labelled “ws” in thefollowing example. The <strong>Firebox</strong> <strong>SSL</strong> administrator configuresthe permissions granted (read-only or read/write) to each sharednetwork drive.The following example shows the result of opening a sharednetwork drive.<strong>VPN</strong> users can copy files from the network share to their computersimply by dragging the file onto the KioskFTP icon andselecting the destination in the File Download dialog box.<strong>Firebox</strong> <strong>SSL</strong> <strong>VPN</strong> <strong>Gateway</strong> <strong>Administration</strong> <strong>Guide</strong> 15
<strong>Firebox</strong> <strong>SSL</strong> OverviewDeployment OptionsThe <strong>Firebox</strong> <strong>SSL</strong> Quick Start describes how to install the <strong>Firebox</strong><strong>SSL</strong> with a firewall, the most common configuration. You canalso connect the <strong>Firebox</strong> <strong>SSL</strong> to other devices such as a serverload balancer or router.Connecting to a Server Load BalancerYou can connect one or more <strong>Firebox</strong> <strong>SSL</strong>s to a server load balancer.Characteristics of this configuration include the following:• Incoming web traffic is intercepted by the server loadbalancer and load balanced between the <strong>Firebox</strong> <strong>SSL</strong>s (ifmore than one <strong>Firebox</strong> <strong>SSL</strong> is in use).• For optimal performance, the server load balancer isconfigured with a virtual IP (VIP). The VIP is used by the<strong>Firebox</strong> <strong>SSL</strong> when reestablishing connection to the serverload balancer.• The <strong>Firebox</strong> <strong>SSL</strong> External Public Address is the externalfacing(public) VIP address of the server load balancer. The<strong>Firebox</strong> <strong>SSL</strong> modifies all requests to include the ExternalPublic Address. The External Public Address ensures that theredirected client returns to the <strong>Firebox</strong> <strong>SSL</strong> it firstencountered, providing session stickiness. The associationbetween a particular request and the <strong>Firebox</strong> <strong>SSL</strong> is brokenonly when the client makes a new connection.To establish the physical connection, connect the <strong>Firebox</strong> <strong>SSL</strong>eth0 interface to the internal network. Use the <strong>Firebox</strong> <strong>SSL</strong><strong>Administration</strong> Tool to configure network settings. Specify theIP address of the server load balancer as the Default <strong>Gateway</strong>setting on the Networking > General Networking tab.16 <strong>Firebox</strong> <strong>SSL</strong> <strong>VPN</strong> <strong>Gateway</strong> <strong>Administration</strong> <strong>Guide</strong>
CHAPTER 2Administering the<strong>Firebox</strong> <strong>SSL</strong>The following topics describe how to administer your <strong>Firebox</strong><strong>SSL</strong>:• “Using the <strong>Firebox</strong> <strong>SSL</strong> Remote Admin Terminal Window”on page 18• “Using the <strong>Administration</strong> Tool” on page 21• “Using the Serial Console” on page 23• “Upgrading the <strong>Firebox</strong> <strong>SSL</strong> Software” on page 23• “Supporting Secure Access Users” on page 25• “Generating a Secure Certificate for the <strong>Firebox</strong> <strong>SSL</strong>” onpage 29• “Blocking External Access to the <strong>Administration</strong> Portal” onpage 39• “Managing Licenses” on page 40• “Viewing and Changing the System Date and Time” onpage 41• “Managing Administrative Users” on page 42• “Saving and Restoring the Configuration” on page 43• “Managing <strong>VPN</strong> Connections” on page 45• “Restarting the <strong>Firebox</strong> <strong>SSL</strong>” on page 49<strong>Firebox</strong> <strong>SSL</strong> <strong>VPN</strong> <strong>Gateway</strong> <strong>Administration</strong> <strong>Guide</strong> 17
Administering the <strong>Firebox</strong> <strong>SSL</strong>• “Shutting Down the <strong>Firebox</strong> <strong>SSL</strong>” on page 49NOTEThis chapter assumes that you have set up the <strong>Firebox</strong> <strong>SSL</strong>hardware and performed the initial configuration asdescribed in the <strong>Firebox</strong> <strong>SSL</strong> Quick Start.Using the <strong>Firebox</strong> <strong>SSL</strong> Remote Admin TerminalWindowThe VNC-like <strong>Firebox</strong> <strong>SSL</strong> Remote Admin Terminal window providesaccess to <strong>Firebox</strong> <strong>SSL</strong> configuration and monitoring tools.As shown in the following illustration, the Remote Admin Terminalwindow includes the <strong>Administration</strong> Tool, a graphicalinterface used to configure the <strong>Firebox</strong> <strong>SSL</strong>. The Remote AdminTerminal taskbar also includes one-click access to a variety ofstandard Linux monitoring applications as well as the Real-timeMonitor, used to view and manage open <strong>VPN</strong> connections, andthe system time and date.18 <strong>Firebox</strong> <strong>SSL</strong> <strong>VPN</strong> <strong>Gateway</strong> <strong>Administration</strong> <strong>Guide</strong>
Using the <strong>Firebox</strong> <strong>SSL</strong> Remote Admin Terminal Window<strong>Administration</strong>Tool TabsHelpTaskbar<strong>Administration</strong> Tool MonitoringWorkspace Switcher Processor UsageApplications and Taskbar Buttons Network UsageReal-time MonitorSystem Time/DateTo open the Remote Admin Terminal window:1 Make sure that the <strong>Firebox</strong> <strong>SSL</strong> is running.2 From a web browser, connect to the <strong>Firebox</strong> <strong>SSL</strong> by enteringthe URL:https://ipAddress:9001where:- ipAddress is the IP address of your <strong>Firebox</strong> <strong>SSL</strong>- 9001 is the administration port of your <strong>Firebox</strong> <strong>SSL</strong>3 If a Security Alert dialog box appears, click Yes.The <strong>Firebox</strong> <strong>SSL</strong> <strong>Administration</strong> Portal appears.<strong>Firebox</strong> <strong>SSL</strong> <strong>VPN</strong> <strong>Gateway</strong> <strong>Administration</strong> <strong>Guide</strong> 19
Administering the <strong>Firebox</strong> <strong>SSL</strong>From the Downloads page, you can launch or download the<strong>Administration</strong> Tool and download documentation, portal pagetemplates, and a sample email that you can customize withinstructions for <strong>VPN</strong> users.NOTEBy default, if you configure the <strong>Firebox</strong> <strong>SSL</strong> to use both LANinterfaces, the <strong>Administration</strong> Portal can be accessed fromeither interface. To block administration access from theexternal-facing interface, see “Blocking External Access tothe <strong>Administration</strong> Portal” on page 39.4 Click either Launch <strong>Firebox</strong> <strong>SSL</strong> <strong>Administration</strong> Tool orDownload the <strong>Firebox</strong> <strong>SSL</strong> <strong>Administration</strong> Tool. (If you seea Security Warning dialog, click Yes to download therequired ActiveX Helper client.)- If you chose the launch link, skip to step 5.- If you chose the download link, click Save to save ashortcut to your desktop, enabling you to skip the20 <strong>Firebox</strong> <strong>SSL</strong> <strong>VPN</strong> <strong>Gateway</strong> <strong>Administration</strong> <strong>Guide</strong>
Using the <strong>Administration</strong> Toolpreceding steps the next time that you want to openthe Remote Admin Terminal window.5 In the Remote Admin Terminal login dialog, enter the<strong>Firebox</strong> <strong>SSL</strong> administrator credentials. Unless you havechanged the default administrative account as described in“Managing Administrative Users” on page 42, enter root inthe User Name field and rootadmin in the Password field,and then click Connect.The Remote Admin Terminal window opens.For information on the applications available from the RemoteAdmin Terminal window, see the following topics:• “Using the <strong>Administration</strong> Tool” on page 21• “Monitoring <strong>Firebox</strong> <strong>SSL</strong> Operations” on page 150Using the <strong>Administration</strong> ToolThe <strong>Administration</strong> Tool, accessed from the Remote Admin Terminalwindow, contains all <strong>Firebox</strong> <strong>SSL</strong> configuration controls,except for administrative user account management which isavailable only from the <strong>Administration</strong> Portal.NOTEThe <strong>Firebox</strong> <strong>SSL</strong> also has a command-line interface, the serialconsole, described in “Using the Serial Console” on page 23.<strong>Firebox</strong> <strong>SSL</strong> <strong>VPN</strong> <strong>Gateway</strong> <strong>Administration</strong> <strong>Guide</strong> 21
Administering the <strong>Firebox</strong> <strong>SSL</strong>The serial console contains the minimal prompts required toconnect the <strong>Firebox</strong> <strong>SSL</strong> to your network.When you open the Remote Admin Terminal window, the<strong>Administration</strong> Tool window opens inside of the Remote AdminTerminal window. If you close the <strong>Administration</strong> Tool, you canreopen it by clicking the <strong>Administration</strong> Tool icon in the taskbarof the Remote Admin Terminal window.The left pane of the <strong>Administration</strong> Tool window displays Helpinformation for the current tab. In a few cases, making a selectionfrom a drop-down menu displays a new Help topic.Click a tab toview a relatedhelp topic.Choose a mainmenu option toview a relatedhelp topic.NOTEWhen working with the <strong>Administration</strong> Tool, click Submit toapply changes. If you are prompted to restart the <strong>Firebox</strong> <strong>SSL</strong>,you can restart it when you have completed your changes.To close the <strong>Administration</strong> Tool window, chooseOptions > Exit or click the close button.22 <strong>Firebox</strong> <strong>SSL</strong> <strong>VPN</strong> <strong>Gateway</strong> <strong>Administration</strong> <strong>Guide</strong>
Using the Serial ConsoleUsing the Serial ConsoleYou can use the serial console to set the IP address and netmaskof the <strong>Firebox</strong> <strong>SSL</strong> Interface 0, as well as the IP address of thedefault gateway device. All other configuration must be donethrough the <strong>Administration</strong> Tool. You can also use the serialconsole to test a connection with the ping command.If you want to reach the <strong>Firebox</strong> <strong>SSL</strong> via the serial consolebefore making any configuration settings, use a serial cable toconnect the <strong>Firebox</strong> <strong>SSL</strong> to a computer that has terminal emulationsoftware.To open the serial console:1 Connect a computer to the <strong>Firebox</strong> <strong>SSL</strong> serial port.2 Make sure that the <strong>Firebox</strong> <strong>SSL</strong> is running.3 Start a terminal emulation application and open a TCP/IPconnection to the <strong>Firebox</strong> <strong>SSL</strong> using its IP address andadministration port number (usually 9001).If the serial console does not open, check the settings in theterminal emulation application. Set the serial connection to115200 bits per second, 8 data bits, no parity, and 1 stopbit.4 Enter the administrative username (defaults to root) andpassword (defaults to rootadmin) when prompted.The serial console menu appears.Upgrading the <strong>Firebox</strong> <strong>SSL</strong> Software<strong>WatchGuard</strong> will notify you when server software upgrades areavailable.Before you upgrade the <strong>Firebox</strong> <strong>SSL</strong>, you might need to look upyour current <strong>Firebox</strong> <strong>SSL</strong> version.<strong>Firebox</strong> <strong>SSL</strong> <strong>VPN</strong> <strong>Gateway</strong> <strong>Administration</strong> <strong>Guide</strong> 23
Administering the <strong>Firebox</strong> <strong>SSL</strong>To display the version of your installed <strong>Firebox</strong> <strong>SSL</strong>:• In the <strong>Administration</strong> Tool, go to the About <strong>WatchGuard</strong><strong>Firebox</strong> <strong>SSL</strong> tab.As described in the following procedure, you can upgradethe <strong>Firebox</strong> <strong>SSL</strong> from the <strong>Administration</strong> Portal or<strong>Administration</strong> Tool.To upgrade your <strong>Firebox</strong> <strong>SSL</strong>NOTEWhen you upload a server upgrade, the <strong>Firebox</strong> <strong>SSL</strong> drops theactive sessions, so it is best to upgrade the server when youknow that traffic is at a minimum.1 Download the upgrade file from the <strong>WatchGuard</strong> Supportsite to your local network. Upgrade files are available fromhttps://www.watchguard.com/archive/softwarecenter.asp. Ifyou cannot locate the upgrade file or do not know whichupgrade file to use, please contact <strong>WatchGuard</strong> Support.2 In the <strong>Firebox</strong> <strong>SSL</strong> <strong>Administration</strong> Tool, go to the<strong>Administration</strong> > Maintenance tab.Alternatively, from the <strong>Administration</strong> Portal, go to theMaintenance tab.3 Across from Upload a Server Upgrade or Saved Config., clickBrowse.4 Locate the upgrade file that you want to upload and clickOpen.The file is uploaded and the <strong>Firebox</strong> <strong>SSL</strong> restarts automatically.24 <strong>Firebox</strong> <strong>SSL</strong> <strong>VPN</strong> <strong>Gateway</strong> <strong>Administration</strong> <strong>Guide</strong>
Supporting Secure Access UsersWhen you upgrade the <strong>Firebox</strong> <strong>SSL</strong>, all of your configurationsettings are preserved. For information on saving and restoring aconfiguration, see “Saving and Restoring the Configuration” onpage 43.Supporting Secure Access UsersTo enable users to connect to and use the <strong>Firebox</strong> <strong>SSL</strong>, you needto provide them with the following information:• <strong>Firebox</strong> <strong>SSL</strong> URLIf a user needs <strong>VPN</strong> access from a computer that is notrunning Windows 2000 or above or Linux, but is running aJava Virtual Machine (JVM) 1.4.2 or higher, the user can usethe Java applet version of the kiosk. The URL forconnecting to the Java applet version of the kiosk is:https://Access_<strong>Gateway</strong>_address/vpn_portal-javaonly.html• The authentication realm name required for login (if youuse realms other than the realm named “default”).• Path to any network drives that the users can access (bymapping a network drive on their PC)• Any system requirements for running the <strong>Firebox</strong> <strong>SSL</strong>clients, if you have configured host check rulesDepending on the configuration of a remote user’s system, youmight also need to provide additional information:• To start the Secure Access client, Windows 2000 users musthave permission to install programs on their computer. Forexample, under Windows 2000, a user must be a member ofa non-restricted group such as Power Users orAdministrators. (The Users Group restricts a user frominstalling programs.) This restriction applies to Windows XPfor first-time installation only, not for upgrades.• If a user runs a firewall on the remote computer, the usermight need to change the firewall settings so that it doesnot block traffic to or from the IP addresses to which youhave granted access. The Secure Access client automaticallyhandles the Internet Connection Firewall built in toMicrosoft Windows XP. For information about configuring a<strong>Firebox</strong> <strong>SSL</strong> <strong>VPN</strong> <strong>Gateway</strong> <strong>Administration</strong> <strong>Guide</strong> 25
Administering the <strong>Firebox</strong> <strong>SSL</strong>variety of popular firewalls, see “Configuring SoftwareFirewalls for the Secure Access Client” on page 26.• Users who wish to FTP over the <strong>Firebox</strong> <strong>SSL</strong> connectionmust set their FTP application to perform passive transfers.A passive transfer means that the remote computer willestablish the data connection to your FTP server, ratherthan your FTP server establishing the data connection tothe remote computer.• Users who wish to run X client applications across the <strong>VPN</strong>connection must run an X Server, such as XManager, ontheir computer.Because Secure Access users work with files and applicationsjust as if they were local to the organization’s network, noretraining of users or reconfiguration of applications is needed.We have provided an email template which includes the informationdiscussed in this section. The template is available fromthe Downloads page of the <strong>Administration</strong> Portal. We recommendthat you customize the text for your site and then sendthe text in an email to your <strong>VPN</strong> users.Configuring Software Firewalls for the SecureAccess ClientIf a <strong>VPN</strong> user is unable to establish a connection to the <strong>Firebox</strong><strong>SSL</strong> or cannot access allowed resources, it is likely that the softwarefirewall on the user’s PC is blocking traffic. The <strong>Firebox</strong><strong>SSL</strong> works with any personal firewall, provided that the firewallapplication allows the user to specify a trusted network or IP forthe <strong>Firebox</strong> <strong>SSL</strong>.The following sections about some of the more widely-usedfirewall applications are intended as a supplement to the firewallvendors’ documentation.NOTEThe recommended source for current information on firewallapplications is the firewall vendors’ documentation.• “BlackICE PC Protection” on page 27• “McAfee Personal Firewall Plus” on page 27• “Norton Personal Firewall” on page 2826 <strong>Firebox</strong> <strong>SSL</strong> <strong>VPN</strong> <strong>Gateway</strong> <strong>Administration</strong> <strong>Guide</strong>
Supporting Secure Access Users• “Sygate Personal Firewall (free and Pro versions)” onpage 28• “Tiny Personal Firewall” on page 28• “ZoneAlarm Pro” on page 29BlackICE PC ProtectionThe following BlackICE settings enable the Secure Access clientto reach the Internet and the resources allowed by the <strong>Firebox</strong><strong>SSL</strong>. To configure the settings, open the BlackICE window andchoose the following commands.Tools > EditBlackICESettingsOn the Firewall tab, make sure that the Protection Level islower than “Paranoid”, which will prevent you from runningapplications, such as e-mail, over the <strong>VPN</strong> connection.On the Intrusion Detection tab, add the IP address of the<strong>Firebox</strong> <strong>SSL</strong> as a trusted zone. Also add the IP address orrange of allowed resources as trusted zones. When you addan IP address, be sure to select the Add Firewall Entrycheck box.McAfee Personal Firewall PlusThe following McAfee Personal Firewall Plus settings enable theSecure Access client to reach the Internet and the resourcesallowed by the <strong>Firebox</strong> <strong>SSL</strong>. To configure the settings, open theMcAfee Security Center window, click the Personal Firewall+tab, and choose the following commands.The following settings assume that you are using the Standardsecurity level. To check your security level, go to the PersonalFirewall+ tab, click Utilities, and then click Security Settings.NOTEBy default, when you install the Secure Access client, PersonalFirewall+ will prompt you to grant or block access for theapplication. Choose Grant Access.Trusted &Banned IPsSystemServicesAdd the IP address or range of allowed resources as trusted IPaddresses.In the System Services list, select each service that you plan touse over the <strong>VPN</strong> connection.<strong>Firebox</strong> <strong>SSL</strong> <strong>VPN</strong> <strong>Gateway</strong> <strong>Administration</strong> <strong>Guide</strong> 27
Administering the <strong>Firebox</strong> <strong>SSL</strong>Norton Personal FirewallIf you are using the default Norton Personal Firewall settings,you can simply respond to the Program Control alerts the firsttime that you attempt to start the Secure Access client or whenyou access a blocked location or application. When you respondto such an alert, choose the Permit action, select Always usethis action, and click OK.If you have changed the default firewall settings, you mightneed to manually configure the following settings in order toreach the Internet and the resources allowed by the <strong>Firebox</strong> <strong>SSL</strong>.To configure the settings, open the Norton Personal Firewallwindow and choose the following tabs.NetworkingProgramsYou might need to add the following as trusted zones:-The IP address of the <strong>Firebox</strong> <strong>SSL</strong>-The IP address or range of allowed resourcesClick Add and enter the IP address(es).You might need to grant access to individual applications. ClickAdd and then browse for and select the application. Whenprompted, choose Permit.Sygate Personal Firewall (free and Pro versions)Each time that the Sygate Personal Firewall encounters newactivity for which it does not have a rule, it displays a prompt.To grant access to the applications and locations that you willaccess through the Secure Access client, select the Remembermy answer check box and click Yes when the prompt appears.Tiny Personal FirewallThe following Tiny Personal Firewall settings enable the SecureAccess client to reach the Internet and the resources allowed bythe <strong>Firebox</strong> <strong>SSL</strong>.NOTEOne method to configure Tiny Personal Firewall is to respondto the prompts displayed when the firewall encounters newactivity for which it does not have a rule. The followinginformation assumes that you do some pre-configuration ofthe firewall before installing the Secure Access client.28 <strong>Firebox</strong> <strong>SSL</strong> <strong>VPN</strong> <strong>Gateway</strong> <strong>Administration</strong> <strong>Guide</strong>
Generating a Secure Certificate for the <strong>Firebox</strong> <strong>SSL</strong>To configure the settings, open the Tiny Personal Firewalladministration window, click the Advanced button to view theFirewall Configuration window, and then use the Filter Rule dialogbox as indicated below.AddTo permit the IP address or range of allowed resources, use thefollowing settings:Protocol = TCP and UDPDirection = Both DirectionLocal Endpoint fields = AnyRemote Endpoint = specify IP address(es)Action = PermitAfter you apply the above configuration and then start theSecure Access client, Tiny Personal Firewall will display severalIncoming Connection Alerts related to the Secure Access client.For each alert, select the Create appropriate filter check boxand click Permit.ZoneAlarm ProThe following ZoneAlarm settings enable the Secure Access clientto reach the Internet and the resources allowed by the <strong>Firebox</strong><strong>SSL</strong>. To configure the settings, choose the tabs indicated inthe following table.Firewall >ZonesDefine the host name of the <strong>Firebox</strong> <strong>SSL</strong> as a trustedzone.Generating a Secure Certificate for the <strong>Firebox</strong><strong>SSL</strong>The <strong>Firebox</strong> <strong>SSL</strong> includes a digital certificate which is not signedby a Certificate Authority. You should install on the <strong>Firebox</strong> <strong>SSL</strong>a digital X.509 certificate that belongs to your company and issigned by a Certificate Authority. Certificates from Verisign andThawte are supported.NOTEOperating the <strong>Firebox</strong> <strong>SSL</strong> without a digital certificate that issigned by a Certificate Authority can subject <strong>VPN</strong>connections to malicious attacks, as described in “AboutDigital Certificates and <strong>Firebox</strong> <strong>SSL</strong> Operation” on page 31.<strong>Firebox</strong> <strong>SSL</strong> <strong>VPN</strong> <strong>Gateway</strong> <strong>Administration</strong> <strong>Guide</strong> 29
Administering the <strong>Firebox</strong> <strong>SSL</strong>The <strong>Firebox</strong> <strong>SSL</strong> accepts a Privacy Enhanced Mail (PEM) formatcertificate file. PEM is a text format that is the Base-64 encodingof the Distinguished Encoding Rules (DER) binary format.The PEM format specifies the use of text BEGIN and END linesthat indicate the type of content that is being encoded.Before you can upload a certificate to the <strong>Firebox</strong> <strong>SSL</strong>, you willneed to generate a Certificate Signing Request (CSR) and privatekey. We recommend using Linux Open<strong>SSL</strong> to administer anycertificate tasks. If Linux is not available, we recommend theCygwin UNIX environment for Windows, which includes anOpen<strong>SSL</strong> module. Instructions for downloading, installing, andusing the Cygwin UNIX environment to generate a CSR areincluded in this section.If you are familiar with certificate manipulation, you can useother tools to create a PEM-formatted file. The certificate thatyou upload to the <strong>Firebox</strong> <strong>SSL</strong> must have the following characteristics:• It must be in PEM format and must include a private key.• The signed certificate and private key must be unencrypted.The following topics describe how to perform the tasks associatedwith generating a CSR:• “About Digital Certificates and <strong>Firebox</strong> <strong>SSL</strong> Operation” onpage 31• “Overview of the Certificate Signing Request” on page 32• “Installing the Cygwin UNIX Environment for Windows” onpage 33• “Generating a CSR” on page 33• “Unencrypting the Private Key” on page 34• “Converting to a PEM-Formatted Certificate” on page 35• “Combining the Private Key with the Signed Certificate” onpage 36• “Generating Trusted Certificates for Multiple Levels” onpage 37• “Uploading a Certificate to the <strong>Firebox</strong> <strong>SSL</strong>” on page 3830 <strong>Firebox</strong> <strong>SSL</strong> <strong>VPN</strong> <strong>Gateway</strong> <strong>Administration</strong> <strong>Guide</strong>
Generating a Secure Certificate for the <strong>Firebox</strong> <strong>SSL</strong>About Digital Certificates and <strong>Firebox</strong> <strong>SSL</strong>OperationThe <strong>Firebox</strong> <strong>SSL</strong> uses digital certificates to encrypt and authenticatetraffic over a <strong>VPN</strong> connection. If the digital certificateinstalled on the <strong>Firebox</strong> <strong>SSL</strong> is not signed by a CertificateAuthority, the traffic is encrypted but not authenticated. A digitalcertificate must be signed by a Certificate Authority to alsoauthenticate the traffic.When traffic over a connection is not authenticated, the connectioncan be compromised through a “man in the middle”(MITM) attack. In an MITM attack, a third party intercepts thepublic key sent by the <strong>Firebox</strong> <strong>SSL</strong> to the Secure Access clientand uses it to impersonate the <strong>Firebox</strong> <strong>SSL</strong>. As a result, the <strong>VPN</strong>user would unknowingly send authentication credentials to theattacker, who could then gain access to the <strong>Firebox</strong> <strong>SSL</strong>. A certificatethat is signed by a Certificate Authority prevents suchattacks.If the certificate installed on the <strong>Firebox</strong> <strong>SSL</strong> is not signed by aCertificate Authority, Secure Access and Kiosk users will see thefollowing security alert when attempting to log in.If the user chooses to establish the connection, the status windowand system tray icon appear as follows.<strong>Firebox</strong> <strong>SSL</strong> <strong>VPN</strong> <strong>Gateway</strong> <strong>Administration</strong> <strong>Guide</strong> 31
Administering the <strong>Firebox</strong> <strong>SSL</strong>Secure Access users will see security warnings unless you installa certificate that is signed by a Certificate Authority on the <strong>Firebox</strong><strong>SSL</strong> and a corresponding certificate on <strong>VPN</strong> users’ computers.Users can also disable the Security Alert through the SecureAccess Connection Properties dialog box.Overview of the Certificate Signing RequestIf you are unfamiliar with generating a CSR, review this sectionfor background information.The general process for generating a CSR and handling thesigned certificate is as follows:1 Generate a CSR (public.csr) and private key (private.key) asdescribed in “Generating a CSR” on page 33.2 Send the public.csr file to an authorized certificate provider.3 If you used a tool other than the Cygwin UNIX environmentto generate the CSR, check the format of the private key. Ifit is in DER format or is encrypted, convert it to PEM formatas described in “Unencrypting the Private Key” on page 34.4 When you receive the signed certificate file from your <strong>SSL</strong>certification company, check the file format. If it is not inPEM format, convert it as described in “Converting to aPEM-Formatted Certificate” on page 35.5 Combine the PEM-formatted signed certificate with thePEM-formatted private key (private.key) as described in“Combining the Private Key with the Signed Certificate” onpage 36.6 If your certificate has more than one level, handle theintermediate certificates as described in “GeneratingTrusted Certificates for Multiple Levels” on page 37.7 Upload the certificate to the <strong>Firebox</strong> <strong>SSL</strong> as described in“Uploading a Certificate to the <strong>Firebox</strong> <strong>SSL</strong>” on page 38.32 <strong>Firebox</strong> <strong>SSL</strong> <strong>VPN</strong> <strong>Gateway</strong> <strong>Administration</strong> <strong>Guide</strong>
Generating a Secure Certificate for the <strong>Firebox</strong> <strong>SSL</strong>Installing the Cygwin UNIX Environment forWindowsIf Linux Open<strong>SSL</strong> is not available, install the Cygwin UNIX environmentfor Windows. When you install Cygwin, you mustchoose the Open<strong>SSL</strong> modules as described in the followingsteps.To install Cygwin:1 Use a web browser to navigate to www.cygwin.com andclick Install Cygwin Now.2 Follow the on-screen instructions to open the setupinstaller.3 In the Cygwin Setup dialog box, click Next.4 Click Install from Internet and then click Next.5 Accept the default root installation directory settings andthen click Next.6 Accept the default local package directory setting and thenclick Next.7 In the Internet Connection screen, click Use IE5 Settingsand then click Next.8 In the list of Available Download Sites, click ftp://ftp.nas.nasa.gov and then click Next.9 In the Select Packages screen, click the View button (upperrightcorner).10 Scroll the packages list to locate in the Package columnopenssl: The Open<strong>SSL</strong> runtime environment and openssldevel:The Open<strong>SSL</strong> development environment.11 In the New column for those two entries, click Skip.The current version number of Cygwin appears.12 Click Next to start the installation.After Cygwin installs, you can generate the CSR.Generating a CSRThese instructions to generate a CSR assume that you are usingthe Cygwin UNIX environment installed as described in “Installingthe Cygwin UNIX Environment for Windows” on page 33.<strong>Firebox</strong> <strong>SSL</strong> <strong>VPN</strong> <strong>Gateway</strong> <strong>Administration</strong> <strong>Guide</strong> 33
Administering the <strong>Firebox</strong> <strong>SSL</strong>To generate a CSR using the Cygwin UNIXenvironment:1 Double-click the Cygwin icon on the desktop.A command window opens with a UNIX bash environment.2 To change to a particular drive, use the command: cddriveLetter:3 At the $ prompt, type the following to generate a CSR:openssl req -new -nodes -keyout privateKeyFilename-out certRequestFilenameFor example:openssl req -new -nodes -keyout private.key -outpublic.csrStatus messages about the private key generation appear. Youwill be prompted for information such as country name.4 When prompted for the Common name, enter the DNSname of the <strong>Firebox</strong> <strong>SSL</strong>.The name that you enter will appear in the certificate and mustmatch the name expected by PCs that connect to the <strong>Firebox</strong> <strong>SSL</strong>.Thus, if you alias DNS names, you will need to use the alias nameinstead.5 Submit your CSR (public.csr) to an authorized certificateprovider such as Verisign. When asked for the type of serverthat the certificate will be used with, indicate “Apache”. (Ifyou indicate “Microsoft”, the certificate might be in PKCS7format and you will need to follow the procedure in“Converting to a PEM-Formatted Certificate” on page 35 toconvert the certificate to a PEM format.)The certificate provider will return a Signed Certificate to you by e-mail within several days.Unencrypting the Private KeyThe following procedure is not needed if you use the CygwinUNIX environment to generate the CSR and private key. Followthis procedure only if the method you use to generate the privatekey results in an encrypted key.34 <strong>Firebox</strong> <strong>SSL</strong> <strong>VPN</strong> <strong>Gateway</strong> <strong>Administration</strong> <strong>Guide</strong>
Unencrypting the Private KeyTo unencrypt the private key:1 At the $ prompt enter the command: openssl rsaIf you enter this command without arguments, you will beprompted as follows:read RSA key2 Enter the name of the password to be encrypted.You can enter the openssl rsa command with arguments ifyou know the name of the private key and the unencryptedPEM file.For example, if the private key filename ismy_keytag_key.pvk, and the unencrypted filename iskeyout.pem, you would enter openssl rsa -inmy_keytag_key.pvk -out keyout.pem.For more information, refer to the following URL:http://www.openssl.org/docs/apps/rsa.html#EXAMPLESFor information on downloading Open<strong>SSL</strong> for Windows, refer tothe following URL:http://sourceforge.net/project/showfiles.php?group_id=23617&release_id=48801Converting to a PEM-Formatted CertificateThe signed certificate file that you receive from your certificateprovider might not be in a PEM format. If the file is in binaryformat (DER), convert it to PEM format as follows:openssl x509 -in certFile -inform DER -outformPEM -out convertedCertFileIf the certificate is already in a text format, it may be in PKCSformat. (You will receive a PKCS formatted certificate if youspecified that the certificate will be used with a Microsoft ratherthan Apache operating system.) The following command willresult in an error message if the certificate is not in PEM format.The certFile should not contain the private key when you runthis command.openssl verify -verbose -CApath /tmp certFile<strong>Firebox</strong> <strong>SSL</strong> <strong>VPN</strong> <strong>Gateway</strong> <strong>Administration</strong> <strong>Guide</strong> 35
Administering the <strong>Firebox</strong> <strong>SSL</strong>If that command results in the following error message, the fileis not in PEM format.certFile: unable to load certificate file4840:error:0906D064:PEM routines:PEM_read_bio:bad base64 decode:pem_lib.c:781:To convert the certificate from PKCS7 to PEMformat1 Run the command:openssl pkcs7 -in ./certFile -print_certsThe output will look like this:subject=......-----BEGIN CERTIFICATE-----... Server Certificate ...-----END CERTIFICATE-----subject=......-----BEGIN CERTIFICATE-----... Intermediate Cert ...-----END CERTIFICATE-----2 Combine the server certificate data and the intermediatecertificate data (if it exists) from the output with the privatekey as specified in “Combining the Private Key with theSigned Certificate” on page 36 and “Generating TrustedCertificates for Multiple Levels” on page 37.Combining the Private Key with the SignedCertificateYou must combine the signed certificate with the private keybefore you can upload it to the <strong>Firebox</strong> <strong>SSL</strong>.36 <strong>Firebox</strong> <strong>SSL</strong> <strong>VPN</strong> <strong>Gateway</strong> <strong>Administration</strong> <strong>Guide</strong>
Unencrypting the Private KeyTo combine the Private Key with the SignedCertificate:1 Use a text editor to combine the unencrypted private keywith the signed certificate in the PEM file format.The file contents should look similar to the following:-----BEGIN RSA PRIVATE KEY----------END RSA Private KEY----------BEGIN CERTIFICATE----------END CERTIFICATE-----2 Save and name the PEM file. For example,Access<strong>Gateway</strong>.pem.Generating Trusted Certificates for Multiple LevelsNOTEAny certificate that has more than one level must include allintermediate certificates, or the system may becomeunusable.You must determine whether your certificate has more than onelevel and, if it does, handle the intermediate certificates properly.To generate trusted certificates for multiple levels:1 Open Internet Explorer, and access a page through the<strong>Firebox</strong> <strong>SSL</strong>. For example, enter a URL similar to thefollowing:https://ipAddress:httpPort//www.mypage.comwhere:- ipAddress is the IP address of your <strong>Firebox</strong> <strong>SSL</strong>- httpPort is the <strong>Firebox</strong> <strong>SSL</strong> HTTP port number2 Double-click the Lock symbol in the bottom right corner ofthe browser.<strong>Firebox</strong> <strong>SSL</strong> <strong>VPN</strong> <strong>Gateway</strong> <strong>Administration</strong> <strong>Guide</strong> 37
Administering the <strong>Firebox</strong> <strong>SSL</strong>3 Switch to the Certificate Path window pane at the top ofthe screen.4 Double-click the first path level to bring up the Certificateinformation for the first level and then go to the Detailsscreen.5 Click the Copy to File button at the bottom.6 After the Certificate Export Wizard appears, click Next.7 Click the format Base-64 encoded and then click Next.8 Enter a filename. For example, G:\tmp\root.cer.9 Review the information and note the complete filename.Click Finish.10 Click OK to close the Certificate information window for thefirst level.11 Repeat Steps 4–10 for all levels except the last level.12 Insert all certificates into one file, and make sure that anyintermediate certificates are part of any certificate file youupload.The file to be uploaded should be in the following format:private keyServer CertificateIntermediate Certificate 0Intermediate Certificate 1Intermediate Certificate 2Uploading a Certificate to the <strong>Firebox</strong> <strong>SSL</strong>After you have completed the steps to obtain and assemble aproperly formatted, signed certificate and private key, you canupload it to the <strong>Firebox</strong> <strong>SSL</strong>.NOTEWhen you save the <strong>Firebox</strong> <strong>SSL</strong> configuration, the uploadedcertificates are included in the backup.To upload a certificate file:1 In the <strong>Administration</strong> Tool, go to the <strong>Administration</strong> >Maintenance tab.38 <strong>Firebox</strong> <strong>SSL</strong> <strong>VPN</strong> <strong>Gateway</strong> <strong>Administration</strong> <strong>Guide</strong>
Blocking External Access to the <strong>Administration</strong> PortalAlternatively, go to the <strong>Administration</strong> Portal and click theMaintenance tab.2 Across from Upload a Certificate, click Browse.3 Locate the file you want to upload and click Open.4 After the upload is complete, go to the Networking >General Networking tab.5 Set the Interface 0 External Public Address to the DNSname for which the certificate was registered.Blocking External Access to the <strong>Administration</strong>PortalBy default, if the <strong>Firebox</strong> <strong>SSL</strong> is configured to use both interfaces,the external-facing interface can be used to access the<strong>Administration</strong> Portal from outside of the firewall. To blockaccess to the <strong>Administration</strong> Portal from the external-facinginterface, clear the check box for this option.To block external access to the <strong>Administration</strong>Portal:1 In the <strong>Firebox</strong> <strong>SSL</strong> <strong>Administration</strong> Tool, go to the<strong>Administration</strong> > Maintenance tab.<strong>Firebox</strong> <strong>SSL</strong> <strong>VPN</strong> <strong>Gateway</strong> <strong>Administration</strong> <strong>Guide</strong> 39
Administering the <strong>Firebox</strong> <strong>SSL</strong>2 Clear the check box for Enable External <strong>Administration</strong>.3 Click Apply Change.Managing Licenses<strong>Firebox</strong> <strong>SSL</strong> licensing limits the number of concurrent <strong>VPN</strong> usersessions to the number of licenses purchased. Thus, if you purchase100 licenses, you can have 100 concurrent <strong>VPN</strong> sessionsat any time. When a user ends a session, that license is freed forthe next <strong>VPN</strong> user. A user who logs into the <strong>Firebox</strong> <strong>SSL</strong> frommore than one computer occupies a license for each session.Once all licenses are occupied, no additional <strong>VPN</strong> connectionscan be opened until a <strong>VPN</strong> user ends a session or the administratorhas used the <strong>Firebox</strong> <strong>SSL</strong> Real-time Monitor to close aconnection, thereby freeing a license. For information on usingthe Real-time Monitor to close connections, see “Managing<strong>VPN</strong> Connections” on page 45.When you purchase the <strong>Firebox</strong> <strong>SSL</strong> or additional licenses, youwill receive an email that contains a link to a download location.After you download the license file(s), we recommend thatyou manage them as follows.To manage licenses:1 On the administrative PC where you run the <strong>Firebox</strong> <strong>SSL</strong><strong>Administration</strong> Tool, create a license directory.2 Copy the license file (.lic) that you downloaded to thelicense directory.We recommend that you retain a local copy of all license filesthat you receive from <strong>WatchGuard</strong>. When you save a backup40 <strong>Firebox</strong> <strong>SSL</strong> <strong>VPN</strong> <strong>Gateway</strong> <strong>Administration</strong> <strong>Guide</strong>
Viewing and Changing the System Date and Timecopy of the configuration file, all uploaded license files areincluded in the backup. If you need to reinstall the <strong>Firebox</strong> <strong>SSL</strong>server software and do not have a backup of the configuration,you will need the original license files.Do not overwrite any .lic files in the license directory. If anotherfile in that directory has the same name, you should rename thenewly received file. The <strong>Firebox</strong> <strong>SSL</strong> software calculates yourlicensed features based on all .lic files that are uploaded to the<strong>Firebox</strong> <strong>SSL</strong>.Do not edit a .lic file or the <strong>Firebox</strong> <strong>SSL</strong> software will ignore anyfeatures associated with that license file. The contents of the fileare encrypted and must remain intact. Should you copy, rename,or insert a license file multiple times, the <strong>Firebox</strong> <strong>SSL</strong> will useonly the original file and will ignore any duplicate files.To upload a license file:1 In the <strong>Administration</strong> Tool, go to the <strong>Administration</strong> >Licensing tab.2 Click Browse and locate the .lic file that you want toupload.License files should be stored on the administrative PC where yourun the <strong>Firebox</strong> <strong>SSL</strong> <strong>Administration</strong> Tool.3 Click Open to upload the license file.Viewing and Changing the System Date and TimeThe system time displays on the right side of the taskbar in theRemote Admin Terminal window. To view the system date,mouse over the system time.<strong>Firebox</strong> <strong>SSL</strong> <strong>VPN</strong> <strong>Gateway</strong> <strong>Administration</strong> <strong>Guide</strong> 41
Administering the <strong>Firebox</strong> <strong>SSL</strong>To view a calendar, click the system time. Click the system timeagain to hide the calendar.To change the system date and time:1 In the <strong>Administration</strong> Tool, go to the <strong>Administration</strong> >Date tab.2 Select a time zone.3 Enter the date and time and then click Submit.Managing Administrative UsersThe <strong>Firebox</strong> <strong>SSL</strong> has a default administrative user account(named root), with full access to the <strong>Firebox</strong> <strong>SSL</strong>. To protect the<strong>Firebox</strong> <strong>SSL</strong> from unauthorized access, you should change thedefault password during your initial configuration.42 <strong>Firebox</strong> <strong>SSL</strong> <strong>VPN</strong> <strong>Gateway</strong> <strong>Administration</strong> <strong>Guide</strong>
Saving and Restoring the ConfigurationNOTETo reset the root administrative password to its default, youmust reinstall the <strong>Firebox</strong> <strong>SSL</strong> server software.The <strong>Firebox</strong> <strong>SSL</strong> is pre-configured with a default username andpassword (root/rootadmin). We recommend that you change theroot password.To change the root administrator password:1 In the <strong>Administration</strong> Tool, go to the <strong>Administration</strong> >Admin Users tab.2 Enter the new password and click Change Password.Saving and Restoring the ConfigurationWhen you upgrade the <strong>Firebox</strong> <strong>SSL</strong>, all of your configurationsettings, including uploaded certificates, licenses, and portalpages, are automatically restored. However, if you reinstall the<strong>Firebox</strong> <strong>SSL</strong> software, you must manually restore your configurationsettings.NOTEBefore using the Recovery CD to reinstall the <strong>Firebox</strong> <strong>SSL</strong>software, save your configuration. Reinstalling the <strong>Firebox</strong><strong>SSL</strong> software returns the <strong>Firebox</strong> <strong>SSL</strong> to its pre-configuredstate.<strong>Firebox</strong> <strong>SSL</strong> <strong>VPN</strong> <strong>Gateway</strong> <strong>Administration</strong> <strong>Guide</strong> 43
Administering the <strong>Firebox</strong> <strong>SSL</strong>If you have saved your configuration settings, as described inthis section, you can easily restore them.NOTEYou can also save and restore configuration settings from theMaintenance tab of the <strong>Administration</strong> Portal.44 <strong>Firebox</strong> <strong>SSL</strong> <strong>VPN</strong> <strong>Gateway</strong> <strong>Administration</strong> <strong>Guide</strong>
Managing <strong>VPN</strong> ConnectionsTo save the <strong>Firebox</strong> <strong>SSL</strong> configuration:1 In the <strong>Administration</strong> Tool, go to the <strong>Administration</strong> >Maintenance tab.2 Click Save Configuration.The entire <strong>Firebox</strong> <strong>SSL</strong> configuration, including system files,uploaded licenses, and uploaded server certificates, are saved toyour computer in a file named config.restore.To restore a saved configuration:1 In the <strong>Administration</strong> Tool, go to the <strong>Administration</strong> >Maintenance tab.2 Across from Upload a Server Upgrade or Saved Config., clickBrowse.3 Locate the file named config.restore and click Open.After the configuration file is uploaded, the <strong>Firebox</strong> <strong>SSL</strong> restarts. Allof your configuration settings, licenses, and certificates will berestored.4 If you use RSA SecurID authentication, you must reset thenode secret on the RSA ACE/Server, as described in“Resetting the Node Secret” on page 99.Because the <strong>Firebox</strong> <strong>SSL</strong> has been re-imaged, the node secret nolonger resides on it and an attempt to authenticate with the RSAACE/Server will fail.Managing <strong>VPN</strong> ConnectionsThe Real-time Monitor lists the open <strong>VPN</strong> connections by username and MAC address. For each <strong>VPN</strong> user, the type of connectionby protocol (TCP, UDP, etc.) is also listed. The Target IP andTarget Port provide additional information about the connec-<strong>Firebox</strong> <strong>SSL</strong> <strong>VPN</strong> <strong>Gateway</strong> <strong>Administration</strong> <strong>Guide</strong> 45
Administering the <strong>Firebox</strong> <strong>SSL</strong>tion. For example, connections to port 21 are FTP connectionsand connections to port 23 are Telnet connections.You can manage connections as follows:• You can close a type of connection (TCP, UDP, etc.).For example, suppose that a user has a TCP connection to aTarget IP (perhaps a mapped drive) that should be off-limitsto the user. You can correct the ACL for the user’s group(“Configuring Resource ACLs for a User Group” onpage 124) and then close the TCP connection. If you do notcorrect the ACL before closing the connection, the user willbe able to re-establish the TCP connection.NOTEThe <strong>Firebox</strong> <strong>SSL</strong> maintains connections to Target IP 0.0.0.0that are required for <strong>VPN</strong> operations. Closing any of thoseconnections will temporarily close a <strong>VPN</strong> connection.• You can disable a user’s connection and prevent subsequentlogins from that user at the listed MAC address. The userwill be able to log in from a different MAC address.• You can re-enable a username/MAC address combination.The following sections describe connection management anduse of the Real-time Monitor:• “About Connection Handling” on page 46• “Closing a Connection to a Resource” on page 47• “Disabling/Enabling a <strong>VPN</strong> User” on page 48• “Monitoring <strong>Firebox</strong> <strong>SSL</strong> Operations” on page 150About Connection HandlingIf a <strong>VPN</strong> user abruptly disconnects the network or puts thecomputer in hibernate or standby mode, the <strong>SSL</strong>/TCP connec-46 <strong>Firebox</strong> <strong>SSL</strong> <strong>VPN</strong> <strong>Gateway</strong> <strong>Administration</strong> <strong>Guide</strong>
Managing <strong>VPN</strong> Connectionstion to the <strong>Firebox</strong> <strong>SSL</strong> is terminated after a maximum waitperiod of ten minutes. (A shorter wait period would penalize<strong>VPN</strong> users who use slow connections.)This handling of <strong>VPN</strong> connections results in the following:• The <strong>VPN</strong> user might continue to appear active in the<strong>Firebox</strong> <strong>SSL</strong> Real-time Monitor for about ten minutes, afterwhich the <strong>VPN</strong> connection is terminated.• The inactive <strong>VPN</strong> user occupies a license until the waitperiod expires and the <strong>VPN</strong> connection is closed. Supposethat you have a license for ten users and all ten users havelogged into the <strong>Firebox</strong> <strong>SSL</strong>, leaving no available licenses. Ifone of the active users goes into standby mode, that user’slicense is not available for ten minutes.The wait period does not apply to connections that are terminatedthrough the Real-time Monitor.Closing a Connection to a ResourceWithout disrupting a user’s <strong>VPN</strong> connection, you can temporarilyclose the user’s connection to a particular resource. Toprevent the user from connecting to the resource, correct theuser’s group ACL.To close a connection:1 In the Remote Admin Terminal window, click the Real-timeMonitor icon .2 Click to expand the user’s entry.3 Right-click the connection that you want to close, andselect Close connection.<strong>Firebox</strong> <strong>SSL</strong> <strong>VPN</strong> <strong>Gateway</strong> <strong>Administration</strong> <strong>Guide</strong> 47
Administering the <strong>Firebox</strong> <strong>SSL</strong>The <strong>Firebox</strong> <strong>SSL</strong> maintains connections to Target IP 0.0.0.0that are required for <strong>VPN</strong> operations. Closing any of thoseconnections will temporarily close a <strong>VPN</strong> connection.Disabling/Enabling a <strong>VPN</strong> UserThe <strong>Firebox</strong> <strong>SSL</strong> tracks user connections by a combination ofuser name and MAC address, enabling a user to establish simultaneous<strong>VPN</strong> connections from different computers. You candisable and enable a user/MAC address combination. Disabling auser frees a license.To disable a user at a particular MAC address:1 In the Remote Admin Terminal window, click the Real-timeMonitor icon .2 Right-click the main entry for the user and choose DisableUser from MAC.The user will be unable to establish a <strong>VPN</strong> connection from thatMAC address until you re-enable the user or restart the <strong>Firebox</strong><strong>SSL</strong>.To re-enable a user at a particular MAC address:1 In the Remote Admin Terminal window, click the Real-timeMonitor icon .2 Right-click the user’s entry and choose Enable User fromMAC.48 <strong>Firebox</strong> <strong>SSL</strong> <strong>VPN</strong> <strong>Gateway</strong> <strong>Administration</strong> <strong>Guide</strong>
Restarting the <strong>Firebox</strong> <strong>SSL</strong>The user will be able to establish a <strong>VPN</strong> connection providedthat there is an available license.Restarting the <strong>Firebox</strong> <strong>SSL</strong>To restart the <strong>Firebox</strong> <strong>SSL</strong>:• From the <strong>Administration</strong> Tool, go to the <strong>Administration</strong> >Maintenance tab and click Reboot.or• From the <strong>Administration</strong> Portal, go to the Maintenance taband click Reboot.Shutting Down the <strong>Firebox</strong> <strong>SSL</strong>Never shut down the <strong>Firebox</strong> <strong>SSL</strong> by powering it off. Use thecommand provided to shut down the device. Use the powerswitch only to power on the device.To shut down the <strong>Firebox</strong> <strong>SSL</strong>:• From the <strong>Administration</strong> Tool, go to the <strong>Administration</strong> >Maintenance tab and click Shut Down.or• From the <strong>Administration</strong> Portal, go to the Maintenance taband click Shut Down.<strong>Firebox</strong> <strong>SSL</strong> <strong>VPN</strong> <strong>Gateway</strong> <strong>Administration</strong> <strong>Guide</strong> 49
Administering the <strong>Firebox</strong> <strong>SSL</strong>50 <strong>Firebox</strong> <strong>SSL</strong> <strong>VPN</strong> <strong>Gateway</strong> <strong>Administration</strong> <strong>Guide</strong>
CHAPTER 3Working with a <strong>VPN</strong>ConnectionThe following topics describe how to work with a <strong>VPN</strong> connection:• “Using the Access Portal” on page 51• “Connecting from a Private Computer” on page 56• “Connecting from a Public Computer (Kiosk Session)” onpage 61Using the Access PortalThe Access Portal is an HTML page that enables a <strong>VPN</strong> user tochoose the type of <strong>VPN</strong> connection to be established from aremote computer.NOTEYou can customize the portal page templates provided withthe AG and assign them on a group basis, as described in“Customizing <strong>VPN</strong> Portal Pages” on page 108 and “Choosinga Portal Page for a Group” on page 130. You can also includea link to the Access <strong>Gateway</strong> clients on a website, asdescribed in “Linking to the <strong>VPN</strong> Clients from Your Website”on page 115.<strong>Firebox</strong> <strong>SSL</strong> <strong>VPN</strong> <strong>Gateway</strong> <strong>Administration</strong> <strong>Guide</strong> 51
Working with a <strong>VPN</strong> ConnectionFrom the portal page, the user either starts the Secure Access orkiosk client.• The Secure Access client is intended for <strong>VPN</strong> connectionsfrom a private computer, as data is transferred from thenetwork to which the user is connecting to the user’scomputer.• The kiosk client is useful for <strong>VPN</strong> connections from a publiccomputer, as no data is written to the <strong>VPN</strong> user’s computer.(However, if you configure network shares, a user can copyfiles from a shared network drive to the remote computer.)NOTEYou can configure the AG <strong>Administration</strong> Tool so that <strong>VPN</strong>users do not have the option to connect from a publiccomputer. For information, see “Configuring Kiosk Operationfor a Group” on page 126.To use the Access Portal:1 Use Internet Explorer to access the URL of the AG. Forexample: https://vpndemo.watchguard.com.If the AG does not have a signed certificate installed, a SecurityAlert dialog box appears. Click Yes to continue.2 In the dialog box, enter your network user name andpassword and then click OK.The portal page opens. This page can be customized for asite, as described in “Customizing <strong>VPN</strong> Portal Pages” onpage 108.52 <strong>Firebox</strong> <strong>SSL</strong> <strong>VPN</strong> <strong>Gateway</strong> <strong>Administration</strong> <strong>Guide</strong>
Using the Access PortalIf you connect from a Linux computer, the following portalpage appears.3 If connecting from a Windows computer, choose the type of<strong>VPN</strong> connection:• If connecting from a secure computer, click My owncomputer.The first time that you connect to the AG (after clicking Myown computer), a terms and conditions of use dialogappears. You must click “I Accept” to install the driver.<strong>Firebox</strong> <strong>SSL</strong> <strong>VPN</strong> <strong>Gateway</strong> <strong>Administration</strong> <strong>Guide</strong> 53
Working with a <strong>VPN</strong> ConnectionWhen the File Download dialog box appears, click Open. (Itis not necessary to save the client to your desktop. Ashortcut to the client will be downloaded automatically.)The Secure Access client starts loading. A shortcut will bedownloaded to your computer desktop. You cansubsequently start the client without going through theportal page. If your administrator has configured the SecureAccess client to start automatically, the client will start afteryou enter your Windows login credentials, which are alsoused for the Secure Access client. Thus, when you start yourcomputer, you do not have to do anything to have a <strong>VPN</strong>connection, provided that you have a network connectionand can log into Windows.The <strong>VPN</strong> connection enables you to work with theconnected site just as if you were logged in at the site. Youcan transfer data between your remote computer and theconnected site. For more information, see “Connecting froma Private Computer” on page 56.• If connecting from a public computer, click A publiccomputer.The kiosk will open in one of two configurable modes, asdescribed in “Connecting from a Public Computer (KioskSession)” on page 61.4 If connecting from a Linux computer, click the Linuxdownload link to start the download and view instructionson how to install the client.54 <strong>Firebox</strong> <strong>SSL</strong> <strong>VPN</strong> <strong>Gateway</strong> <strong>Administration</strong> <strong>Guide</strong>
Using the Access PortalNOTEThe Linux tcl and tk packages are required for the SecureAccess client.In addition to the command net6vpn --login, whichopens the login dialog for the Secure Access client, you canalso enter net6vpn to see a list of other command-lineoptions.If you lose the <strong>VPN</strong> connection, the <strong>VPN</strong> daemon may havestopped. The Secure Access client requires a running <strong>VPN</strong>daemon in order to connect to the Access <strong>Gateway</strong>. If youlose the <strong>VPN</strong> connection, the <strong>VPN</strong> daemon may havestopped. To check the status of the <strong>VPN</strong> daemon:/sbin/service net6vpnd statusTo restart a stopped daemon:/sbin/service net6vpnd start.Then, click Disconnect and reenter your login credentials.To remove the Linux <strong>VPN</strong> client:/sbin/service net6vpnd stop/sbin/chkconfig --del net6vpnd<strong>Firebox</strong> <strong>SSL</strong> <strong>VPN</strong> <strong>Gateway</strong> <strong>Administration</strong> <strong>Guide</strong> 55
Working with a <strong>VPN</strong> Connectionrm -rf /etc/net6vpn.conf /etc/init.d/net6vpnd /usr/bin/net6vpn /usr/sbin/net6vpnd /usr/local/net6vpn/Connecting from a Private ComputerIf a user chooses the My own computer option in the AccessPortal page, the <strong>VPN</strong> connection provides full access to the networkresources that the user’s group(s) can access, as describedin “Adding and Configuring User Groups” on page 121.The access granted by the security policies enable users to workwith the remote system just as if they were logged in locally. Forexample, users might be granted permission to applications,including web, client-server, and peer-to-peer such as InstantMessaging (IM), video conferencing, and real-time Voice over IP(VoIP) applications. Users can also map network drives to accessallowed network resources, including shared folders and printers.While connected to an AG, remote users cannot see networkinformation from the site to which they are connected. Forexample, while connected to the AG, open a Command Promptwindow and run the commands ipconfig/all or routeprint. You will see no network information from the <strong>VPN</strong> site.For information on the <strong>VPN</strong> user experience when using theSecure Access client to connect to the AG, see:• “Using the Secure Access Window” on page 56For information on kiosk operation, see “Connecting from aPublic Computer (Kiosk Session)” on page 61.Using the Secure Access WindowWhen Secure Access is loaded, you will be prompted to log in tothe AG to establish the <strong>VPN</strong> connection. The AG administratordetermines the authentication used through the Authenticationand Local Users tab of the AG <strong>Administration</strong> Tool, as describedin “Configuring Authentication, Authorization, and Local Users”on page 82.56 <strong>Firebox</strong> <strong>SSL</strong> <strong>VPN</strong> <strong>Gateway</strong> <strong>Administration</strong> <strong>Guide</strong>
Connecting from a Private ComputerNOTEIf you are using the Linux client, the connection window willnot include the options described in the following procedure.To log in to the AG:1 In the <strong>WatchGuard</strong> <strong>VPN</strong> - Connect dialog box, enter yourlogin credentials.If the AG is configured with authentication realms and youneed to connect to a realm other than the default, enter therealm name before your user name (realmName\userName).Alternatively, to enter the realm name to be used each timethat you log in, right-click the dialog box, click AdvancedOptions, and then enter the realm name.If your site uses RSA SecurID authentication, your passwordis your PIN plus the RSA SecurID token.2 If you are behind a proxy server, right-click the dialog boxand then click Advanced Options.<strong>Firebox</strong> <strong>SSL</strong> <strong>VPN</strong> <strong>Gateway</strong> <strong>Administration</strong> <strong>Guide</strong> 57
Working with a <strong>VPN</strong> Connection3 Select Use Proxy Host and enter the proxy server IP addressand port. (The AG information is already filled in.) If theproxy server requires authentication, select the check box.When you attempt to establish a <strong>VPN</strong> connection, you firstwill be prompted for your proxy server login credentials.4 To allow failover to your local DNS, select Enable SplitDNS.5 To allow the Secure Access client to automatically update,without prompts, when a new version is available on theAG, select the Always update client check box.6 Click Connect.NOTEIf a digital certificate that is signed by a Certificate Authorityis not installed on the AG, you will see a Security Alert. Formore information, see “About Digital Certificates and <strong>Firebox</strong><strong>SSL</strong> Operation” on page 31.After logging in, you will see a Logging In status dialogbox, followed by an Applying Network Policy status dialogbox. If you have a personal Internet Connection Firewall(ICF) configured on the interface, you will also see an58 <strong>Firebox</strong> <strong>SSL</strong> <strong>VPN</strong> <strong>Gateway</strong> <strong>Administration</strong> <strong>Guide</strong>
Connecting from a Private ComputerInternet Sharing Configuration dialog box and will need toclick Yes to continue.When the <strong>VPN</strong> connection is established, a status windowbriefly appears and the Secure Access window is minimizedto the system tray . The icon indicates whether theconnection is enabled ( ) or disabled ( ) and flashes duringactivity.A shortcut to <strong>WatchGuard</strong> Secure Access is placed on yourdesktop.To use the Secure Access window:1 To open the window, double-click the icon in the systemtray. Alternatively, right-click the icon and choose <strong>VPN</strong>Properties from the menu.The Secure Access window appears.2 To view server information and a list of the securednetworks, click the Details tab.<strong>Firebox</strong> <strong>SSL</strong> <strong>VPN</strong> <strong>Gateway</strong> <strong>Administration</strong> <strong>Guide</strong> 59
Working with a <strong>VPN</strong> Connection3 To view ACLs, click the Access Lists tab. (This tab does notappear for users who are not in a group.)To close the window, click Close.60 <strong>Firebox</strong> <strong>SSL</strong> <strong>VPN</strong> <strong>Gateway</strong> <strong>Administration</strong> <strong>Guide</strong>
Connecting from a Public Computer (Kiosk Session)To view the Connection Log:The Connection Log contains real-time connection informationwhich is particularly useful for troubleshooting connectionissues.1 Right-click the <strong>WatchGuard</strong> Secure Access icon in thesystem tray.2 Choose Connection Log from the menu.The Connection Log for the session appears.NOTEThe Connection Log is written to the computer inDocuments and Settings\UserName\Local Settings\Application Data\NET6\net6vpn.log.The log is overwritten each time that you establish a new <strong>VPN</strong>connection.To end a <strong>VPN</strong> session:• Right-click the Secure Access icon in the system tray andchoose Disconnect from the menu.Connecting from a Public Computer (KioskSession)Users can connect to the AG from a public computer through akiosk session.• If the computer is running Windows 2000 or above orLinux, the user clicks A public computer in the AccessPortal page.• If the computer is running JVM 1.4.2 or higher, the useraccesses the kiosk by running a Java kiosk client. This clientprovides <strong>VPN</strong> access to users on computers, such asMacintosh and Windows 95/98, that are running JVM.To access the Java client, enter the following URL in a webbrowser that supports Java:https://vnp<strong>Gateway</strong>/vpn_portal-javaonly.html<strong>Firebox</strong> <strong>SSL</strong> <strong>VPN</strong> <strong>Gateway</strong> <strong>Administration</strong> <strong>Guide</strong> 61
Working with a <strong>VPN</strong> ConnectionTo support the Java kiosk client, the AG must be configuredwith a certificate that is signed by a trusted CertificateAuthority.After the user clicks the appropriate link and logs in, thekiosk session opens, similar to a Virtual Network Computing(VNC) session.Web BrowserRemote DesktopVNCTelnet 3270 EmulatorSSHCitrixShared NetworkDriveThe kiosk window can include:• A Mozilla browser window. You configure by group whetherto include the Mozilla browser and the browser’s defaultURL. Mozilla preferences, such as saved passwords, areretained for the next session.FTP62 <strong>Firebox</strong> <strong>SSL</strong> <strong>VPN</strong> <strong>Gateway</strong> <strong>Administration</strong> <strong>Guide</strong>
Connecting from a Public Computer (Kiosk Session)• Icons that provide access to shared network drives. The iconlabelled “ws” in the preceding example is a network share.The user can download files from a network share bydragging a file onto the KioskFTP icon, as described in“Working with Shared Network Drives” on page 63.• Icons that provide access to a Web browser and to VNC,Remote Desktop, Telnet 3270 emulator, SSH, and Citrix ICAclients, as shown in the preceding example. You configureby group the clients to be included in the kiosk window.For information on using the clients, see the followingsections:- “Using the Citrix Client” on page 65- “Using the Remote Desktop Client” on page 65- “Using the SSH Client” on page 67- “Using the Telnet 3270 Emulator Client” on page 67- “Using the VNC Client” on page 68If the user’s browser is configured to use a proxy server, thekiosk client will use the browser’s proxy setting.For more background information, see “Kiosk Operation” onpage 13.To log in to the AG in kiosk mode:1 Use the portal page to connect, as described in “Using theAccess Portal” on page 51. Be sure to click A publiccomputer.The <strong>WatchGuard</strong> <strong>VPN</strong> Login dialog box appears.2 Enter your network login credentials and click OK.Working with Shared Network DrivesThe AG administrator can specify the shared network drives thatwill be accessible to any kiosk session. For each shared drive, theadministrator specifies whether <strong>VPN</strong> users will have read-only orread-write access. If <strong>VPN</strong> users are granted read-write access, auser can change the files on the shared network drive, providedthat the user’s account has the permissions to do so.<strong>Firebox</strong> <strong>SSL</strong> <strong>VPN</strong> <strong>Gateway</strong> <strong>Administration</strong> <strong>Guide</strong> 63
Working with a <strong>VPN</strong> ConnectionTo work with a shared network drive:1 From the kiosk window, double-click a shared network driveicon ( ).2 The share window opens inside of the kiosk window.3 To copy a file from the network drive to your computer,drag the file icon over the KioskFTP icon.4 In the Kiosk File Download dialog box, navigate to thelocation where you want to copy the file and then clickOpen.When the FTP is complete, a message window appears.64 <strong>Firebox</strong> <strong>SSL</strong> <strong>VPN</strong> <strong>Gateway</strong> <strong>Administration</strong> <strong>Guide</strong>
Connecting from a Public Computer (Kiosk Session)You cannot FTP folders or copy files back to the sharednetwork drive.Using the Citrix ClientThe Citrix ICA client enables the kiosk user to run a Citrix sessionover the <strong>VPN</strong> connection. During a kiosk session, your ICAsettings can be saved so that they will be available to you forthe next Citrix session.To use the Citrix ICA client:1 From the portal page, choose A public computer... and login.2 In the kiosk window, click the Citrix icon .The Citrix ICA Client for Linux window opens.Using the Remote Desktop ClientThe Remote Desktop client enables a kiosk user to remotelyaccess the desktop of a server that is running Windows TerminalServices. The Remote Desktop does not require any configurationon the <strong>VPN</strong> user’s computer.Through Remote Desktop the <strong>VPN</strong> user has full access to aremote server’s resources, including files, applications, and networkresources. Thus, the <strong>VPN</strong> user can remotely control theserver, just as if the user were sitting at it. The kiosk user’s work<strong>Firebox</strong> <strong>SSL</strong> <strong>VPN</strong> <strong>Gateway</strong> <strong>Administration</strong> <strong>Guide</strong> 65
Working with a <strong>VPN</strong> Connectionremains on the remote server; no files, only images, are sent tothe kiosk user’s computer.To use the Remote Desktop client:1 From the portal page, choose A public computer... and login.2 In the kiosk window, click the Remote Desktop icon .3 Enter your username and the remote host and clickConnect.4 Enter the credentials and network name of the remoteserver.The desktop of the Remote Desktop server displays in a windowon your computer.5 Work with the remote server just as if it were your localcomputer.66 <strong>Firebox</strong> <strong>SSL</strong> <strong>VPN</strong> <strong>Gateway</strong> <strong>Administration</strong> <strong>Guide</strong>
Connecting from a Public Computer (Kiosk Session)Using the SSH ClientThe SSH client enables the kiosk user to establish an SSH connectionto a remote computer.To use the SSH client:1 From the portal page, choose A public computer... and login.2 In the kiosk window, click the SSH icon .3 Enter your username and SSH host name or IP address.The ssh window opens.Using the Telnet 3270 Emulator ClientThe Telnet 3270 Emulator client enables the kiosk user toestablish a Telnet 3270 connection to a remote computer.To use the Telnet 3270 Emulator client:1 From the portal page, choose A public computer... and login.2 In the kiosk window, click the Telnet 3270 Emulator icon.The x3270 window opens.<strong>Firebox</strong> <strong>SSL</strong> <strong>VPN</strong> <strong>Gateway</strong> <strong>Administration</strong> <strong>Guide</strong> 67
Working with a <strong>VPN</strong> Connection3 Left-click Connect and choose Other from the menu.The x3270 Connect window opens.4 Enter the host name or IP address and click Connect tologin and receive a prompt.5 To view the 3270 keypad, click the keypad icon in theupper-right corner .Using the VNC ClientThe VNC client enables a kiosk user to remotely access the desktopof a VNC server. The kiosk user’s work remains on theremote server; no files, only images, are sent to the kiosk user’scomputer.To use the VNC client:1 From the portal page, choose A public computer... and login.2 In the kiosk window, click the VNC icon .3 Enter the IP address of the VNC host, your password for theserver, and click Connect.68 <strong>Firebox</strong> <strong>SSL</strong> <strong>VPN</strong> <strong>Gateway</strong> <strong>Administration</strong> <strong>Guide</strong>
Connecting from a Public Computer (Kiosk Session)The desktop of the VNC server displays in a window on yourcomputer.4 Work with the remote server just as if it were your localcomputer.NOTETo send a Ctrl-Alt-Delete to the connected server through theVNC server, press Shift-Ctrl-Alt-Delete.<strong>Firebox</strong> <strong>SSL</strong> <strong>VPN</strong> <strong>Gateway</strong> <strong>Administration</strong> <strong>Guide</strong> 69
Working with a <strong>VPN</strong> Connection70 <strong>Firebox</strong> <strong>SSL</strong> <strong>VPN</strong> <strong>Gateway</strong> <strong>Administration</strong> <strong>Guide</strong>
CHAPTER 4Configuring <strong>Firebox</strong><strong>SSL</strong> NetworkConnectionsThe following topics describe how to configure <strong>Firebox</strong> <strong>SSL</strong>network connections:• “Configuring Network Interfaces” on page 72• “Specifying DNS/WINS Settings” on page 74• “Configuring Routes” on page 75• “Configuring Failover <strong>Firebox</strong> <strong>SSL</strong>s” on page 80NOTEWhen you have a working configuration, we recommendthat you back up the configuration, as described in “Savingand Restoring the Configuration” on page 43.The configuration instructions throughout those topics assumethe following setup:• The <strong>Firebox</strong> <strong>SSL</strong> is installed. For information on installingthe <strong>Firebox</strong> <strong>SSL</strong>, refer to the <strong>Firebox</strong> <strong>SSL</strong> Quick Start andthe <strong>Firebox</strong> <strong>SSL</strong> Hardware Installation <strong>Guide</strong>.• The devices to which you are connecting the <strong>Firebox</strong> <strong>SSL</strong>,such as a firewall or server load balancer, are already partof a working configuration. This guide does not cover thesteps for configuring application or web servers, firewalls,or a server farm with a server load balancer.<strong>Firebox</strong> <strong>SSL</strong> <strong>VPN</strong> <strong>Gateway</strong> <strong>Administration</strong> <strong>Guide</strong> 71
Configuring <strong>Firebox</strong> <strong>SSL</strong> Network ConnectionsConfiguring Network InterfacesNetwork interface settings define the connections between the<strong>Firebox</strong> <strong>SSL</strong> and your network.To change the network interfaces settings, go to theNetworking > General Networking tab of the <strong>Firebox</strong> <strong>SSL</strong><strong>Administration</strong> Tool. The <strong>Firebox</strong> <strong>SSL</strong> network interface settingsare as follows:• IP address and subnet mask for Interface 0 and, if used,Interface 1When connecting the <strong>Firebox</strong> <strong>SSL</strong> to your network, youtypically place it either inside of a firewall, inside of a serverload balancer, or straddling a firewall. If the <strong>Firebox</strong> <strong>SSL</strong> isinside of a firewall or connected to a server load balancer,choose Use Only Interface 0.If the <strong>Firebox</strong> <strong>SSL</strong> straddles the firewall, choose Use BothInterfaces. Use Interface 0 for the DMZ (external)connection and Interface 1 for the LAN (internal)connection.72 <strong>Firebox</strong> <strong>SSL</strong> <strong>VPN</strong> <strong>Gateway</strong> <strong>Administration</strong> <strong>Guide</strong>
Configuring Network InterfacesFor more information, see the <strong>Firebox</strong> <strong>SSL</strong> Quick Start<strong>Guide</strong> and “Connecting to a Server Load Balancer” onpage 16, in this guide.• External Public AddressThe <strong>Firebox</strong> <strong>SSL</strong> uses the External Public Address to send itsresponse to a request back on the correct networkconnection. If the External Public Address is not specified,the <strong>Firebox</strong> <strong>SSL</strong> sends responses out through the Interfacewhere the gateway is identified. If the External PublicAddress is specified, the <strong>Firebox</strong> <strong>SSL</strong> writes all connectionsto the Interface with the specified host name or IP address.• Duplex mode for each interfaceDuplex mode is either auto, full duplex, or half duplex. Usethe default setting, auto, unless you need to change it.• Maximum transmission unit (MTU) for each interfaceThe MTU defines the maximum size of each transmittedpacket. The default is 1500. Use the default setting unlessyou need to change it.• Incoming <strong>VPN</strong> port (the port on the <strong>Firebox</strong> <strong>SSL</strong> to be usedfor <strong>VPN</strong> connections)• IP address of the default gateway device, such as the mainrouter, firewall, or server load balancer, depending on yournetwork configuration. This should be the same as theDefault <strong>Gateway</strong> setting that you would find on computerson the same subnet.<strong>Firebox</strong> <strong>SSL</strong> <strong>VPN</strong> <strong>Gateway</strong> <strong>Administration</strong> <strong>Guide</strong> 73
Configuring <strong>Firebox</strong> <strong>SSL</strong> Network ConnectionsFor information on the relationship between the defaultgateway and dynamic or static routing, see “ConfiguringRoutes” on page 75.NOTEIP pooling is configured per group, as described in “EnablingIP Pooling” on page 131.Specifying DNS/WINS SettingsIf you use name resolution, go to the Networking > DNS/WINStab of the <strong>Administration</strong> Tool to specify the following:• IP address of the first, second, and third DNS servers.• DNS suffixes. Do not precede a suffix with a dot (“.”). Forexample, specify “site.com”, not “.site.com”. Entries must bespace-separated.• WINS server IP address.74 <strong>Firebox</strong> <strong>SSL</strong> <strong>VPN</strong> <strong>Gateway</strong> <strong>Administration</strong> <strong>Guide</strong>
Configuring RoutesBy default, the <strong>Firebox</strong> <strong>SSL</strong> checks a <strong>VPN</strong> user’s remote DNSonly. If you want to allow failover to a user’s local DNS:• Go to the Global Policies tab and select the Enable SplitDNS check box.The <strong>Firebox</strong> <strong>SSL</strong> fails over to the local DNS only if thespecified DNS servers cannot be contacted, but not if thereis a negative response.Configuring RoutesYou can configure the <strong>Firebox</strong> <strong>SSL</strong> to listen for the routes publishedby your routing server(s) or to use static routes that youspecify. The <strong>Firebox</strong> <strong>SSL</strong> supports the Routing Information Protocol(RIP and RIP 2).The Default <strong>Gateway</strong> field on the Networking > General Networkingtab is relevant to both dynamic and static routing.• If you enable the Dynamic <strong>Gateway</strong> option (whenconfiguring dynamic routing), the default gateway will bebased on the routing table, not on the value entered in theDefault <strong>Gateway</strong> field.• If you add a static route, choose the <strong>Firebox</strong> <strong>SSL</strong> interfacenot being used by the default gateway.Configuring Dynamic RoutingWhen you choose dynamic routing, the <strong>Firebox</strong> <strong>SSL</strong> operates asfollows:• It listens for route information published through RIP andautomatically populates its routing table.<strong>Firebox</strong> <strong>SSL</strong> <strong>VPN</strong> <strong>Gateway</strong> <strong>Administration</strong> <strong>Guide</strong> 75
Configuring <strong>Firebox</strong> <strong>SSL</strong> Network Connections• If the Dynamic <strong>Gateway</strong> option is enabled, the <strong>Firebox</strong> <strong>SSL</strong>uses the default gateway providing by dynamic routing,rather than the value specified on the Networking > GeneralNetworking tab.• It disables any static routes created for the <strong>Firebox</strong> <strong>SSL</strong>. Ifyou later choose to disable dynamic routing, any previouslycreated static routes will redisplay in the <strong>Firebox</strong> <strong>SSL</strong>routing table.To configure dynamic routing:1 In the <strong>Firebox</strong> <strong>SSL</strong> <strong>Administration</strong> Tool, go to theNetworking > Routes tab.2 From the Select Routing Type menu, choose DynamicRouting (RIP).Selecting that option disables the static routes area. If thereare static routes defined, they no longer display in therouting table although they are still available should youwish to switch back to static routing.3 If you want to use the default gateway provided by therouting server(s), rather than the one specified in theNetworking > General Networking tab, select the EnableDynamic <strong>Gateway</strong> check box.The use of a dynamic gateway is noted in the Networking >General Networking tab with the message “<strong>Gateway</strong>Provided by Dynamic Routing.”4 Choose the <strong>Firebox</strong> <strong>SSL</strong> interface(s) to be used for dynamicrouting. Typically, your routing server(s) are inside yourfirewall, so you would choose an internal-facing interfacefor this setting.76 <strong>Firebox</strong> <strong>SSL</strong> <strong>VPN</strong> <strong>Gateway</strong> <strong>Administration</strong> <strong>Guide</strong>
Configuring Routes5 Click Submit.Dynamic routes are not displayed in the <strong>Firebox</strong> <strong>SSL</strong> routing table.Adding, Testing, and Removing a Static RouteWhen setting up communication with another host or network,you might need to add a static route from the <strong>Firebox</strong> <strong>SSL</strong> tothe new destination if you do not use dynamic routing.Set up static routes on the <strong>Firebox</strong> <strong>SSL</strong> interface not being usedby the default gateway. The default gateway is specified on theNetworking > General Networking tab.For an example static route setup, see “Static Route Example”on page 78.To add a static route:1 In the <strong>Firebox</strong> <strong>SSL</strong> <strong>Administration</strong> Tool, go to theNetworking > Routes tab.2 Enter a descriptive name for the route.3 Enter the IP address of the destination LAN.4 Enter the subnet mask for the gateway device.<strong>Firebox</strong> <strong>SSL</strong> <strong>VPN</strong> <strong>Gateway</strong> <strong>Administration</strong> <strong>Guide</strong> 77
Configuring <strong>Firebox</strong> <strong>SSL</strong> Network Connections5 Enter the IP address for the default gateway. If you do notspecify a gateway, the <strong>Firebox</strong> <strong>SSL</strong> can access content onlyon the local network.6 Select the Interface for the static route. The default is eth0.7 Click Add Static Route and then click Submit.The route name appears in the Static Routes list.To test a static route:1 From the <strong>Firebox</strong> <strong>SSL</strong> serial console, type 1 (Ping).Enter the host IP address for the device you want to ping and pressEnter.If you are successfully communicating with the otherdevice, messages will appear saying that the same numberof packets were transmitted and received, and zero packetswere lost.If you are not communicating with the other device, thestatus messages indicate that zero packets were receivedand all the packets were lost. Return to Step 1 and recreatethe static route.To remove a static route:1 In the <strong>Firebox</strong> <strong>SSL</strong> <strong>Administration</strong> Tool, go to theNetworking > Routes tab.2 In the Static Route table, select each route that you want todelete.3 Click Remove Route and then click Submit.Static Route ExampleSuppose the IP address of the eth0 port on your <strong>Firebox</strong> <strong>SSL</strong> is10.0.16.20 and there has been a request to access informationat 129.6.0.20, to which you currently have no path. You cancreate a static route through the interface that is not set as your<strong>Firebox</strong> <strong>SSL</strong> default gateway, and out to the requested networkaddress, as shown in Figure 4, “Building a Static Route,” onpage 79.78 <strong>Firebox</strong> <strong>SSL</strong> <strong>VPN</strong> <strong>Gateway</strong> <strong>Administration</strong> <strong>Guide</strong>
Configuring RoutesFigure 4: Building a Static RouteFigure 4, “Building a Static Route,” on page 79 shows the followingconnections:• The eth0 interface (10.0.16.20) leads to the default gateway(10.0.16.1), which connects to the rest of the 10.0.0.0network.• The eth1 interface (192.168.0.20) is set to communicatewith the 192.168.0.0 network and its gateway(192.168.0.1). Through this gateway, the eth1 port cancommunicate with the 129.6.00 network, and the server atIP address 129.6.0.20.To set up this static route, you need to establish the pathbetween the eth1 interface and IP address 129.6.0.20.To set up the example static route:1 Go to the Networking > Routes tab.2 Set the IP address of the destination LAN to 129.6.0.0.3 Set the subnet mask for the gateway device.4 Set the IP address of the default gateway to 192.168.0.1.<strong>Firebox</strong> <strong>SSL</strong> <strong>VPN</strong> <strong>Gateway</strong> <strong>Administration</strong> <strong>Guide</strong> 79
Configuring <strong>Firebox</strong> <strong>SSL</strong> Network Connections5 Choose eth1 as the gateway device interface.6 Click Add Static Route and then click Submit.Configuring Failover <strong>Firebox</strong> <strong>SSL</strong>sYou can configure an <strong>Firebox</strong> <strong>SSL</strong> to fail over to multiple <strong>Firebox</strong><strong>SSL</strong>s. Because the <strong>Firebox</strong> <strong>SSL</strong> failover is active/active, youcan use each <strong>Firebox</strong> <strong>SSL</strong> as a primary gateway for a differentset of users.During its initial connection to the Secure Access client, the<strong>Firebox</strong> <strong>SSL</strong> provides the failover list to the client. If the clientloses the connection to its primary <strong>Firebox</strong> <strong>SSL</strong>, it iteratesthrough the list of failover <strong>Firebox</strong> <strong>SSL</strong>s. The client performs aDNS lookup for the first failover <strong>Firebox</strong> <strong>SSL</strong> (listed in the <strong>VPN</strong>Failover dialog box) and tries to connect to that server. If thefirst failover <strong>Firebox</strong> <strong>SSL</strong> is not available, the client tries the nextfailover server. When the client successfully connects to afailover <strong>Firebox</strong> <strong>SSL</strong>, the client prompts the user to log in.To specify <strong>Firebox</strong> <strong>SSL</strong>s for failover:1 In the <strong>Firebox</strong> <strong>SSL</strong> <strong>Administration</strong> Tool, go to theNetworking > Failover Servers tab.2 Enter the external IP address or the fully qualified domainname of the <strong>Firebox</strong> <strong>SSL</strong>(s) to be used for failover operation.The <strong>Firebox</strong> <strong>SSL</strong>s are used for failover in the order listed.3 Click Submit.80 <strong>Firebox</strong> <strong>SSL</strong> <strong>VPN</strong> <strong>Gateway</strong> <strong>Administration</strong> <strong>Guide</strong>
CHAPTER 5Configuring <strong>Firebox</strong><strong>SSL</strong> Operation<strong>Firebox</strong> <strong>SSL</strong> operation controls include authentication, authorization,network resource, and host check settings. Group-basedcontrols include access control, host checking, portal pages, IPpools, and kiosk operation.NOTEAll submitted configuration changes are automaticallyapplied to the <strong>Firebox</strong> <strong>SSL</strong> and will not cause a disruption in<strong>Firebox</strong> <strong>SSL</strong> client operation. Policy changes will take effectimmediately; if a <strong>VPN</strong> connection violates a new policy, itwill be closed.The following topics describe how to configure <strong>Firebox</strong> <strong>SSL</strong>operation:• “Configuring Authentication, Authorization, and LocalUsers” on page 82• “Controlling Network Access” on page 102• “Customizing <strong>VPN</strong> Portal Pages” on page 108• “Configuring Host Check Rules” on page 116• “Configuring Network Shares for Kiosk Sessions” onpage 119• “Adding and Configuring User Groups” on page 121<strong>Firebox</strong> <strong>SSL</strong> <strong>VPN</strong> <strong>Gateway</strong> <strong>Administration</strong> <strong>Guide</strong> 81
Configuring <strong>Firebox</strong> <strong>SSL</strong> Operation• “Enabling Split Tunneling” on page 134• “Enabling Split DNS” on page 135• “Enabling Session Timeout” on page 136• “Configuring Internal Failover” on page 137• “Forcing <strong>VPN</strong> User Re-login” on page 138• “Configuring Secure Access for Single Sign-on” onpage 140Configuring Authentication, Authorization, andLocal UsersBy default the <strong>Firebox</strong> <strong>SSL</strong> authenticates users against a user liststored locally on the <strong>Firebox</strong> <strong>SSL</strong>. You can configure the <strong>Firebox</strong><strong>SSL</strong> to also use LDAP, RADIUS, and/or RSA SecurID authenticationservers. The <strong>Firebox</strong> <strong>SSL</strong> supports realm-based authenticationto accommodate sites with more than one LDAP or RADIUSserver or with a combination of LDAP, RADIUS, and/or RSASecurID authentication servers.If a user is not located on an authentication server or failsauthentication on that server, the <strong>Firebox</strong> <strong>SSL</strong> checks the useragainst the local user list.82 <strong>Firebox</strong> <strong>SSL</strong> <strong>VPN</strong> <strong>Gateway</strong> <strong>Administration</strong> <strong>Guide</strong>
Configuring Authentication, Authorization, and Local UsersAfter a user is authenticated, the <strong>Firebox</strong> <strong>SSL</strong> performs a groupauthorization check by obtaining the user’s group informationfrom either an LDAP server or the local group file (if not availableon the LDAP server). If group information is available forthe user, the <strong>Firebox</strong> <strong>SSL</strong> then checks the network resourcesallowed for the group. LDAP can be used for authorizationregardless of the type(s) of authentication servers being used.By default, the <strong>Firebox</strong> <strong>SSL</strong> obtains an authenticated user’sgroup(s) from the local group file stored on the <strong>Firebox</strong> <strong>SSL</strong>.Alternatively, you can configure the <strong>Firebox</strong> <strong>SSL</strong> to obtain anauthenticated user’s group(s) from an LDAP server. If the user isnot located on the LDAP server, the <strong>Firebox</strong> <strong>SSL</strong> checks its localgroup file.The group names obtained from the LDAP server are comparedto the group names created locally on the <strong>Firebox</strong> <strong>SSL</strong>. If thetwo group names match, the properties of the local group applyto the group obtained from the LDAP server. For more informationon groups and group names, see “Adding and ConfiguringUser Groups” on page 121.The following topics describe how to configure authenticationand authorization for the <strong>Firebox</strong> <strong>SSL</strong>:• “About the Realm Named Default” on page 84<strong>Firebox</strong> <strong>SSL</strong> <strong>VPN</strong> <strong>Gateway</strong> <strong>Administration</strong> <strong>Guide</strong> 83
Configuring <strong>Firebox</strong> <strong>SSL</strong> Operation• “Using a Local User List for Authentication” on page 84• “Using RADIUS Servers for Authentication” on page 88• “Using LDAP Servers for Authentication and Authorization”on page 91• “Using RSA SecurID for Authentication” on page 95• “Removing an Authentication Realm” on page 100• “Adding Local Users” on page 100About the Realm Named DefaultThe <strong>Firebox</strong> <strong>SSL</strong> has a permanent realm named Default, with thefollowing characteristics:• For a new installation, the Default realm is configured forlocal authentication.• You can change the authentication type of the Defaultrealm.• You cannot remove the Default realm unless youimmediately replace it with a new Default realm.• The Default realm is assumed when a user enters only a username when logging in to the <strong>Firebox</strong> <strong>SSL</strong>.When a user logs into any other realm, the user must log inusing realmName\userName. Therefore, if all of your users areauthenticated against one authentication server, configure theDefault realm for that type of authentication so that users willnot have to enter a realm name when logging in. Users whoauthenticate against a realm other than the Default realm mustspecify a realm name (once in the Secure Access ConnectionProperties dialog box, or with their user name each time theylog in).Using a Local User List for AuthenticationFor a new installation, the Default realm is set to local authentication.• If your site does not use a RADIUS, LDAP, or RSA server forauthentication, keep the Default realm set to localauthentication. This will enable users to log in to the84 <strong>Firebox</strong> <strong>SSL</strong> <strong>VPN</strong> <strong>Gateway</strong> <strong>Administration</strong> <strong>Guide</strong>
Using a Local User List for Authentication<strong>Firebox</strong> <strong>SSL</strong> without having to enter a realm name. You canhave only one realm for local authentication. You can useLDAP authorization with local authentication, as describedin “Using LDAP Authorization with Local Authentication”on page 85.• If some users will authenticate only against the local userlist on the <strong>Firebox</strong> <strong>SSL</strong>, you can keep the Default realm setto local authentication. Alternatively, you can create adifferent realm for local authentication and use the Defaultrealm for another authentication type, as described in“Changing the Authentication Type of the Default Realm”on page 87.NOTEUsers who authenticate against a realm other than theDefault realm must specify a realm name (once in the SecureAccess Connection Properties dialog box, or with their username each time they log in).• If all users authenticate against authentication servers, youdo not need a realm for local authentication. The <strong>Firebox</strong><strong>SSL</strong> always checks locally for authentication information ifa user fails to authenticate on another authenticationserver.Using LDAP Authorization with LocalAuthenticationBy default, the <strong>Firebox</strong> <strong>SSL</strong> obtains an authenticated user’sgroup(s) from the local group file stored on the <strong>Firebox</strong> <strong>SSL</strong>.Alternatively, you can configure the <strong>Firebox</strong> <strong>SSL</strong> to obtain anauthenticated user’s group(s) from an LDAP server. If the user isnot located on the LDAP server, the <strong>Firebox</strong> <strong>SSL</strong> checks its localgroup file.To use LDAP authorization with localauthentication:1 In the <strong>Firebox</strong> <strong>SSL</strong> <strong>Administration</strong> Tool, go to theAuthentication and Local Users tab.<strong>Firebox</strong> <strong>SSL</strong> <strong>VPN</strong> <strong>Gateway</strong> <strong>Administration</strong> <strong>Guide</strong> 85
Configuring <strong>Firebox</strong> <strong>SSL</strong> Operation2 Open the window for the realm that is configured for localauthentication. You will open the Default realm unless youhave changed its authentication type.3 Click the Authorization tab and complete the settings.See “Using LDAP Servers for Authentication and Authorization”on page 91 (starting with Step 5) for a description of the LDAPserver settings. See “Looking Up Attributes in your LDAPDirectory” on page 94 for information on looking up LDAP serversettings.86 <strong>Firebox</strong> <strong>SSL</strong> <strong>VPN</strong> <strong>Gateway</strong> <strong>Administration</strong> <strong>Guide</strong>
Using a Local User List for AuthenticationChanging the Authentication Type of the DefaultRealmWhen a <strong>VPN</strong> user logs in to the Default realm, the user does nothave to specify a realm name. For any other realm, the usermust specify a realm name when logging in. Thus, if most userswill log into a non-local authentication realm, you shouldchange the authentication type of the Default realm.To change the authentication type of the Default realm, removethe Default realm and then immediately create a new Defaultrealm as follows.To change the authentication type of the Defaultrealm:1 In the <strong>Firebox</strong> <strong>SSL</strong> <strong>Administration</strong> Tool, go to theAuthentication and Local Users tab.2 Open the window for the Default realm.3 From the Action menu, choose Remove “Default” realm.A warning message appears.<strong>Firebox</strong> <strong>SSL</strong> <strong>VPN</strong> <strong>Gateway</strong> <strong>Administration</strong> <strong>Guide</strong> 87
Configuring <strong>Firebox</strong> <strong>SSL</strong> Operation4 Click Yes.5 Create a new realm named Default, choose anauthentication type, and click Add.6 Complete the window that appears. For information, see:- “Using RADIUS Servers for Authentication” onpage 88- “Using LDAP Servers for Authentication andAuthorization” on page 91- “Using RSA SecurID for Authentication” on page 95NOTEIf you remove the Default realm and do not immediatelyreplace it as described above, the <strong>Firebox</strong> <strong>SSL</strong> retains theDefault realm that you attempted to remove.Using RADIUS Servers for AuthenticationYou can configure the <strong>Firebox</strong> <strong>SSL</strong> to authenticate user accesswith one or more RADIUS servers. For each RADIUS realm thatyou use for authentication, you can configure both the primaryand secondary RADIUS servers. If the primary RADIUS server isunavailable, the <strong>Firebox</strong> <strong>SSL</strong> will attempt to authenticateagainst the secondary RADIUS server for that realm.88 <strong>Firebox</strong> <strong>SSL</strong> <strong>VPN</strong> <strong>Gateway</strong> <strong>Administration</strong> <strong>Guide</strong>
Using RADIUS Servers for AuthenticationIf a user is not located on the RADIUS servers or fails authentication,the <strong>Firebox</strong> <strong>SSL</strong> checks the user against the user informationstored locally on the <strong>Firebox</strong> <strong>SSL</strong> (for more information,see “Adding and Configuring User Groups” on page 121).To specify RADIUS server settings:1 In the <strong>Firebox</strong> <strong>SSL</strong> <strong>Administration</strong> Tool, go to theAuthentication and Local Users tab.2 Enter a name for the authentication realm that you willcreate.NOTEIf you want the Default realm to use RADIUS authentication,remove the Default realm as described in “Changing theAuthentication Type of the Default Realm” on page 87.If your site has multiple authentication realms, use a name thatidentifies the RADIUS realm for which you will specify settings.Realm names are case-sensitive and can contain spaces.3 From the Type menu, choose RADIUS and LocalAuthentication.4 Click Add.A window for the authentication realm opens.<strong>Firebox</strong> <strong>SSL</strong> <strong>VPN</strong> <strong>Gateway</strong> <strong>Administration</strong> <strong>Guide</strong> 89
Configuring <strong>Firebox</strong> <strong>SSL</strong> Operation5 Enter the IP address and the port (default is 1812) of theRADIUS server.6 Enter the RADIUS server secret.7 If you use a secondary RADIUS server, enter its IP address,port, and server secret.8 To use LDAP for authorization, click the Authorization taband complete the settings.See “Using LDAP Servers for Authentication and Authorization” onpage 91 (starting with Step 5) for a description of the LDAP serversettings. See “Looking Up Attributes in your LDAP Directory” onpage 94 for information on looking up LDAP server settings.90 <strong>Firebox</strong> <strong>SSL</strong> <strong>VPN</strong> <strong>Gateway</strong> <strong>Administration</strong> <strong>Guide</strong>
Using LDAP Servers for Authentication and Authorization9 Click Submit.NOTEIf you are using Microsoft Internet Authentication Service(IAS) as a RADIUS server and receive a bad username orpassword error when the <strong>Firebox</strong> <strong>SSL</strong> sends a request to theconfigured RADIUS server, check the following IAS setting:In IAS Remote Access Policies, under the applied policy'sproperties in the Authentication tab, make sure "unencryptedauthentication (PAP, SPAP)" is selected.Using LDAP Servers for Authentication andAuthorizationYou can configure the <strong>Firebox</strong> <strong>SSL</strong> to authenticate user accesswith one or more LDAP servers. If a user is not located in anLDAP directory or fails authentication on a server, the <strong>Firebox</strong><strong>SSL</strong> checks the user against the user information stored locallyon the <strong>Firebox</strong> <strong>SSL</strong> (for more information, see “Adding andConfiguring User Groups” on page 121).NOTEIf you need help determining your LDAP server settings, see“Looking Up Attributes in your LDAP Directory” on page 94.<strong>Firebox</strong> <strong>SSL</strong> <strong>VPN</strong> <strong>Gateway</strong> <strong>Administration</strong> <strong>Guide</strong> 91
Configuring <strong>Firebox</strong> <strong>SSL</strong> OperationTo specify LDAP server settings:1 In the <strong>Firebox</strong> <strong>SSL</strong> <strong>Administration</strong> Tool, go to theAuthentication and Local Users tab.2 Enter a name for the authentication realm that you willcreate.NOTEIf you want the Default realm to use LDAP authentication,remove the Default realm as described in “Changing theAuthentication Type of the Default Realm” on page 87.If your site has multiple authentication realms, you might use aname that identifies the LDAP realm for which you will specifysettings. Realm names are case-sensitive and can contain spaces.3 From the Type menu, choose LDAP and LocalAuthentication.4 Click Add.A window for the authentication realm opens.92 <strong>Firebox</strong> <strong>SSL</strong> <strong>VPN</strong> <strong>Gateway</strong> <strong>Administration</strong> <strong>Guide</strong>
Using LDAP Servers for Authentication and Authorization5 Select the Enable LDAP Authorization check box6 Enter the IP address and the port of the LDAP server.The LDAP Server Port defaults to 389. If you are using anindexed database, such as Microsoft Active Directory with aGlobal Catalog, changing the LDAP Server Port to 3268 willsignificantly speed the LDAP queries.If your directory is not indexed, we recommend that you usean administrative connection, rather than an anonymousconnection, from the <strong>Firebox</strong> <strong>SSL</strong> to the database.Download performance improves when you use anadministrative connection.7 Enter the Administrator Bind DN and password for queriesto your LDAP directory.Examples of syntax for Bind DN:"ou=administrator,dc=ace,dc=com""user@domain.name" (for Active Directory)"cn=Administrator,cn=Users,dc=ace,dc=com"For Active Directory, the group name, specified as"cn=groupname", is required. For other LDAP directories,the group name either is not required or, if required, isspecified as "ou=groupname".The <strong>Firebox</strong> <strong>SSL</strong> binds to the LDAP server using theadministrator credentials and then searches for the user.After locating the user, the <strong>Firebox</strong> <strong>SSL</strong> unbinds theadministrator credentials and rebinds with the usercredentials.8 Enter the Base DN under which users are located.Base DN is usually derived from the Bind DN by removingthe user name and specifying the group where users arelocated. Examples of syntax for Base DN:"ou=Users,dc=ace,dc=com""cn=Users,dc=ace,dc=com"9 Enter the attribute under which the <strong>Firebox</strong> <strong>SSL</strong> should lookfor user login names for the LDAP server that you areconfiguring. Defaults to "cn". If you use Active Directory,enter the attribute "sAMAccountName".<strong>Firebox</strong> <strong>SSL</strong> <strong>VPN</strong> <strong>Gateway</strong> <strong>Administration</strong> <strong>Guide</strong> 93
Configuring <strong>Firebox</strong> <strong>SSL</strong> Operation10 Specify the LDAP Group Attribute, which defaults to"memberOf". This attribute enables the <strong>Firebox</strong> <strong>SSL</strong> toobtain the groups associated with a user duringauthorization.11 Click Submit.Looking Up Attributes in your LDAP DirectoryIf you need help determining your LDAP Directory attributes,you can easily look them up with the free LDAP Browser fromSofterra.To install and set up LDAP Browser:1 Download the free LDAP Browser application fromwww.ldapbrowser.com.2 Install LDAP Browser and open it.3 From the LDAP Browser window, choose File > New Profileand specify the following settings:- Host: Host name or IP address of your LDAP server.- Port: Defaults to 389.- Base DN: You can leave this field blank. (Theinformation provided by the LDAP Browser will helpyou determine the Base DN needed for theAuthentication tab.)- Anonymous Bind: Select the check box if the LDAPserver does not require credentials to connect to it. Ifthe LDAP server requires credentials, leave the checkbox cleared, click Next, and enter the credentials.4 Click Finish.The LDAP Browser displays the profile name that you justcreated in the left pane of the LDAP Browser window andconnects to the LDAP server.To look up LDAP attributes:1 In left pane of the LDAP Browser, select the profile namethat you created.2 To look up the Base DN, locate in the right pane thenamingContexts attribute. The value of that attribute is theBase DN for your site. The Base DN is typically94 <strong>Firebox</strong> <strong>SSL</strong> <strong>VPN</strong> <strong>Gateway</strong> <strong>Administration</strong> <strong>Guide</strong>
Using RSA SecurID for Authentication"dc=myDomain,dc=com" (if your directory tree is based onInternet domain names) or"ou=domain,o=myOrg,c=country".3 Navigate with the browser to locate other attributes.Using RSA SecurID for AuthenticationNOTEIf you are running a RADIUS server on an RSA server,configure RADIUS authentication, as described in “UsingRADIUS Servers for Authentication” on page 88.If your site uses an RSA ACE/Server and SecurID for authentication,you can configure the <strong>Firebox</strong> <strong>SSL</strong> to authenticate useraccess with the RSA ACE/Server. The <strong>Firebox</strong> <strong>SSL</strong> acts as an RSAAgent Host, authenticating on behalf of the <strong>VPN</strong> users logginginto the <strong>VPN</strong> client. The <strong>Firebox</strong> <strong>SSL</strong> supports the use of oneRSA ACE/Server.If a user is not located on the RSA ACE/Server or fails authenticationon that server, the <strong>Firebox</strong> <strong>SSL</strong> checks the user against<strong>Firebox</strong> <strong>SSL</strong> <strong>VPN</strong> <strong>Gateway</strong> <strong>Administration</strong> <strong>Guide</strong> 95
Configuring <strong>Firebox</strong> <strong>SSL</strong> Operationthe user information stored locally on the <strong>Firebox</strong> <strong>SSL</strong> (for moreinformation, see “Adding and Configuring User Groups” onpage 121).The <strong>Firebox</strong> <strong>SSL</strong> supports Next Token Mode. If a user entersthree incorrect passwords, the Secure Access client prompts theuser to wait until the next token is active before logging in. If auser logs in too many times with an incorrect password, the RSAserver might disable the user’s account.To contact the RSA ACE/Server, the <strong>Firebox</strong> <strong>SSL</strong> must include acopy of the ACE Agent Host sdconf.rec configuration file that isgenerated by the RSA ACE/Server. The following proceduresdescribe how to generate and upload that file.To generate a sdconf.rec file for the <strong>Firebox</strong> <strong>SSL</strong>:NOTEThe following steps describe the required settings for the<strong>Firebox</strong> <strong>SSL</strong>. Your site might have additional requirements.Refer to the RSA ACE/Server documentation for moreinformation.If you have to re-image the <strong>Firebox</strong> <strong>SSL</strong>, see “Resetting theNode Secret” on page 99.1 On a computer where your RSA ACE/Server <strong>Administration</strong>interface is installed, go to Start > Programs > RSA ACEServer > Database <strong>Administration</strong> - Host Mode.2 In the RSA ACE/Server <strong>Administration</strong> interface, go toAgent Host > Add Agent Host (or, if you are changing anAgent Host, Edit Agent Host).3 In the Name field, enter a descriptive name for the <strong>Firebox</strong><strong>SSL</strong> (the Agent Host for which you are creating aconfiguration file).4 In the Network address field, enter the <strong>Firebox</strong> <strong>SSL</strong> IPaddress (the internal address).5 For Agent type, select UNIX Agent.6 Note that the Node Secret Created check box is clearedand inactive when you are creating an Agent Host. The RSAACE/Server will send the Node Secret to the <strong>Firebox</strong> <strong>SSL</strong> thefirst time that it authenticates a request from the <strong>Firebox</strong>96 <strong>Firebox</strong> <strong>SSL</strong> <strong>VPN</strong> <strong>Gateway</strong> <strong>Administration</strong> <strong>Guide</strong>
Using RSA SecurID for Authentication<strong>SSL</strong>. After that, the Node Secret Created check box will beselected. By deselecting the check box and generating/uploading a new configuration file, you can force the RSAACE/Server to send a new Node Secret to the <strong>Firebox</strong> <strong>SSL</strong>.7 Indicate which users can be authenticated through the<strong>Firebox</strong> <strong>SSL</strong> through one of the following methods:- To configure the <strong>Firebox</strong> <strong>SSL</strong> as an open Agent Host,click Open to All Locally Known Users and then clickOK.- To select the users to be authenticated, click OK, goto Agent Host > Edit Agent Host, select the <strong>Firebox</strong><strong>SSL</strong> host, and then click OK. In the dialog box, clickthe User Activations button and select the users.8 To create the configuration file for the new or changedAgent Host, go to Agent Host > Generate ConfigurationFiles.The file that you generate (sdconf.rec) is what you will upload tothe <strong>Firebox</strong> <strong>SSL</strong>, as described in the following procedure.To enable RSA SecurID authentication for the<strong>Firebox</strong> <strong>SSL</strong>:1 In the <strong>Firebox</strong> <strong>SSL</strong> <strong>Administration</strong> Tool, go to theAuthentication and Local Users tab.2 Enter a realm name to identify the RSA ACE/Server.If you want the Default realm to use RSA authentication, removethe Default realm as described in “Changing the AuthenticationType of the Default Realm” on page 87.Realm names are case-sensitive and can contain spaces.3 From the Type menu, choose SecurID and LocalAuthentication.4 Click Add.A window for the authentication realm opens.<strong>Firebox</strong> <strong>SSL</strong> <strong>VPN</strong> <strong>Gateway</strong> <strong>Administration</strong> <strong>Guide</strong> 97
Configuring <strong>Firebox</strong> <strong>SSL</strong> Operation5 To upload the sdconf.rec file that you generated in theprevious procedure, click Upload sdconf.rec file and use thedialog box to locate and upload the file.The sdconf.rec file is typically written to ace\data\config_files andto windows\system32.- The file status message indicates whether ansdconf.rec file has been uploaded. If one has beenuploaded and you need to replace it, click Uploadsdconf.rec file and use the dialog box to locate andupload the file.- The first time that a client is successfullyauthenticated, the RSA ACE/Server will write someconfiguration files to the <strong>Firebox</strong> <strong>SSL</strong>. If yousubsequently change the IP address of the <strong>Firebox</strong><strong>SSL</strong>, click Remove ACE Configuration Files, rebootwhen prompted, and then upload a new sdconf.recfile.6 After the file uploads, click Submit.7 To use LDAP for authorization, click the Authorization taband complete the settings.See “Using LDAP Servers for Authentication andAuthorization” on page 91 (starting with Step 5) for adescription of the LDAP server settings. See “Looking Up98 <strong>Firebox</strong> <strong>SSL</strong> <strong>VPN</strong> <strong>Gateway</strong> <strong>Administration</strong> <strong>Guide</strong>
Using RSA SecurID for AuthenticationAttributes in your LDAP Directory” on page 94 forinformation on looking up LDAP server settings.8 Click Submit.Resetting the Node SecretIf you have re-imaged the <strong>Firebox</strong> <strong>SSL</strong>, giving it the same IPaddress as before, and restored your configuration, you mustalso reset the node secret on the RSA ACE/Server. (Because the<strong>Firebox</strong> <strong>SSL</strong> has been re-imaged, the node secret no longerresides on it and an attempt to authenticate with the RSA ACE/Server will fail.)After you reset the server secret on the RSA ACE/Server, the nextauthentication attempt will cause the RSA ACE/Server to send anode secret to the <strong>Firebox</strong> <strong>SSL</strong>.To reset the node secret on the RSA ACE/Server:1 On a computer where your RSA ACE/Server <strong>Administration</strong>interface is installed, go to Start > Programs > RSA ACEServer > Database <strong>Administration</strong> - Host Mode.2 In the RSA ACE/Server <strong>Administration</strong> interface, go toAgent Host > Edit Agent Host.3 Select the <strong>Firebox</strong> <strong>SSL</strong> IP address from the list of agenthosts.<strong>Firebox</strong> <strong>SSL</strong> <strong>VPN</strong> <strong>Gateway</strong> <strong>Administration</strong> <strong>Guide</strong> 99
Configuring <strong>Firebox</strong> <strong>SSL</strong> Operation4 Clear the Node Secret Created check box and save thechange.The RSA server will re-send the node secret on the nextauthentication attempt from the <strong>Firebox</strong> <strong>SSL</strong>.Removing an Authentication RealmYou can remove any realm except for the realm named Default.(You can remove the Default realm only if you immediately createa new realm named Default. For more information, see“Changing the Authentication Type of the Default Realm” onpage 87.)To remove an authentication realm:1 In the <strong>Firebox</strong> <strong>SSL</strong> <strong>Administration</strong> Tool, go to theAuthentication and Local Users tab.2 Open the window for the authentication realm that youwant to remove.3 From the Action menu, choose Remove ... realm.Adding Local UsersYou can create user accounts locally on the <strong>Firebox</strong> <strong>SSL</strong> to supplementthe users on authentication servers. For example, youmight want to create local user accounts for temporary <strong>VPN</strong>users, such as consultants or visitors, without creating an entryfor those users on the authentication server. In that case, youadd the user to the <strong>Firebox</strong> <strong>SSL</strong> local user list as described in thissection.If you associate more than one group with a user account, theproperties of the first group that you select for the user will beused.100 <strong>Firebox</strong> <strong>SSL</strong> <strong>VPN</strong> <strong>Gateway</strong> <strong>Administration</strong> <strong>Guide</strong>
Adding Local UsersTo create a user on the <strong>Firebox</strong> <strong>SSL</strong>:1 In the <strong>Firebox</strong> <strong>SSL</strong> <strong>Administration</strong> Tool, go to theAuthentication and Local Users > Local Users tab.2 Enter a user name. A user will need to enter this name whenlogging into Secure Access. User names can contain spaces.3 Enter a password for the user in the two fields. A user willneed to enter this password when logging into SecureAccess. A password must be six or more characters (checkedup to 128 characters).4 Click Add Local User.The added user appears in the Local Users list.5 To change the group membership of a user:- To add a group to a user, select the group in theAvailable Groups list and click Add Group to User. Forinformation on creating a group, see “Adding andConfiguring User Groups” on page 121.- To remove a group from a user, select the group inthe Associated Groups list and click Remove Groupfrom User.<strong>Firebox</strong> <strong>SSL</strong> <strong>VPN</strong> <strong>Gateway</strong> <strong>Administration</strong> <strong>Guide</strong> 101
Configuring <strong>Firebox</strong> <strong>SSL</strong> OperationTo delete a user from the <strong>Firebox</strong> <strong>SSL</strong>:• Select the user in the Local Users list and click RemoveUser.Controlling Network AccessBy default, the <strong>Firebox</strong> <strong>SSL</strong> is blocked from accessing any networks.You must specify the networks that the <strong>Firebox</strong> <strong>SSL</strong> canaccess, referred to as “accessible networks.” You then control<strong>VPN</strong> user access to those networks as follows:• You create network resource groups.A network resource group includes one or more networklocations. For example, a resource group might provideaccess to a single application, a subset of applications, arange of IP addresses, or an entire intranet. What youinclude in a network resource group depends largely on thevarying access requirements of your <strong>VPN</strong> users. You mightwant to provide some user groups with access to manyresources and other user groups with access to smallersubsets of resources. By allowing and denying a user groupaccess to network resource groups, you create an AccessControl List (ACL) for that user group.• You specify whether any user group with no ACL has fullaccess to all of the accessible networks defined for the<strong>Firebox</strong> <strong>SSL</strong>.By default, user groups without an ACL have access to all of theaccessible networks defined for the <strong>Firebox</strong> <strong>SSL</strong>. This defaultoperation provides simple configuration if most of your usergroups are to have full network access. By retaining this defaultoperation, you will need to configure an ACL only for the usergroups who should have more restricted access. The defaultoperation can also be useful for initial testing.You can change the default operation so that user groups aredenied network access unless they have been allowed access toone or more network resource groups.• You configure ACLs for user groups by specifying whichnetwork resources are allowed or denied per user group.102 <strong>Firebox</strong> <strong>SSL</strong> <strong>VPN</strong> <strong>Gateway</strong> <strong>Administration</strong> <strong>Guide</strong>
Controlling Network AccessBy default, all network resource groups are allowed (and networkaccess is controlled by the “Deny Access without ACL”option). When you allow or deny one resource group, all otherresource groups are automatically denied and the networkaccess for the user group is controlled only through its ACL.If a resource group includes a resource that you do not want auser group to access, you can create a separate resource groupfor just that resource and deny the user group access to it.The options just discussed are summarized in the followingtable.ACL set foruser group?Deny accesswithout ACL?User group can access:No No All accessible networksYes No Allowed resource groupsNo Yes NothingYes Yes Allowed resource groupsFor information on controlling network access, see the followingtopics:• “Specifying Accessible Networks” on page 103• “Defining Network Resource Groups” on page 104• “Denying Access to Groups with No ACL” on page 107Specifying Accessible NetworksYou must specify which networks the <strong>Firebox</strong> <strong>SSL</strong> can access. Bydefault, the <strong>Firebox</strong> <strong>SSL</strong> has no network access.To give the <strong>Firebox</strong> <strong>SSL</strong> access to a network:1 In the <strong>Firebox</strong> <strong>SSL</strong> <strong>Administration</strong> Tool, go to the GlobalPolicies tab.<strong>Firebox</strong> <strong>SSL</strong> <strong>VPN</strong> <strong>Gateway</strong> <strong>Administration</strong> <strong>Guide</strong> 103
Configuring <strong>Firebox</strong> <strong>SSL</strong> Operation2 Enter a space-separated list of networks and click Submit.Defining Network Resource GroupsNetwork resource groups define the locations that authorized<strong>VPN</strong> users can access. Resource groups are associated with usergroups to form resource access control policies.Suppose that you want to provide a user group with secureaccess to the following:• the 10.10.x.x subnet• the 10.20.10.x subnet• 10.50.0.60 and 10.60.0.10To provide that access, you would create a network resourcegroup by specifying the following IP address/netmask pairs:104 <strong>Firebox</strong> <strong>SSL</strong> <strong>VPN</strong> <strong>Gateway</strong> <strong>Administration</strong> <strong>Guide</strong>
Controlling Network Access10.10.0.0/255.255.0.010.20.10.0/255.255.255.010.50.0.60/255.255.255.25510.60.0.10/255.255.255.255You can specify the mask in CIDR notation. For example, in theabove example, you could specify 10.60.0.10/32 for the lastentry.Additional tips for working with resource groups follow.• You can further restrict access by specifying a port andprotocol for an IP address/netmask pair. For example, youmight specify that a resource can use only port 80 and theTCP protocol.• When you configure resource group access for a user group,you can allow or deny access to any resource group. Thisenables you to exclude a portion of an otherwise allowedresource. For example, you might want to allow a usergroup access to 10.20.10.0/24, but deny that user groupaccess to 10.20.10.30. Deny rules take precedence overallow rules.• The easiest method to provide all <strong>VPN</strong> user groups withaccess to all network resources, is to not create any resourcegroups and to disable the Deny Access without ACL optionon the Global Policies tab. All user groups will then haveaccess to the accessible networks listed on the GlobalPolicies tab.• If you have one or more user groups that should have accessto all network resources, a shortcut to adding eachindividual resource group to those user groups is to create aresource group for 0.0.0.0/0.0.0.0 and allow that oneresource group for those user groups. For all other usergroups, you will need to allow/deny individual resourcegroups as needed.To create a resource group:1 In the <strong>Firebox</strong> <strong>SSL</strong> <strong>Administration</strong> Tool, go to the NetworkResources tab.<strong>Firebox</strong> <strong>SSL</strong> <strong>VPN</strong> <strong>Gateway</strong> <strong>Administration</strong> <strong>Guide</strong> 105
Configuring <strong>Firebox</strong> <strong>SSL</strong> Operation2 Enter a resource group name. For example, “Archives” or“Web mail”.3 Click Add.A window for the resource group appears.4 Enter the IP address/netmask pair for the resource in theSubnets field. You can use CIDR notation for the mask. Usea space to separate entries.5 Enter a port for the pairs listed. Specify “0” to allow anyport.6 Select a protocol for the pairs listed.7 Click Submit.For information on adding a resource group to a user group, see“Adding and Configuring User Groups” on page 121.To remove a resource group:1 In the <strong>Firebox</strong> <strong>SSL</strong> <strong>Administration</strong> Tool, go to the NetworkResources tab.2 Open the window for the resource group that you want toremove.3 From the Action menu, choose Remove ... resource.106 <strong>Firebox</strong> <strong>SSL</strong> <strong>VPN</strong> <strong>Gateway</strong> <strong>Administration</strong> <strong>Guide</strong>
Controlling Network AccessDenying Access to Groups with No ACLBy default, a user group without an ACL has access to all of theaccessible networks defined for the <strong>Firebox</strong> <strong>SSL</strong>, as described in“Controlling Network Access” on page 102. You can deny accessto user groups with no ACL as follows.To deny access to user groups without an ACL:1 In the <strong>Firebox</strong> <strong>SSL</strong> <strong>Administration</strong> Tool, go to the GlobalPolicies tab.2 Select the Deny Access without ACL check box.3 Click Submit.<strong>Firebox</strong> <strong>SSL</strong> <strong>VPN</strong> <strong>Gateway</strong> <strong>Administration</strong> <strong>Guide</strong> 107
Configuring <strong>Firebox</strong> <strong>SSL</strong> OperationCustomizing <strong>VPN</strong> Portal PagesNOTEYou can also include links to the Secure Access and kioskclients on your website, as described in “Linking to the <strong>VPN</strong>Clients from Your Website” on page 115.By default, your <strong>VPN</strong> users will see a Citrix Access Portal pagewhen they open https://<strong>Firebox</strong> <strong>SSL</strong>_IP_or_hostname. For samplesof the default portal pages for Windows, Linux, and Java,see “Using the Access Portal” on page 51.We have also provided portal page templates that you can customize.One of the templates includes links to both the SecureAccess and Kiosk clients. The following sample is the portalpage that displays on a computer that is running Windows 2000or higher. Your customization can be as simple as replacing thelogo.Replacement logoA variable is used to insertthe current user name.A variable is used to insertthis portion into the template.The text cannot bechanged.The following sample is the same portal page when displayed ona computer that is running Linux. Clicking either link displays apage with instructions.108 <strong>Firebox</strong> <strong>SSL</strong> <strong>VPN</strong> <strong>Gateway</strong> <strong>Administration</strong> <strong>Guide</strong>
Customizing <strong>VPN</strong> Portal PagesThe other two templates include links to just one of those clients.You choose a template based on the access that you wantto provide, on a group basis. For example, you might want toprovide access to both clients to some <strong>VPN</strong> users and accessonly to the Secure Access or kiosk client for other users. You cando that by adding custom portal pages to the <strong>Firebox</strong> <strong>SSL</strong> andthen specifying for each user group the portal page to be used.NOTEIf you want to add text to a template or make formatchanges, you will need to consult with someone who isfamiliar with HTML. Changes to the templates other thanthose described in this section are not supported.The portal page templates are available from the Downloadspage of the <strong>Administration</strong> Portal.<strong>Firebox</strong> <strong>SSL</strong> <strong>VPN</strong> <strong>Gateway</strong> <strong>Administration</strong> <strong>Guide</strong> 109
Configuring <strong>Firebox</strong> <strong>SSL</strong> OperationLinks to PortalPage TemplatesThe following topics describe how to create portal pages,upload them to the <strong>Firebox</strong> <strong>SSL</strong>, and specify the portal page tobe used for a user group:• “Downloading and Working with Portal Page Templates” onpage 110• “Loading Custom Portal Files on the <strong>Firebox</strong> <strong>SSL</strong>” onpage 113• “Disabling Portal Page Authentication” on page 114• “Linking to the <strong>VPN</strong> Clients from Your Website” onpage 115• “Choosing a Portal Page for a Group” on page 130Downloading and Working with Portal PageTemplatesThe portal page templates include variables that the <strong>Firebox</strong> <strong>SSL</strong>replaces with the current user name and with links that are110 <strong>Firebox</strong> <strong>SSL</strong> <strong>VPN</strong> <strong>Gateway</strong> <strong>Administration</strong> <strong>Guide</strong>
Customizing <strong>VPN</strong> Portal Pagesappropriate for the connecting computer (Windows 2000 orhigher, or Linux).If you also have users on platforms such as Macintosh or Windows95/98, you can provide them access to the Java-basedkiosk client by inserting the appropriate variable in the template(s)used by those groups, as described in this section. Thevariables that can be used in templates are described in the followingtable.Variable$citrix_username;$citrix_portal;Content inserted by variableName of logged in userLinks to both the Secure Access and the Kiosk clients:WindowsLinux$citrix_portal_full_client_only;Link to the Secure Access only:$citrix_portal_kiosk_client_only;Link to the Kiosk client only:A template can include only one of the three variables that startwith “$citrix_portal”.<strong>Firebox</strong> <strong>SSL</strong> <strong>VPN</strong> <strong>Gateway</strong> <strong>Administration</strong> <strong>Guide</strong> 111
Configuring <strong>Firebox</strong> <strong>SSL</strong> OperationNOTEIf you want to add text to a template or make formatchanges, you will need to consult with someone who isfamiliar with HTML. Changes to the templates other thanthose described in this section are not supported.When choosing a template that is appropriate for a group, youonly need to know whether the group should have access toboth the Secure Access and kiosk clients or just one of the clients.The <strong>Firebox</strong> <strong>SSL</strong> detects the user’s platform (Windows,Linux, Java) and inserts the appropriate links into the templatesthat you upload to the <strong>Firebox</strong> <strong>SSL</strong>.To download the portal page templates to yourlocal computer:1 In the <strong>Firebox</strong> <strong>SSL</strong> <strong>Administration</strong> Portal, go to theDownloads page.2 To download a template to a local computer, right-click thelink and specify a location in the dialog box.To work with the templates for Windows and Linuxusers:1 Determine how many custom portal pages that you willneed. You can use the same portal page for multiple groups.Use this portal page:vpnAndKioskClients.htmlvpnClientOnly.htmlkioskClientOnly.htmlTo include links to these clients:Secure Access and kioskSecure Access onlyKiosk only2 Make a copy of each template that you will use and namethe template, using the extension .html.3 To replace the Citrix image:- Locate the following line in the template:- Replace vpn_logo.gif with the filename of yourimage. For example, if your image file is namedlogo.gif, change the line to:112 <strong>Firebox</strong> <strong>SSL</strong> <strong>VPN</strong> <strong>Gateway</strong> <strong>Administration</strong> <strong>Guide</strong>
Customizing <strong>VPN</strong> Portal PagesAn image file must have a file type of GIF or JPG.Do not change other characters on that line.4 Save the file.Loading Custom Portal Files on the <strong>Firebox</strong> <strong>SSL</strong>You must load on the <strong>Firebox</strong> <strong>SSL</strong> any custom portal pages andreferenced image files.To load a custom portal page or image on the<strong>Firebox</strong> <strong>SSL</strong>:1 In the <strong>Firebox</strong> <strong>SSL</strong> <strong>Administration</strong> Tool, go to the PortalPage Configuration tab.2 Click Add File.<strong>Firebox</strong> <strong>SSL</strong> <strong>VPN</strong> <strong>Gateway</strong> <strong>Administration</strong> <strong>Guide</strong> 113
Configuring <strong>Firebox</strong> <strong>SSL</strong> Operation3 For the File Identifier of portal pages, enter a name that isdescriptive of the types of <strong>VPN</strong> users who will use the portalpageThe filename can help you later when you need to associatethe portal page with a group. For example, you might havea primary portal page used by many groups and a separateportal page used only by guests. In that case, you mightidentify the files as Primary Portal and Guest Portal. Or, youmight have several portal pages that correspond to usergroups, and use names such as Admin Portal, StudentPortal, IT Portal.4 Select the type from the File Type menu.Portal pages must be an HTML file. Any images referenced from anHTML page must be either GIF or JPG files.5 Click Upload File.6 Navigate to the file and click Open.The file will be loaded on the <strong>Firebox</strong> <strong>SSL</strong>.To remove a portal file from the <strong>Firebox</strong> <strong>SSL</strong>:• Select the page identifier in the list and click RemoveSelected File.Disabling Portal Page AuthenticationBy default, a <strong>VPN</strong> user must log in to the portal page and thenagain to the Secure Access or kiosk client. You can eliminate theportal page login step using either of the following methods:You can set a global policy that disables authentication for theportal page and that specifies the portal page that will displayfor all <strong>VPN</strong> users. This global policy overrides any portal pageselections for groups.You can include links to the Secure Access and kiosk clientsdirectly on your website, as described in “Linking to the <strong>VPN</strong>Clients from Your Website” on page 115.To disable portal page authentication:1 In the <strong>Firebox</strong> <strong>SSL</strong> <strong>Administration</strong> Tool, go to the GlobalPolicies tab.114 <strong>Firebox</strong> <strong>SSL</strong> <strong>VPN</strong> <strong>Gateway</strong> <strong>Administration</strong> <strong>Guide</strong>
Customizing <strong>VPN</strong> Portal Pages2 Clear the checkbox for Enable Portal Page Authentication.3 Select the portal page to which all <strong>VPN</strong> users will bedirected.4 Click Submit.Linking to the <strong>VPN</strong> Clients from Your WebsiteYou can also provide your <strong>VPN</strong> users links to the Secure Accessand kiosk clients from your website. The links will launch theclients for Windows or will direct the user to a page thatexplains how to download and install the client for Linux.To include links to the Secure Access and kiosk client onyour website:1 Add the following code to the HEAD tag of the web pagethat is to contain the links:<strong>Firebox</strong> <strong>SSL</strong> <strong>VPN</strong> <strong>Gateway</strong> <strong>Administration</strong> <strong>Guide</strong> 115
Configuring <strong>Firebox</strong> <strong>SSL</strong> Operation2 Add the links as follows to the web page.Client:Secure Access (Windows/Java)Kiosk (Windows/Java)Secure Access (Linux)Link to:https://ipAddress/CitrixSAClient.exehttps://ipAddress/CitrixSAKiosk.exehttps://ipAddress/full_linux_instructions.htmlThis page includes a link to the Linux installerexecutable.The ipAddress is the address of your <strong>Firebox</strong> <strong>SSL</strong>.Configuring Host Check RulesHost check rules provide another layer of security, helping toensure that the <strong>VPN</strong> users are connecting to your <strong>Firebox</strong> <strong>SSL</strong>on a computer that meets certain criteria. For example, you canrequire that a connecting computer has particular registryentries, files, and/or active processes.Each host check rule specifies that a computer must have one ofthe following:• A registry entry that matches the path, entry type, and valuethat you specify.• A file that matches the path, filename, and date that youspecify. You can also specify a checksum for the file.• A running process that you specify. You can also specify achecksum for the file.NOTE“Example Host Check Rules” on page 118 contains the file andprocess names for a variety of personal firewall, antivirus, andspybot applications.You apply host check rules to each group, by specifying a hostcheck expression, a Boolean expression that uses host check rulenames. For more information, see “Configuring a Host CheckPolicy for a Group” on page 128.To create a host check rule:1 In the <strong>Firebox</strong> <strong>SSL</strong> <strong>Administration</strong> Tool, go to the HostChecks tab.116 <strong>Firebox</strong> <strong>SSL</strong> <strong>VPN</strong> <strong>Gateway</strong> <strong>Administration</strong> <strong>Guide</strong>
Configuring Host Check Rules2 Specify a name for the host check rule.3 Select the rule type from the drop-down list.4 Click Add.5 If you selected Registry Entry Rule, enter the path to theregistry key, select a key type, enter the key name, and enterthe value to which that key must be set. Click Submit.6 If you selected File Rule, enter the path, filename, andcreation date of the file. To specify a checksum for the file,select Calculate Checksum and click Upload File toChecksum. Navigate to the file and click Open. ClickSubmit.7 If you selected Process Rule: Enter the name of the processthat must be running. To specify a checksum for the file,<strong>Firebox</strong> <strong>SSL</strong> <strong>VPN</strong> <strong>Gateway</strong> <strong>Administration</strong> <strong>Guide</strong> 117
Configuring <strong>Firebox</strong> <strong>SSL</strong> Operationselect the Manually Enter Checksum option and enter it, orselect Calculate Checksum and click Upload File toChecksum. Navigate to the file and click Open. ClickSubmit.NOTEFor information on adding a host check expression to a usergroup, see “Configuring a Host Check Policy for a Group” onpage 128.To delete a host check rule:1 In the <strong>Firebox</strong> <strong>SSL</strong> <strong>Administration</strong> Tool, go to the HostChecks tab.2 Open the window for the host check rule that you want toremove.3 From the Action menu, choose Remove ... host check.Example Host Check RulesThis table contains information that you can use to create hostcheck rules for a variety of personal firewall, antivirus, and spy-118 <strong>Firebox</strong> <strong>SSL</strong> <strong>VPN</strong> <strong>Gateway</strong> <strong>Administration</strong> <strong>Guide</strong>
Configuring Network Shares for Kiosk SessionsApplicationsAntivirusAntiViravast!McAfeeNortonPersonal FirewallMcAfeeNortonSygateTinyZone AlarmSpybotAd-aware SEPersonal EditionSpybot - Searchand Destroybot applications. The path information provided assumes thatthe application is installed in the default directory.Host Check RulesFile: C:\Program Files\AVPersonal\AVWIN.EXEProcess: AVGUARD.EXEFile: C:\Program Files\Avast\ashAvast.exeProcess: ashServ.exeFile: C:\Program Files\McAfee.com\VSO\mcvsshld.exeProcess: McShield.exeFile: C:\Program Files\Norton AntiVirus\NAVAPSVC.exeFile: C:\Program Files\McAfee.com\PersonalFirewall\MpfService.exeProcess: MpfService.exeProcess: ccProxy.exe OR ccSetMgr.exeFile: C:\Program Files\Sygate\SPF\Smc.exeProcess: Smc.exeFile: C:\Program Files\Tiny PersonalFirewall\PERSFW.EXEProcess: PERSFW.EXEFile: C:\Program Files\Zone Labs\ZoneAlarm\zlclient.exeProcess: zlclient.exeFile: C:\Program Files\Lavasoft\Ad-Aware SEPersonal\Ad-Aware.exeProcess: Ad-Aware.exeFile: C:\Program Files\Spybot - Search &Destroy\SpybotSD.exeProcess: SpybotSD.exeConfiguring Network Shares for Kiosk SessionsWhen a <strong>VPN</strong> user connects from a public computer (by selectingthat option on a portal page), the <strong>Firebox</strong> <strong>SSL</strong> opens a kioskconnection. The network shares available to a kiosk user areconfigured in the Share Mounts tab.<strong>Firebox</strong> <strong>SSL</strong> <strong>VPN</strong> <strong>Gateway</strong> <strong>Administration</strong> <strong>Guide</strong> 119
Configuring <strong>Firebox</strong> <strong>SSL</strong> OperationTo provide kiosk users access to network shares:1 In the <strong>Firebox</strong> <strong>SSL</strong> <strong>Administration</strong> Tool, go to the ShareMounts tab.2 Enter a name for the network share and click Add. Thename that you enter will display with the share icon in thekiosk window.A configuration window appears.3 Type the path to the share source, using the form: //server/share.4 Choose the type of mount, either CIFS/SMB or NFS.5 If administrative user credentials are required to mount aCIFS/Samba drive, specify the username and password.Those fields are not enabled for NFS.All users who access the share will have the rights of this user.6 Enter the Active Directory domain or the Windowsworkgroup of the share. This field is not enabled for NFS.7 Specify whether you want remote users to have read/writeor read-only permissions for the share.120 <strong>Firebox</strong> <strong>SSL</strong> <strong>VPN</strong> <strong>Gateway</strong> <strong>Administration</strong> <strong>Guide</strong>
Adding and Configuring User GroupsNOTENote: Users can FTP files from the share to the remotecomputer.8 Click Submit.NOTETo add a share to a user group, see “Configuring KioskOperation for a Group” on page 126.To remove a share:• Open the window for the share and choose Action >Remove.Adding and Configuring User GroupsWhen you enable LDAP authorization on the <strong>Firebox</strong> <strong>SSL</strong>, usergroup information is obtained from the LDAP server after a useris authenticated. If the group name obtained from LDAPmatches a group name created locally on the <strong>Firebox</strong> <strong>SSL</strong>, theproperties of the local group are used for the matching groupobtained from LDAP.Each <strong>VPN</strong> user should belong to at least one group that isdefined locally on the <strong>Firebox</strong> <strong>SSL</strong>. If a user does not belong toa group, the overall access of the user is determined by the DenyAccess without ACL setting on the Global Policies tab, as follows:• If the Deny Access option is enabled, the user will not beable to establish a <strong>VPN</strong> connection.• If the Deny Access option is disabled, the user will have fullnetwork access.<strong>Firebox</strong> <strong>SSL</strong> <strong>VPN</strong> <strong>Gateway</strong> <strong>Administration</strong> <strong>Guide</strong> 121
Configuring <strong>Firebox</strong> <strong>SSL</strong> Operation• In either case, the user will be able to run a kiosk session,but network access within that session will be determinedby the Deny Access without ACL setting.You can also add local groups that are not related to LDAPgroups. For example, you might create a local group to set up acontractor or visitor to whom you want to provide temporaryaccess without having to create an LDAP entry. For informationon creating a local user, see “Adding Local Users” on page 100.Several aspects of <strong>VPN</strong> operation are configured at the grouplevel, including access control, host checking, kiosk operation,portal page usage, and IP pooling. If a user belongs to morethan one group, group policies are applied to the user based onthe group priorities set on the Group Priorities tab, as describedin “Setting the Priority of Groups” on page 132.To create a local user group on the <strong>Firebox</strong> <strong>SSL</strong>:1 In the <strong>Firebox</strong> <strong>SSL</strong> <strong>Administration</strong> Tool, go to the Groupstab.2 Type a descriptive name for the group (such as “TempEmployees” or “accounting”) and then click Add. If youwant the group’s properties to be used for a group obtainedfrom LDAP, the group name must match the LDAP groupname, including case and use of spaces.A window for the added group appears.122 <strong>Firebox</strong> <strong>SSL</strong> <strong>VPN</strong> <strong>Gateway</strong> <strong>Administration</strong> <strong>Guide</strong>
Adding and Configuring User Groups3 To configure the group, see the following topics:- “Configuring Resource ACLs for a User Group” onpage 124- “Configuring Kiosk Operation for a Group” onpage 126- “Configuring a Host Check Policy for a Group” onpage 128- “Choosing a Portal Page for a Group” on page 130- “Enabling IP Pooling” on page 131To remove a user group:1 In the Groups tab, open the window for the group.2 Right-click the group name in the window and chooseRemove...group.<strong>Firebox</strong> <strong>SSL</strong> <strong>VPN</strong> <strong>Gateway</strong> <strong>Administration</strong> <strong>Guide</strong> 123
Configuring <strong>Firebox</strong> <strong>SSL</strong> OperationAlternatively, from the group window’s Action menu, chooseRemove.Configuring Resource ACLs for a User GroupNOTEFor background information on network access, see“Controlling Network Access” on page 102.You will need to let your users know which resources thatthey can access. A sample email with instructions that youcan customize for your users is available from the<strong>Administration</strong> Portal Downloads page.For each user group, you can create an ACL by specifying theresources that are to be allowed or denied for the group.Resource groups are defined as described in “Defining NetworkResource Groups” on page 104.Unless you want to provide all <strong>VPN</strong> users with full access to allaccessible networks, you must associate user groups withresource groups.By default, all network resource groups are allowed (and networkaccess is controlled by the “Deny Access without ACL”option). When you allow or deny one resource group, all otherresource groups are automatically denied and the networkaccess for the user group is controlled only through its ACL.The <strong>Firebox</strong> <strong>SSL</strong> interprets allow/deny as follows:• The <strong>Firebox</strong> <strong>SSL</strong> denies access to any resource that is notexplicitly allowed. Thus, if you want to provide a particularuser group with access to only one resource group, you onlyhave to allow access to that resource group.• Deny rules take precedence over allow rules. This enablesyou to allow access to a range of resources and to also denyaccess to selected resources within that range. For example,you might want to allow a group access to a resource group124 <strong>Firebox</strong> <strong>SSL</strong> <strong>VPN</strong> <strong>Gateway</strong> <strong>Administration</strong> <strong>Guide</strong>
Adding and Configuring User Groupsthat includes 10.20.10.0/24, but need to deny that usergroup access to 10.20.10.30. To handle this, you will needto create a resource group that includes 10.20.10.30. Accessto that resource will be denied unless you specifically allowit.To configure resource access control for a group:1 In the group window, right-click Resource ACLs.2 Choose Add Resource, choose a resource, and then chooseAllow.NOTEIf you have not allowed a resource, it will be denied.3 If you allow a resource and later want to deny it, right-clickResource ACLs, choose Add Resource, choose the resource,and then choose Deny.<strong>Firebox</strong> <strong>SSL</strong> <strong>VPN</strong> <strong>Gateway</strong> <strong>Administration</strong> <strong>Guide</strong> 125
Configuring <strong>Firebox</strong> <strong>SSL</strong> Operation4 Click Submit.To remove an resource from a user group:1 In the group window, right-click the resource that you wantto remove.2 Choose Remove Resource and then click Submit.Configuring Kiosk Operation for a GroupYou can specify whether a group is allowed <strong>VPN</strong> kiosk accessfrom public computers and, if so, which applications and networkshares appear in the kiosk window.To remove the kiosk option from the Access Portalfor a group:1 In the group window, clear the check box for Enable KioskMode.2 Click Submit.To configure kiosk operation for a group:1 To add a network share to the group, open the group’swindow, right-click Network Shares, choose Add Share,choose the share name, and then choose Allow.126 <strong>Firebox</strong> <strong>SSL</strong> <strong>VPN</strong> <strong>Gateway</strong> <strong>Administration</strong> <strong>Guide</strong>
Adding and Configuring User GroupsThe share name appears.To configure network shares, see “Configuring Network Sharesfor Kiosk Sessions” on page 119.2 Verify that the Enable Kiosk Mode option is selected.<strong>Firebox</strong> <strong>SSL</strong> <strong>VPN</strong> <strong>Gateway</strong> <strong>Administration</strong> <strong>Guide</strong> 127
Configuring <strong>Firebox</strong> <strong>SSL</strong> Operation3 To retain Citrix ICA settings and Mozilla preferencesbetween sessions, select Persistent Mode. The Mozillapreferences saved include the passwords saved through theMozilla Password Manager. The preferences are saved onthe remote server (hosting the kiosk session).4 If you want a Mozilla browser window to appear in thekiosk window:- Specify the URL to open in the browser window (suchas http://www.mysite.com/index.html, typically anIntranet site). The default is http://www.net6.com.NOTEIf the user has general Internet access before making a Kioskconnection, the user can browse the Internet from theMozilla browser in the Kiosk window, unless there is anetwork resource defined that denies access to the Internet.- Select the Mozilla option.5 For the other kiosk applications listed, select each one thatyou want included in the kiosk window for the group.To work with any of those applications, the <strong>VPN</strong> user will need toknow the IP addresses of the corresponding servers.6 Click Submit.Configuring a Host Check Policy for a GroupTo configure a host check policy for a group, you specify aBoolean expression containing the host check rule names thatyou want to apply to the group.Suppose that you create the following host check rules:• CorpAssetRegistryEntry• AntiVirusProcess1• AntiVirusProcess2Your host check expression might specify that a registry checkmust verify that the resource attempting to connect is a corporateasset and that the resource must have one of the antivirusprocesses running. That Boolean expression is:(CorpAssetRegistryEntry & (AntiVirusProcess1 |AntiVirusProcess2))128 <strong>Firebox</strong> <strong>SSL</strong> <strong>VPN</strong> <strong>Gateway</strong> <strong>Administration</strong> <strong>Guide</strong>
Adding and Configuring User GroupsValid operators for host check expressions are as follows:( ) - used to nest expressions to control their evaluation& - logical AND| - logical OR! - logical NOTFor users without Administrative privileges, a host check will failif it includes a file in a restricted zone (such as C:\Documentsand Settings\Administrator) or if it includes a restricted registrykey.If a user belongs to more than one group, the host checkexpression applied to the user is the union of the expression foreach of the user’s groups.For information on host check rules, see “Configuring HostCheck Rules” on page 116.To specify a host check expression for a group:1 In the group window, enter the Boolean expression in theHost Check Expression field.<strong>Firebox</strong> <strong>SSL</strong> <strong>VPN</strong> <strong>Gateway</strong> <strong>Administration</strong> <strong>Guide</strong> 129
Configuring <strong>Firebox</strong> <strong>SSL</strong> Operation2 Click Submit.Choosing a Portal Page for a GroupBy default, a group uses the <strong>Firebox</strong> <strong>SSL</strong> Access Portal page. Youcan load custom portal pages on the <strong>Firebox</strong> <strong>SSL</strong>, as describedin “Customizing <strong>VPN</strong> Portal Pages” on page 108, and thenselect a portal page for each group. This enables you to controlwhich of the <strong>Firebox</strong> <strong>SSL</strong> clients are available by group.NOTEDisabling portal page authentication on the Global Policiespage, as described in “Disabling Portal Page Authentication”on page 114, overrides the Portal Page setting for all groups.To specify a portal page for a group:• In the group window, choose the page name from thePortal Page menu and click Submit.130 <strong>Firebox</strong> <strong>SSL</strong> <strong>VPN</strong> <strong>Gateway</strong> <strong>Administration</strong> <strong>Guide</strong>
Adding and Configuring User GroupsEnabling IP PoolingIn some situations, the Secure Access will need a unique IPaddress for the <strong>Firebox</strong> <strong>SSL</strong>. For example, in a Samba environment,each user connecting to a mapped network drive needs toappear to originate from a different IP address. When youenable IP pooling for a group, the <strong>Firebox</strong> <strong>SSL</strong> can assign aunique IP address alias to each client.You can specify the gateway device to be used for IP pooling.The gateway device can be the <strong>Firebox</strong> <strong>SSL</strong> itself, or some otherdevice. If you do not specify a <strong>Gateway</strong>, an <strong>Firebox</strong> <strong>SSL</strong> interfaceis used, based on the General Networking settings, as follows:• If you have configured only Interface 0 (the <strong>Firebox</strong> <strong>SSL</strong> isinside your firewall), the Interface 0 IP address is used as thegateway.• If you have configured Interfaces 0 and 1 (the <strong>Firebox</strong> <strong>SSL</strong>straddles your firewall), the Interface 1 IP address is used as<strong>Firebox</strong> <strong>SSL</strong> <strong>VPN</strong> <strong>Gateway</strong> <strong>Administration</strong> <strong>Guide</strong> 131
Configuring <strong>Firebox</strong> <strong>SSL</strong> Operationthe gateway. (Interface 1 is considered the internal interfacein this scenario.)To configure IP pooling for a group:1 In the group window, select Enable IP Pools.2 Specify the starting IP address for the pool.3 Specify the number of IP address aliases. You can have asmany as 2000 IP addresses total in all IP pools.4 Specify the <strong>Gateway</strong> IP address.If you leave this field blank, an <strong>Firebox</strong> <strong>SSL</strong> interface is used, asdescribed earlier in this section. If you specify some other deviceas the gateway, the <strong>Firebox</strong> <strong>SSL</strong> adds an entry for that route inthe <strong>Firebox</strong> <strong>SSL</strong> routing table.5 Click Submit.Setting the Priority of GroupsFor users who belong to more than one group, you can determinewhich group’s policies applies to a user by specifying the132 <strong>Firebox</strong> <strong>SSL</strong> <strong>VPN</strong> <strong>Gateway</strong> <strong>Administration</strong> <strong>Guide</strong>
Adding and Configuring User Groupspriority of groups. For example, suppose that some users belongto both the “sales” group and the “support” group. If the salesgroup appears before the support group in the User Groups list,the sales group policies will apply to the users who belong toboth of those groups. If the support group appears before thesales group in the list, the support group policies take precedence.• The policies that are affected by the Group Priority settingare as follows:- Kiosk mode and persistence mode- Kiosk default URL- Portal page use- IP pools• For ACLs and kiosk applications, a user who belongs tomultiple groups has access to all resources and applicationsenabled for each of those groups.For example, suppose that the sales group has access to theCitrix ICA and Mozilla clients and that the support grouphas access to all clients. Users who belong to both groupswill have access to all clients.• Host check expressions are applied as described in“Configuring a Host Check Policy for a Group” onpage 128.Groups are initially listed in the order in which they are created.To set the priority of groups:1 In the <strong>Firebox</strong> <strong>SSL</strong> <strong>Administration</strong> Tool, go to the GroupPriority tab.<strong>Firebox</strong> <strong>SSL</strong> <strong>VPN</strong> <strong>Gateway</strong> <strong>Administration</strong> <strong>Guide</strong> 133
Configuring <strong>Firebox</strong> <strong>SSL</strong> Operation2 Select a group that you want to move and use the arrowkeys to raise or lower the group in the list.The group at the top of the list has the highest priority.3 Click Submit.To view the group priorities for a user:• In the Remote Admin Terminal window, click the Real-timeMonitor icon.The display lists all groups to which the user belongs andthe group with the highest priority.Enabling Split TunnelingBy default, all traffic goes through the <strong>VPN</strong> tunnel. You canchoose to use “split tunneling” so that the <strong>VPN</strong> client sendsonly the traffic destined for the secured network through the<strong>VPN</strong> tunnel. The secured network consists of the addressesspecified as accessible networks, as described in “SpecifyingAccessible Networks” on page 103.When you enable split tunneling, group-based policies apply tothe internal NIC only. For connections from inside of the firewall,group-based policies do not apply to traffic to externalresources or resources local to the network; that traffic is notencrypted.134 <strong>Firebox</strong> <strong>SSL</strong> <strong>VPN</strong> <strong>Gateway</strong> <strong>Administration</strong> <strong>Guide</strong>
Enabling Split DNSTo enable split tunneling:1 In the <strong>Firebox</strong> <strong>SSL</strong> <strong>Administration</strong> Tool, go to the GlobalPolicies tab.2 Select the check box for Enable Split Tunneling.3 If there are no Accessible Networks specified, enter theaddresses as described in the next section.4 Click Submit.Enabling Split DNSBy default, the <strong>Firebox</strong> <strong>SSL</strong> checks a <strong>VPN</strong> user’s remote DNSonly. You can allow failover to a user’s local DNS by enablingsplit DNS. A <strong>VPN</strong> user can override this setting from the ConnectionProperties dialog box (from the login dialog box, selectOptions > Advanced Options).To allow failover to a user’s local DNS:• Go to the Global Policies tab and select the Enable SplitDNS check box.The <strong>Firebox</strong> <strong>SSL</strong> fails over to the local DNS only if thespecified DNS servers cannot be contacted, but not if thereis a negative response.<strong>Firebox</strong> <strong>SSL</strong> <strong>VPN</strong> <strong>Gateway</strong> <strong>Administration</strong> <strong>Guide</strong> 135
Configuring <strong>Firebox</strong> <strong>SSL</strong> OperationEnabling Session TimeoutBy default, a <strong>VPN</strong> user can keep a <strong>VPN</strong> connection open indefinitely.You can set a session timeout, which is the maximum<strong>VPN</strong> session duration allowed, after which a <strong>VPN</strong> user has to login again. One minute before a session is due to timeout, the<strong>VPN</strong> user is alerted that a login will be required shortly.To enable session timeout:1 In the <strong>Firebox</strong> <strong>SSL</strong> <strong>Administration</strong> Tool, go to the GlobalPolicies tab.136 <strong>Firebox</strong> <strong>SSL</strong> <strong>VPN</strong> <strong>Gateway</strong> <strong>Administration</strong> <strong>Guide</strong>
Configuring Internal Failover2 Enter the maximum session duration in minutes.3 Click Submit.Configuring Internal FailoverThe Internal Failover setting enables the Secure Access to connectto the <strong>Firebox</strong> <strong>SSL</strong> from inside of the firewall if the <strong>Firebox</strong><strong>SSL</strong> external IP address cannot be reached from inside the firewall.When the Internal Failover setting is enabled, the <strong>VPN</strong> clientwill failover to the internal IP address of the <strong>Firebox</strong> <strong>SSL</strong> ifthe external IP address is unreachable.NOTETo install the Secure Access client from inside the firewall, goto the portal page and use the “click here to download theclient installer” link to download the client. The first time thatyou run the client from inside the firewall, you will need topoint the client to the internal IP address of the <strong>Firebox</strong> <strong>SSL</strong>by right-clicking the Secure Access client log in dialog boxand choosing Advanced Options.<strong>Firebox</strong> <strong>SSL</strong> <strong>VPN</strong> <strong>Gateway</strong> <strong>Administration</strong> <strong>Guide</strong> 137
Configuring <strong>Firebox</strong> <strong>SSL</strong> OperationTo enable the Secure Access client to fail over tothe <strong>Firebox</strong> <strong>SSL</strong> internal IP address:1 In the <strong>Firebox</strong> <strong>SSL</strong> <strong>Administration</strong> Tool, go to the GlobalPolicies tab.2 Select Enable Internal Failover.3 Click Submit.Forcing <strong>VPN</strong> User Re-loginBy default, if a <strong>VPN</strong> user’s network connection is briefly interrupted,the user does not have to log in again once the connectionis restored. You can require that users log in afterinterruptions such as when a computer comes out of a hibernatestate, when the user switches to a different wireless network,or when you force close a connection.To force re-logins:1 In the <strong>Firebox</strong> <strong>SSL</strong> <strong>Administration</strong> Tool, go to the GlobalPolicies tab.138 <strong>Firebox</strong> <strong>SSL</strong> <strong>VPN</strong> <strong>Gateway</strong> <strong>Administration</strong> <strong>Guide</strong>
Forcing <strong>VPN</strong> User Re-login2 Under Force Relogin after, select options as follows:Standby/HibernateThis option forces a user to log in again if the user’scomputer awakens from a stand by or hibernate state. Thisoption provides additional security for unattendedcomputers.Network InterruptionThis option forces a user to log in again if the networkconnection is briefly interrupted.NOTEIf you want to close a <strong>VPN</strong> connection and prevent the useror group from reconnecting, you must select the NetworkInterruption setting. Otherwise, the user(s) will beimmediately reconnected without being prompted forcredentials. For more information, see “Managing <strong>VPN</strong>Connections” on page 45.3 Click Submit.<strong>Firebox</strong> <strong>SSL</strong> <strong>VPN</strong> <strong>Gateway</strong> <strong>Administration</strong> <strong>Guide</strong> 139
Configuring <strong>Firebox</strong> <strong>SSL</strong> OperationConfiguring Secure Access for Single Sign-onBy default, Windows users open a <strong>VPN</strong> connection by launchingthe Secure Access client from the desktop. You can specify thatSecure Access start automatically after the user logs into Windows.Users’ Windows login credentials are passed to the <strong>Firebox</strong><strong>SSL</strong> for authentication. After authentication, the <strong>Firebox</strong> <strong>SSL</strong>establishes the <strong>VPN</strong> connection, obtains Windows login scriptsfrom the domain controller, and then runs the login scripts toperform operations such as automatic drive mapping.NOTELogin script support is restricted to scripts that are executedby the command processor, such as executables and batchfiles. Visual Basic and Javascript login scripts are not yetsupported.You should enable single sign-on only if <strong>VPN</strong> users’ computersare logging into your organization’s domain. If single sign-on isenabled and a user connects from a computer that is not onyour domain, the user will be prompted to log in. The user’sconnection log will note that the <strong>Firebox</strong> <strong>SSL</strong> failed to look upthe domain controller.To configure Secure Access for single sign-on:1 In the <strong>Firebox</strong> <strong>SSL</strong> <strong>Administration</strong> Tool, go to the GlobalPolicies tab.140 <strong>Firebox</strong> <strong>SSL</strong> <strong>VPN</strong> <strong>Gateway</strong> <strong>Administration</strong> <strong>Guide</strong>
Configuring Secure Access for Single Sign-on2 Select Enable Single Sign-On.3 Click Submit.<strong>Firebox</strong> <strong>SSL</strong> <strong>VPN</strong> <strong>Gateway</strong> <strong>Administration</strong> <strong>Guide</strong> 141
Configuring <strong>Firebox</strong> <strong>SSL</strong> Operation142 <strong>Firebox</strong> <strong>SSL</strong> <strong>VPN</strong> <strong>Gateway</strong> <strong>Administration</strong> <strong>Guide</strong>
APPENDIX ALogging, Monitoring,and Troubleshooting<strong>Firebox</strong> <strong>SSL</strong>OperationsThe following topics describe how to use <strong>Firebox</strong> <strong>SSL</strong> logs andtroubleshoot issues:• “Viewing and Downloading System Message Logs” onpage 143• “Enabling and Viewing SNMP Logs” on page 146• “Monitoring <strong>Firebox</strong> <strong>SSL</strong> Operations” on page 150• “Recovering from a Crash of the <strong>Firebox</strong> <strong>SSL</strong>” on page 153• “Troubleshooting” on page 154Viewing and Downloading System Message LogsSystem message logs contain information that can help <strong>Firebox</strong><strong>SSL</strong> support personnel assist with troubleshooting. By reviewingthe information provided, you can track unusual changesthat can affect the stability and performance of the <strong>Firebox</strong><strong>SSL</strong>.System message logs are archived on the <strong>Firebox</strong> <strong>SSL</strong> for 30days. The oldest log is then replaced with the current log.You can download one or all logs at any time. You can alsohave system messages forwarded to your syslog server, as<strong>Firebox</strong> <strong>SSL</strong> <strong>VPN</strong> <strong>Gateway</strong> <strong>Administration</strong> <strong>Guide</strong> 143
Logging, Monitoring, and Troubleshooting <strong>Firebox</strong> <strong>SSL</strong> Operationsdescribed in “Forwarding System Messages to a Syslog Server”on page 145.NOTEIf you need to view the system log and the <strong>Firebox</strong> <strong>SSL</strong> isoffline, go to the <strong>Administration</strong> Portal and click the Loggingtab.To view and filter the system log:1 In the <strong>Administration</strong> Tool, go to the Logging > LocalSystem Log tab.The log displayed is for the current date.2 To display the log for a prior date, select the date in the LogArchive list and click View Log.3 By default, the log displays all entries. Filter the log asfollows.144 <strong>Firebox</strong> <strong>SSL</strong> <strong>VPN</strong> <strong>Gateway</strong> <strong>Administration</strong> <strong>Guide</strong>
Viewing and Downloading System Message Logs- To filter the log by user or applications, select one ormore categories that you want to include.- To filter the log by priority, select the priorities thatyou want to include.- The filters that you select are treated as logical ORs.Thus, for each selected filter, all matches for the filterdisplay.4 To download a log:- Select a log in the Log Archive list and click DownloadSelected Log File. The log filename defaults toyyyymmdd.log.- Click Download All Log Files to download all logslisted in the Log Archive list. The filename defaults tolog_archive_yyyymmdd.tgz. After you download thefile, you can unzip it to access the individual log files.Forwarding System Messages to a Syslog ServerThe <strong>Firebox</strong> <strong>SSL</strong> archives system messages, as described in“Viewing and Downloading System Message Logs” on page 143.You can also have the <strong>Firebox</strong> <strong>SSL</strong> forward system messages to asyslog server.To forward <strong>Firebox</strong> <strong>SSL</strong> system messages to asyslog server:1 In the <strong>Administration</strong> Tool, go to the Logging > Syslog tab.2 Enter the IP address of the syslog server3 Select the syslog facility level.4 Enter a broadcast frequency.<strong>Firebox</strong> <strong>SSL</strong> <strong>VPN</strong> <strong>Gateway</strong> <strong>Administration</strong> <strong>Guide</strong> 145
Logging, Monitoring, and Troubleshooting <strong>Firebox</strong> <strong>SSL</strong> Operations5 Click Submit.Enabling and Viewing SNMP LogsWhen SNMP is enabled, the <strong>Firebox</strong> <strong>SSL</strong> reports the MIB-II systemgroup (1.3.6.1.2.1). The <strong>Firebox</strong> <strong>SSL</strong> does not support <strong>Firebox</strong><strong>SSL</strong>-specific SNMP data.You can view SNMP messages in the <strong>Administration</strong> Tool andyou can configure an SNMP monitoring tool such as the MultiRouter Traffic Grapher (MRTG) to provide a visual representationof the SNMP data reported by the <strong>Firebox</strong> <strong>SSL</strong> in response toqueries. For a sample of MRTG output, see “MRTG Example” onpage 147.To enable the logging of SNMP messages:1 In the <strong>Administration</strong> Tool, go to the Logging > SNMP tab.146 <strong>Firebox</strong> <strong>SSL</strong> <strong>VPN</strong> <strong>Gateway</strong> <strong>Administration</strong> <strong>Guide</strong>
Enabling and Viewing SNMP Logs2 Enter the SNMP location and contact. These fields areinformational only.3 Enter the SNMP community, which is the password that willbe required by a client to obtain data from the SNMP agent.For example, if you use the MRTG monitoring tool, you willneed to include this community string as a part of theTarget field in the MRTG configuration file.4 The SNMP port defaults to 161. If you change this value,you will also need to change it in any tools that you use tomonitor SNMP data.5 Click Submit.SNMP messages appear on the SNMP tab.MRTG ExampleThe Multi Router Traffic Grapher (MRTG) is a tool to monitorSNMP data, such as traffic load. MRTG generates HTML pagescontaining PNG images which provide a visual representation ofthe traffic. MRTG works under UNIX and Windows NT.NOTEThe information in this section is intended to provide ageneral idea of working with MRTG. For information onobtaining and using MRTG, refer to http://people.ee.ethz.ch/~oetiker/webtools/mrtg/.To obtain SNMP data for the <strong>Firebox</strong> <strong>SSL</strong> throughMRTG (in UNIX):1 Configure the <strong>Firebox</strong> <strong>SSL</strong> to respond to SNMP queries(Logging > SNMP).2 Create MRTG configuration files in /etc/mrtg.Each configuration file specifies the OIDs that the MRTGdaemon is to monitor, specifies the target from which toobtain SNMP data, and defines the MRTG output.<strong>Firebox</strong> <strong>SSL</strong> <strong>VPN</strong> <strong>Gateway</strong> <strong>Administration</strong> <strong>Guide</strong> 147
Logging, Monitoring, and Troubleshooting <strong>Firebox</strong> <strong>SSL</strong> OperationsAG host name3 Modify /etc/crontab to perform an SNMP query every fiveminutes, resulting in graphed data. The various .cfg fileslisted will generate separate MRTG output.OIDs to obtain AG SNMP AG internalfrom the AG Community IP addressMRTGconfigurationfiles4 View the MRTG output in a Web browser.MRTG stores HTML output in the Workdir specified in theconfiguration file. The output filename that corresponds to theconfiguration file in Step 2 is vpn.myorg.com.tcpcurrestab.html.148 <strong>Firebox</strong> <strong>SSL</strong> <strong>VPN</strong> <strong>Gateway</strong> <strong>Administration</strong> <strong>Guide</strong>
Viewing System StatisticsViewing System StatisticsGeneral system statistics are provided on the Logging > Statisticstab.The Max. Connections value is the number of licenses installed.<strong>Firebox</strong> <strong>SSL</strong> <strong>VPN</strong> <strong>Gateway</strong> <strong>Administration</strong> <strong>Guide</strong> 149
Logging, Monitoring, and Troubleshooting <strong>Firebox</strong> <strong>SSL</strong> OperationsMonitoring <strong>Firebox</strong> <strong>SSL</strong> OperationsThe <strong>Firebox</strong> <strong>SSL</strong> includes a variety of standard Linux monitoringapplications so that you can conveniently access the applicationsfrom one location. With the exception of the Real-timeMonitor, the applications are included in the <strong>Firebox</strong> <strong>SSL</strong> underthe GNU public license.The icons across the bottom left of the screen provide singleclickaccess to the six monitoring tools. In the bottom right corner,you can view process and network activity levels; mouseover the two graphs to view numeric data.The monitoring applications are as follows.150 <strong>Firebox</strong> <strong>SSL</strong> <strong>VPN</strong> <strong>Gateway</strong> <strong>Administration</strong> <strong>Guide</strong>
Monitoring <strong>Firebox</strong> <strong>SSL</strong> Operations<strong>Firebox</strong> <strong>SSL</strong> Real-time MonitorShows the open <strong>VPN</strong> connections. To view details about aconnection, click the arrow ( ) for the user name.From the monitor, you can temporarily close a connection byconnection type (TCP, etc.), disable a user (the user will notbe able to connect until you enable the user), and re-enablea user. For more information, see “Managing <strong>VPN</strong>Connections” on page 45.Ethereal Network AnalyzerEnables you to interactively browse packet data from a livenetwork or from a previously saved capture file. For moreinformation, refer to the Help that is available from theEthereal Network Analyzer window.xNetToolsA multi-threaded network tool that includes a servicescanner, port scanner, ping utility, ping scan, name scan,whois query, and finger query.<strong>Firebox</strong> <strong>SSL</strong> <strong>VPN</strong> <strong>Gateway</strong> <strong>Administration</strong> <strong>Guide</strong> 151
Logging, Monitoring, and Troubleshooting <strong>Firebox</strong> <strong>SSL</strong> OperationsMy tracerouteCombines the functionality of the 'traceroute' and 'ping'programs in one network diagnostic tool. As My traceroute(mtr) starts, it investigates the network connection betweenthe <strong>Firebox</strong> <strong>SSL</strong> and the destination host that you specify.After it determines the address of each network hop betweenthe devices, it sends a sequence ICMP ECHO requests to eachone to determine the quality of the link to each device. As itdoes this, it prints running statistics about each device.fnetloadProvides real-time network interface statistics. It checks the /proc/net/dev every second and builds a graphicalrepresentation of its values.152 <strong>Firebox</strong> <strong>SSL</strong> <strong>VPN</strong> <strong>Gateway</strong> <strong>Administration</strong> <strong>Guide</strong>
Recovering from a Crash of the <strong>Firebox</strong> <strong>SSL</strong>System MonitorShows information about CPU usage and memory/swapusage. For more information, refer to the Help available fromthe System Monitor window.Recovering from a Crash of the <strong>Firebox</strong> <strong>SSL</strong>If the <strong>Firebox</strong> <strong>SSL</strong> software crashes, reinstall the <strong>Firebox</strong> <strong>SSL</strong>server software from the CD provided with the device.Prepare the PC before you attempt to reinstall the software. Setthe PC to have an IP address on the same network as you wantto assign to the <strong>Firebox</strong> <strong>SSL</strong>. For example, if the <strong>Firebox</strong> <strong>SSL</strong> will<strong>Firebox</strong> <strong>SSL</strong> <strong>VPN</strong> <strong>Gateway</strong> <strong>Administration</strong> <strong>Guide</strong> 153
Logging, Monitoring, and Troubleshooting <strong>Firebox</strong> <strong>SSL</strong> Operationsbe set to the address 10.20.30.40/24, set the PC to an addressof 10.20.30.41 (or another available address), set the subnetmask address to 255.255.255.0, and set the default gatewayaddress to 10.20.30.40.To reinstall the <strong>Firebox</strong> <strong>SSL</strong> server software:1 Make sure that a PC capable of hosting terminal emulationsoftware is connected to the <strong>Firebox</strong> <strong>SSL</strong>; power on bothsystems.2 Insert the <strong>Firebox</strong> <strong>SSL</strong> Restore CD into the CD-ROM drive ofthe PC.For each <strong>Firebox</strong> <strong>SSL</strong> you want to load software on,do these steps:1 Connect a green (straight-through) network cable from theWindows PC to the Eth1 interface on the <strong>Firebox</strong> <strong>SSL</strong>.2 Connect the blue null modem (serial) cable from theWindows PC to the <strong>Firebox</strong> <strong>SSL</strong> serial port.3 Power on the <strong>Firebox</strong> <strong>SSL</strong>.4 On the Windows PC, click Start > Run and type cmd, thenclick OK.5 Change to the CD drive. For example, if the CD drive is D:,type D: and press Enter.6 Type install ip_address_of_<strong>Firebox</strong>/netmask.For example, to install and give the <strong>Firebox</strong> <strong>SSL</strong> an IP address of10.20.30.40 with a subnet mask of 255.255.0.0, type:install 10.20.30.40/16To install and give the <strong>Firebox</strong> <strong>SSL</strong> an IP address of 10.10.10.1 with asubnet mask of 255.255.255.0, type:install 10.10.10.1/24.7 Power off the <strong>Firebox</strong> <strong>SSL</strong> when prompted. When promptedby the PC, power the <strong>Firebox</strong> <strong>SSL</strong> on.Installation continues on the <strong>Firebox</strong> <strong>SSL</strong>. The <strong>Firebox</strong> <strong>SSL</strong> restartsautomatically once during this process.TroubleshootingThe following information explains how to deal with problemsyou might encounter when setting up and using the <strong>Firebox</strong><strong>SSL</strong>.154 <strong>Firebox</strong> <strong>SSL</strong> <strong>VPN</strong> <strong>Gateway</strong> <strong>Administration</strong> <strong>Guide</strong>
TroubleshootingThe <strong>Firebox</strong> <strong>SSL</strong> does not start and the <strong>Firebox</strong> <strong>SSL</strong>serial console is blank.Verify that the following are correctly set up:• The serial console is using the correct port and the physicaland logical ports match.• The cable is a null-modem cable.• The COM settings in your serial communication softwareare set to 115200 bits per second, 8 data bits, no parity, and1 stop bit.The <strong>Firebox</strong> <strong>SSL</strong> is offline and I cannot reach the<strong>Administration</strong> Tool.You can use the <strong>Administration</strong> Portal to perform tasks such asviewing the system log and restarting the <strong>Firebox</strong> <strong>SSL</strong>.Devices cannot communicate with the <strong>Firebox</strong> <strong>SSL</strong>.Verify that the following are correctly set up:• The External Public Address specified in the <strong>Firebox</strong> <strong>SSL</strong><strong>Administration</strong> Tool (Networking > General Networking tab)is available outside of your firewall.• Any changes made in the <strong>Firebox</strong> <strong>SSL</strong> serial console or<strong>Administration</strong> Tool have been submitted.I tried using Ctrl-Alt-Delete to reboot the <strong>Firebox</strong><strong>SSL</strong>, but nothing happened.The reboot function on the <strong>Firebox</strong> <strong>SSL</strong> is disabled. You mustuse the <strong>Firebox</strong> <strong>SSL</strong> <strong>Administration</strong> Tool to restart and shutdownthe device.<strong>SSL</strong>V2 sessions do not work with a multilevelcertificate chainIf intermediate (multilevel) certificates are part of your securecertificate upload, you need to make sure that the intermediatecertificates are part of the certificate file you are uploading.<strong>SSL</strong>V2 does not support certificate chaining. Any certificate thathas more than one level must include all intermediate certificates,or the system may become unusable. For informationabout how to add intermediate certificates to the uploaded certificatefile, see “Generating a Secure Certificate for the <strong>Firebox</strong><strong>SSL</strong>” on page 29.<strong>Firebox</strong> <strong>SSL</strong> <strong>VPN</strong> <strong>Gateway</strong> <strong>Administration</strong> <strong>Guide</strong> 155
Logging, Monitoring, and Troubleshooting <strong>Firebox</strong> <strong>SSL</strong> Operations156 <strong>Firebox</strong> <strong>SSL</strong> <strong>VPN</strong> <strong>Gateway</strong> <strong>Administration</strong> <strong>Guide</strong>
APPENDIX BLegal and CopyrightInformationGNU GENERAL PUBLIC LICENSE FOR LINUX KERNEL ASPROVIDED WITH FIREBOX <strong>SSL</strong> ACCESS GATEWAYVersion 2, June 1991Copyright (C) 1989, 1991 Free Software Foundation, Inc.675 Mass Ave, Cambridge, MA 02139, USAEveryone is permitted to copy and distribute verbatim copiesof this license document, but changing it is not allowed.PreambleThe licenses for most software are designed to take away yourfreedom to share and change it. By contrast, the GNU GeneralPublic License is intended to guarantee your freedom to shareand change free software--to make sure the software is free forall its users. This General Public License applies to most of theFree Software Foundation's software and to any other programwhose authors commit to using it. (Some other Free SoftwareFoundation software is covered by the GNU Library General<strong>Firebox</strong> <strong>SSL</strong> <strong>VPN</strong> <strong>Gateway</strong> <strong>Administration</strong> <strong>Guide</strong> 157
Legal and Copyright InformationPublic License instead.) You can apply it to your programs, too.When we speak of free software, we are referring to freedom,not price. Our General Public Licenses are designed to makesure that you have the freedom to distribute copies of free software(and charge for this service if you wish), that you receivesource code or can get it if you want it, that you can change thesoftware or use pieces of it in new free programs; and that youknow you can do these things.To protect your rights, we need to make restrictions that forbidanyone to deny you these rights or to ask you to surrender therights. These restrictions translate to certain responsibilities foryou if you distribute copies of the software, or if you modify it.For example, if you distribute copies of such a program,whether gratis or for a fee, you must give the recipients all therights that you have. You must make sure that they, too, receiveor can get the source code. And you must show them theseterms so they know their rights.We protect your rights with two steps: (1) copyright the software,and (2) offer you this license which gives you legal permissionto copy, distribute and/or modify the software.Also, for each author's protection and ours, we want to makecertain that everyone understands that there is no warranty forthis free software. If the software is modified by someone elseand passed on, we want its recipients to know that what theyhave is not the original, so that any problems introduced byothers will not reflect on the original authors' reputations.Finally, any free program is threatened constantly by softwarepatents. We wish to avoid the danger that redistributors of afree program will individually obtain patent licenses, in effectmaking the program proprietary. To prevent this, we have made158 <strong>Firebox</strong> <strong>SSL</strong> <strong>VPN</strong> <strong>Gateway</strong> <strong>Administration</strong> <strong>Guide</strong>
it clear that any patent must be licensed for everyone's free useor not licensed at all.The precise terms and conditions for copying, distribution andmodification follow.GNU GENERAL PUBLIC LICENSETERMS AND CONDITIONS FOR COPYING, DISTRIBUTIONAND MODIFICATION0. This License applies to any program or other work whichcontains a notice placed by the copyright holder saying it maybe distributed under the terms of this General Public License.The "Program", below, refers to any such program or work, anda "work based on the Program" means either the Program orany derivative work under copyright law: that is to say, a workcontaining the Program or a portion of it, either verbatim orwith modifications and/or translated into another language.(Hereinafter, translation is included without limitation in theterm "modification".) Each licensee is addressed as "you".Activities other than copying, distribution and modification arenot covered by this License; they are outside its scope. The actof running the Program is not restricted, and the output fromthe Program is covered only if its contents constitute a workbased on the Program (independent of having been made byrunning the Program). Whether that is true depends on whatthe Program does.1. You may copy and distribute verbatim copies of the Program'ssource code as you receive it, in any medium, providedthat you conspicuously and appropriately publish on each copyan appropriate copyright notice and disclaimer of warranty;keep intact all the notices that refer to this License and to theabsence of any warranty; and give any other recipients of theProgram a copy of this License along with the Program.<strong>Firebox</strong> <strong>SSL</strong> <strong>VPN</strong> <strong>Gateway</strong> <strong>Administration</strong> <strong>Guide</strong> 159
Legal and Copyright InformationYou may charge a fee for the physical act of transferring a copy,and you may at your option offer warranty protection inexchange for a fee.2. You may modify your copy or copies of the Program or anyportion of it, thus forming a work based on the Program, andcopy and distribute such modifications or work under the termsof Section 1 above, provided that you also meet all of theseconditions:a) You must cause the modified files to carry prominentnotices stating that you changed the files and the date of anychange.b) You must cause any work that you distribute or publish,that in whole or in part contains or is derived from the Programor any part thereof, to be licensed as a whole at no charge toall third parties under the terms of this License.c) If the modified program normally reads commands interactivelywhen run, you must cause it, when started running forsuch interactive use in the most ordinary way, to print or displayan announcement including an appropriate copyrightnotice and a notice that there is no warranty (or else, sayingthat you provide a warranty) and that users may redistributethe program under these conditions, and telling the user howto view a copy of this License. (Exception: if the Programitself is interactive but does not normally print such anannouncement, your work based on the Program is not requiredtoprint an announcement.)These requirements apply to the modified work as a whole. Ifidentifiable sections of that work are not derived from the Program,and can be reasonably considered independent and separateworks in themselves, then this License, and its terms, do notapply to those sections when you distribute them as separate160 <strong>Firebox</strong> <strong>SSL</strong> <strong>VPN</strong> <strong>Gateway</strong> <strong>Administration</strong> <strong>Guide</strong>
works. But when you distribute the same sections as part of awhole which is a work based on the Program, the distribution ofthe whole must be on the terms of this License, whose permissionsfor other licensees extend to the entire whole, and thus toeach and every part regardless of who wrote it.Thus, it is not the intent of this section to claim rights or contestyour rights to work written entirely by you; rather, theintent is to exercise the right to control the distribution of derivativeor collective works based on the Program.In addition, mere aggregation of another work not based on theProgram with the Program (or with a work based on the Program)on a volume of a storage or distribution medium does notbring the other work under the scope of this License.3. You may copy and distribute the Program (or a work basedon it, under Section 2) in object code or executable form underthe terms of Sections 1 and 2 above provided that you also doone of the following:a) Accompany it with the complete corresponding machinereadablesource code, which must be distributed under theterms of Sections 1 and 2 above on a medium customarilyused for software interchange; or,b) Accompany it with a written offer, valid for at least threeyears, to give any third party, for a charge no more than yourcost of physically performing source distribution, a completemachine-readable copy of the corresponding source code, tobe distributed under the terms of Sections 1 and 2 above ona medium customarily used for software interchange; or,c) Accompany it with the information you received as to theoffer to distribute corresponding source code. (Thisalternative is allowed only for noncommercial distributionand only if you received the program in object code or<strong>Firebox</strong> <strong>SSL</strong> <strong>VPN</strong> <strong>Gateway</strong> <strong>Administration</strong> <strong>Guide</strong> 161
Legal and Copyright Informationexecutable form with such an offer, in accord with Subsectionb above.)The source code for a work means the preferred form of thework for making modifications to it. For an executable work,complete source code means all the source code for all modulesit contains, plus any associated interface definition files, plusthe scripts used to control compilation and installation of theexecutable. However, as a special exception, the source codedistributed need not include anything that is normally distributed(in either source or binary form) with the major components(compiler, kernel, and so on) of the operating system onwhich the executable runs, unless that component itself accompaniesthe executable.If distribution of executable or object code is made by offeringaccess to copy from a designated place, then offering equivalentaccess to copy the source code from the same place counts asdistribution of the source code, even though third parties arenot compelled to copy the source along with the object code.4. You may not copy, modify, sublicense, or distribute the Programexcept as expressly provided under this License. Anyattempt otherwise to copy, modify, sublicense or distribute theProgram is void, and will automatically terminate your rightsunder this License. However, parties who have received copies,or rights, from you under this License will not have their licensesterminated so long as such parties remain in full compliance.5. You are not required to accept this License, since you havenot signed it. However, nothing else grants you permission tomodify or distribute the Program or its derivative works. Theseactions are prohibited by law if you do not accept this License.Therefore, by modifying or distributing the Program (or anywork based on the Program), you indicate your acceptance ofthis License to do so, and all its terms and conditions for copying,distributing or modifying the Program or works based on it.162 <strong>Firebox</strong> <strong>SSL</strong> <strong>VPN</strong> <strong>Gateway</strong> <strong>Administration</strong> <strong>Guide</strong>
6. Each time you redistribute the Program (or any work basedon the Program), the recipient automatically receives a licensefrom the original licensor to copy, distribute or modify the Programsubject to these terms and conditions. You may notimpose any further restrictions on the recipients' exercise of therights granted herein. You are not responsible for enforcingcompliance by third parties to this License.7. If, as a consequence of a court judgment or allegation ofpatent infringement or for any other reason (not limited topatent issues), conditions are imposed on you (whether by courtorder, agreement or otherwise) that contradict the conditions ofthis License, they do not excuse you from the conditions of thisLicense. If you cannot distribute so as to satisfy simultaneouslyyour obligations under this License and any other pertinentobligations, then as a consequence you may not distribute theProgram at all. For example, if a patent license would not permitroyalty-free redistribution of the Program by all those whoreceive copies directly or indirectly through you, then the onlyway you could satisfy both it and this License would be torefrain entirely from distribution of the Program.If any portion of this section is held invalid or unenforceableunder any particular circumstance, the balance of the section isintended to apply and the section as a whole is intended toapply in other circumstances.It is not the purpose of this section to induce you to infringeany patents or other property right claims or to contest validityof any such claims; this section has the sole purpose of protectingthe integrity of the free software distribution system, whichis implemented by public license practices. Many people havemade generous contributions to the wide range of software distributedthrough that system in reliance on consistent applicationof that system; it is up to the author/donor to decide if heor she is willing to distribute software through any other systemand a licensee cannot impose that choice.<strong>Firebox</strong> <strong>SSL</strong> <strong>VPN</strong> <strong>Gateway</strong> <strong>Administration</strong> <strong>Guide</strong> 163
Legal and Copyright InformationThis section is intended to make thoroughly clear what isbelieved to be a consequence of the rest of this License.8. If the distribution and/or use of the Program is restricted incertain countries either by patents or by copyrighted interfaces,the original copyright holder who places the Program under thisLicense may add an explicit geographical distribution limitationexcluding those countries, so that distribution is permitted onlyin or among countries not thus excluded. In such case, thisLicense incorporates the limitation as if written in the body ofthis License.9. The Free Software Foundation may publish revised and/ornew versions of the General Public License from time to time.Such new versions will be similar in spirit to the present version,but may differ in detail to address new problems or concerns.Each version is given a distinguishing version number. If theProgram specifies a version number of this License which appliesto it and "any later version", you have the option of followingthe terms and conditions either of that version or of any laterversion published by the Free Software Foundation. If the Programdoes not specify a version number of this License, you maychoose any version ever published by the Free Software Foundation.10. If you wish to incorporate parts of the Program into otherfree programs whose distribution conditions are different, writeto the author to ask for permission. For software which is copyrightedby the Free Software Foundation, write to the Free SoftwareFoundation; we sometimes make exceptions for this. Ourdecision will be guided by the two goals of preserving the freestatus of all derivatives of our free software and of promotingthe sharing and reuse of software generally.NO WARRANTY164 <strong>Firebox</strong> <strong>SSL</strong> <strong>VPN</strong> <strong>Gateway</strong> <strong>Administration</strong> <strong>Guide</strong>
11. BECAUSE THE PROGRAM IS LICENSED FREE OF CHARGE,THERE IS NO WARRANTY FOR THE PROGRAM, TO THEEXTENT PERMITTED BY APPLICABLE LAW. EXCEPT WHENOTHERWISE STATED IN WRITING THE COPYRIGHT HOLDERSAND/OR OTHER PARTIES PROVIDE THE PROGRAM "AS IS"WITHOUT WARRANTY OF ANY KIND, EITHER EXPRESSED ORIMPLIED, INCLUDING, BUT NOT LIMITED TO, THE IMPLIEDWARRANTIES OF MERCHANTABILITY AND FITNESS FOR APARTICULAR PURPOSE. THE ENTIRE RISK AS TO THE QUAL-ITY AND PERFORMANCE OF THE PROGRAM IS WITH YOU.SHOULD THE PROGRAM PROVE DEFECTIVE, YOU ASSUMETHE COST OF ALL NECESSARY SERVICING, REPAIR OR COR-RECTION.12. IN NO EVENT UNLESS REQUIRED BY APPLICABLE LAWOR AGREED TO IN WRITING WILL ANY COPYRIGHT HOLDER,OR ANY OTHER PARTY WHO MAY MODIFY AND/OR REDIS-TRIBUTE THE PROGRAM AS PERMITTED ABOVE, BE LIABLETO YOU FOR DAMAGES, INCLUDING ANY GENERAL, SPECIAL,INCIDENTAL OR CONSEQUENTIAL DAMAGES ARISING OUT OFTHE USE OR INABILITY TO USE THE PROGRAM (INCLUDINGBUT NOT LIMITED TO LOSS OF DATA OR DATA BEING REN-DERED INACCURATE OR LOSSES SUSTAINED BY YOU ORTHIRD PARTIES OR A FAILURE OF THE PROGRAM TO OPER-ATE WITH ANY OTHER PROGRAMS), EVEN IF SUCH HOLDEROR OTHER PARTY HAS BEEN ADVISED OF THE POSSIBILITY OFSUCH DAMAGES.END OF TERMS AND CONDITIONSAppendix: How to Apply These Terms to Your New ProgramsIf you develop a new program, and you want it to be of thegreatest possible use to the public, the best way to achieve thisis to make it free software which everyone can redistribute andchange under these terms.<strong>Firebox</strong> <strong>SSL</strong> <strong>VPN</strong> <strong>Gateway</strong> <strong>Administration</strong> <strong>Guide</strong> 165
Legal and Copyright InformationTo do so, attach the following notices to the program. It issafest to attach them to the start of each source file to mosteffectively convey the exclusion of warranty; and each fileshould have at least the "copyright" line and a pointer to wherethe full notice is found.
This is free software, and you are welcome to redistribute itunder certain conditions; type `show c' for details.The hypothetical commands `show w' and `show c' should showthe appropriate parts of the General Public License. Of course,the commands you use may be called something other than`show w' and `show c'; they could even be mouse-clicks ormenu items--whatever suits your program.You should also get your employer (if you work as a programmer)or your school, if any, to sign a "copyright disclaimer" forthe program, if necessary. Here is a sample; alter the names:Yoyodyne, Inc., hereby disclaims all copyright interest in theprogram`Gnomovision' (which makes passes at compilers) written byJames Hacker., 1 April 1989Ty Coon, President of ViceThis General Public License does not permit incorporating yourprogram into proprietary programs. If your program is a subroutinelibrary, you may consider it more useful to permit linkingproprietary applications with the library. If this is what youwant to do, use the GNU Library General Public License insteadof this License.<strong>Firebox</strong> <strong>SSL</strong> <strong>VPN</strong> <strong>Gateway</strong> <strong>Administration</strong> <strong>Guide</strong> 167
Legal and Copyright Information168 <strong>Firebox</strong> <strong>SSL</strong> <strong>VPN</strong> <strong>Gateway</strong> <strong>Administration</strong> <strong>Guide</strong>
IndexAaccess control, see ACL and usergroupsaccessible networks 102and split tunneling 134deny access without ACL 107specifying 103ACL 102allow/deny rules 124defining for user group 124deny access without ACL 107listed in Secure Access Clientwindow 60Admin Terminal window 18<strong>Administration</strong> Tool 21monitoring tools 150opening 19Real-time Monitor 150administration 7Admin Terminal window 18blocking external access 39portal 19Tool 21<strong>Administration</strong> > Date tab 42<strong>Administration</strong> > Licensing tablicense upload 41<strong>Administration</strong> > Maintenance tabblock external access 39certificate upload 38restart 49restore configuration 45save configuration 45server upgrade 24shut down 49<strong>Administration</strong> > Users tab 43<strong>Administration</strong> Portal page 19administrative userschanging password 43resetting to default password 43adware, host check examples 118antivirus, host check examples 118application access, see resourcegroupsarchive of system log 143authentication 82LDAP 91local 82RADIUS 88realm 82realm, removing 100RSA SecurID 95<strong>Firebox</strong> <strong>SSL</strong> <strong>VPN</strong> <strong>Gateway</strong> <strong>Administration</strong> <strong>Guide</strong> 169
Authentication and Local Users tabadd local user 101LDAP authentication/authorization92RADIUS authentication 89remove realm 100RSA SecurID authentication 97authorization 82LDAP 91local 83, 85Bbacking up the configuration 43BlackICE PC Protection configuration27Ccertificate 29backing up 43combining with private key 36converting to PEM format 35CSR overview 32generating for multiple levels 37installing Cygwin for 33multilevel and <strong>SSL</strong> V2 155private key, unencrypting 34Security Alert 31signed by Certificate Authority 29support 6uploading 38Certificate Authority 29Certificate Signing Request (CSR)generating 33overview 32Citrix client 65enabling 126saving preferences 128client variables for portal page 111client, see Secure Access Client, kioskclosing <strong>VPN</strong> connection 45computer hibernate/suspend, affect onclient 138configurationAdmin Terminal window 18<strong>Administration</strong> Portal 19<strong>Administration</strong> Tool 21restoring 45saving 43serial console 21connectionclosing to resource 47handling 46managing 45policy changes 81CPU usage 153DDefault <strong>Gateway</strong> setting 72and dynamic gateway 75Default realm 84changing authentication 87replacing 87deployment overview 7deployment withfirewall, see Quick StartLDAP server 82RADIUS server 82RSA ACE/Server 82server load balancer 16digital certificate support 6see also certificateDNSclient override 58enable split 75, 135failover to local 74in Secure Access Client window 59server settings 74suffixes 74Duplex Mode setting 73dynamic gateway, enabling 75dynamic routes, configuring 75170 <strong>Firebox</strong> <strong>SSL</strong> <strong>VPN</strong> <strong>Gateway</strong> <strong>Administration</strong> <strong>Guide</strong>
EEthereal Network Analyzer 151Ethereal Network Anaylzerunencrypted traffic on client PC 12External Public Address setting 73Ffailoverclient 137DNS servers 74gateways 80internal 137finger query 151firewall 26BlackICE PC Protectionconfiguration 27host check examples 118Internet Connection Firewall 58McAfee Personal Firewall Plusconfiguration 27Norton Personal Firewallconfiguration 28Sygate Personal Firewallconfiguration 28Tiny Personal Firewall configuration28using Secure Access Client behind a11ZoneAlarm Pro configuration 29fnetload tool 152FTPconfiguring for use with <strong>VPN</strong> client26using during kiosk session 63Ggateway devicedefault 73dynamic gateway 75<strong>Gateway</strong> Interface setting 72Global Policies tabaccessible networks 103deny access if no ACL 107disable portal page authentication114force re-login 138internal failover 138session timeout 114, 136single sign-on 140split DNS 75, 135split tunneling 135Group Priority tab 133groups, see user groupsHhibernate/suspend 138host check rules 116adding to user group 128examples 118Host Checks tab 116, 118IIEEE 802.11 support 2internal failover for <strong>VPN</strong> client 137Internet Connection Firewall 58IP addresschange impact on SecurID setup 98internal/external interfaces 72preconfigured 23IP pooling 131IPSec functionality 10JJava support (client) 25, 61Kkiosk 13browser default URL 128Citrix client 65<strong>Firebox</strong> <strong>SSL</strong> <strong>VPN</strong> <strong>Gateway</strong> <strong>Administration</strong> <strong>Guide</strong> 171
Lconfiguring for user group 126configuring network shares 119connecting to 61Java applet 25link to from website 115Mozilla client 128Remote Desktop client 65removing from portal page 126shared network drives, using 63SSH client 67Telnet 3270 Emulator client 67using FTP to copy files 64VNC client 68LDAP Browser 94LDAP server 82attribute lookup 94authentication 91authorization 91settings 91licenses 40backing up 43backup CD 40freeing 45managing 40uploading 41Linux support (client) 4, 54checking status 55command-line options 55link to from website 115removing client 55restarting stopped <strong>VPN</strong> daemon 55local usersauthorization 83, 85closing connection 45creating 100for authentication 82Logging > Local System Log tab 144Logging > SNMP tab 146Logging > Statistics tab 149Logging > Syslog tab 145logging, see monitoring tools, SNMP,system loglogin script support 140MMacintosh support (JVM client) 61McAfee Personal Firewall Plusconfiguration 27memory usage 153monitoring tools 18using 150Mozilla browser in kiosk 126configuring 128saving preferences 128MRTG 146MTU setting 73My traceroute tool 152Nname scanner 151NAT host 73networkaccess 102accessible networks 103activity level graph 150address translation (NAT) 73connections overview 71drives, shared 63interface (NIC) settings 72interface traffic load monitor 152monitoring 150packet data analyzer 151resource groupsroute tracing 152scanning tools 151Network Resources tab 105, 106Networking > DNS/WINS tab 74Networking > Failover Servers tab 80Networking > General Networking tab72Networking > Routes tab 76, 77172 <strong>Firebox</strong> <strong>SSL</strong> <strong>VPN</strong> <strong>Gateway</strong> <strong>Administration</strong> <strong>Guide</strong>
networks accessible to <strong>Gateway</strong> 103deny access without ACL 107in Secure Access Client window 59Norton Personal Firewall configuration28OOpen<strong>SSL</strong> ciphers supported 6Ppacket data, browsing 151password, administrative user 43Persistent Mode setting (kiosk) 128pingfrom serial console 23from xNetTools 151platforms supported by <strong>VPN</strong> client 4policiesACLs 102configuring for groups 121host checks 116IP pooling 131multi-group membership 132network access 102network shares (kiosk) 119portal pages 108, 114setting priority 132see also global policiesportfor <strong>VPN</strong> connections 73required 6scanner 151portal<strong>Administration</strong> 19<strong>VPN</strong> client 51see <strong>Administration</strong> Portal, VirtualNetwork PortalPortal Page Configuration tab 113private keycombining with signed certificate36unencrypting 34process activity level graph 150protocols supported 4proxy server setup for <strong>VPN</strong> client 57RRADIUS server 82authentication 88settings 88using LDAP authorization with 90realm-based authentication 82Default realm 84see also authenticationReal-time Monitor 45, 151reinstalling software 153remote client, see Secure Access ClientRemote Desktop client 65enabling 126resource groups 102adding to user group 124defining 104removing from user group 126restarting server 49restoring a configuration 45routesdynamic 75static 75RSA ACE/Server 82configuration file, see sdconf.rec fileresetting node secret 99SecurID authentication 95settings 95RSA/ACE Serverusing LDAP authorization with 98Ssdconf.rec file 95generating 96replacing 98uploading 97Secure Access Client 6, 140ACL list in 60<strong>Firebox</strong> <strong>SSL</strong> <strong>VPN</strong> <strong>Gateway</strong> <strong>Administration</strong> <strong>Guide</strong> 173
affect of computer 138affect of policy changes 81assigning IP address from pool 131automatic drive mapping support140automatic updates 58Connection Log 61forcing re-login 138FTP configuration 25host check rules 116internal failover 137link to from website 115Linux support 54operation 9platforms supported 4portal (custom) 108portal (default) 51proxy server setup 57single sign-on operation 140through firewalls/proxies 11use with Internet ConnectionFirewall 58window described 56SecurID authentication 82security 6, 8authentication/authorization 82controlling network access 102denying access without ACL 107digital certificates 29forcing user re-login afterinterruption 138host checking 116preventing MITM attacks 31Security Alert 31serial console 23servercrash recovery 153software reinstallation 153server load balancer, connection to 16server softwareuploading 24service scanner 151session timeout 136Share Mounts tab 120shared network drives 63shutting down 49single sign-on for <strong>VPN</strong> client 140SNMP 146logs, enabling and viewing 146MIB groups reported 146settings 146softwarefirewall, see firewallinstalled version 24reinstalling 153restarting 49shutting down 49upgrades 23upgrading from a file 24split DNS, enabling 75, 135overriding at client 58spyware, host check examples 118SSH client 67enabling 126<strong>SSL</strong>, use of 10static routesadding 77configuring 75example 78removing 78testing 78swap space usage 153Sygate Personal Firewall configuration28syslog server, forwarding system log to145system configurationrestoring 45saving 43system date and timechanging 41viewing 41system logarchive 143downloading 143filtering 143forwarding to syslog server 145viewing 143System Monitor 153system statistics 149174 <strong>Firebox</strong> <strong>SSL</strong> <strong>VPN</strong> <strong>Gateway</strong> <strong>Administration</strong> <strong>Guide</strong>
TTelnet 3270 Emulator client 67enabling 126templates (portal), see Virtual NetworkPortaltime zone, changing 41Tiny Personal Firewall configuration 28TLS, use of 10troubleshooting 154UUpload Certificate setting 38Upload Server Upgrade setting 24URLof <strong>Administration</strong> Portal 19of Java client 61user groups 121authorization 121choosing custom portal page 130configuring host check expression128configuring kiosk operation 126configuring resource ACL 124creating 121enabling IP pooling 131LDAP, obtained from 121naming 121prioritizing policies 132User Groups tab 122user name variable for portal page 111users, see administrative users, localusers, <strong>VPN</strong> usersVversion of installed software 24Virtual Network Portal 51customizing 108disabling authentication 114downloading templates 110loading custom files 113variables 110VNC client 68enabling 126<strong>VPN</strong> connection types 53<strong>VPN</strong> <strong>Gateway</strong> Remote Admin Terminalwindow 8<strong>VPN</strong> port setting 73<strong>VPN</strong> usersclosing connection 45disabling/enabling 48enabling single sign-on 140forcing re-login 138multi-group membership 132preventing access through hostchecks 116supporting 25viewing groups and priority group134viewing open connections 151working with shared network drives63Wwhois query 151Windows support (client) 4Windows Terminal Services, support of65WINS serverin Secure Access Client window 59setting 74XxNetTools 151ZZoneAlarm Pro configuration 29<strong>Firebox</strong> <strong>SSL</strong> <strong>VPN</strong> <strong>Gateway</strong> <strong>Administration</strong> <strong>Guide</strong> 175
176 <strong>Firebox</strong> <strong>SSL</strong> <strong>VPN</strong> <strong>Gateway</strong> <strong>Administration</strong> <strong>Guide</strong>