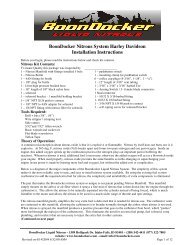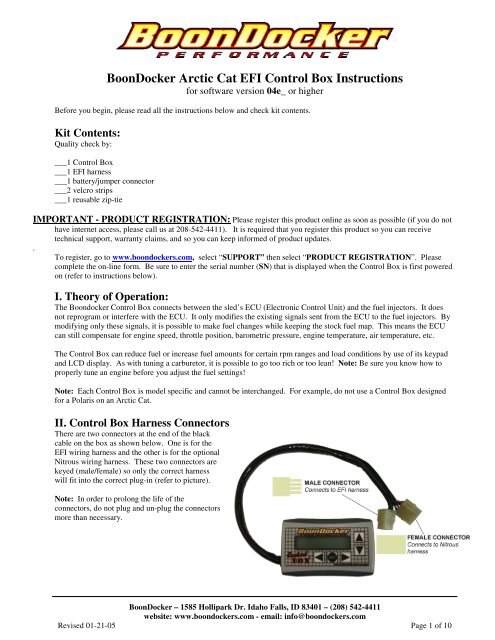
BoonDocker Arctic Cat EFI Control Box Instructions
BoonDocker Arctic Cat EFI Control Box Instructions
BoonDocker Arctic Cat EFI Control Box Instructions

Create successful ePaper yourself
Turn your PDF publications into a flip-book with our unique Google optimized e-Paper software.
<strong>BoonDocker</strong> <strong>Arctic</strong> <strong>Cat</strong> <strong>EFI</strong> <strong>Control</strong> <strong>Box</strong> <strong>Instructions</strong><br />
for software version 04e_ or higher<br />
Before you begin, please read all the instructions below and check kit contents.<br />
Kit Contents:<br />
Quality check by:<br />
___1 <strong>Control</strong> <strong>Box</strong><br />
___1 <strong>EFI</strong> harness<br />
___1 battery/jumper connector<br />
___2 velcro strips<br />
___1 reusable zip-tie<br />
IMPORTANT - PRODUCT REGISTRATION: Please register this product online as soon as possible (if you do not<br />
have internet access, please call us at 208-542-4411). It is required that you register this product so you can receive<br />
technical support, warranty claims, and so you can keep informed of product updates.<br />
.<br />
To register, go to www.boondockers.com, select “SUPPORT” then select “PRODUCT REGISTRATION”. Please<br />
complete the on-line form. Be sure to enter the serial number (SN) that is displayed when the <strong>Control</strong> <strong>Box</strong> is first powered<br />
on (refer to instructions below).<br />
I. Theory of Operation:<br />
The Boondocker <strong>Control</strong> <strong>Box</strong> connects between the sled’s ECU (Electronic <strong>Control</strong> Unit) and the fuel injectors. It does<br />
not reprogram or interfere with the ECU. It only modifies the existing signals sent from the ECU to the fuel injectors. By<br />
modifying only these signals, it is possible to make fuel changes while keeping the stock fuel map. This means the ECU<br />
can still compensate for engine speed, throttle position, barometric pressure, engine temperature, air temperature, etc.<br />
The <strong>Control</strong> <strong>Box</strong> can reduce fuel or increase fuel amounts for certain rpm ranges and load conditions by use of its keypad<br />
and LCD display. As with tuning a carburetor, it is possible to go too rich or too lean! Note: Be sure you know how to<br />
properly tune an engine before you adjust the fuel settings!<br />
Note: Each <strong>Control</strong> <strong>Box</strong> is model specific and cannot be interchanged. For example, do not use a <strong>Control</strong> <strong>Box</strong> designed<br />
for a Polaris on an <strong>Arctic</strong> <strong>Cat</strong>.<br />
II. <strong>Control</strong> <strong>Box</strong> Harness Connectors<br />
There are two connectors at the end of the black<br />
cable on the box as shown below. One is for the<br />
<strong>EFI</strong> wiring harness and the other is for the optional<br />
Nitrous wiring harness. These two connectors are<br />
keyed (male/female) so only the correct harness<br />
will fit into the correct plug-in (refer to picture).<br />
Note: In order to prolong the life of the<br />
connectors, do not plug and un-plug the connectors<br />
more than necessary.<br />
<strong>BoonDocker</strong> – 1585 Hollipark Dr. Idaho Falls, ID 83401 – (208) 542-4411<br />
website: www.boondockers.com - email: info@boondockers.com<br />
Revised 01-21-05 Page 1 of 10
III. Battery / Jumper Connector<br />
The supplied Battery/Jumper Connector has a dual purpose. It can function as a battery connector in order to supply<br />
voltage to the <strong>Control</strong> <strong>Box</strong> when the engine is not running, and it can function as a jumper in order to bypass the <strong>Control</strong><br />
<strong>Box</strong>.<br />
1. Battery Connector<br />
The <strong>Control</strong> <strong>Box</strong> is designed to operate without a battery – the box will turn itself on whenever power is applied for the<br />
fuel injectors. However, a 9-volt battery (not included) can be plugged into the box through the <strong>Control</strong> <strong>Box</strong>’s connectors<br />
with the supplied battery / jumper connector in order to operate the box without the sled running. This battery connector<br />
plugs into the <strong>Control</strong> <strong>Box</strong>’s nitrous connector (refer to picture below). Secure the battery to the connector with a zip tie in<br />
order to provide a strain relief for the 9-volt connector. The battery can also be secured to part of the harness if it is to be<br />
used on the sled while it is running.<br />
The battery connector can be left plugged<br />
in during engine operation, but the nitrous<br />
harness (if used) cannot be plugged into<br />
the <strong>Control</strong> <strong>Box</strong>. The battery will<br />
eventually drain if left connected to the<br />
box, so it is best to disconnect the battery<br />
when not in use.<br />
2. Jumper Connector<br />
The Battery/Jumper connector can also be used to bypass the <strong>Control</strong> <strong>Box</strong> in case the sled needs to be run without the<br />
<strong>Control</strong> <strong>Box</strong>. Disconnect the <strong>Control</strong> <strong>Box</strong> from the <strong>EFI</strong> harness and plug in the Jumper connector - the injectors are now<br />
connected directly to the sled’s ECU.<br />
<strong>BoonDocker</strong> – 1585 Hollipark Dr. Idaho Falls, ID 83401 – (208) 542-4411<br />
website: www.boondockers.com - email: info@boondockers.com<br />
Revised 01-21-05 Page 2 of 10
IV. <strong>EFI</strong> Wiring Harness<br />
<strong>Arctic</strong> <strong>Cat</strong> <strong>EFI</strong> Harness<br />
The <strong>EFI</strong> harness plugs in between the stock harness and the fuel injectors as follows:<br />
1. Disconnect the stock harness connector from each fuel injector.<br />
2. Plug each <strong>EFI</strong> <strong>Control</strong> <strong>Box</strong> harness fuel injector connector (female) to each injector. There is a left (PTO) and right<br />
(MAG) connector for each injector. The shorter length connectors go to the MAG side and the longer length<br />
connectors go the PTO side (see pictures below).<br />
Note: Be sure the black harness connectors latch securely to the gray injector connectors. This may require<br />
pushing the latch on the gray connector down over the tab on the black connector.<br />
3. Plug the remaining <strong>Control</strong> <strong>Box</strong> harness connector (male) to the corresponding stock fuel injector connector.<br />
4. Connect the <strong>Control</strong> <strong>Box</strong> harness ground wire to chassis ground. A good ground connection is extremely important!<br />
5. Use zip ties to keep the harness away from moving parts. Use reflective heat tape if the harness must be routed near<br />
hot items such as the exhaust. Note: Twin pipes will require heat-tape to cover the harness near the fuel rail.<br />
6. Once a suitable location is found for the <strong>Control</strong> <strong>Box</strong> (see below), plug the box into the <strong>EFI</strong> harness.<br />
V. <strong>Box</strong> Mounting Locations<br />
The <strong>Control</strong> <strong>Box</strong> can be mounted under the hood, on the dash, or on the handlebars using the supplied Velcro strips.<br />
Before applying the adhesive strips, thoroughly clean each surface (rubbing alcohol works well). It is also best if each<br />
surface is room temperature.<br />
If the box is mounted under the hood, keep the box away from excess heat (like the exhaust), and away from the ignition<br />
coil.<br />
Note: The <strong>Control</strong> <strong>Box</strong> is<br />
designed to be splashproof.<br />
Do not submerge<br />
or subject the box to highpressure<br />
spray.<br />
Note for M7: The<br />
location on the plate in<br />
front of the steering shaft,<br />
above the exhaust pipe<br />
gets very hot! We do not<br />
recommend this location.<br />
<strong>BoonDocker</strong> – 1585 Hollipark Dr. Idaho Falls, ID 83401 – (208) 542-4411<br />
website: www.boondockers.com - email: info@boondockers.com<br />
Revised 01-21-05 Page 3 of 10
VI. <strong>Control</strong> <strong>Box</strong> Menus<br />
Note: The buttons will become inactive whenever engine rpms are above 3500rpm.<br />
A. Intro Screen<br />
When the box is first turned on (by the engine or battery), the Intro screen is displayed. Press any key to go to the main<br />
menu. An example Intro screen display is shown below:<br />
<strong>BoonDocker</strong> A.<strong>Cat</strong><br />
v:04b1 SN:000000<br />
In the example shown above, this screen displays the following information:<br />
A.<strong>Cat</strong> Sled model This box is designed for an <strong>Arctic</strong> <strong>Cat</strong>. <strong>Box</strong>es for other sleds will have other lettering.<br />
Note: Be sure the <strong>Control</strong> <strong>Box</strong> is for your model of sled!<br />
04b1 Sofware Version This is the software version of the box. The box can be reprogrammed only by sending<br />
the box back to Boondocker.<br />
000000 Serial Number Use this number when registering or identifying your box for technical assistance.<br />
B. Main Menu<br />
The main menu is shown below:<br />
1-Fuel 3-Load<br />
2-N2O 4-Copy<br />
The current selection is shown by the right arrow and the cursor (underscore below the ‘1’ above). Use the arrow keys to<br />
move the cursor. Move the cursor to the desired selection and press the “sel” key to select the desired menu option.<br />
1. Fuel Adjust Menu<br />
This selection is used to make fuel adjustments. There are four screens (shown below). The first screen comes up after<br />
making this selection.<br />
Go to the next screen by pressing the “sel” button. After pressing the “sel” on the 4 th screen, you will return to the main<br />
menu. Use the up/down arrow keys to change the settings. Use the left/right arrow keys to switch between settings. The<br />
four fuel adjust screens are shown below.<br />
Fuel screen1: M1L LO MD HI tr<br />
3000 00 00 00 00<br />
Fuel screen2: M1L LO MD HI tr<br />
5000 00 00 00 00<br />
Fuel screen3: M1L LO MD HI tr<br />
6700 00 00 00 00<br />
Fuel screen4: M1L LO MD HI tr<br />
7800 00 00 00 00<br />
<strong>BoonDocker</strong> – 1585 Hollipark Dr. Idaho Falls, ID 83401 – (208) 542-4411<br />
website: www.boondockers.com - email: info@boondockers.com<br />
Revised 01-21-05 Page 4 of 10
Fuel Adjust Menu Description:<br />
M1L LO MD HI tr<br />
3000 00 00 00 00<br />
M1L This displays current map that is being used – in this case, M1 stands for Map1. Five possible fuel maps<br />
can be used. The L indicates that this map is Locked – this means the settings cannot be changed (the<br />
up/down buttons have no effect). If the map is Unlocked, adjustments can be made to any setting and<br />
these changes will be automatically saved to the selected map. Refer to the Load/Copy sections for more<br />
details.<br />
3000 This displays the rpm region for the fuel adjustments on this screen. For this example, this screen’s<br />
adjustments will be centered at 3000 rpm. There are 4 rpm regions. Each region is blended with the<br />
region below and the region above it as shown below. The effect of the 3000rpm adjustments taper off<br />
until 5000 rpms as shown.<br />
LO This adjustment is for Low load conditions. This will affect throttle settings from 0 up to 1/4 or 1/3. For<br />
rpm region 3000, this adjustment will effect idle. For other rpm regions, this will affect deceleration and<br />
light load conditions. If this setting becomes too high, the engine may load up with fuel during<br />
deceleration.<br />
MD This adjustment is for Medium (mid-range) load conditions. This will effect throttle settings from 1/4 up<br />
to 2/3 or 3/4. This will primarily effect medium load conditions.<br />
HI This adjustment is for High load conditions. This will effect throttle settings from 2/3 or 3/4 to full open.<br />
This will affect high load conditions.<br />
tr This adjustment is to Trim the PTO cylinder (left-side cylinder when sitting on the sled). This is used to<br />
add or subtract fuel on the left side if fine-tuning is desired. The LO adjustment is not affected by the Trim<br />
value – trim is only used for the MD and HI settings. It is best to tune the right cylinder first then make<br />
adjustments to the left (PTO) cylinder if necessary. If more than a small amount of adjustment is required<br />
(greater than plus or minus 7), check for other problems first.<br />
Note: We have found that some <strong>Arctic</strong> <strong>Cat</strong> M/F7’s run richer on the PTO side when running twin pipes.<br />
This requires a negative trim setting (between -2 to -4). This can be useful for adding additional fuel in<br />
the midrange to the Mag side without flooding the PTO side out.<br />
00 Each setting can go from –20 to 99. Refer to the <strong>EFI</strong> tuning section for tuning guidelines.<br />
<strong>BoonDocker</strong> – 1585 Hollipark Dr. Idaho Falls, ID 83401 – (208) 542-4411<br />
website: www.boondockers.com - email: info@boondockers.com<br />
Revised 01-21-05 Page 5 of 10
2. Nitrous Menu<br />
This screen is used to make fuel adjustments for nitrous use and to display bottle pressure<br />
Use the up/down arrow keys to change the settings, use the left/right arrow keys to switch between settings, and use the<br />
“sel” button to go back to the main menu.<br />
M1L Fuel N2O 1050<br />
42 40 ON psi<br />
M1L This displays the current fuel map – Map1. The L indicates that this map is Locked and the settings<br />
cannot be changed. If a U is displayed, this means that the map is Unlocked and the settings can be<br />
changed. Refer to the Load/Copy sections for more details.<br />
Fuel 40 This is the Fuel adjustment for nitrous use. A default value of 40 is used – you must still adjust this value<br />
to properly tune for nitrous - refer to the Nitrous Tuning section for more details.<br />
42 This is the Compensated Fuel amount that will be delivered when nitrous is used (N2O is ON). The<br />
bottle pressure input is used to adjust the Fuel adjustment (40) up or down.<br />
N2O This shows the setting for the Nitrous Solenoid. This setting works as described below:<br />
N2O ON: The nitrous solenoid will turn on when the nitrous button is pressed. The adjusted fuel amount<br />
(compensated for bottle pressure) will be added.<br />
Note: fuel will not be added unless the engine is above 3500rpm. This allows you to test the nitrous<br />
circuit at idle without flooding the motor.<br />
N2O OFF: The nitrous solenoid will not turn on when the nitrous button is pressed. Fuel will be added according to<br />
the Fuel setting only (not the Compensated Fuel), and it will be added even if the engine is below<br />
3500rpm. This can be used for tuning purposes – extra fuel can be added whenever the button is pressed.<br />
1050 This is the nitrous bottle pressure in psi. If the nitrous pressure transducer is not connected to the <strong>Control</strong><br />
<strong>Box</strong>, this could be a random value. Note: The nitrous pressure will not be updated if the engine is above<br />
3500 rpm.<br />
<strong>BoonDocker</strong> – 1585 Hollipark Dr. Idaho Falls, ID 83401 – (208) 542-4411<br />
website: www.boondockers.com - email: info@boondockers.com<br />
Revised 01-21-05 Page 6 of 10
3. Load Map Menu<br />
This screen is used to load a different Fuel adjustment map. It can also be used to lock and unlock each map. Five fuel<br />
adjustment maps can be loaded (Map 1-5). When a new map is loaded, the current adjustment settings will be changed to<br />
the values from that map.<br />
When a map is loaded, the Mx (x is the map number) that is displayed in the Fuel and Nitrous menus will show the loaded<br />
map number as a reminder.<br />
Use the up/down and left/right arrow keys to move the cursor around. If the cursor is over a number (1-5), the<br />
corresponding map will be loaded. If the cursor is placed over an L or U, the corresponding map’s (1-5) lock/unlock status<br />
will be changed (from Locked to Unlocked or Unlocked to Locked). Select Q to Quit and return to the main menu.<br />
Load 1 2 3 4 5 Q<br />
Lock L U U U U Q<br />
Load 1-5 Selects which map to load<br />
Lock L = Locked, U = Unlocked<br />
Q Quits this menu<br />
If a map number 1-5 is selected, the following screen will be displayed to confirm the Load operation (x=selected map):<br />
Load Mapx? Y N<br />
If an L or U is selected, the following screen will be displayed to confirm the Lock/Unlock operation (x=selected map):<br />
Lock Mapx? Y N or Unlock Mapx? Y N<br />
4. Copy Map Menu<br />
This screen is used to save the CURRENT Fuel adjustment map TO one of five available map locations. The map that is<br />
being copied TO must be Unlocked – otherwise a message will be displayed telling you that the map you selected cannot<br />
be overwritten. When a map is saved, Mx that is displayed in the Fuel and Nitrous menus will remain on the same map.<br />
Use the up/down and left/right arrow keys to move the cursor around. If the cursor is over a number (1-5), the<br />
corresponding map will be loaded. If the cursor is placed over an L or U, the corresponding map’s (1-5) lock/unlock status<br />
will be changed (from Locked to Unlocked or Unlocked to Locked). Select Q to Quit and return to the main menu.<br />
Copy 1 2 3 4 5 Q<br />
Lock L U U U U Q<br />
Copy 1-5 Selects which map to copy the current map TO<br />
Lock L = Locked, U = Unlocked<br />
Q Quits this menu<br />
If a map number 1-5 is selected, the following screen will be displayed to confirm the Load operation (x=selected map):<br />
Copy TO Mapx? Y N<br />
If an L or U is selected, the same screen as in the LOAD menu will be displayed to confirm the Lock/Unlock operation.<br />
<strong>BoonDocker</strong> – 1585 Hollipark Dr. Idaho Falls, ID 83401 – (208) 542-4411<br />
website: www.boondockers.com - email: info@boondockers.com<br />
Revised 01-21-05 Page 7 of 10
VII. <strong>EFI</strong> Tuning<br />
Each Fuel adjustment setting goes from –20 to 99. Positive numbers add fuel and negative numbers subtract fuel. The<br />
minimum is set to –20 so accidental adjustments beyond this value don’t occur. However, this will not prevent a lean<br />
burndown! You must still take the proper tuning steps.<br />
The maximum is set to 99. This does not mean you have an effective range all the way to 99 – you will likely max out the<br />
injector before this setting is reached. Your usable adjustment range (max value) is dependent on how long the ECU<br />
already has the injector on. This will vary depending on rpms, throttle setting, temps, and can be different from sled to sled<br />
even of the same model. There is no direct relation<br />
Exhaust Gas Temperature gauges can be an effective tuning tool, but they are not a substitute for reading spark plugs and<br />
piston wash and feeling how the engine runs. Use EGTs only as a backup to verify what you see. They can be misleading<br />
under certain conditions and safe readings can vary greatly from engine to engine depending on such things as probe<br />
placement, fuel, timing, pipe design, porting, etc.<br />
Tuning tips:<br />
Important: Find the settings where your motor runs rich before you decide to go lean!<br />
1. Tune with the engine and pipe at operating temperature. The sled’s ECU will make adjustments as the engine<br />
warms up – you might think the engine needs leaner settings then later realize you are too lean once the engine<br />
warms up.<br />
2. Use the Load/Save Map feature to quickly change and compare fuel settings when testing. This can also be useful<br />
for riding under different conditions. For example, changing elevations or temperatures may require different<br />
adjustments if the stock ECU does not compensate properly for your modifications. For drag racing, you might<br />
want to run richer settings for longer distances than you would for short distances.<br />
3. To find out where a fuel adjustment setting is effective, greatly increase only that setting. Run the engine to find<br />
out when it suddenly becomes too rich – this is where that setting is effective. Be careful – you can easily flood<br />
the motor, especially with LO load or low RPM settings. To restart the engine you may have to pull several times<br />
with the throttle held wide open.<br />
4. Set the N2O setting to OFF and use the nitrous button to add fuel interactively. When the nitrous button is<br />
pressed, the amount of fuel set in the nitrous menu will be added in addition to the fuel adjustments that are<br />
already made.<br />
Also consider the following:<br />
A/F Mixture Generally EGT’s get hotter as the motor gets lean, but too lean and the temps can actually drop! It’s like<br />
turning the oxygen up too high on a torch – as oxygen is added, the flame gets hotter to a certain point,<br />
then gradually cools off until it becomes extinguished from too much oxygen.<br />
Detonation EGT’s can read low during detonation – heat is going into the cylinder and piston instead of out the<br />
pipe. Detonation often requires an experienced tuner to detect.<br />
Timing Timing can affect the pipe temperature. Generally if the ignition is retarded, more heat will build up in<br />
the pipe. Too much advance may drop EGT temps, but increase cylinder temps.<br />
Fuel Different fuels have different densities and other characteristics which can affect your mixture and fuel<br />
requirements. Oxygenated fuel will run leaner. Octane rating is important for highly modified motors.<br />
Lean spots Sometimes a motor runs hot at certain rpms and throttle positions (usually in its mid-range) no matter<br />
what. The fuel adjustment settings can be used to richen this up, but the engine may quickly become<br />
too rich and run erratic. Under light load conditions you can sometimes get away with running hot for<br />
short periods of time. Under such conditions it is best to vary the throttle position often and not stay at<br />
one throttle setting for long durations.<br />
<strong>BoonDocker</strong> – 1585 Hollipark Dr. Idaho Falls, ID 83401 – (208) 542-4411<br />
website: www.boondockers.com - email: info@boondockers.com<br />
Revised 01-21-05 Page 8 of 10
VIII. Nitrous Tuning<br />
The Fuel adjustment setting in the Nitrous menu is used to control how much fuel is added during nitrous use. The nitrous<br />
pressure transducer input is used to automatically scale the fuel adjustment up or down from this base setting according to<br />
the amount of nitrous that is sprayed. However, you still must go through the nitrous tuning procedure before you can<br />
safely use nitrous.<br />
The numbers for the nitrous fuel adjustment work the same as for the non-nitrous fuel adjustments. This can help to<br />
quickly get a baseline nitrous fuel setting if fuel adjustments are made after the nitrous has been adjusted. For example, if<br />
the 7800 HI fuel setting is decreased by X amount, you need to increase the nitrous fuel setting by X amount.<br />
Warning: Only adjust the <strong>Control</strong> <strong>Box</strong> settings according to the steps below.<br />
The steps below should be done with a full nitrous bottle that is at the proper operating temperature (70-90deg F) and<br />
pressure (700-1000psi). Make sure the engine is at normal operating temperature.<br />
Do not exceed 2 seconds of nitrous use until the fuel adjustment is complete and correct.<br />
This adjustment process should only be performed by an experienced tuner. If you are not an experienced tuner, find<br />
someone who is. Remember, safety first!<br />
1. Increase the nitrous fuel adjustment setting on the <strong>Control</strong> <strong>Box</strong> until you notice a drop in the power increase when<br />
using nitrous. When this occurs, you are rich. Be sure you have reached this point before proceeding. Note this<br />
adjustment setting.<br />
2. Only after step 1 is complete, start reducing the fuel setting. Continue reducing the fuel setting until a maximum<br />
power increase is obtained. This can be determined by noticing your maximum RPM.<br />
3. If the fuel is reduced but no power increase is noticed from the previous setting, this means you are lean. Note<br />
this adjustment setting.<br />
4. Increase the fuel setting back to where it was before no additional power increase was noted in step 3. This<br />
setting should be somewhere between the rich and lean settings. It is best to stay on the rich side.<br />
5. After this adjustment is made, if the engine does not run perfectly smooth when using nitrous, do not use it! If the<br />
exhaust note does not sound clean, the cause is likely detonation, which can quickly destroy the engine. Use<br />
higher octane fuel, add more ignition retard, reduce the engine’s compression, or reduce the amount of nitrous<br />
(see next section for changing nozzles) before using nitrous again.<br />
Pressure Transducer Faults<br />
When the nitrous button is pressed, the <strong>Control</strong> <strong>Box</strong> checks to make sure the readings from the pressure transducer are<br />
correct. One of the following two fault messages may be displayed. If a fault message is displayed, the nitrous solenoid<br />
will not operatae and the message will remain displayed until any key is pressed to clear it.<br />
ERROR: N2O pres.<br />
transducer fault<br />
This screen may appear if the pressure transducer<br />
is unplugged or there is a wiring problem.<br />
ERROR: N2O pres.<br />
over 2000 psi<br />
This screen will appear if the pressure transducer senses<br />
a pressure above 2000psi. This may also occur if the<br />
pressure transducer is unplugged.<br />
<strong>BoonDocker</strong> – 1585 Hollipark Dr. Idaho Falls, ID 83401 – (208) 542-4411<br />
website: www.boondockers.com - email: info@boondockers.com<br />
Revised 01-21-05 Page 9 of 10
IX. Troubleshooting<br />
Engine runs erratic 1. Verify that the <strong>EFI</strong> Harness Ground Wire has a good connection.<br />
2. Verify that all wiring is in good condition.<br />
3. To determine if problem is with the <strong>Control</strong> <strong>Box</strong>, unplug the <strong>Control</strong> <strong>Box</strong> and install the jumper<br />
on the <strong>EFI</strong> harness.<br />
4. If problem persists with <strong>Control</strong> <strong>Box</strong> unplugged and jumper installed, unplug the <strong>EFI</strong> harness<br />
and plug original harness back into the injectors.<br />
5. If problem only occurs with <strong>Control</strong> <strong>Box</strong> plugged in, change all fuel adjustment settings to 0 and<br />
see if problem persists.<br />
Rough Idle Idle adjustments are much more sensitive than other adjustments since the injectors are on for a<br />
very short duration. You may not be able to adjust your 3000 LO settings by very much.<br />
LCD is dim If you are using a 9 volt battery, your battery voltage is getting low – replace your battery.<br />
LCD display is slow Cold weather conditions can make the LCD respond very slowly. The <strong>Control</strong> <strong>Box</strong> will still<br />
function OK. You can locate the box under the hood in order to provide heat so the LCD will<br />
display quicker.<br />
Moisture on LCD Condensation is normal if the <strong>Control</strong> <strong>Box</strong> is quickly moved from a cold to a warm environment. If<br />
there is excess moisture that does not go away, the box can be opened up and dried out. Note –<br />
there is a silica gel pack inside the box that will help absorb extra moisture.<br />
Check Engine light 1. Bad connection in the wiring harness. Recheck all connectors and be sure each is completely<br />
latched. Also inspect each wire to make sure there are no frayed or broken wires.<br />
2. Fuel adjustment is too high. It is possible to increase the fuel adjustment so the injector is always<br />
on. Some ECU’s check to make sure the injector is off before it drives the injector on again. A<br />
fault will be detected if this condition is not met.<br />
3. Fuel adjustment is too low. If the fuel adjustment is set too low, the injector may not completely<br />
turn on. The ECU may detect this as a fault.<br />
X. Warranty, Terms & Conditions<br />
Returned Goods – No merchandise will be accepted without prior approval. A RMA number (Return Merchandise<br />
Authorization) provided by Boondocker is required before a return will be accepted. A 20% handling and restocking<br />
charge will be applied to returned merchandise. No unauthorized returns will be accepted.<br />
Limited Warranty – Boondocker warrants its product to the original purchaser against workmanship defects for a period<br />
of 90 days, commencing from the date of product delivery to the Consumer.<br />
Maximum Liability – The maximum liability of Boondocker in connection with this warranty shall not under any<br />
circumstances exceed the price of the product claimed to be defective.<br />
<strong>BoonDocker</strong> – 1585 Hollipark Dr. Idaho Falls, ID 83401 – (208) 542-4411<br />
website: www.boondockers.com - email: info@boondockers.com<br />
Revised 01-21-05 Page 10 of 10