Model BCA280 - Avanti Products
Model BCA280 - Avanti Products
Model BCA280 - Avanti Products

You also want an ePaper? Increase the reach of your titles
YUMPU automatically turns print PDFs into web optimized ePapers that Google loves.
TABLE OF CONTENTSImportant Safety Instructions 3Appliance Safety 3Important Safeguides 4Help Us Help You … 5Parts and Features 6Electrical Connection / Extension Cord / Surge Protector 7Installation Instructions 8Before Using Your Appliance 8Installation of Your Appliance 8Operating Your ApplianceON/OFF Power 9Setting the Temperature Control 9Interior Light 9Door Lock 9Positive Seal Self Closing Door 9Shelves 10Care and MaintenanceCleaning the Beverage Cooler 11Power Failure 11Moving Your Beverage Cooler 11Energy Saving Tips 11Troubleshooting Guide 12Service for Your Appliance 13Wiring Diagram 13Your <strong>Avanti</strong> <strong>Products</strong> Warranty 14Instrucciones en Español 15 - 17Registration Information and Registration CardLast Page2
IMPORTANT SAFETY INSTRUCTIONSTo reduce the risk of fire, electrical shock,WARNINGor injury when using your appliance, followthese basic precautions:• Read all instructions before using the Beverage Cooler.• DANGER or WARNING: Risk of child entrapment.Child entrapment and suffocation are not problems of the past. Junked or abandonedappliances are still dangerous . . . even if they will “just sit in the garage a few days”.• Before you throw away your old Beverage Cooler: Take off the door. Leave theshelves in place so that children may not easily climb inside.• Never allow children to operate, play with, or crawl inside the appliance.• Never clean appliance parts with flammable fluids. The fumes can create a firehazard or explosion.• Do not store or use gasoline or any other flammable vapors and liquids in the vicinityof this or any other appliance. The fumes can create a fire hazard or explosion.-Save these instructions-APPLIANCE SAFETYYour safety and the safety of others are very important.We have provided many important safety messages in this manual and on your appliance. Alwaysread and obey all safety messages.This is the Safety Alert Symbol. This symbol alerts you to potential hazards thatcan kill or injure you and others. All safety messages will follow the SafetyAlert Symbol and either the words “DANGER”, “WARNING” or “CAUTION”.Danger means that failure to heed thissafety statement may result in severepersonal injury or death.Warning means that failure to heed thissafety statement may result in extensiveproduct damage, serious personal injury, ordeath.Caution means that failure to heed thissafety statement may result in minor ormoderate personal injury, or property orequipment damage.All safety messages will alert you do what the potential hazard is, tell you how to reduce the chance ofinjury, and let you know what can happen if the instructions are not followed.3
HELP US HELP YOU...Read this guide carefully.It is intended to help you operate and maintainyour new Beverage Cooler properly.Keep it handy to answer your questions.If you don't understand something or youneed more assistance, please call:<strong>Avanti</strong> Customer Service800-220-5570Keep proof of original purchase date (such asyour sales slip) with this guide to establish thewarranty period.CAUTION:THIS BEVERAGE COOLER ISNOT DESIGNED FOR THESTORAGE OF MEDICINE OROTHER MEDICAL PRODUCTS.Write down the model and serial numbers.You'll find them on a plate located on the rearoutside wall of the Beverage Cooler.Please write these numbers here:____________________________________Date of Purchase____________________________________<strong>Model</strong> Number____________________________________Serial NumberUse these numbers in any correspondence orservice calls concerning your Beverage Cooler.If you received a damaged Beverage Cooler,immediately contact the dealer (or builder) thatsold you the Beverage Cooler.Save time and money. Before you call forservice, check the Troubleshooting Guide. Itlists causes of minor operating problems thatyou can correct yourself.IF YOU NEED SERVICEWe're proud of our service and want you to bepleased. If for some reason you are not happywith the service you receive, here are somesteps to follow for further assistance.FIRST, contact the people who serviced yourBeverage Cooler. Explain why you are notpleased. In most cases, this will solve theproblem.NEXT, if you are still not pleased, write all thedetails, including your telephone number, andsend it to:Customer Service<strong>Avanti</strong> <strong>Products</strong>, LLC10880 NW 30 StreetMiami, FL 33172 USA5
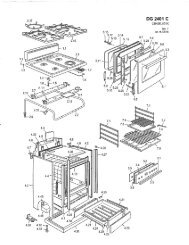
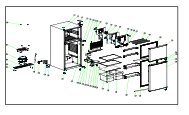
PARTS & FEATURES1 Temperature Control2 Interior Fan3 Light Switch4 Beverage Shelves (Total 4)5 Front Grille6 Rear Casters7 Front Leveling Legs8 Top Door Hinge with Cover9 Glass Door with Integrated Door Handle10 Side LED Lighting6
INSTALLATION INSTRUCTIONS‣ BEFORE USING YOUR BEVERAGE COOLER• Remove the exterior and interior packing.• Check to be sure you have all of the following parts:1 Instruction Manual4 Beverage Shelves2 Keys• Before connecting this appliance to the power source, let it stand upright for approximately 2hours. This will reduce the possibility of a malfunction in the cooling system from handlingduring transportation.• Clean the interior surface with lukewarm water using a soft cloth.‣ INSTALLATION OF YOUR BEVERAGE COOLER• This appliance is designed to be for free standing installation only.• Place your Beverage Cooler on a floor that is strong enough to support it when it is fullyloaded.• Your Beverage Cooler is designed to either be free standing in a fixed position or moveableusing the casters (located at the rear of the unit).• Locate the Beverage Cooler away from direct sunlight and sources of heat (stove, heater,radiator, etc.). Direct sunlight may affect the acrylic coating and heat sources may increaseelectrical consumption. Extreme cold ambient temperatures may also cause the unit not toperform properly.• Avoid locating the unit in moist areas.• Plug the Beverage Cooler into an exclusive, properly installed-grounded wall outlet. Do notunder any circumstances cut or remove the third (ground) prong from the power cord. Anyquestions concerning power and/or grounding should be directed toward a certified electricianor an authorized <strong>Avanti</strong> <strong>Products</strong> service center.8
OPERATING YOUR BEVERAGE COOLERIMPORTANT SAFEGUARDSDo not store food in Beverage Center, as interior temperature may not get cool enough to preventspoilage.As a natural result of condensation, in summer months or areas of high humidity, the glass doormay build up moisture on the outside. Just wipe it away.It is recommended you install the appliance in a place where the ambient temperature is between 72-78 ºF (22º - 26ºC). If the ambient temperature is above or below recommended temperatures, theperformance of the unit may be affected. For example, placing your unit in extreme cold or hotconditions may cause interior temperatures to fluctuate. The range of 34º-43ºF (1º-6ºC) may not bereached.Your Beverage Cooler is designed to operate with at a range of 34º - 43º F (1 – 6ºC).‣ ON/OFF POWERYour unit is designed to turn ON as soon as the power cord has been plugged into an active electricaloutlet. You can turn the temperature control knob to the OFF position, which will turn off the coolingoperation but will not turn off the power to the unit.‣ Setting the Temperature Control• Your unit has only one control for regulating the temperature in the compartment. The temperaturecontrol is located on the upper right hand side of the compartment.• The first time you turn the unit on, set the temperature control to “5”.• The range of the temperature control is from position "OFF” to “5”. After 24 to 48 hours, adjust thetemperature control to the setting that best suits your needs. The setting of “3-4” should beappropriate for normal use.• To turn the off the cooling system, turn the temperature control to ”OFF”.NOTE:• Also, as cold air falls and warm air rises, there could be a slight temperature variance betweenthe top and bottom shelves.‣ STORAGEMany bottles may differ in size and dimensions. As such the actual number of bottles you may be ableto store may vary.‣ INTERIOR LIGHTYou can turn the interior light on or off by pressing the red light switch.‣ DOOR LOCKYour unit is provided with a lock and key combination.The keys are located inside the plastic bag that contains the User’s Guide.Insert the key into the lock and turn it clockwise to unlock the door. To lock the door turn the keycounterclockwise making sure metal pin is engaged completely.Remove the key and place it in a secure place for safekeeping.‣ POSITIVE SEAL SELF-CLOSING DOORFor your convenience, your Beverage Cooler has been designed with a self-closing door mechanismthat will completely close the door and create a positive seal between the door gasket and the cooler.9
‣ SHELVESTo prevent damaging the door gasket, make sure to have the door all the way opened when pullingshelves out of the rail compartment.For easy access to the storage content, you can pull the shelves approximately 1/3 the way out of therail compartment, for your safety and convenience this unit was designed with a plastic stopper oneach side of the shelf track to prevent shelves from falling.When removing any of these shelves out of the rail compartment, you must first remove all items fromthe shelves, then disassemble and remove both of the plastic stoppers by removing each of thestoppers on each side of the shelf.Safety Stoppers2 on each side of eachshelf.10
CARE AND MAINTENANCE‣ CLEANING YOUR BEVERAGE COOLER• Unplug the appliance, and remove all items including shelves.• Wash the inside surfaces with a warm water and baking soda solution. The solution should beabout 2 tablespoons of baking soda to a quart of water.• Wash the shelves with a mild detergent solution.• Wring excess water out of the sponge or cloth when cleaning area of the controls, or anyelectrical parts.• Wash the outside cabinet with warm water and mild liquid detergent. Rinse well and wipe dry witha clean soft cloth.• Do not use steel wool or steel brush on the stainless steel. These will contaminate the stainlesssteel with steel particles and rusting may occur.‣ POWER FAILURE• Most power failures are corrected within a few hours and should not affect the temperature ofyour appliance if you minimize the number of times the door is opened. If the power is going to beoff for a longer period of time, you need to take the proper steps to protect your contents.‣ MOVING YOUR BEVERAGE COOLER• Remove all items.• Securely tape down all loose items (shelves) inside your appliance.• Tape the door shut.• Be sure the appliance stays secure in the upright position during transportation. Also protectoutside of appliance with a blanket, or similar item.‣ ENERGY SAVING TIPS• The Beverage Cooler should be located in the coolest area of the room, away from heatproducing appliances, and out of the direct sunlight.11
PROBLEMS WITH YOUR BEVERAGE COOLER?You can solve many common Beverage Cooler problems easily, saving you the cost of a possibleservice call. Try the suggestions below to see if you can solve the problem before calling the servicer.TROUBLESHOOTING GUIDEPROBLEMBeverage Cooler does not operate.Beverage Cooler is not cold enough.Turns on and off frequently.The light does not work.Vibrations.The Beverage Cooler seems to make too muchnoise.The door will not close properly.POSSIBLE CAUSENot plugged in.The appliance is turned off.The circuit breaker tripped or a blown fuse.Check the temperature control, setting maybe toohigh.The door is opened too often.The door is not closed completely.The door gasket does not seal properly.The room temperature is hotter than normal.A large amount of contents has been added tothe Beverage Cooler.The door is opened too often.The door is not closed completely.The temperature control is not set correctly.The door gasket does not seal properly.Not plugged in.The circuit breaker tripped or a blown fuse.The light button is “OFF”.Check to assure that the Beverage Cooler islevel.The rattling noise may come from the flow of therefrigerant, which is normal.As each cycle ends, you may hear gurglingsounds caused by the flow of refrigerant in yourBeverage Cooler.Contraction and expansion of the inside wallsmay cause popping and crackling noises.The Beverage Cooler is not level.The door is misaligned.The Beverage Cooler is not level.The gasket is dirty.The shelves are out of position.12
SERVICE FOR YOUR BEVERAGE COOLERWe are proud of our customer service organization and the network of professional servicetechnicians that provide service on your <strong>Avanti</strong> appliances. With the purchase of your <strong>Avanti</strong>appliance, you can have the confidence that if you ever need additional information or assistance, the<strong>Avanti</strong> <strong>Products</strong> Customer Service team will be here for you. Just call us toll-free.Product Information800-323-5029Part Orders800-220-5570In-Home Repair Service800-220-5570AVANTI PRODUCTS CUSTOMER SERVICESWhatever your questions are about our products,help is available.You may order parts and accessories that will bedelivered directly to your home by personalcheck, money order, Master Card, or Visa.An <strong>Avanti</strong> <strong>Products</strong> authorized service center willprovide expert repair service, scheduled at a timethat is convenient for you. Our trained servicersknow your appliance inside and out.WIRING DIAGRAM13
INSTRUCCIONES DE SEGURIDADATENCIONINSTRUCCIONES PARA LA CONEXION A TIERRAEste aparato electrodoméstico debe estar conectado a tierra. En caso de un cortocircuito eléctrico, laconexión a tierra reduce el riesgo de choque eléctrico proporcionando un cable a tierra con unaenchufe de conexión a tierra. Este enchufe debe estar conectado en un tomacorriente instaladocorrectamente y conectado a tierra.ADVERTENCIA – El uso inadecuado del enchufe de conexión a tierra puede resultar en un riesgo dechoque eléctrico. Consulte con un electricista o persona de reparaciones competente si nocomprenden bien las instrucciones de conexión a tierra o si existe alguna duda sobre si el aparatoesta conectado a tierra correctamente.NO USE UN CORDON DE PROLONGACION ELECTRICAUse un tomacorriente de pared exclusivo. No conecte su Enfriador a cordones de prolongacióneléctrica o junto a cualquier otro electrodoméstico en el mismo tomacorriente de pared.ADVERTENCIA IMPORTANTE:Un Enfriador vacío es una atracción muy peligrosa para los niños. Saque todas las juntas,pestillos, tapas o puerta de todo electrodoméstico que no esté en uso, o tome algunamedida para asegurar que no presente peligro.INSTRUCCIONES DE INSTALACIONSaque los embalajes exteriores, limpie bien el exterior con un paño suave seco, y el interior con unpaño húmedo y tibio. Evite colocar el Enfriador cerca de una fuente de calor, luz de sol directa, olugar húmedo.Ubicación1. Seleccione un lugar con su piso fuerte y nivelado.2. Evite la luz directa del sol o calor. La luz directa del sol puede afectar la capa de acrílico.Las fuentes de calor en su proximidad provocarán un consumo mayor de electricidad.OPERACIONPRECAUCIONES IMPORTANTESNo guarde alimentos en el enfriador.La parte externa de la puerta de vidrio puede mostrar signos de humedad durante los meses deverano o en areas de alta humedad, esto es el resultado natural de la condensación.Se recomienda que Ud coloque su Enfriador en un lugar donde la temperatura ambiental semantenga entre 72º - 78ºF (22º - 26ºC)..Si la temperatura ambiental es mayor o menor que la temperatura recomendada, el funcionamientode la unidad podría ser afectado. Por ejemplo, si mantiene la unidad en condiciones de calor o fríoextreme, puede ocasionar que la temperatura interna fluctúe y que no se alcance el rango de 34º -43ºF (1º - 6ºC).Su Enfriador bebidas ha sido diseñado con un rango de temperatura de 34º - 43ºF (1º - 6ºC).Para evitar vibraciones, el enfriador debe estar bien nivelado. La temperatura variará dependiendo dela cantidad de botellas o latas almacenadas y la frecuencia con que se abre la puerta.Cuando el Enfriador no se use por un período largo, desconecte el enchufe y deje la puertaentreabierta.15
Nota: Como el aire frio cae y el aire caliente sube, podrá haber una pequeña variación detemperatura entre las repisas superiores y las inferiores.COMO AJUSTAR EL CONTROL DE TEMPERATURASu unidad tiene un solo control para regular la temperatura, este control se encuentra localizado en laparte superior derecha del compartimiento.Al conectar y encender su unidad, asegúrese de rotar el control de temperatura hacia la posición de“5”.Este control de temperatura puede variar desde “OFF” hasta la posición “5”, después de habersemantenido en la posición “5” por 24 o 48 horas aproximadamente, regrese el control de temperaturapara ajustarlo a la posición que más se ajuste a sus necesidades, por ejemplo la posición “3-4” seríaapropiada para usar su unidad en su hogar u oficinas.Para apagar su unidad, simplemente rote el control de temperatura hacia la posición de “OFF”.Nota:Rotando el control de temperatura hacia la posición de “OFF”, Usted solamente apaga el ciclo deenfriamiento, pero no desconecta su unidad de la fuente de corriente.Si la unidad es desconectada de la pared o sufre una interrupción de electricidad Usted siempre debeesperar por un aproximado de 3 a 5 minutos para poder encenderla de nuevo, de no hacerlo así, suunidad no comenzará a funcionar.Luz interiorLa luz interior se controla manualmente y no funciona al abrir ni cerrar la puerta. Para prender oapagar la luz, presione el botón colorado de la luz ubicado en el panel de control.Cerradura de la puertaSu unidad viene equipada con una combinación de cerradura y llave.Las llaves (2) están dentro de la bolsa plástica junto al manual de instrucciones.Introduzca la llave en la cerradura y gírela hacia la derecha para abrir la puerta.Para cerrarla, gire la llave hacia el lado opuesto.Quite la llave y colóquela en un lugar seguro para evitar que se pierda.Algunas reglas importantes para el uso correcto de su enfriador.• Las bebidas se deben guardar en botellas o latas cerradas.• No sobrecargue el compartimiento interior.• No abra la puerta a menos que sea necesario.• Si el enfriador se guardará sin uso por períodos largos, se sugiere que, luego de una limpiezacuidadosa, se deje la puerta entreabierta para permitir que el aire circule dentro de la caja y evitaruna posible formación de condensación, moho u olores.Nunca cubra los estantes del compartimiento para bebidas con papel de aluminio o cualquier otromaterial para cubrir estantes que puedan obstruir la circulación del aire.16
CUIDADO Y MANTENIMIENTOLimpiezaPara limpiar el interior, use un paño suave con una solución de una cucharada de bicarbonato desodio por cada cuarto de agua, o una solución de espuma de jabón suave, o un detergente suave.Para lavar las rejillas, sáquelas deslizándolas con cuidado, y use una solución de detergente suave;luego séquelas con un paño suave. Limpie el exterior con un paño húmedo suave y un poco dedetergente suave o productos de limpieza para electrodomésticos.Período de vacacionesPara períodos cortos de vacaciones, deje los controles en la posición normal. Durante ausenciasmás largas;(a) saque todo el contenido,(b) desconecte el enfriador del tomacorriente,(c) limpie bien el enfriador,(d) deje la puerta abierta para evitar la formación de condensación, moho u olores.Corte de corrienteLa mayoría de los cortes de corriente se corrigen en una o dos horas y no afectarán las temperaturasde su enfriador. Sin embargo, Ud. deberá reducir la cantidad de veces que abra la puerta cuando lacorriente esté apagada.Si Ud. se mudaSaque o asegure todos los artículos dentro de su enfriador. Para evitar que los tornillos nivelantes seaveríen, gírelos completamente hacia la base.‣ REPISAS(VER IMAGEN EN LA PAGINA 10)Para prevenir daños al sello de la puerta, este seguro que la puerta está completamente abiertaantes de deslizar las repisas hacia afuera.Para mejor acceso al contenido de cada repisa, se puede deslizar cada repisa aproximadamente 1/3del la distancia del compartimiento. Para su seguro y conveniencia su enfriador ha sido diseñadocon dos obturadores en cada lado de la repisa que previene las repisas de caer del enfriador. Antesde remover las repisas del enfriador retire todo el contenido de cada repisa, remueva los obturadoresde cada lado de la repisa, desliza la repisa hacia afuera.17
Registration InformationThank you for purchasing this fine <strong>Avanti</strong> product. Please fill out this form and return it to thefollowing address within 100 days from the date of purchase and receive these important benefits:<strong>Avanti</strong> <strong>Products</strong> LLCP.O.Box 520604 – Miami, Florida 33152‣ Protect your product:We will keep the model number and date of purchase of your new <strong>Avanti</strong> product on file tohelp you refer to this information in the event of an insurance claim such as fire or theft.‣ Promote better products:We value your input. Your responses will help us develop products designed to best meetyour future needs.-------------------------------------------------------(detach here)--------------------------------------------------------------<strong>Avanti</strong> Registration CardName <strong>Model</strong> # Serial #Address Date Purchased Store / Dealer NameCity State Zip E-mail AddressArea Code Phone Number OccupationDid You Purchase An Additional Warranty As your Primary Residence, Do You: Extended Own Rent NoneYour Age:Reason for Choosing This <strong>Avanti</strong> Product: under 18 18-25 26-30Please indicate the most important factors 31-35 36-50 over 50That influenced your decision to purchase Marital Status:this product: Married Single Price Product Features <strong>Avanti</strong> Reputation Product Quality Salesperson Recommendation Other: ___________________ Friend / Relative Recommendation Warranty Other: ___________________Comments:Is This Product Used In The: Home BusinessHow Did You Learn About This Product: Advertising In-Store Demo Personal Demo19
<strong>BCA280</strong> – VER2.0 - 03032013PRINTED IN CHINA20