User Manual 4x4 HDMI matrix Switch with 4 x CAT5 ... - Atlona
User Manual 4x4 HDMI matrix Switch with 4 x CAT5 ... - Atlona
User Manual 4x4 HDMI matrix Switch with 4 x CAT5 ... - Atlona

You also want an ePaper? Increase the reach of your titles
YUMPU automatically turns print PDFs into web optimized ePapers that Google loves.
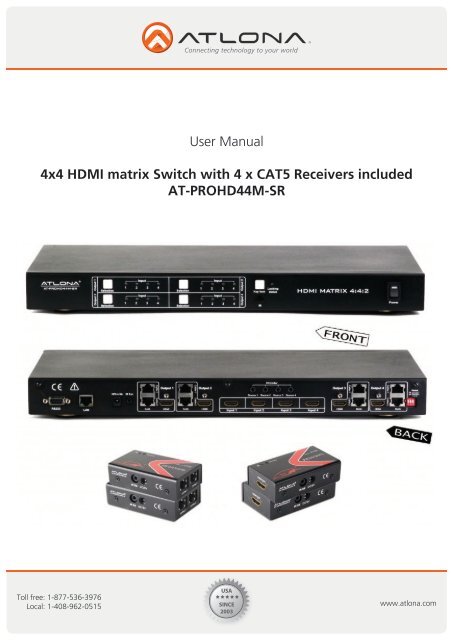
<strong>User</strong> <strong>Manual</strong><strong>4x4</strong> <strong>HDMI</strong> <strong>matrix</strong> <strong>Switch</strong> <strong>with</strong> 4 x <strong>CAT5</strong> Receivers includedAT-PROHD44M-SRToll free: 1-877-536-3976Local: 1-408-962-0515www.atlona.com
TABLE OF CONTENTS1. Introduction .................................................. 22. Package Contents .................................................. 23. Features .................................................. 34. Specification .................................................. 35. Panel Description .................................................. 45.1 Main Unit .................................................. 45.1.1. Front Panel .................................................. 45.1.2. Rear Panel .................................................. 45.2 <strong>HDMI</strong> Receiver .................................................. 56. Connect and Operation .................................................. 57. IR Remote Control .................................................. 87.1. RS232 Control .................................................. 87.2. RS232 Cable Wiring .................................................. 88. F.A.Q. .................................................. 109. Safety Information .................................................. 1110. Warranty .................................................. 1211. <strong>Atlona</strong> Product Registration .................................................. 13Toll free: 1-877-536-3976Local: 1-408-962-05151 www.atlona.com
FEATURES• <strong>HDMI</strong> 1.3b, HDCP and EDID compatible• 4 x <strong>CAT5</strong>/6/7 receivers are included• Allows up to four <strong>HDMI</strong> sources to be independently switched to eight <strong>HDMI</strong> outputs, where each outputis featured <strong>with</strong> <strong>HDMI</strong> and Twisted pair connections and both are active at the same time.• The four outputs could show the same or different source simultaneously• Supports high definition resolutions up to 1920x1200 or 1080p• Supports all latest <strong>HDMI</strong> audio formats including Dolby TrueHD and DTS-HD• <strong>Switch</strong>er is featured <strong>with</strong> IR call back function which allows each remote location to send IR signal though• <strong>CAT5</strong>/6/7 receivers back to the switch and further down to the nearby sources.• Each <strong>CAT5</strong>/6/7 output can go up to 165ft @ 1080p on <strong>CAT5</strong>/6 cables and up to 250ft @ 1080p on theCAT7 cable (tested <strong>with</strong> Tyco wire). If more distance is required, <strong>Atlona</strong> offers <strong>CAT5</strong>/6/7 repeater(AT-PROHD-RP) unit which can double the distance and allow chain up to 6 units.• Each input and output port is able to support <strong>HDMI</strong> or DVI signal. For DVI signal adapter will be required.• Five switching modes: panel buttons, local IR, IR call back from remote locations, RS485 and TCP/IP.• Rack Mountable, comes <strong>with</strong> 19-inch Rack-Ears (1U)SPECIFICATIONSOperating Temperature Range-5 to +35°C (-41 to +95 °F)Operating Humidity Range5 to 90 % RH (no condensation)Input Video Signal0.5-1.0 volts p-pInput DDC Signal12v (main unit) and 5v (receivers)Video Format SupportedHDTV: 480p/576p/720p/1080i/1080p (50/60Hz)Computer: up to 1920x1200Audio Format SupportedAll latest <strong>HDMI</strong> audio formats including Dolby TrueHD andDTS-HD<strong>HDMI</strong> Standard <strong>HDMI</strong> 1.3cMaximum Output Distance (HDM out) 55ft (16m)Maximum Output Distance RJ45 outputs 165ft (50m) @ 1080p on <strong>CAT5</strong>/6 cables andUp to 250ft (80m) @ 1080p on the CAT7 cable(Tested <strong>with</strong> Tyco wire)Power Consumption30wtts (Max)Dimensions (inch)17.3’’L×7.9’’W×1.7’’H – 1UMain Unit Weight/Receiver6.5LB/0.3LBToll free: 1-877-536-3976Local: 1-408-962-05153 www.atlona.com
PANEL DESCRIPTIONMain Unit1. Front Panel31 24 51. Output selection and indicator of input for outputs 1 to 4.2. IR sensor for controlling the switch.3. Key lock button, to lock the front panel buttons (it will not lock the power button).4. Indicator of locking status: when the output selection buttons are locked, LED will illuminate.5. ON/OFF switch.2. Rear Panel84 5 6 7 1 2 3 91. Outputs 1- 2 via <strong>HDMI</strong> and RJ45.2. <strong>HDMI</strong> Inputs 1 - 4.3. Outputs 3 - 4 via <strong>HDMI</strong> and RJ45.4. RS485 port – comes <strong>with</strong> RS485 to RS232 adapter.5. TCP/IP port.6. 12v DC input.7. IR extension for controlling the switcher from further away.8. IR port for controlling devices located near the switch.9. DIP <strong>Switch</strong> SelectionNote: The TCP/IP port has to be connected to the computer via direct Crosswire <strong>CAT5</strong>/6/7 wire while if connectedto the router it needs to be connected though Straight wire.Toll free: 1-877-536-3976Local: 1-408-962-05154 www.atlona.com
<strong>HDMI</strong> Receiver (4 x Receivers included)RJ45 inputs – please be careful when connecting RJ45 # 1 and # 2 inputs. They absolutely have to match theoutputs on the switch. Output # 1 should be connected to Input # 1 and Output # 2 should be connected toInputs # 2.CONNECTION AND OPERATION1. Connect the <strong>HDMI</strong> input sources (such as HD-DVD, PS3, AppleTV, DirecTV etc) into the inputs on AT-PROHD0408M-SR.2. Connect the <strong>HDMI</strong> outputs from AT-PROHD0408M-SR (such as LCD, Plasma, LED, Projector, Monitor)3. Power on the input source you want to show. (Keep the unused input power off, otherwise it may interfere<strong>with</strong> the normal display.)4. Use IR remote, front panel, RS232, TCP/IP or RS485 connections to choose desired input source.5. IR calls back from remote locations allows controlling the <strong>matrix</strong> switch as well as nearby sources (such asDVD, AppleTV, Satellite, Cable and etc…).Note: To enable the function: press the output2 selection button and the key lock button at the sametime for about 3 seconds. After all the output1 LEDs and the output2 LEDs flash once, the function isenabled.*Disable the function: press the output2 selection button and the key lock button at the same time forabout 3 seconds. After all the output1 LEDS and the output2 LEDS flash twice, the function is disabled.6. Instruction on IR Emitter.The sequence of “IR1, IR2, IR3, IR4” one-to-one correspond <strong>with</strong> “<strong>HDMI</strong> INPUTS1 through 4”. When anoutput chooses certain input, the call-back IR signal of RJ45 on this output will choose the corresponding“IR” port to send the signal out.For example, OUTPUT1 chooses INPUT3, then the call-back IR signal of RJ45 on OUTPUT1 will choose “IR3” to send the signal out.Toll free: 1-877-536-3976Local: 1-408-962-05155 www.atlona.com
Note: For better functionality of the IR, we suggest to place the IR receiver Eye at the IR Eye of the controllingsource.8. EDID Settings (PLEASE READ, IT IS VERY IMPORTANT):The functionality of the switch will depend on how you select the DIP <strong>Switch</strong>es below. Please read the instructionsand explanations below to understand the purpose of different configurations.There are four DIP switches on the back of the <strong>4x4</strong> <strong>matrix</strong> switcher. Below you will find the definition of eachone of the dip switches.Position IDEDID Operational Mode1 2 3OFF OFF OFF AUTO EDID MANAGEMENT (DIP # 1)OFF OFF ON Record EDID (DIP # 2)OFF ON OFF Up to 1080P <strong>with</strong> Stereo Audio (DIP#3)ON OFF OFF Up to 1080P <strong>with</strong> 5.1 Audio (DIP#4)ON OFF ON Up to 1080P <strong>with</strong> 7.1 Audio (DIP#5)OFF ON ON Up to 1080i <strong>with</strong> Stereo Audio (DIP#6)Note: 1 – ON and 0 – OFFToll free: 1-877-536-3976Local: 1-408-962-05156 www.atlona.com
EACH TIME DIP SWITCHES ARE CHANGED; THE ATLONA SWITCH HAS TO POWER CYCLED.DIP#1: Auto EDID Management (ADM) is a smart function which will allow users to have <strong>matrix</strong> switch figure out thebest and most appropriate EDID.The way it works: <strong>Atlona</strong> 8x8 <strong>matrix</strong> acquires EDID from all the outputs and after processing it, chooses the EDID whichwill work on all the outputs.Example # 1: <strong>User</strong> has 8 outputs connected where 6 of the outputs are 1080P TV’s only and the other 2 locations are720P TV’s. The <strong>Atlona</strong>’s EDID would be 720P <strong>with</strong> 2-channel Stereo (because most TV’s will only be able to take stereoaudio though <strong>HDMI</strong> input).Example # 2: <strong>User</strong> has 8 outputs connected, where 6 outputs are 1080P TV’s and the remaining are 2 x SurroundSound Receivers (after connected to the TV’s for video only). The <strong>Atlona</strong>’s EDID would be 1080P <strong>with</strong> Stereo or PCM(because most TV’s will only take Stereo Audio though <strong>HDMI</strong> input).DIP#2: Record EDID from output port to the input port. Select the output you would like to record the EDID from andselect the input you would like to record it to. Press and hold the output you wish to record the data from for # 4seconds; the data will be recorded to the input pointed at the output you were holding. For example, when input # 1is going to output # 3, after pressing and holding the Output # 3 button for 4 seconds, switch will record EDID fromoutput # 3 to input # 1.DIP#3: <strong>Atlona</strong> <strong>Switch</strong>er has a few built-in EDID modes; this mode is for resolutions up to 1080P <strong>with</strong> StereoAudio.DIP#4: <strong>Atlona</strong> <strong>Switch</strong>er has a few built-in EDID modes; this mode is for resolutions up to 1080P <strong>with</strong> 5.1 Digital Audio.This mode is designed for applications where user has AV Receivers in each remote location which are able toaccept Digital Audio from <strong>HDMI</strong> inputs. If this mode is selected and in even one of the locations user has a TV <strong>with</strong>outan AV receiver, the TV might “mute” or start outputting garbled audio (because most TV’s don’t support digital audiothough <strong>HDMI</strong> input)DIP#5: <strong>Atlona</strong> <strong>Switch</strong>er has a few built-in EDID modes; this mode is for resolutions up to 1080P <strong>with</strong> 7.1 Digital Audio.This mode is designed for applications where user has AV Receivers in each remote location which are able toaccept Digital Audio from <strong>HDMI</strong> inputs. If this mode is selected and in even one of the locations user has a TV <strong>with</strong>outan AV receiver, the TV might “mute” or start outputting garbled audio (because most TV’s don’t support digital audiothough <strong>HDMI</strong> input)DIP#6: <strong>Atlona</strong> <strong>Switch</strong>er has a few built-in EDID modes; this mode is for resolutions up to 1080i <strong>with</strong> Stereo Audio.VERY IMPORTANT:If one of your Output devices is a projector or a display <strong>with</strong> a unique resolution your sources/sourcewhich are/is connected to the switch might not send out a proper video format which will result image tointermit or signal not show up on the display.Solution: Make sure your DIP switch configuration is either DIP # 2. Route the device in question to theoutput in question. Press and hold the output you wish to record the data from for # 4 seconds; the datawill be recorded to the input pointed at the output you were holding. For example, when input # 1 is goingto output # 3, after pressing and holding the Output # 3 button for 4 seconds, switch will record EDIDfrom output # 3 to input # 1Resetting back to Default: Select DIP combination # 3 and power cycle the switchToll free: 1-877-536-3976Local: 1-408-962-05157 www.atlona.com
IR REMOTE CONTROLThe AT-PROHD44M-SR comes <strong>with</strong> 16 button IR remote control, which couldbe used to control the switcher when pointing at it or controlling the switcherfrom a remote location by pointing the remote control to the IR Eye connectedto the <strong>HDMI</strong> receiver.For users who would like to use a 3rd part IR remote control or IR remotesystem, we recommend either learning IR codes off the remote or copying andpasting the IR HEX code into the remote control software. The file <strong>with</strong> HEXcodes could be found on <strong>Atlona</strong> website under downloads for AT-PROHD44M-SR.There are 2 scenarios which codes to use:• <strong>User</strong> will need to learn all 64 x codes in order to control each location whenpointing at the switcher• <strong>User</strong> will only need to learn 8 x codes if there will be a separate remote foreach remote locationNote: The switcher can only accept and route IR signal which doesn’t exceed 38KHz. In other words, if you are trying to send IR signal from the remote location though out <strong>HDMI</strong> receiverand the IR signal is higher than 38 KHz, the IR signal will not pass though.VERY IMPORTANT:When connecting IR receivers and IR emitters, be very careful as if they are reversed the IR Eye will burn-outand also may damage the IR module inside of the switch and Receiver.TX – Connects to the <strong>Switch</strong>RX – Connects to the <strong>HDMI</strong> ReceiversRS232 Control:Baud Rate: 9600 bpsData bits: 8 bitsParity: NoneStop bits: 1 bitFlow control: NoneToll free: 1-877-536-3976Local: 1-408-962-05158 www.atlona.com
CONNECTION AND OPERATIONRS232 Cable Wiring:AT-PROHD44M-SRControllerPin Definition Pin Definition1 NC 1 NC2 Tx 2 Rx3 Rx 3 Tx4 NC 4 NC5 GND 5 GND6 NC 6 NC7 NC 7 NC8 NC 8 NC9 NC 9 NCNote: ‘’ is carriage return.OUTPUT COMMAND ACTION< cir 57 Output 1 select Input previous> cir 41 Output 1 select Input nextcir 09 Output 1 select Input 1Output 1cir 1D Output 1 select Input 2cir 1F Output 1 select Input 3cir 0D Output 1 select Input 4< cir 63 Output 2 select Input previous> cir 62 Output 2 select Input nextcir 19Output 2 select Input1Output 2cir 1BOutput 2 select Input2cir 11Output 2 select Input3cir 15Output 2 select Input4< cir 65 Output 3 select Input previous> cir 64 Output 3 select Input nextcir 17Output 3 select Input1Output 3cir 12Output 3 select Input2cir 59Output 3 select Input3cir 08Output 3 select Input4< cir 67 Output 4 select Input previous> cir 66 Output 4 select Input nextcir 50Output 4 select Input1Output 4cir 55Output 4 select Input2cir 48Output 4 select Input3cir 4AOutput 4 select Input4Toll free: 1-877-536-3976Local: 1-408-962-05159 www.atlona.com
F.A.Q.1. Question: Some of my sources are not <strong>HDMI</strong>, how can I have them all routed though this switch?Answer: <strong>Atlona</strong> offers a wide range of scalers and converters for converting: Composite, S-Video,Component, VGA, DVI, HDSDI to <strong>HDMI</strong>2. Question: What type of cable do you suggest I use for connecting the <strong>matrix</strong> switch to the <strong>HDMI</strong>receiver?Answer: CAT7 would be the best, then CAT6, and then <strong>CAT5</strong>e and the last would be <strong>CAT5</strong>3. Question: How do I terminate the RJ45 cable?Answer: We strongly suggest terminating your RJ45 cables 568B for the best performance4. Question: On one of the TV’s the signal is going in and out; however it is able to support as high ofresolutions as other TV’sAnswer:a) We recommend illuminating RJ45 wall plates and patch panels and connect the output of the switchdirectly <strong>with</strong> the receiver.b) Also, we suggest checking the termination of the wire <strong>with</strong> RJ45 tested, all 8 wires have to work.c) <strong>HDMI</strong> receiver is not plugged in to the power outlet.d) Try another input on the TV.5. Question: The audio which comes into the Audio receiver is only Stereo or PCMAnswer: Please check EDID dip switch configuration page, as it fully explains the audio works6. Question: I have a universal remote control and I would like to program this switcher into it.Answer: Under the download page on <strong>Atlona</strong> website you would be able to find IR codes in HEX formatwhich you use to program your remote control or you can also learn the commands.7. Question: When using local <strong>HDMI</strong> outputs the signal is going in and out; however when connectingdisplays though <strong>CAT5</strong> receivers everything is fine.Answer: Our switcher has priority set on <strong>CAT5</strong> outputs and some sources require priority to be changedin order to work properly. Please contact <strong>Atlona</strong> tech support to obtain software which will allow you tounlock the priority and change it to <strong>HDMI</strong> outputs.Toll free: 1-877-536-3976Local: 1-408-962-051510 www.atlona.com
SAFETY INFORMATIONSafeguardsPrecautionsTo reduce the risk of electric shock, do notexpose this product to rain or moistureIf the wall plug does not fit into your localpower socket, hire an electrician to replaceyour obsolete socket.Do not modify the wall plug. Doing so willvoid the warranty and safety features.This equipment should be installed nearthe socket outlet and the device shouldbe easily accessible in the case it requiresdisconnection.FCC regulations state that any unauthorized changes or modifications to this equipment, not expresslyapproved by the manufacturer, could void the user’s authority to operate this equipment.Operate this product using only the included external power supply. Use of other power supplies could impairperformance, damage the product, or cause fires.In the event of an electrostatic discharge this device may automatically turn off. If this occurs, unplug the deviceand plug it back in.Protect and route power cords so they will not be stepped on or pinched by anything placed on or againstthem. Be especially careful of plug-ins or cord exit points from this product.Avoid excessive humidity, sudden temperature changes or temperature extremes.Keep this product away from wet locations such as bathtubs, sinks, laundries, wet basements, fish tanks, andswimming pools.Use only accessories recommended by <strong>Atlona</strong> to avoid fire, shock, or other hazards.Unplug the product before cleaning. Use a damp cloth for cleaning and not cleaning fluid or aerosols.Such products could enter the unit and cause damage, fire, or electric shock. Some substances may alsomar the finish of the product.Never open, remove unit panels, or make any adjustments not described in this manual. Attempting todo so could expose you to dangerous electrical shock or other hazards. It may also cause damage to yourAT-PROHD44M-SR. Opening the product will void the warranty.Do not attempt to service the unit. Disconnect the product and contact your authorized <strong>Atlona</strong> reseller orcontact <strong>Atlona</strong> directly.Toll free: 1-877-536-3976Local: 1-408-962-051511 www.atlona.com
WARRANTYLimited Warranty<strong>Atlona</strong> Technologies warrants that (a) its products (the AT-PROHD44M-SR) will performsubstantially in accordance <strong>with</strong> the accompanying written materials for a period of 3 years fromthe date of receipt and (b) that the product will be free from defects in materials and workmanshipunder normal use and service for a period of 3 years. In the event applicable law imposes anyimplied warranties, the implied warranty period is limited to 3 years from the date of receipt. Somejurisdictions do not allow such limitations on duration of an implied warranty, so the above limitationmay not apply to customers that fall <strong>with</strong>in those areas.Customer Remedies<strong>Atlona</strong> Technologies’ and its suppliers’ entire liability and Customer’s exclusive remedy shallbe, at <strong>Atlona</strong> Technologies’ decision, either return of the price paid for the product, repair, orreplacement of the product that does not meet this Limited Warranty and which is returned to <strong>Atlona</strong>Technologies <strong>with</strong> a copy of the Customer’s receipt. This Limited Warranty is void if failure of theproduct has resulted from accident, abuse, misapplication, or natural occurrence. In example but notlimited to: power surges (electrical storms, local power outage), dropping the product (or items onthe product), contact <strong>with</strong> fluids, and physical misconduct (i.e. kicking or punching). Any replacementproduct will be warranted for the remainder of the original warranty period.No other warrantiesTo the maximum extent permitted by applicable law, <strong>Atlona</strong> Technologies and its suppliersdisclaim all other warranties, either expressed or implied, including, but not limited to, impliedwarranties of merchantability and fitness for a particular purpose, <strong>with</strong> regard to the product and anyrelated written materials. This Limited Warranty gives customer specific legal rights. Customers mayhave other rights depending on the jurisdiction.No liability for damagesTo the maximum extent permitted by applicable law, in no event shall <strong>Atlona</strong> Technologies orits suppliers be liable for any damages arising out of the use of or inability to use this product, evenif <strong>Atlona</strong> Technologies has been advised of the possibility of such damages. Such damages includebut are not limited to: special, incidental, consequential, or indirect damages for personal injury, lossof business profits, business interruption, loss of business information, or any other pecuniary loss.<strong>Atlona</strong> Technologies’ and its suppliers’ entire liability under any provision of this agreement shallbe limited to the amount actually paid by you for the product. Some Jurisdictions do not allow theexclusion or limitation of liability for consequential or incidental damage. The above limitations maynot apply to you in such jurisdictional cases.Toll free: 1-877-536-3976Local: 1-408-962-051512 www.atlona.com
ATLONA PRODUCT REGISTRATIONThank you for purchasing this <strong>Atlona</strong> product. - We hope you enjoy it and will take an extra fewmoments to register your new purchase.Registration creates an ownership record if your product is lost or stolen and helps ensure you’llreceive notification of performance issues and firmware updates.At <strong>Atlona</strong>, we respect and protect your privacy, assuring you that your registration informationis completely secure. <strong>Atlona</strong> product registration is completely voluntary and failure to register will notdiminish your limited warranty rights.To register go to: http://www.atlona.com/registrationToll free: 1-877-536-3976Local: 1-408-962-051513 www.atlona.com