Flystick-3_QuickGuid.. - Schneider Digital
Flystick-3_QuickGuid.. - Schneider Digital
Flystick-3_QuickGuid.. - Schneider Digital
- No tags were found...

Create successful ePaper yourself
Turn your PDF publications into a flip-book with our unique Google optimized e-Paper software.
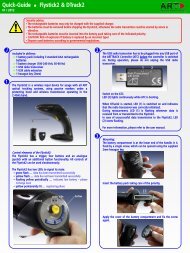
Quick-Guide <strong>Flystick</strong>3 & DTrack25When using the <strong>Flystick</strong>3 with active target, the modulated flashhas to be activated in “Settings” → “Cameras” → “Advanced”for one camera. This camera has to be in syncgroup #1.<strong>Flystick</strong> configuration:Select “Settings” → “<strong>Flystick</strong>” and the configuration window isopened. Define the desired number of <strong>Flystick</strong>s to be used.7Body calibration:If the <strong>Flystick</strong>3 has been recognized correctly in step 4 pleaseselect “Calibration” → “Body”.In the appearing dialogue, the body to be selected is named“<strong>Flystick</strong> body 01”. Please define the orientation of the bodycoordinate system relative to the body (default setting is due tobody). Make sure that all markers (depending on the target: fouror five) of the <strong>Flystick</strong>3 are seen by the cameras using the“Monitor 2DOF” view which appears in the background.You have to assign your <strong>Flystick</strong>3 to a '<strong>Flystick</strong> ID' by selecting'F1' and selecting your <strong>Flystick</strong>3 out of the “available <strong>Flystick</strong>s”list.If the list “available <strong>Flystick</strong>s” doesn't contain your <strong>Flystick</strong>3(represented by its serial number) although it is already present,just press a button of the <strong>Flystick</strong>3 to register it at the radiotransceiver. Press “Select” and “OK”.Press “Calibrate” → the calibration starts within 5 seconds.➢ NOTE: The radio transmission and the active target areswitched off after 15 minutes without usage. Press any buttonto reactivate the <strong>Flystick</strong>3 and, therefore, tracking.Depending on the ATC, there are two <strong>Flystick</strong>1 entries in the list“available <strong>Flystick</strong>s“, even if no <strong>Flystick</strong>1 is present in thevolume. This is due to the fact that the <strong>Flystick</strong>1 connects viaserial COM-port which cannot be polled automatically. If you areusing a <strong>Flystick</strong>1 please refer to the <strong>Flystick</strong>1 manual.8Display Data:During DTrack measurement the 6DOF results of the tracked<strong>Flystick</strong>3 are listed among the other calibrated bodies in theDisplay Data window.Select “Display” → “<strong>Flystick</strong>” to see which <strong>Flystick</strong>3 buttons arecurrently pressed by the user.These are indicated by blue fields in the corresponding column.The <strong>Flystick</strong>3 with active target emits IR flashes either in onesingle, two or three sync groups (adjustable) depending on yoursetup. Depending on the distance (close / far) between <strong>Flystick</strong>3and cameras the flash intensity (1 / 4) of the <strong>Flystick</strong>3 target isadjustable. The highest flash intensity results in higher powerconsumption.Ticking the checkbox “use 6DOF filter” applies a filter to themeasurement data in order to remove the jitter of the positionmeasurement. If your application has been configured to use theoutput format of the <strong>Flystick</strong>1, you can simply tick the checkbox“use old output format” in order to be compatible. Using theold output format will automatically change the analoguejoystick to digital.9Output settings:In DTrack2, select “Settings“ → “Output“. You can either select“this computer” (remote PC) or enter an IP address of thecomputer you want to send data to.Please make sure that the checkbox for <strong>Flystick</strong> data is ticked.Otherwise, the data will not be transmitted.Press “Start” to start measurement.For more details on the <strong>Flystick</strong>3, please refer to the manual.6MultiUser option (if more than one <strong>Flystick</strong> is used):The MultiUser option is an enhancement especially for VR / ARapplications when working with more than one <strong>Flystick</strong>. Up toten users can be equipped with a <strong>Flystick</strong> and a head target(usually mounted on glasses). The software DTrack2 tracks themall, but only transmits the data pair (<strong>Flystick</strong> and head body) ofone user. Switching between the single users can be done by justpressing one of the <strong>Flystick</strong> buttons.The MultiUser option is available as additional license forDTrack2 if two or more (max. 10) <strong>Flystick</strong>s are participating inthe entire tracking system.iPlease refer to the user manual for a more detailed descriptionof the ART tracking system. If you need further assistance pleasedo not hesitate to contact our support:ART GmbH +49 (0)881-92530-00http://www.ar-tracking.de© Copyright 2012 ART GmbH