Physical to Virtual Process - Spiceworks Community
Physical to Virtual Process - Spiceworks Community
Physical to Virtual Process - Spiceworks Community

You also want an ePaper? Increase the reach of your titles
YUMPU automatically turns print PDFs into web optimized ePapers that Google loves.
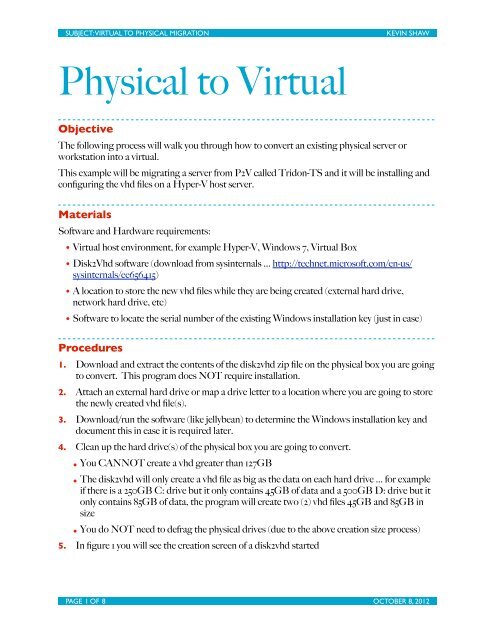
SUBJECT: VIRTUAL TO PHYSICAL MIGRATION KEVIN SHAW<strong>Physical</strong> <strong>to</strong> <strong>Virtual</strong>ObjectiveThe following process will walk you through how <strong>to</strong> convert an existing physical server orworkstation in<strong>to</strong> a virtual.This example will be migrating a server from P2V called Tridon-TS and it will be installing andconfiguring the vhd files on a Hyper-V host server.MaterialsSoftware and Hardware requirements:• <strong>Virtual</strong> host environment, for example Hyper-V, Windows 7, <strong>Virtual</strong> Box• Disk2Vhd software (download from sysinternals ... http://technet.microsoft.com/en-us/sysinternals/ee656415)• A location <strong>to</strong> s<strong>to</strong>re the new vhd files while they are being created (external hard drive,network hard drive, etc)• Software <strong>to</strong> locate the serial number of the existing Windows installation key (just in case)Procedures1. Download and extract the contents of the disk2vhd zip file on the physical box you are going<strong>to</strong> convert. This program does NOT require installation.2. Attach an external hard drive or map a drive letter <strong>to</strong> a location where you are going <strong>to</strong> s<strong>to</strong>rethe newly created vhd file(s).3. Download/run the software (like jellybean) <strong>to</strong> determine the Windows installation key anddocument this in case it is required later.4. Clean up the hard drive(s) of the physical box you are going <strong>to</strong> convert.• You CANNOT create a vhd greater than 127GB• The disk2vhd will only create a vhd file as big as the data on each hard drive ... for exampleif there is a 250GB C: drive but it only contains 45GB of data and a 500GB D: drive but i<strong>to</strong>nly contains 85GB of data, the program will create two (2) vhd files 45GB and 85GB insize• You do NOT need <strong>to</strong> defrag the physical drives (due <strong>to</strong> the above creation size process)5. In figure 1 you will see the creation screen of a disk2vhd startedPAGE 1 OF 8 OCTOBER 8, 2012
SUBJECT: VIRTUAL TO PHYSICAL MIGRATION KEVIN SHAWFigure 16. You will see that there is two (2) hard drives being created and it is going <strong>to</strong> s<strong>to</strong>re them in theW:\Tridon-TS\ folder7. One file will be called Tridon-TS-0 and the other will be called Tridon-TS-18. While the above process is completing you can start <strong>to</strong> prepare the new vhd environment onyour virtual host (you need the files <strong>to</strong> complete the preparation process).9. Create the appropriate folder on the Hyper-V host ... eg. D:\<strong>Virtual</strong> Hard Disks\Tridon-TS10. Once the Disk2vhd is completed creating the virtual drive(s) you can continue.11. Copy the vhd file(s) in<strong>to</strong> the D:\<strong>Virtual</strong> Hard Disks\Tridon-TS folder on the Hyper-V host12. Create your virtual environment in Hyper-V (do not create new hard drives, instead add thetwo hard drives) ... see figure 2PAGE 2 OF 8 OCTOBER 8, 2012
SUBJECT: VIRTUAL TO PHYSICAL MIGRATION KEVIN SHAWFigure 213. Figures 3-5 you will show the second drive being added.Figure 3PAGE 3 OF 8 OCTOBER 8, 2012
SUBJECT: VIRTUAL TO PHYSICAL MIGRATION KEVIN SHAW14. Figure 4 shows where you select the controller on the left side and then select “Hard Drive”in the right hand window so that you can add the next hard drive.Figure 415. Figure 5 shows the second added hard drive.Figure 5PAGE 4 OF 8 OCTOBER 8, 2012
SUBJECT: VIRTUAL TO PHYSICAL MIGRATION KEVIN SHAW16. Figure 6 shows where you select the DVD drive in the left windowFigure 617. Figure 7 shows where you add D:\Windows\system32\vmguest.iso <strong>to</strong> the image file for theDVD drive. It is important <strong>to</strong> note that I always end up adding this <strong>to</strong> the “Media” menu inorder for it <strong>to</strong> start the integrated services installation properly.Figure 7PAGE 5 OF 8 OCTOBER 8, 2012
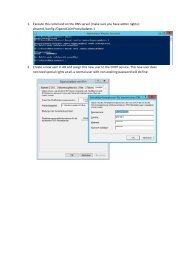
SUBJECT: VIRTUAL TO PHYSICAL MIGRATION KEVIN SHAW18. Once you have created the environment it is now time <strong>to</strong> boot the OS. It is important <strong>to</strong>realize the following things:• When it first starts <strong>to</strong> boot you will have <strong>to</strong> quickly select the option <strong>to</strong> “Connect” <strong>to</strong> therunning server• You will have <strong>to</strong> change the boot option from “Disk2vhd Windows Server 2003, Standard”<strong>to</strong> “Windows Server 2003, Standard” (you have 3 seconds <strong>to</strong> do this in or you will have <strong>to</strong>reboot the virtual and try again)• See Figure 8Figure 819. After the server has booted you will need <strong>to</strong> have a lot of patience.20. You will use your keyboard and arrow keys only (no mouse).21. You have <strong>to</strong> wait for it <strong>to</strong> try <strong>to</strong> activate Windows and select No using the keyboard.PAGE 6 OF 8 OCTOBER 8, 2012
SUBJECT: VIRTUAL TO PHYSICAL MIGRATION KEVIN SHAW22. To install the “integrated services” you have <strong>to</strong> select “Media” from the menu and then add D:\Windows\system32\vmguest.iso <strong>to</strong> the selection. This will eventually cause the integratedservices <strong>to</strong> start installing.23. Reboot the server as required and make sure you change the selection <strong>to</strong> “Windows Server2003, Standard”24. Sign in<strong>to</strong> the server25. Modify your nic (presuming you will have <strong>to</strong> hard code your IP)26. Reboot the server and make sure you change the selection <strong>to</strong> “Windows Server 2003,Standard”27. Sign in<strong>to</strong> the server28. Right click “My Computer” -> “Properties”, select the “advanced” tab, in the “Startup andRecovery” section, click on Settings then in the “default operating system” pull downselection pick “Windows Server 2003, Standard”. This will cause it <strong>to</strong> boot in<strong>to</strong> the rightmode and you will not have <strong>to</strong> manually select it each time on server start up. See figures 9and 10Figure 9Figure 10PAGE 7 OF 8 OCTOBER 8, 2012
SUBJECT: VIRTUAL TO PHYSICAL MIGRATION KEVIN SHAW29. Reboot, sign in and activate Windows30. After activating Windows you should be able <strong>to</strong> connect via a normal RDP clientPAGE 8 OF 8 OCTOBER 8, 2012