Porteus Kiosk Edition (PKE) - Spiceworks Community
Porteus Kiosk Edition (PKE) - Spiceworks Community
Porteus Kiosk Edition (PKE) - Spiceworks Community

Create successful ePaper yourself
Turn your PDF publications into a flip-book with our unique Google optimized e-Paper software.
<strong>Porteus</strong> <strong>Kiosk</strong> <strong>Edition</strong> (<strong>PKE</strong>)Customizations Beyond the <strong>Kiosk</strong> Wizard06/24/2013Note: This document was written with <strong>PKE</strong> 2.0.4 and Linux Mint 13 (Maya) in mind. You may need to adjustthe steps to meet your needs. In Linux Mint, in order to view all of the <strong>PKE</strong> directory structure from the gui, turnon the ability to view hidden files. Also, if you want to modify a file, right click on it and select “Open asadministrator” so the file will be writeable instead of read only.11. Download the kiosk wizard with:wget http://ponce.cc/porteus/i486/packages/kiosk/porteuskioskwizardv2.0.4noarch.run2. Make the kiosk wizard executable:sudo chmod u+x porteuskioskwizardv2.0.4noarch.run3. Run the kiosk wizard to download the latest kiosk base and begin customization of <strong>PKE</strong>. With the kioskwizard you can change account passwords, change the home page, enable and download Flash, disable thenavigation bar, disable the mouse cursor, set a custom wallpaper, disable the screensaver, disable the firewall,2etc... It will also create the necessary directories in /tmp.sudo ./porteuskioskwizardv2.0.4noarch.run1http://forum.porteus.org/viewtopic.php?f=35&t=21012http://porteus.org/component/content/article/8information/generalinfo/146porteuskioskeditioninstallationcustomizationandfaq.html
== 003SETTINGS.XZM CHANGES ==31. Unsquash the 003settings.xzm file :cd /tmp/customkiosk/porteus/basesudo unsquashfs 003settings.xzm2. Make any necessary changes within the unsquashed, squashfsroot, file system.Firefox Proxy 4a. Firefox proxy settings can be changed in:/tmp/customkiosk/porteus/base/squashfsroot/home/guest/.mozilla/firefox/c3pp43bg.default/prefs.js byadding or editing the following lines. These lines should be modified for your network.user_pref("network.proxy.ftp", "proxy.example.com");user_pref("network.proxy.ftp_port", 3128);user_pref("network.proxy.http", "proxy.example.com");user_pref("network.proxy.http_port", 3128);user_pref("network.proxy.no_proxies_on", "localhost, 127.0.0.1");user_pref("network.proxy.share_proxy_settings", true);user_pref("network.proxy.ssl", "proxy.example.com");user_pref("network.proxy.ssl_port", 3128);user_pref("network.proxy.type", 1);Firewallb. Firewall settings can be changed in:/tmp/customkiosk/porteus/base/squashfsroot/etc/rc.d/rc.FireWallFor example, adding the bolded item below, allows the <strong>PKE</strong> firewall to access a local proxy serveron tcp port 3128.# Restrict outgoing traffic to DNS/ftp/http/https ports only:iptables A OUTPUT p udp dport 53 m state state NEW,ESTABLISHED j ACCEPTiptables A OUTPUT p tcp dport 21 m state state NEW,ESTABLISHED j ACCEPTiptables A OUTPUT p tcp dport 80 m state state NEW,ESTABLISHED j ACCEPTiptables A OUTPUT p tcp dport 443 m state state NEW,ESTABLISHED j ACCEPTiptables A OUTPUT p tcp dport 3128 m state state NEW,ESTABLISHED j ACCEPTc. You can completely disable the <strong>PKE</strong> firewall in:/tmp/customkiosk/porteus/base/squashfsroot/etc/rc.d/rc.M by placing a # in front of the following line:[ x /etc/rc.d/rc.FireWall ] && sh /etc/rc.d/rc.FireWall &3http://forum.porteus.org/viewtopic.php?f=102&t=17414I’ve tried putting the Firefox proxy settings in the rootcopy directory, but it didn’t work. The settings get overwritten. :(
5You can also disable the firewall by making the file nonexecutable using this command :sudo chmod x /tmp/customkiosk/porteus/base/squashfsroot/etc/rc.d/rc.FireWallAlso, the ability to disable the firewall has been reenabled into the kiosk wizard. 6Disable Mouse Cursor For Touchscreen Implementationsd. This option is now included in the kiosk wizard, however, it is nice to know it is accomplished byadding the nocursor option to the startx line in /usr/bin/xdm of the squashed 003settings.xzm file. 7This solution was obtained from noah.org.while [ 1 ]; dosu c "/usr/bin/startx nocursor vt7 > /dev/null 2>&1"doneOther Customizationse. Other customizations can be made in:/tmp/customkiosk/porteus/base/squashfsroot/etc/rc.d/rc.MWallpaperf. The wallpaper is stored in:/tmp/customkiosk/porteus/rootcopy/usr/share/wallpapers as default.jpg.For additional ways to customize <strong>PKE</strong>, consult [HOWTO] USE THE ROOTCOPY DIRECTORY.3. Delete previous 003settings.xzm file:cd /tmp/customkiosk/porteus/basesudo rm r 003settings.xzm4. Create new squashed 003settings.xzm file:sudo mksquashfs squashfsroot 003settings.xzm b 256K noappend5. Remove squashfsroot directory:sudo rm r squashfsroot5http://forum.porteus.org/viewtopic.php?f=102&t=2058&p=14164#p141646http://forum.porteus.org/viewtopic.php?f=35&t=21017http://forum.porteus.org/viewtopic.php?f=102&t=2048
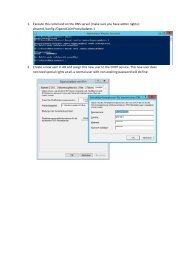
== TOUCHSCREEN CALIBRATION ==1. Touch Screen Calibrations 8a. Refer to this website for more information: The Fan Clubi. On the hardware that will be deployed as the <strong>PKE</strong> kiosk, boot to an Ubuntu 12.04 Desktop liveCD and select “Try Ubuntu”.ii. Set proxy servers if needed System Settings, Network, Network Proxy or in /etc/apt/apt.confand /etc/wgetrc.iii. Start the Ubuntu Software Center and search for calibrate. The Calibrate Touchscreenapplication should appear. Double click on it to install it.iv. You will be prompted with a “Available from the “universe” source. Click “Use This Source”or enable the “universe” source in /etc/apt/sources.list.v. Close the Ubuntu Software Center.vi. Click on the Dash home and type in terminal to open a terminal session.vii. In terminal, type sudo aptget updateviii. Start the Ubuntu Software Center again and search for calibrate. The CalibrateTouchscreen application should appear. Click on it and select Install. After the installation hascompleted, the Calibrate Touchscreen application will appear in the dash bar as a “?”.ix. Start the Calibrate Touchscreen utility and press each of the four touchpoints.x. The utility will open a terminal window. You are interested in two lines. The one that says,“Calibrating EVDEV driver for "EloTouchSystems,Inc Elo TouchSystems 2216 AccuTouch®USB Touchmonitor Interface" id=11” and the one that says, “Setting new calibration data:516, 3428, 3422, 665”. This information will vary based on your specific hardware and theaccuracy of your calibration.Sample output:Calibrating EVDEV driver for "EloTouchSystems,Inc Elo TouchSystems 2216 AccuTouch®USB Touchmonitor Interface" id=11current calibration values (from XInput): min_x=516, max_x=3424 and min_y=3425,max_y=671Doing dynamic recalibration:Setting new calibration data: 516, 3428, 3422, 665b. Open /tmp/customkiosk/porteus/rootcopy folder as administrator.8http://forum.porteus.org/viewtopic.php?f=102&t=2047&p=14634#p14634
c. Create the necessary directory structure and place a 99calibration.conf in/tmp/customkiosk/porteus/rootcopy/etc/X11/xorg.conf.d directory.The 99calibration.conf file should look something like this:Section "InputClass"Identifier "calibration"MatchProduct "EloTouchSystems,Inc Elo TouchSystems 2216 AccuTouch® USB Touchmonitor Interface"Option "Calibration" "516 3428 3422 665"EndSectionYou can “stack” multiple configurations into one 99calibration.conf file so that it looks something likethis:Section "InputClass"Identifier "calibration"MatchProduct "EloTouchSystems,Inc Elo TouchSystems 2216 AccuTouch® USB Touchmonitor Interface"Option "Calibration" "516 3428 3422 665"EndSectionSection "InputClass"Identifier "calibration"MatchProduct "Elo TouchSystems, Inc. Elo TouchSystems IntelliTouch 2500U"Option "Calibration" "4107 10 4156 23"EndSectionSection "InputClass"Identifier "calibration"MatchProduct "eGalax Inc. USB TouchController"Option "Calibration" "1952 103 127 1891"EndSection== CREATE THE ISO ==1. Create new ISO file:cd ..(You should now be in /tmp/customkiosk/porteus/.)sudo ./make_iso.shSelect a directory and filename for the new ISO, i.e. /tmp/porteuskiosk1.iso2. Copy the new ISO to a location so it can be tested in VirtualBox prior to burning it to CD.3. After successfully, testing the ISO in VirtualBox, burn the ISO using Brasero, K3B, or other image burningutility.== CREATE A BOOTABLE FLASH DRIVE == 91. Create a bootable flash drive:isohybrid /tmp/porteuskiosk1.isosudo dd if=/tmp/porteuskiosk1.iso of=/dev/sdx (Depends on the letter assigned to drive, i.e. sdc.)9http://forum.porteus.org/viewtopic.php?f=39&t=1577&p=10990&hilit=isohybrid#p10990