exacqVision EL Hybrid Linux NVR Appliance Quick start Guide
exacqVision EL Hybrid Linux NVR Appliance Quick start Guide
exacqVision EL Hybrid Linux NVR Appliance Quick start Guide

Create successful ePaper yourself
Turn your PDF publications into a flip-book with our unique Google optimized e-Paper software.
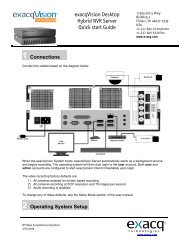
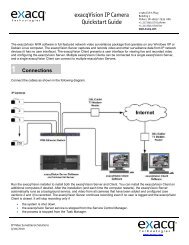
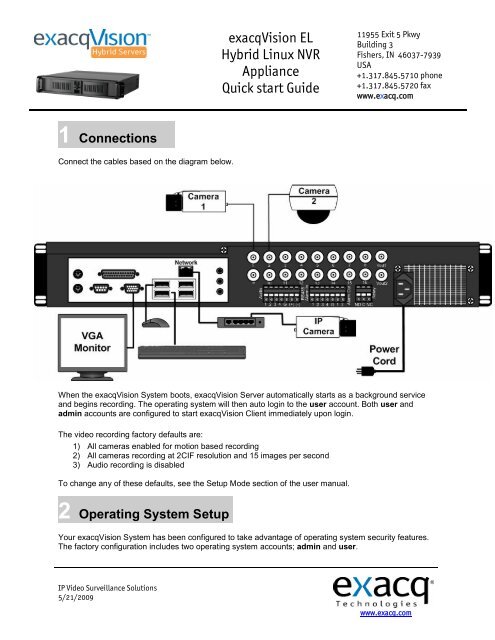
<strong>exacqVision</strong> <strong>EL</strong><strong>Hybrid</strong> <strong>Linux</strong> <strong>NVR</strong><strong>Appliance</strong><strong>Quick</strong> <strong>start</strong> <strong>Guide</strong>11955 Exit 5 PkwyBuilding 3Fishers, IN 46037-7939USA+1.317.845.5710 phone+1.317.845.5720 faxwww.exacq.com1 ConnectionsConnect the cables based on the diagram below.When the <strong>exacqVision</strong> System boots, <strong>exacqVision</strong> Server automatically <strong>start</strong>s as a background serviceand begins recording. The operating system will then auto login to the user account. Both user andadmin accounts are configured to <strong>start</strong> <strong>exacqVision</strong> Client immediately upon login.The video recording factory defaults are:1) All cameras enabled for motion based recording2) All cameras recording at 2CIF resolution and 15 images per second3) Audio recording is disabledTo change any of these defaults, see the Setup Mode section of the user manual.2 Operating System SetupYour <strong>exacqVision</strong> System has been configured to take advantage of operating system security features.The factory configuration includes two operating system accounts; admin and user.IP Video Surveillance Solutions5/21/2009www.exacq.com
NOTE: The default passwords should be changed by the operator and written and stored in a securefashion to prevent unauthorized access or modifications to the system.To change the passwords for your operating system accounts:Log off the user account by pressing the red power button in the lower left corner.Log in to the admin account. Default password is “admin256”Access the Start Menu ► System Administration ► Users & GroupsPick the account to be changed and select PropertiesUnder Set Password by hand, enter the new password twice.Select OK, and OK againOnce you successfully change the password for the admin and user accounts, write them in the spaceprovided for future reference.Default Operating System SettingsUsername: adminPassword: admin256Privileges: computer administratorUsername: userPassword: user5710Privileges: restricted userNew Operating System SettingsUsername: adminPassword: ____________________Privileges: computer administratorUsername: userPassword: ____________________Privileges: restricted userOnce the <strong>exacqVision</strong> Server begins recording video, it will continue even if no user is logged in or no<strong>exacqVision</strong> Client is running. It will stop recording only if:The <strong>exacqVision</strong> system is shut downThe <strong>exacqVision</strong> Server service is stoppedThe <strong>exacqVision</strong> core process is stoppedTo prevent this from happening inadvertently or maliciously, the ability to shut down the computer oraccess the operating controls has been restricted from the user account. To shut down the system orperform maintenance, it will be necessary to switch to the admin account.3 <strong>exacqVision</strong> User SetupThe <strong>exacqVision</strong> Server can be accessed from multiple <strong>exacqVision</strong> Clients, which may be running fromthe same computer as <strong>exacqVision</strong> Server or from remotely networked computers.Your <strong>exacqVision</strong> Server has been preconfigured with both an admin and user account:To log in to the system, see Section 2 for the log in names and passwords.Each operating system account maintains separate settings for <strong>exacqVision</strong> Client. These settingsinclude usernames, passwords, and network addresses required for the <strong>exacqVision</strong> Client to access<strong>exacqVision</strong> Servers. By default both the user and admin operating system accounts have settings whichprovide administrator access to the instance of <strong>exacqVision</strong> Server running on the local <strong>exacqVision</strong>system.NOTE: To protect the <strong>exacqVision</strong> Server, Exacq recommends that as part of the initial <strong>exacqVision</strong>Server configuration, the operator configure a new user on the <strong>exacqVision</strong> Server with RestrictedprivilegesIP Video Surveillance Solutions5/21/2009www.exacq.com
To add new users, press the Setup toolbar button. Expand the server’s setup menu by clicking the “+”next to the <strong>exacqVision</strong> Server in the tree, then select Users . Click the New User button. TheUsername field is automatically populated with “New User” and highlighted in blue to begin adding thenew user. Type in the name of the new user you are adding then tab to the Password field and enter anew password. Select the Password Confirm field and retype the password.Click the Group drop down box to select the type of assess level that will be assigned to this user. Thereare several default groups already created, and you may create a custom group if you wish.Restricted:User Admin:Power User:Access to viewing live video and searching recorded video.Access to viewing live video, searching recorded video, andadding and deleting users.Access to all features except adding or deleting users.Administrator: Access to all features of the system.Designate which cameras the user will be able to access for viewing live and recorded video in theAuthorized Sources tree, and click the Apply button to add the new user to the <strong>exacqVision</strong>Server. For more detailed instructions, see the User Setup section of the <strong>exacqVision</strong> User Manual or thecontext sensitive online help file.4 System SetupOnce the new users have been created, you’ll need to customize the <strong>exacqVision</strong> System for yourinstallation. The System Setup screen is where you set basic system parameters for the serverapplication, including the System Name, Time Zone, and IP Address Settings.IP Video Surveillance Solutions5/21/2009www.exacq.com
1) The System Name field will default to the serial number on the sticker on the side of the chassisof the system you purchased. You can keep this name or change it by typing a new name overthe serial number, but your system name must be unique.2) The Time Zone will be set as Eastern (US) time. You can change the time zone by using thedropdown menu. Use the radio buttons to indicate Daylight Savings or Standard time.3) Your <strong>exacqVision</strong> System is configured to receive an IP address dynamically via a DHCP server.To set your <strong>exacqVision</strong> System to use a static IP address, <strong>start</strong> the <strong>exacqVision</strong> Client on the<strong>exacqVision</strong> System. Go to the System Setup page and change it to static and enter the desiredIP Address. Do not change the 127.0.0.1 IP address from the Add System page. The 127.0.0.1address will always connect to the local computer, regardless of the IP address assigned by therouter or user.4) Click the Apply buttons to apply these settings to your Client application.Now, log off the operating system and log in as user. The <strong>exacqVision</strong> Client will <strong>start</strong> automatically. Goto the Add Systems menu, select the System Name from the System List, type user in the User Namefield, type and confirm the password, and click Apply. You are now logged in as the user you havecreated. When the User account logs in, it will now use this account by default.5 Network ConfigurationIf you plan to have clients from outside your local area network access your <strong>exacqVision</strong> Server, you willneed to change your router settings to forward port 22609 to the <strong>exacqVision</strong> Server’s IP address. Seeyour router user manual or go to www.portforward.com/routers.htm for instructions.IP Video Surveillance Solutions5/21/2009www.exacq.com