Manufactured by - Woodworking Tools
Manufactured by - Woodworking Tools
Manufactured by - Woodworking Tools

Create successful ePaper yourself
Turn your PDF publications into a flip-book with our unique Google optimized e-Paper software.
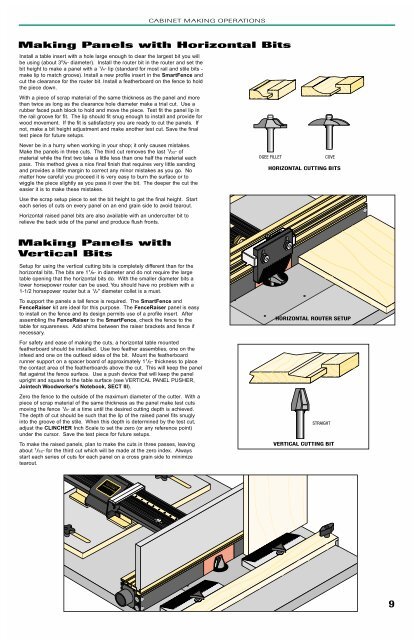
CABINET MAKING OPERATIONSMaking Panels with Horizontal BitsInstall a table insert with a hole large enough to clear the largest bit you willbe using (about 3 5 /8" diameter). Install the router bit in the router and set thebit height to make a panel with a 1 /4" lip (standard for most rail and stile bits -make lip to match groove). Install a new profile insert in the SmartFence andcut the clearance for the router bit. Install a featherboard on the fence to holdthe piece down.With a piece of scrap material of the same thickness as the panel and morethan twice as long as the clearance hole diameter make a trial cut. Use arubber faced push block to hold and move the piece. Test fit the panel lip inthe rail groove for fit. The lip should fit snug enough to install and provide forwood movement. If the fit is satisfactory you are ready to cut the panels. Ifnot, make a bit height adjustment and make another test cut. Save the finaltest piece for future setups.Never be in a hurry when working in your shop; it only causes mistakes.Make the panels in three cuts. The third cut removes the last 1 /32" ofmaterial while the first two take a little less than one half the material eachpass. This method gives a nice final finish that requires very little sandingand provides a little margin to correct any minor mistakes as you go. Nomatter how careful you proceed it is very easy to burn the surface or towiggle the piece slightly as you pass it over the bit. The deeper the cut theeasier it is to make these mistakes.Use the scrap setup piece to set the bit height to get the final height. Starteach series of cuts on every panel on an end grain side to avoid tearout.Horizontal raised panel bits are also available with an undercutter bit torelieve the back side of the panel and produce flush fronts.Making Panels withVertical BitsSetup for using the vertical cutting bits is completely different than for thehorizontal bits. The bits are 1 1 /8" in diameter and do not require the largetable opening that the horizontal bits do. With the smaller diameter bits alower horsepower router can be used. You should have no problem with a1-1/2 horsepower router but a 1 /2" diameter collet is a must.OGEE FILLETCOVEHORIZONTAL CUTTING BITSTo support the panels a tall fence is required. The SmartFence andFenceRaiser kit are ideal for this purpose. The FenceRaiser panel is easyto install on the fence and its design permits use of a profile insert. Afterassembling the FenceRaiser to the SmartFence, check the fence to thetable for squareness. Add shims between the raiser brackets and fence ifnecessary.HORIZONTAL ROUTER SETUPFor safety and ease of making the cuts, a horizontal table mountedfeatherboard should be installed. Use two feather assemblies, one on theinfeed and one on the outfeed sides of the bit. Mount the featherboardrunner support on a spacer board of approximately 1 1 /2" thickness to placethe contact area of the featherboards above the cut. This will keep the panelflat against the fence surface. Use a push device that will keep the panelupright and square to the table surface (see VERTICAL PANEL PUSHER,Jointech Woodworker's Notebook, SECT III).Zero the fence to the outside of the maximum diameter of the cutter. With apiece of scrap material of the same thickness as the panel make test cutsmoving the fence 1 /8" at a time until the desired cutting depth is achieved.The depth of cut should be such that the lip of the raised panel fits snuglyinto the groove of the stile. When this depth is determined <strong>by</strong> the test cut,adjust the CLINCHER Inch Scale to set the zero (or any reference point)under the cursor. Save the test piece for future setups.To make the raised panels, plan to make the cuts in three passes, leavingabout 1 /32" for the third cut which will be made at the zero index. Alwaysstart each series of cuts for each panel on a cross grain side to minimizetearout.STRAIGHTVERTICAL CUTTING BIT9