Manufactured by - Woodworking Tools
Manufactured by - Woodworking Tools
Manufactured by - Woodworking Tools

You also want an ePaper? Increase the reach of your titles
YUMPU automatically turns print PDFs into web optimized ePapers that Google loves.
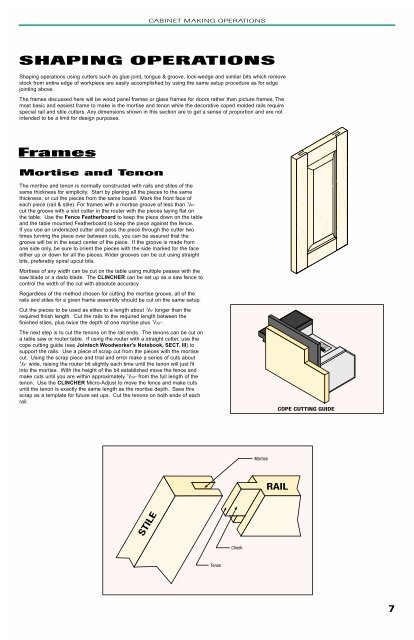
CABINET MAKING OPERATIONSSHAPING OPERATIONSShaping operations using cutters such as glue joint, tongue & groove, lock-wedge and similar bits which removestock from entire edge of workpiece are easily accomplished <strong>by</strong> using the same setup procedure as for edgejointing above.The frames discussed here will be wood panel frames or glass frames for doors rather than picture frames. Themost basic and easiest frame to make is the mortise and tenon while the decorative coped molded rails requirespecial rail and stile cutters. Any dimensions shown in this section are to get a sense of proportion and are notintended to be a limit for design purposes.FramesMortise and TenonThe mortise and tenon is normally constructed with rails and stiles of thesame thickness for simplicity. Start <strong>by</strong> planing all the pieces to the samethickness, or cut the pieces from the same board. Mark the front face ofeach piece (rail & stile). For frames with a mortise groove of less than 1 /4"cut the groove with a slot cutter in the router with the pieces laying flat onthe table. Use the Fence Featherboard to keep the piece down on the tableand the table mounted Featherboard to keep the piece against the fence.If you use an undersized cutter and pass the piece through the cutter twotimes turning the piece over between cuts, you can be assured that thegroove will be in the exact center of the piece. If the groove is made fromone side only, be sure to orient the pieces with the side marked for the faceeither up or down for all the pieces. Wider grooves can be cut using straightbits, preferably spiral upcut bits.Mortises of any width can be cut on the table using multiple passes with thesaw blade or a dado blade. The CLINCHER can be set up as a saw fence tocontrol the width of the cut with absolute accuracy.Regardless of the method chosen for cutting the mortise groove, all of therails and stiles for a given frame assembly should be cut on the same setup.Cut the pieces to be used as stiles to a length about 1 /8" longer than therequired finish length. Cut the rails to the required length between thefinished stiles, plus twice the depth of one mortise plus 1 /32".The next step is to cut the tenons on the rail ends. The tenons can be cut ona table saw or router table. If using the router with a straight cutter, use thecope cutting guide (see Jointech Woodworker's Notebook, SECT. III) tosupport the rails. Use a piece of scrap cut from the pieces with the mortisecut. Using the scrap piece and trial and error make a series of cuts about1/4" wide, raising the router bit slightly each time until the tenon will just fitinto the mortise. With the height of the bit established move the fence andmake cuts until you are within approximately 1 /32" from the full length of thetenon. Use the CLINCHER Micro-Adjust to move the fence and make cutsuntil the tenon is exactly the same length as the mortise depth. Save thisscrap as a template for future set ups. Cut the tenons on both ends of eachrail.COPE CUTTING GUIDEMortiseCheekTenon7