ADR-3000 SD Drive Manual.pdf - Peek Traffic
ADR-3000 SD Drive Manual.pdf - Peek Traffic
ADR-3000 SD Drive Manual.pdf - Peek Traffic
- No tags were found...

You also want an ePaper? Increase the reach of your titles
YUMPU automatically turns print PDFs into web optimized ePapers that Google loves.
Copyright © 2009 <strong>Peek</strong> <strong>Traffic</strong> CorporationAll rights reserved.Information furnished by <strong>Peek</strong> <strong>Traffic</strong> is believed to be accurate and reliable, however <strong>Peek</strong> does notwarranty the accuracy, completeness, or fitness for use of any of the information furnished. No license isgranted by implication or otherwise under any intellectual property. <strong>Peek</strong> reserves the right to alter any ofthe Company's products or published technical data relating thereto at any time without notice.No part of this publication may be reproduced, stored in a retrieval system, or transmitted in any form orvia any electronic or mechanical means for any purpose other than the purchaser’s personal use withoutthe expressed, written permission of <strong>Peek</strong> <strong>Traffic</strong> Corporation.<strong>Peek</strong> <strong>Traffic</strong> Corporation2906 Corporate WayPalmetto, FL 34221 U.S.A.TrademarksThe <strong>ADR</strong>-<strong>3000</strong> Plus, <strong>ADR</strong>-2000 Plus, StopWatch+, TOPS, and the <strong>SD</strong>-<strong>3000</strong> <strong>Drive</strong> are trademarks orregistered trademarks of <strong>Peek</strong> <strong>Traffic</strong> Corporation, in the USA and other countries. Microsoft and Windowsare trademarks or registered trademarks of Microsoft Corporation. Other brands and their products aretrademarks or registered trademarks of their respective holders and should be noted as such.
iv<strong>SD</strong>-<strong>3000</strong> <strong>Drive</strong> for the <strong>ADR</strong>-<strong>3000</strong> Plus
OVERVIEWThe <strong>Peek</strong> <strong>SD</strong> <strong>Drive</strong> fits into the company’s <strong>ADR</strong>-<strong>3000</strong> Plus automatic data recorder,providing a new way to store, retrieve and transport traffic data. It allows an <strong>ADR</strong> datarecorder operator to use standard <strong>SD</strong> (‘secure digital’) or <strong>SD</strong>HC (‘secure digital – highcapacity’) memory cards. Cards that meet the <strong>SD</strong> standard use the logo shown inFigure 1. Cards that meet the <strong>SD</strong>-HC standard, typically those with more than 2GB ofcapacity, use the logo shown in Figure 2. For <strong>SD</strong>-HC cards, the drive can use up to4GB of storage space. Throughout the rest of this document, we will speak of ‘<strong>SD</strong>’memory cards when refering to both types.Figure 1 – <strong>SD</strong> LogoFigure 2 – <strong>SD</strong>HC logo<strong>SD</strong> memory card technology used by the <strong>ADR</strong>-<strong>3000</strong> <strong>Drive</strong> module offers highperformancein a reliable, easy to use format. The advantages of <strong>SD</strong> cards over oldermemory storage methods include:Write protection for your dataEase of availabilityWider range of storage capacities (much higher than PCMCIA)Lower in cost per kilobyte than any other type of memoryEasy to use "push-push" socket makes inserting and removing media simplePortability and compact sizeInteroperable <strong>SD</strong> cards offer flexibility in transferring data to other devicesCan be read from a standard card reader attached to a PC / laptopAllows studies to be created that generate large sized data files (for example,you can use smaller recording intervals on binned files and perform PVRstudies simultaneously with a binned study).<strong>SD</strong>-<strong>3000</strong> <strong>Drive</strong> for the <strong>ADR</strong>-<strong>3000</strong> Plus 1
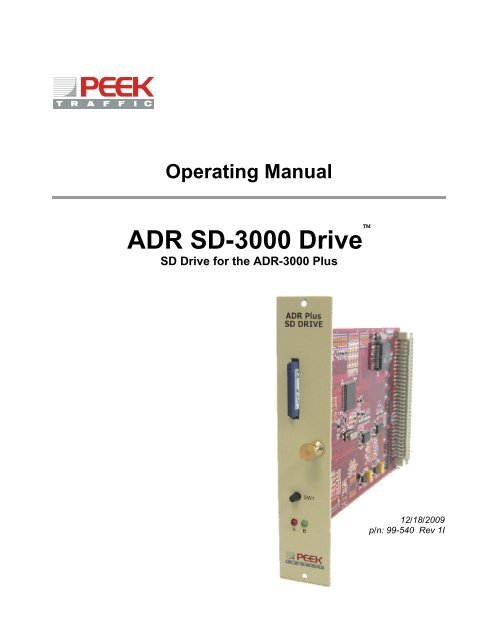
Figure 3 – <strong>ADR</strong> <strong>SD</strong> <strong>Drive</strong>System RequirementsThe <strong>Peek</strong> <strong>ADR</strong> <strong>SD</strong> <strong>Drive</strong> is designed as a rack-mounted drive for the <strong>ADR</strong>-<strong>3000</strong> Plusrack. The <strong>ADR</strong> <strong>SD</strong> <strong>Drive</strong> has a spring-loaded memory card slot, a status monitorswitch, and a pair of status monitor LEDs visible on the front panel.The firmware loaded into the <strong>ADR</strong>-<strong>3000</strong> Plus unit must be at version 6.10 or higher.This allows the host <strong>ADR</strong> to recognize the <strong>SD</strong> <strong>Drive</strong>, and allows an operator to assignfile storage to <strong>SD</strong> cards that have been inserted into the unit.2 <strong>SD</strong>-<strong>3000</strong> <strong>Drive</strong> for the <strong>ADR</strong>-<strong>3000</strong> Plus
Installing the <strong>Drive</strong>The <strong>ADR</strong> <strong>SD</strong> <strong>Drive</strong> itself is not hot swappable. The <strong>ADR</strong> unit must be OFF when youinsert the <strong>SD</strong> <strong>Drive</strong> into the <strong>ADR</strong> rack. However, once the drive is installed into an<strong>ADR</strong>, the <strong>SD</strong> memory cards themselves are hot swappable.<strong>SD</strong> <strong>Drive</strong>Figure 4 – <strong>ADR</strong> <strong>SD</strong> <strong>Drive</strong> installed in an <strong>ADR</strong>-<strong>3000</strong> PlusTo install the drive into an <strong>ADR</strong>-<strong>3000</strong> Plus unit, you will first need to remove thepower supplied to the unit.ImportantIf your <strong>ADR</strong>-<strong>3000</strong> unit is powered using a <strong>Peek</strong> PMU driveinstalled in the rack itself, you should be aware that there isa PMU upgrade option that may be required, depending onyour exact configuration. The original PMU design provided250mA of current, which is adequate for most simple <strong>ADR</strong>-<strong>3000</strong> configurations. However, if you are using multipledrives in your <strong>ADR</strong> rack, including those that havesignificant current requirements such as WIM drives, ormultiple sensor drives of any type, you may need to updateyour PMU to the new configuration.The new configuration is a simple hardware modification ofyour existing PMU unit, at a minimal cost, that will upgradethe PMU to supply up to 360mA of power. This upgrade isnot strictly required to support the <strong>ADR</strong> <strong>SD</strong> <strong>Drive</strong>. However,if you will be using your <strong>ADR</strong> <strong>SD</strong> <strong>Drive</strong> in a fully loaded<strong>ADR</strong>-<strong>3000</strong> unit, we highly recommend that you do requestthis PMU upgrade.1. On an <strong>ADR</strong>-<strong>3000</strong> unit, first disconnect the 12V DC power connected to the rearof the unit. Whether the power is wired directly into the top plug on an <strong>ADR</strong>Power Management Unit (PMU) in the rack, the default method, or it comesinto the unit in some other manner, i.e. from a solar charge controller or from a<strong>SD</strong>-<strong>3000</strong> <strong>Drive</strong> for the <strong>ADR</strong>-<strong>3000</strong> Plus 3
cabinet power panel, the power must be removed from the <strong>ADR</strong> before thenew drive is installed.2. Remove the Single wide slot cover from the location in the rack where youintend to install the <strong>SD</strong> <strong>Drive</strong>.3. With no <strong>SD</strong> Card in the slot of the drive, firmly push the new drive into the <strong>ADR</strong>rack until it is firmly seated.4. Attach the <strong>SD</strong> <strong>Drive</strong> to the rack using the top and bottom face screws.5. Reattach the power supply to the <strong>ADR</strong>-<strong>3000</strong> Plus unit.6. When the Main Menu of the <strong>ADR</strong> unit shows up on the display screen (or onyour attached PC interface), press ESC to enter the menu system.7. Press the number 1 on the <strong>ADR</strong> keypad to enter the Check menu. (Or choosethe Check menu option on your PC interface.)8. Scroll down the Check menu, and select the Check Equipment screen.12.288MHz <strong>ADR</strong>+2/<strong>3000</strong>1024K Intel 28F800V6.10-AS 24-AUG-0720 BY 4 LCDFigure 5 – Initial Check Equipment screen9. On the Check Equipment screen, press ENTER to go to the next screen. If the<strong>SD</strong> <strong>Drive</strong> has been properly installed, the <strong>ADR</strong> has up-to-date firmware (v6.10or higher,) and the drive is working correctly, you will see the new file storagelocation at the bottom of this list. Since there is no <strong>SD</strong> card installed, it willshow the memory location with an unknown (“?”) capacity.FILE STORAGE604K CPU DRIVE 00? <strong>SD</strong> CARD 08Figure 6 – File Storage area of the Check Equipment screens – No <strong>SD</strong>Card inserted4 <strong>SD</strong>-<strong>3000</strong> <strong>Drive</strong> for the <strong>ADR</strong>-<strong>3000</strong> Plus
10. At this point, insert an <strong>SD</strong> card into the <strong>SD</strong> <strong>Drive</strong>. After a few seconds, the FileStorage screen will update to show the capacity of the card. For instance, ifyou insert a 2GB card in the slot, you will probably see something like this:FILE STORAGE604K CPU DRIVE 001946M <strong>SD</strong> CARD 08Figure 7 – File Storage area of the Check Equipment screens – <strong>SD</strong>Card inserted11. It is strongly recommended that you format the <strong>SD</strong> card within the <strong>ADR</strong> unitbefore attempting to use it for data storage. This is true even if it camepreformatted or you formatted it from a PC prior to installing it in the <strong>ADR</strong> unit.Formatting is done from the Format Media screen . Use the left and right arrowkeys to select <strong>SD</strong> <strong>Drive</strong> 08, and press the Enter button to begin the formatting.This completes the installation of the <strong>SD</strong> <strong>Drive</strong>.<strong>SD</strong>-<strong>3000</strong> <strong>Drive</strong> for the <strong>ADR</strong>-<strong>3000</strong> Plus 5
Using the <strong>ADR</strong> <strong>SD</strong> <strong>Drive</strong>The purpose of the <strong>SD</strong> <strong>Drive</strong> is to allow an <strong>ADR</strong> operator to use standard <strong>SD</strong> memorycards as a memory storage location for files and data, to allow data to be retrievedfrom field locations, and to allow files to be transfered between <strong>ADR</strong> units.Selecting <strong>SD</strong> Memory CardsThe <strong>ADR</strong> <strong>SD</strong> drive is compatible with all <strong>SD</strong> or <strong>SD</strong>-HC memory cards. This includesany memory cards from your local drug store or local electronics retailer, includinglarger capacity cards. However the FAT16 filing system used when the <strong>ADR</strong> <strong>SD</strong> <strong>Drive</strong>formats your card will only be able to address the first 4GB of the <strong>SD</strong> card’s capacity.Figure 8 – A Typical <strong>SD</strong> CardAnother consideration when selecting your <strong>SD</strong> memory cards is response time. Thereare differences in how fast an <strong>SD</strong> card reads and writes data, which can impact howquickly they read back data for transmission. Generally all <strong>SD</strong> cards, no matter themake or model, are sufficiently responsive to support the writing requirements of an<strong>ADR</strong> unit. It should be mentioned, however, that the <strong>SD</strong> card units sold by <strong>Peek</strong><strong>Traffic</strong> have been specifically selected for their quick response times and for theirability to handle the harsh environmental conditions experienced by a typical roadsidetraffic counter/classifier. The specifications for the <strong>Peek</strong> cards are listed on page 12.Inserting an <strong>SD</strong> Card in the <strong>ADR</strong> <strong>SD</strong> <strong>Drive</strong>The <strong>SD</strong> <strong>Drive</strong>’s card slot is a spring loaded mechanism. To insert a card, press firmlyuntil the card clicks into place. The angled notch in the corner of the card should betoward the bottom of the <strong>ADR</strong> <strong>SD</strong> drive, and the metal connection pads should befacing to the left. Make sure that the Write switch on the <strong>SD</strong> card is unlocked.6 <strong>SD</strong>-<strong>3000</strong> <strong>Drive</strong> for the <strong>ADR</strong>-<strong>3000</strong> Plus
A card can be inserted into the <strong>ADR</strong><strong>SD</strong> <strong>Drive</strong> at any time, whether the <strong>ADR</strong>is powered or not. If power is suppliedto the <strong>ADR</strong>, as soon as an <strong>SD</strong> card isinserted, the ‘A’ LED will flashmomentarily to acknowledge theinsertion of the card. But it will thenturn off as a power-saving feature.Figure 9 – Inserting an <strong>SD</strong> Card into the <strong>ADR</strong> <strong>SD</strong> <strong>Drive</strong>Formatting an <strong>SD</strong> CardFormatting an <strong>SD</strong> Card is performed exactly the same way it is for any other memorylocation attached to an <strong>ADR</strong>. Insert the <strong>SD</strong> card into the slot, activate the <strong>ADR</strong>interface, and navigate to the Format Media screen. The <strong>SD</strong> card can be selected byusing the left or right arrow buttons, at which point you will see the drive shown likethis:SOURCE MEDIA<strong>SD</strong> CARD 08FREE MEMORY 01948MbCHG; ENTER SELECTSFigure 10 – Navigate to the Format Media screen on the <strong>ADR</strong>It is strongly recommended that you format your <strong>SD</strong> cards to be used with the <strong>ADR</strong>within the <strong>ADR</strong> unit itself before attempting to use it for data storage. This is true evenif it came preformatted or you formatted it from a PC prior to installing it in the <strong>ADR</strong>unit. The reason for this is file capacity. An <strong>SD</strong> card that was formatted on a PC mayonly allow 500 individual files to be stored on the card, while the formatting donewithin the <strong>ADR</strong> guarantees that the <strong>SD</strong> card will accept up to 7000 files at once.(Large, complex, long duration studies can easily create large numbers of data files.)<strong>SD</strong>-<strong>3000</strong> <strong>Drive</strong> for the <strong>ADR</strong>-<strong>3000</strong> Plus 7
Removing an <strong>SD</strong> Card from the <strong>ADR</strong> <strong>SD</strong> <strong>Drive</strong>Removing a card from the <strong>ADR</strong> <strong>SD</strong> <strong>Drive</strong>’s slot is a bit more complicated, since it ispossible that the <strong>ADR</strong> could be writing to the card, and you don’t want to interrupt adata-write that may be occuring. To remove the <strong>SD</strong> card, follow these steps:1. Press the SW1 switch on the front of the <strong>ADR</strong> <strong>SD</strong> drive to see the currentstatus of the <strong>SD</strong> card. The A and B LEDs just below the switch will light up toshow the current status:Red flashes once to indicate that the card is NOT safe to remove; the cardis currently being used to write data.Green flashes twice to indicate that it is safe to remove the card; no datafiles are open.2. If the light flashes GREEN, press the <strong>SD</strong> card into the slot and release. Thecard should unclick and come out from the slot a couple of millimeters. Pull thecard out.Figure 11 – Removing an <strong>SD</strong> Card from the <strong>ADR</strong> <strong>SD</strong> drive3. If the LED flashes RED, you will need to enter the <strong>ADR</strong> interface and halt theactive study, after which you should be able to obtain the double flash of theGreen LED. At that point, it will be safe to press the card into the slot, unlatch itfrom the spring-latch mechanism, and remove it.8 <strong>SD</strong>-<strong>3000</strong> <strong>Drive</strong> for the <strong>ADR</strong>-<strong>3000</strong> Plus
Setting the <strong>SD</strong> Card as an <strong>ADR</strong> File LocationTo use the <strong>SD</strong> card as a file/data storage location, you will need to tell the <strong>ADR</strong> howto use it. This means assigning files types and percentages to the new memorylocation provided by the <strong>SD</strong> card.1. Insert an <strong>SD</strong> card into the <strong>ADR</strong> <strong>SD</strong> <strong>Drive</strong> slot.2. Open the <strong>ADR</strong> interface and press ESC to enter the menus.3. Go into the Configure menu (Keyboard button ‘4’ or scroll and ENTER.)4. Scroll down and select File Storage. You will see the File Storage selectionwindow.FILE PRIMARY MEDIABIN CPU MODULE 00
Transferring Files Off of the <strong>SD</strong> CardTo retrieve the data off of an <strong>SD</strong> card, there are two possible options:Retrieve the Data RemotelyThis is done in exactly the same manner you currently use, except you choose thesource of the data files to be the <strong>SD</strong> Card.Retrieve the Data PhysicallyThe other method to retrieve data from the <strong>ADR</strong> is to actually travel to the site of thestudy and to remove the <strong>SD</strong> card from the <strong>ADR</strong> <strong>SD</strong> <strong>Drive</strong>. Any standard <strong>SD</strong> Cardreader can be used to transfer .bin or .pvr files to a PC or laptop.NoteBe aware of the method to remove the card from the unitwithout causing file problems, as described on page 7.10 <strong>SD</strong>-<strong>3000</strong> <strong>Drive</strong> for the <strong>ADR</strong>-<strong>3000</strong> Plus
ADDITIONAL GUIDANCEFor more guidance on the configuration and usage of the <strong>SD</strong>-<strong>3000</strong> <strong>Drive</strong>, refer to thefollowing documents and contacts.TroubleshootingThese are some suggested steps to follow if your <strong>ADR</strong> <strong>SD</strong> <strong>Drive</strong> is not working as itshould. It’s best to work your way from the top to bottom of the table until you find theproblem.Table 1 – Troubleshooting checklistSymptomNeither A nor B LEDs flash whenan <strong>SD</strong> card is inserted in the slot<strong>SD</strong> <strong>Drive</strong> doesn’t show up as anoption in the <strong>ADR</strong> screeninterface. The check equipmentscreen shows that the <strong>SD</strong> <strong>Drive</strong> isin place, but the card capacity isshown as ‘?’Possible Causes/ResolutionsMake sure the <strong>ADR</strong> <strong>SD</strong> drive is firmly seated in the drive slot.It takes some pressure to properly seat any <strong>ADR</strong> drive intothe backplane of the drive slot. Be sure not to press on the<strong>SD</strong> card itself if one is inserted in the slot in the drive, as thiscould damage the slot or the <strong>SD</strong> card.Power has not been properly restored to the <strong>ADR</strong>. Make surethe <strong>ADR</strong> has power by using the interface or some other drivethat has LED indicators.Make sure you have a version of the <strong>ADR</strong> firmware thatsupports the <strong>ADR</strong> <strong>SD</strong> <strong>Drive</strong>. The firmware should be atversion 6.10 or higher.Connections between the <strong>ADR</strong> backplane boards are notproperly seated. Make sure the cables that connect the rearof the engine board to the backplane board are properlyattached at both ends.Faulty backplane. Remove the <strong>SD</strong> <strong>Drive</strong> and attempt to insertsome other <strong>ADR</strong> drive in the same slot. See if it responds asexpected. If not, you may need to return the <strong>ADR</strong> to <strong>Peek</strong><strong>Traffic</strong> for repair.If another drive placed in the slot works as expected, then it’slike that the <strong>ADR</strong> <strong>SD</strong> <strong>Drive</strong> is faulty. Arrange to return it forrepair or replacement. The RMA process is described on theCounter/Classifier Support page on the <strong>Peek</strong> <strong>Traffic</strong> website:www.peektraffic.com/ptdataspt.htmMake sure you have a version of the <strong>ADR</strong> firmware thatsupports the <strong>ADR</strong> <strong>SD</strong> <strong>Drive</strong>. The firmware should be atversion 6.10 or higher.The first thing is to verify that the <strong>ADR</strong> <strong>SD</strong> <strong>Drive</strong> itself isworking properly. Press the SW1 button and see if one or theother of the LEDs light up. If neither does, then its quitepossible the problem is with the drive, rather than the <strong>SD</strong>card. Use the steps above to check out the problem.<strong>SD</strong>-<strong>3000</strong> <strong>Drive</strong> for the <strong>ADR</strong>-<strong>3000</strong> Plus 11
SymptomPossible Causes/ResolutionsVerify that the write-lock mechanism on the side of the <strong>SD</strong>card is not in the ‘locked’ position.Try a different <strong>SD</strong> card in the slot and see if a capacitynumber shows up in the <strong>ADR</strong> interface. If a card does notwork, it may need to be formatted. This can be done using the<strong>ADR</strong> interface, under the FILES menu.If you cannot get an <strong>SD</strong> card to be recognized in the slot,even though the drive itself is recognized by the <strong>ADR</strong>interface, you may have a faulty drive. Arrange to return it forrepair or replacement. The RMA process is described on theCounter/Classifier Support page on the <strong>Peek</strong> <strong>Traffic</strong> website:www.peektraffic.com/ptdataspt.htmParts and <strong>Drive</strong>sTable 2 – Parts and <strong>Drive</strong>s available for the <strong>ADR</strong> <strong>SD</strong> <strong>Drive</strong>DescriptionPart Number<strong>ADR</strong> <strong>SD</strong> <strong>Drive</strong> for the <strong>ADR</strong>-<strong>3000</strong> 82-1815-01<strong>ADR</strong> <strong>SD</strong> <strong>Drive</strong> for the <strong>ADR</strong>-2000, plus a 2 GB <strong>SD</strong>Card 82-1815-022 GB <strong>SD</strong> Card 2M23-0013<strong>Peek</strong> <strong>Traffic</strong> <strong>SD</strong> Card SpecificationsThe <strong>SD</strong> cards sold by <strong>Peek</strong> <strong>Traffic</strong> have been specifically selected to survive theharsh operating environment often experienced by an automatic data recorder in thefield:Operating temperature range .....................Industrial (-40C to +85C)Low current.................................................150uARead/Write Speed ......................................15MB/s read, 11MB/s writeWear-leveled ..............................................On-boardMean time between failures........................>2.5 MhrsTesting........................................................Integrated testing (in an <strong>ADR</strong>). Runthrough a thermal chamber test12 <strong>SD</strong>-<strong>3000</strong> <strong>Drive</strong> for the <strong>ADR</strong>-<strong>3000</strong> Plus
DocumentationThese additional documents provide useful information for the operation of the <strong>ADR</strong>-<strong>3000</strong> <strong>SD</strong> <strong>Drive</strong>, and the hardware and software products used in conjunction with the<strong>ADR</strong>-<strong>3000</strong> Plus hardware.Table 3 — Additional documentationDocumentPart Number<strong>ADR</strong> Plus Technical <strong>Manual</strong> 81-921<strong>ADR</strong> Firmware Release Notes 99-351<strong>ADR</strong> Modem Setup Instructions 99-363<strong>ADR</strong> <strong>SD</strong>/RS232 Module Operating <strong>Manual</strong> 99-547Loop Installation InstructionsG1050433TOPS Operating <strong>Manual</strong> 81-897TOPS Software Release Notes 99-291Firmware LicenseThe firmware for the <strong>ADR</strong> <strong>SD</strong> Card module is copyrighted by <strong>Peek</strong> <strong>Traffic</strong> Corporation. However, the firmwareis running on top of the open source ‘Free RTOS’ real-time operating system within the <strong>SD</strong> module. FreeRTOS is software that is licensed under version 2 of the GPL General Public License. The <strong>ADR</strong> <strong>SD</strong> <strong>Drive</strong>firmware is allowed to distribute the Free RTOS software as part of a proprietary product due to the GPLClause 1 Exception. The <strong>ADR</strong> <strong>SD</strong> Card module is using Free RTOS version 5.4.2, and is not itself a kernel,scheduler, or RTOS product, nor is it a library intending to be linked into other software applications. FreeRTOS is available as free source code, which can be requested from <strong>Peek</strong> <strong>Traffic</strong>, or can be downloadeddirectly by going to the Free RTOS project pages on SourceForge:http://sourceforge.net/projects/freertos/files/FreeRTOS/Technical SupportThis contact information will connect you with the technical support staff of <strong>Peek</strong><strong>Traffic</strong> Corporation, should you require additional help concerning the <strong>ADR</strong>-<strong>3000</strong> <strong>SD</strong><strong>Drive</strong>.<strong>Peek</strong> <strong>Traffic</strong> Corporation - Customer Service Center2906 Corporate WayPalmetto, FL 34221toll free in the U.S.: 1 (800) 245-7660tel: 1 (941) 845-1200fax: 1 (941) 845-1504email: tech.support@peektraffic.comweb: www.peektraffic.com<strong>SD</strong>-<strong>3000</strong> <strong>Drive</strong> for the <strong>ADR</strong>-<strong>3000</strong> Plus 13
14 <strong>SD</strong>-<strong>3000</strong> <strong>Drive</strong> for the <strong>ADR</strong>-<strong>3000</strong> Plus