Fit flaps J100 - Jabiru
Fit flaps J100 - Jabiru
Fit flaps J100 - Jabiru

You also want an ePaper? Increase the reach of your titles
YUMPU automatically turns print PDFs into web optimized ePapers that Google loves.
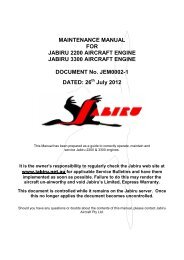
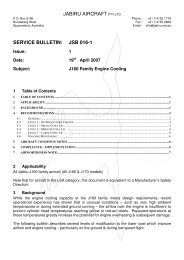
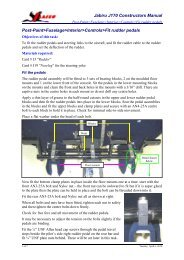
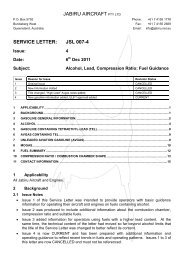
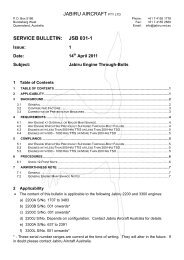
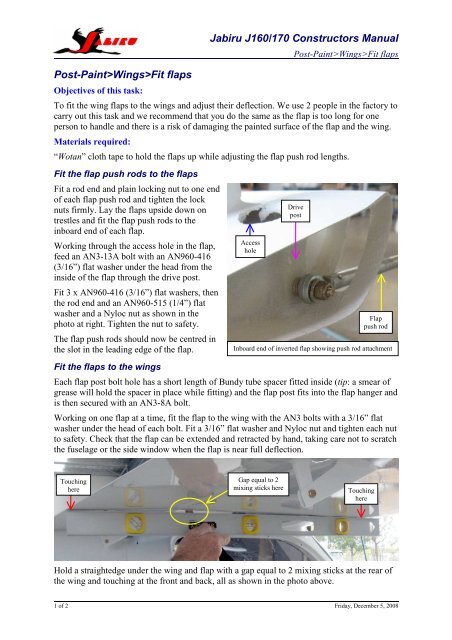
Post-Paint>Wings><strong>Fit</strong> <strong>flaps</strong>Objectives of this task:<strong>Jabiru</strong> J160/170 Constructors ManualPost-Paint>Wings><strong>Fit</strong> <strong>flaps</strong>To fit the wing <strong>flaps</strong> to the wings and adjust their deflection. We use 2 people in the factory tocarry out this task and we recommend that you do the same as the flap is too long for oneperson to handle and there is a risk of damaging the painted surface of the flap and the wing.Materials required:“Wotan” cloth tape to hold the <strong>flaps</strong> up while adjusting the flap push rod lengths.<strong>Fit</strong> the flap push rods to the <strong>flaps</strong><strong>Fit</strong> a rod end and plain locking nut to one endof each flap push rod and tighten the locknuts firmly. Lay the <strong>flaps</strong> upside down ontrestles and fit the flap push rods to theinboard end of each flap.Working through the access hole in the flap,feed an AN3-13A bolt with an AN960-416(3/16”) flat washer under the head from theinside of the flap through the drive post.<strong>Fit</strong> 3 x AN960-416 (3/16”) flat washers, thenthe rod end and an AN960-515 (1/4”) flatwasher and a Nyloc nut as shown in thephoto at right. Tighten the nut to safety.The flap push rods should now be centred inthe slot in the leading edge of the flap.AccessholeDrivepostFlappush rodInboard end of inverted flap showing push rod attachment<strong>Fit</strong> the <strong>flaps</strong> to the wingsEach flap post bolt hole has a short length of Bundy tube spacer fitted inside (tip: a smear ofgrease will hold the spacer in place while fitting) and the flap post fits into the flap hanger andis then secured with an AN3-8A bolt.Working on one flap at a time, fit the flap to the wing with the AN3 bolts with a 3/16” flatwasher under the head of each bolt. <strong>Fit</strong> a 3/16” flat washer and Nyloc nut and tighten each nutto safety. Check that the flap can be extended and retracted by hand, taking care not to scratchthe fuselage or the side window when the flap is near full deflection.TouchinghereGap equal to 2mixing sticks hereTouchinghereHold a straightedge under the wing and flap with a gap equal to 2 mixing sticks at the rear ofthe wing and touching at the front and back, all as shown in the photo above.1 of 2 Friday, December 5, 2008
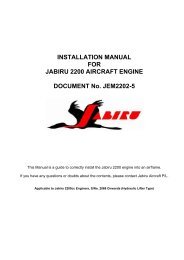
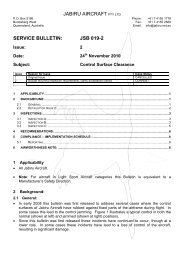
Tape the flap into position with a length ofcloth tape as shown arrowed in the photo atright.<strong>Fit</strong> and set the other flap in the same manner.The <strong>flaps</strong> are now in the fully retractedposition and are ready for the flap push rodsto be connected to the flap drive arms in thenext step.<strong>Jabiru</strong> J160/170 Constructors ManualPost-Paint>Wings><strong>Fit</strong> <strong>flaps</strong>Connect and adjust the <strong>flaps</strong>Apply power to the flap motor and extendthe actuating shaft fully as shown at right.<strong>Fit</strong> a rod end with a plain locking nut to thefree end of the flap push rods and screw therod end into the flap push rods until the holein the rod end lines up with the hole in theflap drive arm, then fit the rod end into theclevis in the flap drive arm as shown belowright with an AN3-10A bolt with a 3/16”washer under the head of the bolt andanother 3/16” flat washer and a Nyloc nutand tighten the nut to safety. Tighten theplain locking nut firmly.Repeat the process for the other flap. At thispoint the <strong>flaps</strong> have been fitted and adjusted.Apply power to the flap motor and extendthe flap to the first position and check both<strong>flaps</strong> for clearance from the fuselage.Have someone watch each flap as youcontinue to extend the <strong>flaps</strong> to the second“full flap” position and check each flap forclearance from the fuselage until the full flapposition is reached.If you set your flap end clearances correctly in the Pre-Paint>Wings>Test fit wings task thereshould be no problems, but if the <strong>flaps</strong> do touch the fuselage then you will need to remove theflap and cut the end of the flap away to maintain a 5mm clearance from the fuselage.This completes the Post-Paint>Wings><strong>Fit</strong> <strong>flaps</strong> task.2 of 2 Friday, December 5, 2008