service bulletin: jsb 029-1 - Jabiru
service bulletin: jsb 029-1 - Jabiru
service bulletin: jsb 029-1 - Jabiru

You also want an ePaper? Increase the reach of your titles
YUMPU automatically turns print PDFs into web optimized ePapers that Google loves.
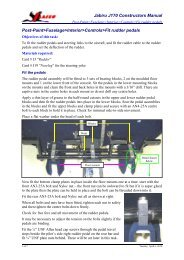
<strong>Jabiru</strong> Service Bulletin: J170 Handling UpgradeJSB <strong>029</strong>-1 20th January 2011not rub on the side of the fuselage. If required AN363 or MS21042 nuts may be used asthey are thinner than Nylock-type nuts.Turn the aircraft master power on and drive the motor to the fully “down” position, then turnthe master power off.Once in position, adjust the rod end in the motor shaft to align with the lowest hole in theadaptor and re-connect it using a ¼” bolt. Note that if there is not enough adjustment in therod end the external flap drive pushrods can be adjusted to suit. Again, AN363 or MS21042nuts may be used if required to give clearance from the fuselage.Remove the tape or stands from the flaps.Turn the aircraft master power on and cycle the flaps, checking for smooth operation withno binding or other issues. Measure the flap deflection – between full up and full downpositions the flaps must travel 30° ±1.5°.Note that it is not necessary to disconnect the flap position indicator during this job or toadjust the position indicator once the task is complete.Align holes in extensionwith hole in original arm.Cut off tip ofexisting armMin edge distance 1.3mmFigure 3 – Fitting Adaptor to Drive ArmJSB <strong>029</strong>-1 Page 4 of 7
<strong>Jabiru</strong> Service Bulletin: J170 Handling UpgradeJSB <strong>029</strong>-1 20th January 2011Use the 3/16” hole in the adaptor as a guideto drill a matching hole in the existing armAdaptor bolted & bonded in place.Use of penny washer is optional.Figure 4 – Adaptor in PlaceSpacer washer to preventdrive shaft bindingNote clearance betweenbolt and fuselage sideFigure 5 – Flap Drive ModificationJSB <strong>029</strong>-1 Page 5 of 7
<strong>Jabiru</strong> Service Bulletin: J170 Handling UpgradeJSB <strong>029</strong>-1 20th January 20114.3 iii. – Ventral Fin ReplacementRemove the existing ventral fin and weigh it accurately.Cut the inspection hole and fit the tie-down tube to the new ventral fin. Drill two ¼” drainholes in the bottom of the fin at the positions indicated in Figure 7. Paint to match theaircraft.Match drill the replacement fin mounting screw holes to the original part. Note that althoughthe replacement fins are supplied with pilot holes drilled the exact hole positions must befound by comparison to the original parts.Weigh the replacement fin accurately.Fit the new fin.Some J170 aircraft operate quite close to the rear of their CG envelope and in some casesthe extra weight added by this new ventral fin will be sufficient for the aircraft to exceed itsrear CG limit in some load cases. Operators must calculate the effect that changing thispart has had on their aircraft and assess if any ballast or operating changes are required.Depending on the category in which the aircraft is operating these calculations may need tobe carried out by an approved Weight Control Authority.Tie-down tubeInspection holeFigure 6 – Original Ventral FinJSB <strong>029</strong>-1 Page 6 of 7
<strong>Jabiru</strong> Service Bulletin: J170 Handling UpgradeJSB <strong>029</strong>-1 20th January 2011Tie down tube fittedDrain holes drilled5 Airworthiness Note:Figure 7 – New Ventral Fin FittedStandard aircraft practices apply to nuts used in the control system assembly: whentightened no less than 1 and no more than 3 threads must show through the nut.All work called for by this Bulletin must be carried out by authorised personnel. For theaircraft detailed herein this may mean the owner, an RA-Aus Level 2 holder, a LicensedAircraft Maintenance Engineer (LAME) or equivalent – as appropriate to the aircraft’sregistration and use.On completion of the work, the authorised person must note the completion of the actionsrequired by this <strong>bulletin</strong> in the aircraft’s maintenance logbook. This note should include thedate of the work and the identity (including licence number where appropriate) of the personcarrying out the work.JSB <strong>029</strong>-1 Page 7 of 7