
You also want an ePaper? Increase the reach of your titles
YUMPU automatically turns print PDFs into web optimized ePapers that Google loves.
<strong>Jabiru</strong><strong>J160</strong>Constructors<strong>Manual</strong>from kit/serial number 237
General>IntroductionWelcome to the <strong>Jabiru</strong> family, and a family it is.<strong>Jabiru</strong> <strong>J160</strong> Constructors <strong>Manual</strong>General>Introduction<strong>Jabiru</strong> is a small aircraft and aero-engine manufacturer located in Bundaberg, Queensland,Australia. The city has a population of 60,000 and until recently its most renowned export hasbeen the famous (or infamous) Bundaberg Rum. The <strong>Jabiru</strong> factory is located on the airport atthe Western edge of town where a staff of 55 craftsmen turns out these fine aircraft andengines.We are not just another kit manufacturer; we also build certified aircraft, engines andpropellers and have a quality assurance program fully approved by the Australian CivilAviation Safety Authority (CASA); as far as we know we are the only company doing so.All of our products are original and have been designed, prototyped and produced in house, sowe can support you like no other kit manufacturer can.Our distributors are fully supported by us and are a ready source of spares and free advice.You need not have a degree in electrical engineering, an intimate knowledge of hydraulics ora garage full of tools to complete this aircraft. There are no complex or complicated systemson this aircraft. The gear stays down, the prop pitch is fixed and a simple switch operates theflaps. The brakes are hydraulic and the simplicity will delight you.Your <strong>Jabiru</strong> kit is designed to be simple to complete and finish, and will provide you withmany years of enjoyable flying.Once completed you will find the aircraft extremely economical with operating costs moreassociated with a car than an aeroplane, and the ease of maintenance will increase your flyingtime.If you're ever in our area call in for a coffee, we'll show you what we're up to and how wemake our aircraft and engines.Safe Aviating and Happy Landings.Rodney Stiff, Managing DirectorWednesday, April 7, 2010 2 of 327
General>Constructors manualWelcome to the Constructors <strong>Manual</strong>!<strong>Jabiru</strong> <strong>J160</strong> Constructors <strong>Manual</strong>General>Constructors manualIn this <strong>Manual</strong> you will find all the instructions that you will need to build your very own<strong>Jabiru</strong>, one step or task at a time. Each task in this <strong>Manual</strong> stands alone, with the intention thateach task will be completed before you move on to the next task. There are many goodreasons for this approach: you can easily keep track of where you are in the build; it forms achecklist to ensure that nothing gets overlooked; and in many cases a task will be dependanton the completion of a previous task, and if the sequence shown in the Table of Contents isfollowed there will be no issues of this kind.The Table of Contents of this <strong>Manual</strong> is also the Build Sequence.We suggest that you print the Table of Contents out and keep it on the wall in your workshop.As each task is completed mark it off - in this manner you can accurately track your progresswhile ensuring that nothing gets overlooked.The manual has been arranged into 2 major Sections plus General and Painting sections:Pre-PaintPost-PaintWhich have been further Grouped by:FuselageWingsEach Group is then broken down into Stage, Task and Step as required.In the main the only sets of tasks that can be done without relation to each other are thoseunder the Group headings: Fuselage and Wings. Tasks in one group may be worked onindependent of tasks in the other group but the individual sequences under each group reallyneed to remain intact.This <strong>Manual</strong> details the procedures that we have refined over many years of certified factorybuilds, all combined with the experience of many kit builders to produce a document thatcombines the best of both worlds: efficient, proven factory techniques throughout, butarranged into a build sequence that meets the needs of kit builders.For example: the first objective for most kit builders is to get the fuselage up onto its wheelsand mobile as quickly as possible so that the fuselage can be moved around the workshop/outof the way of the wife‟s car/outside for cleaning/etc. By way of contrast, in the factory thefuselage remains in a floor-mounted jig for the majority of the Pre-Paint tasks, which is notusually an option for most kit builders.Each task contains photographs of the work in progress in our factory, often in a step-by-stepmanner in the case of the more complex tasks. While the <strong>Manual</strong> is formatted in A4 size youmay wish to print some pages in A3 size (if you have a suitable printer) for a clearer viewshould that be required. Each task starts on a new page so you can print out single tasks.As you work through this manual, and we suggest that you read it right through from start tofinish before you start your build, if something is not completely clear please call your dealeror e-mail us for clarification: it may be that we can better explain something for the benefit offuture kit builders at the same time as helping you.Enjoy your build!Wednesday, April 7, 2010 3 of 327
<strong>Jabiru</strong> <strong>J160</strong> Constructors <strong>Manual</strong>General>Constructors manualTable of ContentsGeneralGeneral>Introduction ................................................................................................................2General>Constructors manual ...................................................................................................3General>Tools and equipment ...................................................................................................8General>Glossary ................................................................................................................... 11General>Registration and certification .................................................................................... 12General>Reference documentation .......................................................................................... 12General>Unpacking and support ............................................................................................. 13General>Composite standard procedures ................................................................................. 14General>Aircraft grade bolts and lock nuts .............................................................................. 17General>Rod ends................................................................................................................... 19General>Health and safety ...................................................................................................... 20Pre-Paint>Fuselage>Fit ventral fin and trim horn .................................................................... 21Pre-Paint>Fuselage>Prepare the fuselage ................................................................................ 24Pre-Paint>Fuselage>Undercarriage>Assemble main wheels .................................................... 29Pre-Paint>Fuselage>Undercarriage>Assemble main gear ........................................................ 31Pre-Paint>Fuselage>Undercarriage>Fit main gear ................................................................... 37Pre-Paint>Fuselage>Firewall forward>Fit firewall .................................................................. 41Pre-Paint>Fuselage>Firewall forward>Firewall fittings ........................................................... 45Pre-Paint>Fuselage>Firewall forward>Assemble and fit nose gear .......................................... 51Pre-Paint>Fuselage>Firewall forward>Fit engine mount and engine ....................................... 58Pre-Paint>Fuselage>Firewall forward>Fit propeller flange extension ...................................... 62Pre-Paint>Fuselage>Firewall forward>Fit oil cooler ............................................................... 64Pre-Paint>Fuselage>Firewall forward>Fuel pump fittings ....................................................... 69Pre-Paint>Fuselage>Firewall forward>Fit ram air cooling ducts.............................................. 71Pre-Paint>Fuselage>Fit windscreen ........................................................................................ 75Pre-Paint>Fuselage>Fit control cables and lines ...................................................................... 78Pre-Paint>Fuselage>Empennage>Fit vertical tail fin ............................................................... 81Pre-Paint>Fuselage>Empennage>Fit elevator ......................................................................... 88Pre-Paint>Fuselage>Empennage>Fit horizontal stabiliser ....................................................... 92Pre-Paint>Fuselage>Empennage>Fit rudder ............................................................................ 95Pre-Paint>Fuselage>Fit cowling............................................................................................ 100Pre-Paint>Fuselage>Fit flap drive shaft bearing blocks ......................................................... 108Pre-Paint>Fuselage>Interior>Console>Pre-fit handbrake ...................................................... 110Pre-Paint>Fuselage>Interior>Console>Pre-fit trim control .................................................... 113Pre-Paint>Fuselage>Interior>Console>Fit control stick......................................................... 117Wednesday, April 7, 2010 4 of 327
<strong>Jabiru</strong> <strong>J160</strong> Constructors <strong>Manual</strong>General>Constructors manualPre-Paint>Fuselage>Interior>Fit rudder pedal mount blocks ................................................. 121Pre-Paint>Fuselage>Interior>Fit aileron cable brackets ......................................................... 123Pre-Paint>Fuselage>Interior>Fuel system ............................................................................. 127Pre-Paint>Fuselage>Interior>Fit seatbelt anchors .................................................................. 131Pre-Paint>Fuselage>Pre-fit doors .......................................................................................... 133Pre-Paint>Fuselage>Fit windows .......................................................................................... 137Pre-Paint>Fuselage>Wheel alignment ................................................................................... 139Pre-Paint>Fuselage>Pre-fit wheel spats ................................................................................. 141Pre-Paint>Wings>General..................................................................................................... 144Pre-Paint>Wings>Fit fuel tank filler body ............................................................................. 145Pre-Paint>Wings>Prepare wing root ..................................................................................... 149Pre-Paint>Wings>Cut aileron cable openings ........................................................................ 153Pre-Paint>Wings>Fit quick drain sumps ............................................................................... 156Pre-Paint>Wings>Mount flaps .............................................................................................. 158Pre-Paint>Wings>Fit wing tips ............................................................................................. 165Pre-Paint>Wings>Fit ailerons ............................................................................................... 167Pre-Paint>Wings>Fit pitot tube to strut ................................................................................. 173Pre-Paint>Wings>Test fit wings ............................................................................................ 175Paint>General ....................................................................................................................... 180Paint>Masking ...................................................................................................................... 182Paint>Surface preparation ..................................................................................................... 183Paint>Topcoat ....................................................................................................................... 184Post-Paint>General ............................................................................................................... 185Post-Paint>Fuselage>Fit panel mounted throttle .................................................................... 186Post-Paint>Fuselage>Assemble instrument panel .................................................................. 189Post-Paint>Fuselage>Electrical wiring diagrams ................................................................... 201Post-Paint>Fuselage>Interior>Fit upholstery 1 ...................................................................... 207Post-Paint>Fuselage>Install electrical wiring ........................................................................ 210Post-Paint>Fuselage>Interior>Fit console controls ................................................................ 222Post-Paint>Fuselage>Interior>Controls>Fit rudder pedals ..................................................... 227Post-Paint>Fuselage>Interior>Fit flap drive motor ................................................................ 234Post-Paint>Fuselage>Interior>Fit instrument panel housing .................................................. 237Post-Paint> Fuselage>Interior>Engine control cabling .......................................................... 240Post-Paint>Fuselage>Interior>Fit the instrument panel.......................................................... 243Post-Paint>Fuselage>Interior>Fit upholstery 2 ...................................................................... 244Post-Paint>Fuselage>Fit rudder, elevator and elevator trim ................................................... 247Post-Paint>Fuselage>Fit doors .............................................................................................. 252Post-Paint>Fuselage>Firewall forward>Final assembly ......................................................... 255Wednesday, April 7, 2010 5 of 327
<strong>Jabiru</strong> <strong>J160</strong> Constructors <strong>Manual</strong>General>Constructors manualPost-Paint>Fuselage>Firewall forward>Fit propeller and spinner .......................................... 259Post-Paint>Fuselage>Fit wheel spats ..................................................................................... 263Post-Paint>Wings>Install aileron cables................................................................................ 264Post-Paint>Wings>Fit stall warning ...................................................................................... 266Post-Paint>Wings>Prepare wings for fitting .......................................................................... 268Post-Paint>Wings>Fit wings ................................................................................................. 272Post-Paint>Wings>Connect ailerons ..................................................................................... 274Post-Paint>Wings>Connect wing tanks ................................................................................. 277Post-Paint>Wings>Fit flaps................................................................................................... 278Post-Paint>Wings>Fit fairings .............................................................................................. 280Testing>General ................................................................................................................... 282Testing>Weight and balance ................................................................................................. 283Testing>Rigging check ......................................................................................................... 287Testing>Calibrate fuel gauges ............................................................................................... 290Testing>Registration markings .............................................................................................. 292Testing>Final inspection checklist ........................................................................................ 293Testing>Flight testing ........................................................................................................... 308Testing>Forms ...................................................................................................................... 321Wednesday, April 7, 2010 6 of 327
Direction references<strong>Jabiru</strong> <strong>J160</strong> Constructors <strong>Manual</strong>General>Constructors manualIn all cases throughout this manual when any reference is made to direction (left, right, front,forward, rear, aft) it is made relative to the pilot‟s point of view, where the pilot is assumed tobe sitting in the pilot‟s seat facing towards the front of the aircraft.“Lateral” means something that it is oriented from side to side in relation to the aircraft.“Longitudinal” or “Fore and aft” means something that it is oriented from the front to theback of the aircraft.PreparationWe suggest that you get as much preparation done as possible before starting your build.Start with your workshop: give it a good clean out and consider upgrading the lighting andpower with plenty of strip lights and extra sockets for power tools. Paint the walls and ceilinga light colour to provide as light a work area as possible. This will also help if you plan toprepare the aircraft for painting preparation (filling/primer) and also the topcoat if you feelyou are capable of doing so.In preparation for storing the vacuum-sealed Build Cards that pack many of the small partsinto convenient groups we suggest that you construct a large wallboard that you can place theBuild Cards on, preferably in numerical order (each Card is numbered) – you will find thatthis is much easier and more pleasant than sorting through a box or pile of Build Cards!For items such as fairings and instrumentation prepare as much protected shelf space as youcan find (some shelving under a workbench can be particularly useful in this instance) andalso make a vertical bin in a cooler corner of the workshop to stand long items like elevator,rudder and flaps in while building the relevant parts of the aircraft. Reserve an out-of-the-wayarea for windows and other fragile parts.In our factory we use large mobile bench/racks that contain all of the parts for an aircraft andthat rack stays with that aircraft all the way through production.If you're going to do any painting, try to keep equipment and parts off the floor as much aspossible so that you can sweep/vacuum/hose the place out thoroughly in order to minimisedust before you start any painting.Get all of the tools and equipment on the list that starts on the next page.Read this manual from start to finish to familiarise yourself with the work to come.Consider getting extra insurance cover for your kit during the build to cover any risks(fire/damage/theft, etc). Most aircraft insurers will quote for this and many builders considerthat the cost is worth it for the peace of mind that it brings.Cold climate considerationsIf you are building in a colder climate/during winter, some extra heating and insulation inyour workshop will help, as well as keeping the humidity levels up to acceptable levels forepoxy work. Clearly, all workshops are different and your build inspector will advise.Get a large roll of bubble wrap packaging sheet (1.5m x 15m) from your local garden centreor packaging company (usually cheaper). In low temperature environments you will use thisto create an insulated tunnel by draping it over the work you've bonded/flocked and, with thecareful application of warm air from a fan heater, you'll easily achieve the 24°C (or so) youneed for a good epoxy cure.Wednesday, April 7, 2010 7 of 327
General>Tools and equipment<strong>Jabiru</strong> <strong>J160</strong> Constructors <strong>Manual</strong>General>Tools and equipmentBefore getting started we recommend that you acquire the following tools and equipment:these tools are not included in the kit and must be supplied by you.Required toolsThe following tools and equipment will be required as a bare minimum to complete this kit:Allen keys: imperial set.Aluminium angle: 3 or 4 straight lengths of 20x20x3 angle approximately 2m in length.Clecoes: Clecoe pliers and at least 20 Clecoes.Digital Kitchen Scales: (up to 5kg measured in 10gram increments) for mixing resins by weight, usingthe mixing pots provided. Accurate measurements ofsmall mixes can be made. Slip the scales into a clearplastic bag to keep them clean – the scale can still beread through the bag.Disposable gloves: for handling of epoxy and resin.Buy a large box from the supermarket or hardware supply store.Drill bits: 1/8" to ½" normal shank, 5/32" and 3/16" extended shank.Electric drill: 3/8 chuck, preferably cordless with a variable speed trigger.Electric hot air (paint stripping) gun: used to 'adjust' some non - structural glass fibreairframe parts, like doorframes, door stop strips, etc.Electric soldering iron: for general wiring as well as removing temporary screws.Files: medium flat, medium and small rat-tail, medium half-round.Hacksaw blades in holders for cutting in restricted spaces.Hole saws: 1½" to 2" or metric equivalents.Masks: disposable paper face masks and/or a half-face respirator with suitable filter elements.Nylon spring clamps: these come in mixed size bags fromhardware stores and you will use them in a multitude of ways.Get 2 or 3 bags plus 3 or 4 big individual clamps.Ring-open ended spanners: 3/8", 7/16", 1/2" and 7mmPadding: felt or old blankets for various uses.Pop rivet gun: hand operated or pneumatic.Sandpaper: various grades between 80 and 240 grit. Detailed in the Painting task.Screwdrivers: Phillips: small & #2, medium flat blade.Socket set: ¼" drive: at the very least 3/8", 7/16" and 1/2" sockets.Torque wrench: for engine/prop fitting, etc. Check the torque settings in the Technical<strong>Manual</strong> that shipped with your kit to ensure you get one with the right range.Trestles: at least 2 required, preferably 4 at about 800-900mm high with carpet covered tops.Wet and dry bulb thermometer or calibrated hygrometer for the wall of your workshop.Wednesday, April 7, 2010 8 of 327
Optional tools and equipment<strong>Jabiru</strong> <strong>J160</strong> Constructors <strong>Manual</strong>General>Tools and equipmentThe following tools are not essential, but they will certainly make the job more pleasant:Air Compressor & Air Gun. You can probably do without this if you plan to contract outyour filling and painting job, but if you intend to prime/fill/paint then you'll definitely need touse the air gun to clean out crevices and pinholes in the gel coat. If you intend to do all ofyour own painting then get a good quality spray gun and a compressor capable of at least15cfm. You will need to include a good quality water trap too – anywhere that compressorsand air tools are sold will be able to advise you on brands and specifications.Cordless Screwdriver with various bits (get some spare Phillips #2 bits: those self-tappersare really hard!)Dremel Moto-Tool (or similar, cordless and multi speed if possible) used for grinding anddrilling glass fibre in hard-to-get places. Permagrit make some very useful bits for these: thecut off disc and cylindrical grinding tools can be particularly handy.Electric or Pneumatic Angle Grinder (4 - 5"), preferably with a vacuum cleaner attachmentto keep dust to a minimum. This is for grinding parts like the trailing edge of the wing abovethe flaps. If you can get an adjustable speed one then so much the better. Fit a disc sanderbacking pad and use discs between 80 and 240 grit.Electric or Pneumatic Jig Saw for cutting holes such as the aileron/flap fitting holes in thewing and other holes in wing/fuselage/empennage.Electric or Pneumatic Orbital Sander for surfacing filler, preferably with a vacuum cleanerattachment to keep dust to a minimum.Industrial Vacuum Cleaner with 'crevice tools' A domestic vacuum may not be up to thetask, and as industrial units are readily available we suggest the purchase of a suitablemachine. You will be surprised how difficult it is to get glass fibre dust out from behind theseats with just a brush! Get any fittings necessary to connect to your sanders and grinders. Weuse several of these units in our factories and the amount of glass fibre dust lying around atany time is minimal. A very worthwhile investment.Lock Wire Pliers to put that professionaltwist on all of your lock wire.Lock latchLock handleTo use: lock the jaws onto both ends of yourlockwire using the silver lock handle, thensimply pull the “twist” handle at the back ofthe pliers and presto, perfect lockwire!Lock the jaws onto bothends of your lockwireand pull back on the twist handleWednesday, April 7, 2010 9 of 327
<strong>Jabiru</strong> <strong>J160</strong> Constructors <strong>Manual</strong>General>Tools and equipmentPedestal Fans to blow fresh air across work surfaces. We use plenty of these in our factory.Permagrit-type Shaped Abrasive Tools for shaping/sanding glass fibre parts (try to get a setof various shapes). Or make your own Sanding Blocks as described further down the page.Pneumatic tools are great if you have a compressor that can drive them – drills, jigsaws,various sanding tools are widely available. We use plenty of these in our factory too.Scales for weighing the aircraft: must be capable of weighing up to 150kg. Regular bathroomscales are fine for this task. A single scale can be used, but these scales are quite reasonablypriced (less than $50 each in Australia currently) and the task is much easier with 3 scales.Setsquare the long builders type with each side at least 500mm in length.Silicone Sealer, General Purpose or Roof and Gutter sealer, must suitable for use on metal.Spade Drill Bits as used in woodwork (pictured at right).Used to recess the threaded inserts in the ventral fin and thelower strut fairings.Straightedge in 2 lengths: a 1 metre builders level type is good for aligning the flaps to wingsand checking the control surface deflections, while a 3 metre long length of 100mm RHS(rectangular hollow section) aluminium is excellent for checking the rear of the wing andaligning the horizontal stabiliser: make sure that you buy a straight length with no dents.Sanding Blocks - stapling 80 grit emery tape around the ends of a length of straight timberabout 600mm long (shown below left) is very useful for achieving straight edges on itemssuch as trailing edges, flaps, etc. Taping emery tape to a short length of tubing (shown belowright) can be useful for things like the final sizing of the fuel filler body holes in the wing/tankand so on. You will use plenty of sanding blocks as you progress through your build, and witha little bit of imagination you can make them in almost any size and shape that you need.TorqueSeal – brand name security sealing lacquer used to show that nuts have been tightenedto safety or to the recommended torque setting and require no further work. Try aircraft partsor engineering suppliers for this product. Comes in several colours.Loctite compoundsThis brand name compound is considered essential in the construction of your <strong>Jabiru</strong>.Purchase the following grades:Type Use Appearance242 Thread locker medium strength Blue liquid262 Thread locker high strength Red liquid518 Sealant, form-in-place gasket Red gel577 Thread sealer medium strength Yellow paste620 Thread retainer high strength Green liquid7063 Cleaner – can use Acetone in place Clear solvent, aerosol applicatorWednesday, April 7, 2010 10 of 327
General>Glossary<strong>Jabiru</strong> <strong>J160</strong> Constructors <strong>Manual</strong>Here is a glossary of common composite terms that are used throughout this manual:Term5-Minute AralditeAT133 (not supplied)AT244AT303AT312AT313Body Filler – (bog)ClecoesCorematFlockGelcoatGlassJoggleLay-UpLC 3600 EpoxyLC 3600 HardenerLC 3600 ResinPeel ClothPolyester ResinQ-Cells (not supplied)ResinDescriptionQuick setting brand name epoxy glue.General>GlossaryFibreglass cloth with wide unidirectional strands, whichprovides great strength for weight. It is used in the fabrication ofthe spar and undercarriage legs.This is a standard bi-directional cloth that is used extensively forplates and other flat surfaces.This is a twill weaved cloth that can be moulded into curves andis therefore used for wing and fuselage skins, cowls, etc.A 2” wide glass tape.This 3” wide glass tape is used to joint other glass structures.The edges of glass tape do not fray like glass cloth.Lightweight automotive filler used in paint preparation.Patented reusable fasteners used to align parts prior to flockingand fixing with pop-rivets. Store in Acetone to keep them clean.Lightweight core material used to make sandwich panels.Low-grade short fibre reinforcement for resin. Also used as averb: to “flock something into place” for example.White polyester resin film used on exterior of suppliedfibreglass parts to provide a smooth finish.Fibreglass cloth. Also describes the process of wetting fibreglasscloth into a mould or onto parts: to “glass something into place”.Recessed step where 2 surfaces are to be flush joined.An example is the joggle around the windscreen and windows.Resin wetted fibreglass cloth laid into a mould or onto parts.Epoxy system used on all structural parts.¼ part of LC 3600 epoxy.¾ part of LC 3600 epoxy.To provide a surface that requires minimal preparation beforebonding, polyester cloth is included as the top layer of a glasslay-up. The cloth is simply „peeled off‟ and the surface beneathis ready for bonding, hence the name.Resin system that uses a catalyst to cure. Does not provide goodstructural properties like epoxies, and for this reason is not usedon any structural parts in your <strong>Jabiru</strong>.Inorganic micro-spheres mixed with resin and used as alightweight filler, usually used in paint preparation.Generic term used to refer to the LC3600 epoxy/resin mix.Wednesday, April 7, 2010 11 of 327
General>Registration and certification<strong>Jabiru</strong> <strong>J160</strong> Constructors <strong>Manual</strong>General>Registration and certificationThe accuracy of records and correct administrative procedures are just as important as thequality of workmanship in your project.By now you should have established the regulations under which you will build your aircraft.In Australia you have two options:1. Experimental Rule2. CAO 95.55 Amateur-built Ultralight CategoryOption 1 is administered by the Sports Aircraft Association of Australia (SAAA)Option 2 is administered by Recreational Aviation Australia (RAA)Aircraft built under Option 1 can only be General Aviation (VH-) registered and must carry“EXPERIMENTAL” markings.Aircraft built under Option 2 can only be registered with the RAA and must carry “19” seriesregistration numbers.You should consult the appropriate administrative association on their requirements fordocumentation, inspections and project administration.Contact details are:Sports Aircraft Association of Australia (SAAA)PO Box 169Clifton Hill, VIC 3068Phone: 03 9482 4716Fax: 03 9482 3936Recreational Aviation Australia (RAA)PO Box 1265Fyshwick, ACT, 2609Phone: 02 6280 4700Fax: 02 6280 4775Internationally you will need to establish the requirements for building your aircraft under theappropriate regulations governing amateur aircraft building in your particular country.Your local <strong>Jabiru</strong> distributor can give you guidance on who to consult and how your projectshould be administered.In all cases, however, it is your responsibility as an amateur builder to ensure that you arefully informed of the requirements and to ensure that you meet these requirements.General>Reference documentationThe FAA Advisory Circular “Aircraft Inspection, Repair and Alterations” (publication AC43.13-2A, ISBN: 1560270985) is an excellent reference work that covers all aspects ofaircraft building and repair, and it can be downloaded or purchased online from severalsuppliers of technical publications.The FAA Advisory Circular “Amateur-Built Aircraft and Ultralight Flight TestingHandbook” (publication AC 90-89A), addresses the topic in considerable detail and whichmay be obtained here: www.faa.gov/library/manuals/.Wednesday, April 7, 2010 12 of 327
General>Unpacking and support<strong>Jabiru</strong> <strong>J160</strong> Constructors <strong>Manual</strong>General>Unpacking and supportUnpack the wing box first and inspect the contents: there should be two wings. Inspect fortransit damage then close the box and store, as the wings will not be required for some time.Unpacking the main box is a much more complicated task as there are hundreds of parts andthey all have to be inspected for transit damage.The first thing you should do is locate your packing list which is in with all the individualcomponents that have been packed with your fuselage. This list will show you all of thecomponents that have been packed, each of which should correspond with the specific type &model of aircraft that you have ordered.Your kit was triple checked when it was packed in our factory, but PLEASE check off everysingle part as you unpack it: mark off every item so that YOU can be sure that you havereceived them.You could also make a note of where you plan to store each part or group of parts.Please notify <strong>Jabiru</strong> of any missing parts within 3 months of the receipt of your kit.At this stage it would be a good idea to store your instruments in a low humidity environment.Store your propeller in a horizontal position.Treat all the steel components with an anticorrosive substance.Fibreglass components will soften and change shape when heat is applied, so keep this inmind when deciding where to store your parts. For example: storing your flaps between therafters in the heat of the roof is a very bad idea if you live in a hot sunny climate.Here at <strong>Jabiru</strong> we pride ourselves on our after-market support, and if you have any difficultiesthrough the building process we would be happy to help you to resolve them.We provide product support via email, phone or fax.Start by checking the resources on our web site at: www.jabiru.net.au and contact us:Email: info@jabiru.net.au (please send us a fax or call if no read receipt is received)Phone: +61 (0)7 4155 1778 - (8.30 am-4.30pm AEST (Australian Eastern Standard Time))Fax: +61 (0)7 4155 2669Spare Parts DepartmentEmail: spares@jabiru.net.auPhone: +61 (0)7 4155 2917 - (8.30 am-4.00 pm AEST)Service DepartmentEmail: engines@jabiru.net.auPhone: +61 (0)7 4155 2811 - (8.30 am-4.00 pm AEST)Postal Address:<strong>Jabiru</strong> Aircraft Pty. Ltd.P.O. Box 5792Bundaberg West QLD 4670AUSTRALIALocation:Airport DriveBundaberg West QLD 4670AUSTRALIAWednesday, April 7, 2010 13 of 327
General>Composite standard proceduresComposite introduction<strong>Jabiru</strong> <strong>J160</strong> Constructors <strong>Manual</strong>General>Composite standard proceduresComposite construction techniques may seem mystifying to those who have never beeninvolved with composites before but they are straightforward and require only a few basicprocedures.Composite surface preparationFor bonding composite-to-composite or composite-to-metal the surfaces must be prepared inthe following ways:With peel clothWhere it is known that a surface will be bonded toanother surface, peel cloth is usually incorporated inthe lay-up under the gelcoat to provide a bare, clean„virgin‟ surface to aid the builder.Typically peel cloth is included in the lay-up for allstructural components: vertical fin, horizontalstabiliser, flaps, aileron pre-molds, etc.To prepare the surface for bonding simply cut at theedge of the peel cloth with a knife and peel the peelcloth off as shown in the photo at right, then lightlyroughen the surface by sanding to provide a good„key‟ for the epoxy to bond to.BaresurfacePeel cloth is typically red in colour as shown, although other colours are sometimes used.If you are in any doubt about the area that you intend to glass to, sand away the gelcoat and ifyou see anything that is not bare fibreglass then do not glass to it until it is bare fibreglass.NEVER, NEVER, NEVER glass over the top of peel cloth!PeelclothGelcoatWithout peel clothWhere there is no peel cloth for a bonding surface the surface must be free of gelcoat, greaseand contaminates and must be sanded lightly to provide a good „key‟ for the epoxy to bond to.MetalIf it is necessary to bond to composite to metal, the metal surface must be degreased androughly sanded to provide a good „key‟ for the epoxy to bond to.SummaryCareful surface preparation is extremely important when working with composites: allsurfaces to be bonded must be absolutely clean and must be roughened in order to provide agood „key‟ for the epoxy to bond to.Wednesday, April 7, 2010 14 of 327
Epoxy measuring and mixingQuality assurance and record keeping<strong>Jabiru</strong> <strong>J160</strong> Constructors <strong>Manual</strong>General>Composite standard proceduresIn Australia the SAAA require that a wet and dry bulb thermometer is kept in the room wherethe lay-ups are done. A further requirement is that a sample of each mix is kept as a qualityassurance step. In your builders log you should record the wet and dry bulb temperatures, themix number (all samples to be numbered) and the batch numbers of the resin and hardener.Samples of resin batches should be retained, dated and labelled according to the Task onwhich the batch was used. Samples should be inspected after 24 hours to ensure correctcuring. The cured resin should be hard and “scratch-able”.A good sampling device is a small plastic medicine measure cup: wipe the interior of the cupwith wax before each use to facilitate easy removal of the sample. Samples should not exceed10mm in depth otherwise the heat generated during curing may affect the result.Measuring epoxyThe Epoxy system used for the production of <strong>Jabiru</strong> Aircraft is LC3600, which is mixed in a3:1 ratio, which means that 3 parts of resin are mixed with 1 part of hardener.The best method for ensuring accurate measuring is to use a digital kitchen scale as describedin the section General>Required tools and equipment which is what we do in our factory.Curing timesThe LC3600 is a room temperature (24° Celsius minimum) curing epoxy so it requires noelevated temperature curing unless you are working in a particularly cold climate or perhapsduring winter months. The recommended curing time depends upon temperature but aminimum of 24 hours is good rule of thumb.Mixing epoxyWhen mixing the epoxy the mixture will initially appear 'cloudy' then as you mix the mixturewill become clearer but 'stringy', keep mixing and finally you'll be left with a clear mixturewith no sign of being 'stringy'.Note: The smaller the mix the larger the possibility for errors, so consider combining severaltasks and doing a larger mix wherever possible.Mixing in flockAs a general rule, mix flock so you can take a sample with a mixing stick turn it over & itdoes not dribble off. If it is a little too runny, add more fibre flock.Mixing epoxy and milled cotton flock together creates an excellent filler which is used inmany places to form edges and fillets. The mixture is referred to as 'flock' but is often used asa verb, for example: "flock the bracket into the position shown...”Mixing 5-minute Araldite5-minute Araldite is a fast curing epoxy and is very useful for bonding non-structural itemsinto place. If you find that your Araldite won‟t cure it is usually because 2 lots of the samepart were used instead of 1 each. We have all made that mistake at least once.Mixing 5-min Araldite with cotton flock creates a good paste for 'bedding' parts into place.Same rule applies as for mixing Epoxy.Wednesday, April 7, 2010 15 of 327
Composite generalGlassing procedure<strong>Jabiru</strong> <strong>J160</strong> Constructors <strong>Manual</strong>General>Composite standard proceduresAny lay-up of glass fibre cloth should follow this general procedure: make a mix of resin andbrush a coat of resin onto the entire area to be glassed, then lay the first piece of cloth on andcarefully brush it into place, adding small amounts of resin to the brush as required to wet thecloth, until the resin has completely saturated the cloth: the cloth seems to change colourslightly from a silvery white to a colour close to that of the surrounding surface when it issaturated with resin.Once the first layer of cloth has been successfully brushed on, apply the second layer andbrush that on in the same manner, adding small amounts of resin as required to wet the cloth.Repeat for as many layers of cloth as the task requires.Peel clothPeel cloth is supplied in the bags of glass fibre cloth in the kit. The intended use for this peelcloth is to brush it onto the top of a layed-up area of glass fibre cloth.The peel cloth will smooth out the finished surface by allowing the resin to level off acrossthe weave of the glass fibre cloth and provide a good surface for painting preparation.Trimming edges of glass fibre clothThere are two times for trimming edges, these are before curing while the epoxy is 'tacky'(approximately 2 to 4 hours after mixing) and when the structure is fully cured.Various tools are used for trimming edges but for thin or 'tacky' lay-ups a sharp utility knifemay be used. Thicker cured edges may require a jigsaw and a rough file to trim. A heat gunmay be used to soften cured edges so that a utility knife can trim them.Inspection and evaluationEach lay-up will require an inspection and evaluation after curing.Inspect for soft or wet patches after a reasonable time for curing has been allowed, as suchwet or soft areas may indicated an improperly mixed batch of epoxy.Care must be taken to check that areas have actually been bonded together and that there areno air gaps or bubbles between the layers of glass, especially in curves/radii.Removing screwsSelf-tapping screws are used to hold parts in place while epoxy is curing but once the epoxyhas cured it can be difficult to remove the screws.Use your soldering iron to heat the head of the screw and the composite around the screw willsoften allowing the screw to be removed easily.This is also a handy trick to use if any bushes are not perfectly in line and need a slight adjust.ClecoesClecoes are used to hold hinges while they are being flocked into place prior to riveting andso they must be free of oil and grease that could contaminate the surface to be bonded, andthey will inevitably get flock onto them during the bonding or flocking process.To prevent these problems, keep your Clecoe fasteners stored in a sealed tin of Acetone toensure that they remain clean and ready for use – the Acetone will dry off them in seconds.Wednesday, April 7, 2010 16 of 327
General>Aircraft grade bolts and lock nutsGeneral<strong>Jabiru</strong> <strong>J160</strong> Constructors <strong>Manual</strong>General>Aircraft grade bolts and lock nutsAll bolts 3/16” or larger in diameter that have been supplied with your <strong>Jabiru</strong> kit are Aircraftgrade bolts.Under no circumstances must any bolts other than Aircraft grade bolts be used on your <strong>Jabiru</strong>.Aircraft grade bolts are significantly stronger than regular commercial grade bolts and havefeatures such as corrosion resistance that have been designed specifically for aircraft use.Aircraft grade bolts are quite different in appearance to regular commercial grade bolts inseveral ways: Aircraft grade bolts are usually gold or silver in colour; they have a relativelyshort thread length and a longer plain shank or grip length.In almost all cases the supplied and specified bolts will be the correct length for each task, butkit builders need to be aware of the correct method of determining and/or checking the correctlength of bolts and also the correct method of tightening lock nuts.The parts of a boltThere are 2 variable lengths to an Aircraftgrade bolt: the overall length, usually justreferred to as the length, and the grip length,which is the length of the plain shank of thebolt, which is measured from underneath thehead of the bolt to the beginning of thethreads (see the drawing at right).The thread length is generally fixed inrelation to the diameter of the bolt.Bolt identificationAircraft bolts supplied with your <strong>Jabiru</strong> kit are identified in this <strong>Manual</strong> and in <strong>Jabiru</strong>drawings by the prefix letters “AN”, the diameter (measured in 1/16” increments) and thelength (measured in 1/8” increments) of the bolt and a suffix, which is usually “A”.Examples of bolt identifiers would be: AN3-6A, AN4-14A, AN3-22A, AN4-72 and so on.For example, for an AN3-5A bolt:AN means the bolt has been manufactured to Aircraft (Military) standards3 the diameter of the bolt in 1/16" increments: (3/16” in this case)-5 (the dash number) the length of the bolt in 1/8" increments: (5/8” in this case)A not drilled for a lock pin. Bolts with no “A” here are drilled for a lock pinIf the dash number defining the length of the bolt has two digits, the first digit is the length inwhole inches and the second number is the length in additional 1/8" increments. This canbecome complex and if you feel the need to delve deeply into the subject you can locate anAN bolt chart online or purchase an AN bolt gauge from suppliers of Aircraft grade fasteners.The last example given above (AN4-72) there is no “A” suffix, which indicates that thethreaded end has been drilled during manufacture for a lock pin while the other 3 examples allhave the suffix “A” and do not have provision for a lock pin.Wednesday, April 7, 2010 17 of 327
Determining and checking bolt lengths<strong>Jabiru</strong> <strong>J160</strong> Constructors <strong>Manual</strong>General>Aircraft grade bolts and lock nutsA bolt must be long enough to ensure that no more than one thread will be inside the bolt holewhen the bolt is fitted. This grip length should be equal to the material thickness that is beingheld by the bolt.What this means is that the correct bolt length must be used in every case, and if a nutcannot be tightened to safety then measures must be taken to correct the length, either bypacking with washers (an absolute maximum of 3 flat washers may be used for packing,starting with the required washer under the nut, then one washer under the head of the boltand finally, if needed, another washer under the nut) or using a different length bolt.Lock nutsAll bolted components on your <strong>Jabiru</strong> aircraft are held in place with lock nuts, either a Nyloctype fibre lock nut for most uses or a steel lock nut for hot areas such as in the engine bay.It is important to understand the procedure for tightening Aircraft lock nuts: each nut must befitted with a flat washer under it and “tightened to safety”, which is defined as having aminimum of 1½ threads and a maximum of 3 threads showing beyond the end of the lock nut.!!WRONG!!Less than 1½Correct!!WRONG!!More than 3This is considered critical for load-bearing bolts and good practise for all other bolts.Any less than 1½ threads showing beyond the end of the lock nut means a risk of the nut notlocking correctly while any more than 3 threads showing beyond the end of the lock nut couldmean that the lock nut is bottoming on the thread and there is a risk overstressing the bolt andnut and/or not gripping the joined material correctly. Examples of each case are shown above.In general all nuts should be fitted so that they face outward so that they can be easilyinspected. Nuts inside the cabin should face out and towards the pilot if at all possible.Nuts that have been tightened to safety should be marked with a dab of TorqueSeal.Wednesday, April 7, 2010 18 of 327
General>Rod ends<strong>Jabiru</strong> <strong>J160</strong> Constructors <strong>Manual</strong>General>Rod endsIt can truthfully be said that the rod ends are the sole connection between the pilot and thecontrol surfaces of your <strong>Jabiru</strong>.A very important item of hardware indeed!Given the vital role that each and every rod end performs in your <strong>Jabiru</strong> it is equally importantthat you familiarise yourself with the correct method of connecting rod ends.There are 2 parts to connecting a rod end: the cable connection and the drive connection.Cable connectionAll cable rod ends arefemale rod ends, which isto say that the cable (themale end) is screwed intothe rod end (the femaleend) the cable length canbe adjusted by screwingthe rod end further ontoJam nutRod endthe cable or further offSafetythe cable, and then the Cableholecable is fixed to the rodend by means of a jam nut on the cable that locks the threads from turning.There must be enough cable thread length in the rod end to provide strength and security, andeach female rod end has a small hole, called the safety hole, part-way along one side throughwhich the cable threads must be visible – if you cannot see the cable threads through thesafety hole, then you must not fly the aircraft until adjustments have been made so that thecable threads are visible through the safety hole.This is of the utmost importance and cannot be overstated!Drive connectionMost of the rod ends on your <strong>Jabiru</strong> are driven by a 3/16” bolt through the spherical bush, andthey must be connected in the following manner: between the rod end and the drive lever, fitone 3/16” flat washer (or more in the case of the flap drive arms – details in the Flaps task).Between the rod end and the retaining nut (or the head of the bolt, depending on which waythe bolt is fitted) fit one ¼” flat washer (one size larger than the bolt).The purpose of this larger flatwasher is that should the sphericalbush in the rod end fail, the largewasher will provide a margin ofsafety by preventing the rod endfrom leaving the drive bolt. In thephoto at right you can see the waythat the washers are fitted.In practical terms, should a rod end fail internally in flight the rod end will still remainconnected to the drive bolt and the control will continue to function.Thus the correct fitting of the flat washers to rod ends is extremely important.SphericalbushWednesday, April 7, 2010 19 of 327
General>Health and safety<strong>Jabiru</strong> <strong>J160</strong> Constructors <strong>Manual</strong>General>Health and safetyWorking with composites is no different than working with other chemicals and flammablematerials, and caution and common sense should prevail at all times.NO SMOKINGDo not smoke or have any exposed flames near your kit or resin storage area.Epoxy will burn.Warning: the fumes from burning epoxy are extremely toxic!EpoxyLong term exposure to epoxy can lead to an 'epoxy allergy' so suitable safety precautionsshould be taken as follows:ContactDo not expose your skin to epoxy. Neoprene, latex or nitrile rubber gloves (with pure cottongloves worn underneath to wick away sweat from your hands) and protective (industrial)clothing should be worn when handling epoxies.If epoxy is spilt onto the skin, wash off with warm water and soap immediately.Barrier cream can help the skin to avoid becoming sensitised. Note: if barrier cream is usedtake care to keep it away from any surfaces to be bonded by wearing gloves – the cream couldcontaminate and weaken the join so keep the cream inside your disposable gloves at all times.Fresh AirEpoxy fumes should not be inhaled. Blow fresh air across the work face at all times.The use of an external fresh air source and facemask is strongly recommended along with theuse of a fan for blowing the epoxy fumes away. In our factory we use several industrialpedestal fans to blow fresh air across the work surfaces at all times.DustAlways wear a dust mask when sanding or cutting composites. Cutting and sandingcomposites creates a lot of dust and the extremely fine glass dust should not be inhaled.A half-face respirator with suitable filters is highly recommended and should be worn at alltimes when sanding fibreglass parts.OK, lets get building!Wednesday, April 7, 2010 20 of 327
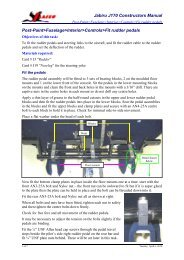
Pre-Paint>Fuselage>Fit ventral fin and trim hornObjectives of this task:<strong>Jabiru</strong> <strong>J160</strong> Constructors <strong>Manual</strong>Pre-Paint>Fuselage>Fit ventral fin and trim hornTo fit the ventral fin, trim horn and cut the related rear fuselage penetrations. This task iscarried out while the fuselage is inverted and supported on trestles.Materials required:Epoxy resin and flock, 5-minute AralditeHardware box #4Cut the cable and tube slotsThe cable and tube slots are marked on the underside of the fuselage with marker pen.Cut out the marked slots on the fuselage centreline. Each slot should be drilled at each end toabout ½” and then the holes can be joined by cutting along the lines with a jigsaw.Elevator cablemounting bolts150mmTrim hornDO NOTCUT OUT!Completed ventral fin area showing slots, trim horn and ventral fin retaining nutsWe find that widening the elevator cable slot (the slot at the very rear of the fuselage) asshown in the photo above can provide useful access later in the build.Do not cut out the line marker for the trim horn! The trim horn marking can be transferredthrough the peel cloth by scribing around the marks with a sharp knife, cutting just deepenough that the cut can be seen once the peel cloth has been removed.File and sand all cutouts to a good finish. Remove the peel cloth from the ventral fin area (rearunderside) of the fuselage.Check the elevator cable mounting holes: test fit the horizontal stabiliser to the fuselage andpush it all the way forward. Hold a set square against the rear of the horizontal stabiliser andalong the fuselage and measure exactly 150mm forward from the rear of the stabiliser (andnot the fuselage) as shown in cyan in the photo above – the 2 holes should be on that line.If they are not, fill the existing holes with flock and redrill them so that they are exactly150mm from the rear of the stabiliser. This dimension will become critical later when youadjust the elevator travel so take the opportunity to check it (and adjust it if needed) now.Remove the horizontal stabiliser and store carefully until required.Wednesday, April 7, 2010 21 of 327
<strong>Jabiru</strong> <strong>J160</strong> Constructors <strong>Manual</strong>Pre-Paint>Fuselage>Fit ventral fin and trim hornFit the ventral finUse a chalk line to mark the fore and aft centreline of the fuselage.Lay the ventral fin on the rear of the fuselage and seat it so that it matches the curve of thefuselage, then check that the fin is centred at the front and the rear and tape it in place. Drill3/16” holes though each of the marked locations in the ventral fin mounting lip and throughthe fuselage. Remove the ventral fin then enlarge the holes in the fuselage to 13/64” and use afluted wood drill bit (pictured right) to recess the hole so that the lip of the insert sits flushwith the surface and then tap each hole to a 1/4” UNC thread.Use a screw and spacer (shown above right) as a tool to placeeach insert. Before fitting the insert put a single drop of superglueonto the outside thread and then screw it into place.Fit the trim hornSand away any remaining gel coat and roughness from around the trim horn mounting area.The trim horn is slightly offset from the fuselage centreline so it will be necessary to sand thefoot of the trim horn so that it will sit completely upright when it is mounted. Sand the sidesof the trim horn at the same time so that the glass fibre cloth will bond correctly.Mix up a small batch of 5-minute Araldite andflock and coat the foot of the trim horn, then placeit on the marked line and use a length of tape tohold it upright. Put masking tape over the threadedinserts nearest to the trim horn to prevent flockgetting into the threads.75 x 170 100 x 170When the Araldite/flock mix has cured apply a small amount of resin and flock to make asmooth radius at the foot of the trim horn and then apply 3 layers of AF303 glass fibre cloth toeach side of the trim horn. The bag labelled “Trim Horn” contains 2 sizes of glass fibre cloth:the larger pieces (100 x 170) go on the side nearest the fuselage centreline. Leave to cureovernight. The next day any excess cloth can be trimmed away with a sharp knife.Wednesday, April 7, 2010 22 of 327
Finish the ventral fin<strong>Jabiru</strong> <strong>J160</strong> Constructors <strong>Manual</strong>Pre-Paint>Fuselage>Fit ventral fin and trim hornResinDrainholesCut outSand the inside bottom rear quarter of the ventral fin. Mix around 200 grams of polyesterresin and add a few drops of hardener (take care not to use too much hardener or there may beheat issues as it cures) and pour into the bottom of the ventral fin then prop the fin up at a 45°angle while it cures.Once the resin has cured drill a 12.5mm hole through at the marked location – this will beyour rear tie down point. Drill 2 drain holes, one at the front corner and one at the rear just infront of the resin.Cut out the marked area at the top rear – this is where the elevator drive arm will travel.Store the ventral fin for later final fitting and painting.This completes the Pre-Paint>Fuselage>Fit ventral fin and trim horn task.Wednesday, April 7, 2010 23 of 327
Pre-Paint>Fuselage>Prepare the fuselageObjectives of this task:Once the Fit ventral fin and trim horn task has been completedthe fuselage can be turned upright and the remainingpenetrations made. This allows the bulk (but not all) of the messto be made early in the build.In the factory we place the fuselage in a jig at this stage,however you can achieve much the same result by placing asawhorse or a similar platform or trestle under the cabin and ahigher trestle under the empennage. Cover both of these itemswith some padding to minimise scratching the fuselage.Large holes should be started with a pilot hole first to accuratelyplace the hole and then be drilled out with a hole saw.Slots should have each end drilled out first and then mark anduse a jigsaw to join the holes.<strong>Jabiru</strong> <strong>J160</strong> Constructors <strong>Manual</strong>Pre-Paint>Fuselage>Prepare the fuselageRectangular holes should have a hole drilled at each corner and then be marked and cut fromhole to hole with a jigsaw. This practise will ensure accurate cuts with no sharply angularcorners or irregular edges.Tools and materials required:Orbital sander and hand sanding blocksPower drill with bits, 30mm and 2¼” hole sawsJigsawEpoxy resin and flockQ-Cell filler5-minute AralditeSand the fuselageStart by using your orbital sander to take any rough edges away: the moulding process canleave sharp edges and the occasional few glass fibre prickles, so take a bit of time now andremove all of these potential hand hazards before starting work. Fibreglass cuts are painfuland you can do a lot to avoid them by careful preparation at this early point in the build.Think of it as an investment in your comfortable building future.Run your orbital sander lightly across every internal surface: around the door frames, seats,console, windows, etc and anywhere else that looks even slightly rough. There is no need tosand heavily; just a light scuff is all that is required. Use a few hand sanding blocks for anyhard-to-get-at places.Remove peel clothRemove the peel cloth from the vertical fin stub and around the rear of the empennagegenerally, including around the horizontal stabiliser opening.Lightly sand around the edges of the areas under the peel cloth to remove any peel cloththreads that remain.Wednesday, April 7, 2010 24 of 327
Vertical fin stub<strong>Jabiru</strong> <strong>J160</strong> Constructors <strong>Manual</strong>Pre-Paint>Fuselage>Prepare the fuselageThe rudder cable passes from the empennage and through the fin stub as does the static line,VHF antenna cabling and strobe wiring (if you elect to have a tail strobe). All these itemsrequire access into and though the fin stub.15mm180mm70mm140mmStart by marking and cutting the rudder cable slot on the right-hand side of the fin stub:measuring from the rear of the stub the slot starts at 180mm and is 70mm wide.The bottom of the slot is located 15mm up from the base of the fin stub. Drill each end of theslot to 15mm and jigsaw the slot out, and then sand any rough edges away. Refer to the photoabove left for detail.The 30mm access hole on the left-hand side of the fin stub has its centre located at 140mmfrom the rear of the stub. Refer to the photo above right for detail.The 30mm access hole in the top of the finstub has its centre located at 30mm from therear of the stub. Refer to the photo at right.30mmWednesday, April 7, 2010 25 of 327
<strong>Jabiru</strong> <strong>J160</strong> Constructors <strong>Manual</strong>Pre-Paint>Fuselage>Prepare the fuselageCabin top penetrations30mm45mm210mm45mmMark a centreline between the bolt holes in the front and rear wing attach lugs: this will be theheight of the centre of the fuel gauge opening.Now double check the measurement marked“210mm” in the photos above and at right:measure in the wing root from the front wing210mmlug back to the centre of the gauge as shownat right, then measure on the fuselage from theinside (not the outside) of the inner front wing attach lug (see photo above) the exact samedistance (which should be very close to 210mm) then mark and drill the pilot hole for the fuelgauge opening. Recheck your measurements and then use a 2¼” hole saw to cut the gaugehole: drill a pilot hole first.Measure forward 45mm from the front wing attach lug and drill a 10mm hole for the stallwarning tube on the left side of the fuselage only.To mark the fuel system connector slot, draw a line down 12mm from the back of therearmost wing lug and another line 45mm below the bottom of the rearmost wing lug, andthen mark the slot at 50mm wide and 10mm high. Drill both ends to 10mm and use a jigsawto cut between the holes. File the top and bottom of the slot to a smooth and square finish.12mmCabin air ventsCut a 60 x 44mm opening on each side of thelower forward fuselage.The bottom of the opening should be 80mmabove the bottom of the door opening and thefore and aft location should be centred on avertical line drawn down from the rear of theupper cowl joggle, all as shown at right:Corners of the opening should be rounded tosuit the vent door – the door should fittowards the front of opening with a 3mm gapat the rear to allow for the hinge action.60mm80mm44mmThe air vent door surround can be flockedinto place inside the fuselage as shown atright, with the hinge arm positioned at therear of each hole and using the door to aidthe positioning.Wednesday, April 7, 2010 26 of 327
Fit the header tank enclosure<strong>Jabiru</strong> <strong>J160</strong> Constructors <strong>Manual</strong>Pre-Paint>Fuselage>Prepare the fuselageThe fuel header tank sits behind the right-hand seat in a sealable enclosure and an additionalrib is fitted to the left-hand floor rib so that the lid that seals the enclosure also functions as aluggage shelf behind the seats.RH floor ribCable slotHeader tankenclosureLongitudinal ribRear ribRight-angle sectionLH floor ribSupport ribPlace the header tank enclosure on the floor behind the right-hand seat so that it fits snuglybetween the longitudinal rib and the right-hand floor rib as shown above right and check thatthe rear lip of the enclosure sits down on the rear rib. Drill the 3 pilot holes in the enclosure(arrowed below right) at 3/32” through the fuselage floor and then remove the enclosure.The drain from the enclosure will be throughthe quick-drain fitting hole.Mix a batch of resin, stir in Q-Cell to make afirm mix and apply the Q-Cell to the cabinfloor as shown in blue at right, including acircle with a clear centre of about 1½”around the quick drain hole. Apply the Q-Cell thicker towards the rear.Refit the enclosure and secure with 3 x 8Gself-tapping screws and washers: tighten thequick drain (front) screw so that theenclosure sits firmly against the floor butonly tighten the rear screws enough to bedthe enclosure firmly into the Q-Cell mix.Fuel pumppilot holesSupport ribQuick drainpilot holeCut the front of the support rib off so that it runs straight down from the rear of the seat to thefloor, then pre-fit it inside the left-hand floor rib and make sure that the top of the support ribis level with rear rib and the cross beam behind the seats. Araldite a length of split tube alongthe front edge of the rib to protect fuel lines and cabling that will later pass in front of it.Mix some resin and flock and fit the support rib into place and then fit the long right-anglesection of glass fibre to the cross beam behind the seats as shown top right and above. Makesure that the top front of the enclosure is sealed and leave to cure overnight.Next day trim the ends of the right-angle section to size, remove the 8G screws (heat ifrequired) then drill the quick drain hole out to 1 1/8” and the fuel pump holes to 3/16”.Use TLR rivets to fix the tie-down lugs to the floor ribs as shown on the drawing overleaf.Wednesday, April 7, 2010 27 of 327
<strong>Jabiru</strong> <strong>J160</strong> Constructors <strong>Manual</strong>Pre-Paint>Fuselage>Prepare the fuselageThis completes the Pre-Paint>Fuselage>Prepare the fuselage task.Wednesday, April 7, 2010 28 of 327
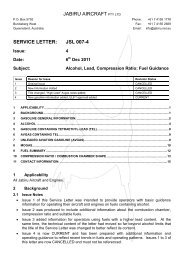
<strong>Jabiru</strong> <strong>J160</strong> Constructors <strong>Manual</strong>Pre-Paint>Fuselage>Undercarriage>Assemble main wheelsPre-Paint>Fuselage>Undercarriage>Assemble main wheelsObjectives of this task:In this task you will assemble the main wheels and tyres and fit the brake discs.Materials required:Cards # J21 „Main wheels‟Talcum powder for fitting the inner tubeAssemble the main wheelsUse a press or a vise to press the bearings into the main hub – use a socket with a slightlysmaller diameter than the outer race of the bearing to press the bearings in with.The outer bearing will sit slightly inside the hub while the inner bearing will be flush.Do not press on the inner race – the bearing is not designed to take pressure in that direction.Sprinkle some talcum powder inside the tyre and insert the inner tube. Slightly inflate theinner tube to prevent it becoming pinched then fit tyre and tube over the main hub and fit theouter rim to the main hub with the inner tube inflation valve facing out.Bolt the outer rim to the main hub, but before tightening the bolts make sure that the innertube is not being pinched by rotating the tyre and tube while holding the wheel still.Fit the inner tube inflation valve through the hole in the outer rim and then tighten the boltsholding the outer rim to the main hub. Inflate the tube to a pressure of 30psi – the tyre willpop out to the final seated position on the rims so keep fingers away while inflating.Left wheelRight wheelFit the brake disc to each wheel. It is important that each disc is fitted in the correct directionof rotation as shown in the photo above and in the drawing on the next page. Fit each AN3-6Abolt though from the disc towards the wheel as shown above and secure with an AN960-10(3/16”) flat washer and Nyloc nut and tighten firmly.Use chalk to mark each wheel as being either a left or a right wheel.Wednesday, April 7, 2010 29 of 327
<strong>Jabiru</strong> <strong>J160</strong> Constructors <strong>Manual</strong>Pre-Paint>Fuselage>Undercarriage>Assemble main wheelsThis completes the Pre-Paint>Fuselage>Undercarriage>Assemble main wheels task.Wednesday, April 7, 2010 30 of 327
<strong>Jabiru</strong> <strong>J160</strong> Constructors <strong>Manual</strong>Pre-Paint>Fuselage>Undercarriage>Assemble main gearPre-Paint>Fuselage>Undercarriage>Assemble main gearObjectives of this task:In this task you will assemble the main undercarriage legs, which includes fitting the axles,disc brakes and wheels and adjusting the brakes.Materials required:Cards # J8 „Dual Brakes‟ and J21 „Main wheels‟Brake fluid for assembly of disc brake pistonsSpat bracketsFit the retained nuts to the spat mounting bracketsusing countersunk 3/32” rivets. There are 4 retainednuts (arrowed) on each bracket. Countersink theactual screw holes where the spat will be fitted: thecountersinks will help to guide the screws into theholes when fitting the spats.Fit the axles and backing platesSlip the stub axle (from the „Main wheels‟card) through the mounting plate with thebrake unit facing towards the front of theaircraft and fit to the main gear leg as shownin the photo at right. The chamfered face ofthe plate is on the side that faces the gear leg.Align the bolt hole in the outboard end of thestub axle (arrowed in green at right)vertically and fix the plate in place 2 x AN5-16A bolts at the top and 2 x AN5-15A boltsat the bottom. The longer bolts are used atthe top to allow for the spat bracket.Fit the spat bracket to the AN5 bolts with thecaptive nuts facing towards the wheel andwith the notched surface to the bottom asshown below right.Fix in place with one Nyloc nut and washeron the top front bolt.The gear leg shown in the photos on thispage is a right-hand gear leg.Front of aircraftFront of aircraftFit Nyloc nuts and flat washers to the 2 bottom bolts and a Nyloc nut with a penny washer tocover the adjustable slot at the top rear bolt. This slot will allow the spat to be moved up ordown during final assembly. The slot must face the rear of the aircraft.Check that the bolt hole in the outboard end of the stub axle is positioned up and down beforetightening the nuts firmly.Use a permanent marker to identify each leg as being either a right or left leg at this point – itcan save confusion when you come to fit the gear legs in the next task.Wednesday, April 7, 2010 31 of 327
Assemble the brake pads<strong>Jabiru</strong> <strong>J160</strong> Constructors <strong>Manual</strong>Pre-Paint>Fuselage>Undercarriage>Assemble main gearFit the brake pads to the backing plates: there are 2 types of backing plates – flat and Uchannel.Both types take the same pads, but the shorter rivets are used on the flat backing plate.Face the angled side of the pad to the outside of the backing plate as shown in the photo ofcompleted pads below right. Each brake pad is held in place by 3 rivets and the fitting processis as follows: fit all 3 rivets from the recessed hole in the pad through the pad and though thebacking plate. Note that fitting the third rivet may need a slight touch with a drill to ease therivet through the last hole.Seat the rivets by tapping theheads to make sure that eachrivet is fully through the pad andthe backing plate, then turn theassembly over and rest the headof the rivet on a protrusion* andflare the rivet using a taperedpunch then use a flat punch to mushroom the end of therivet over. The rivets should not be able to move whencorrectly fitted.*In the factory we use a simple jig that holds the backingplates over studs at each end and has 3 raised screws tohold the rivets up – you can see it in the riveting photosabove.You could make up something similar in your workshopby screwing 3 screws into a solid wooden bench (use abacking plate for the spacing), all at the same height sothat the brake pad just clears the bench and the head ofeach screw touches the head of each rivet, then place each brake pad and backing plate overthem and use them to punch against.Check each brake pad and backing plate assembly carefully to see if there are any cracks inthe pad, particularly around the end rivet holes. If there are any cracks call your dealer for areplacement pad and rivets: do not fit a cracked brake pad.The brake pad and backing plate assembly will be referred to as simply a pad from this pointon. The U channel pad is the outer pad and the flat plate pad is the inner pad.Wednesday, April 7, 2010 32 of 327
Assemble the brake calipersIn this step you will assemble the hydraulic disc brake calipers.<strong>Jabiru</strong> <strong>J160</strong> Constructors <strong>Manual</strong>Pre-Paint>Fuselage>Undercarriage>Assemble main gearCleanliness is essential when working with hydraulic brake parts, so clean your working areaand your hands thoroughly before starting this step.Use compressed air to clean any dust and dirt from the inside of the brake calipers andpistons. Apply brake fluid to the O-rings and fit one to each piston, then apply a smear ofbrake fluid to the inside of the caliper and fit the pistons to the calipers: press the piston gentlyinto the caliper with the cupped side of the piston facing outwards.Thread and tighten a bleednipple into the lower fitting onthe caliper (under the <strong>Jabiru</strong>logo) and push a blanking pluginto the top fitting as shown atright – the brake lines will befitted later in Post-Paint and theblanking plug will keep thecaliper sealed until then.Wash any brake fluid off your hands with soap and water – it can irritate sensitive skin.Refer to the drawing on the next page for an overview of the brake system.Wednesday, April 7, 2010 33 of 327
<strong>Jabiru</strong> <strong>J160</strong> Constructors <strong>Manual</strong>Pre-Paint>Fuselage>Undercarriage>Assemble main gearWednesday, April 7, 2010 34 of 327
Assemble the brake and wheelFirstly and very importantly place the alloy washer(#6A028B0D on the „Main wheels‟ card) on the stub axlewith the tapered inner side towards the gear leg and awayfrom the wheel – this washer (circled at right) provides asquare surface for the inner wheel bearing to butt up to.Now we can fit the appropriate wheel (left or right) to eachgear leg and then fit the brake system.<strong>Jabiru</strong> <strong>J160</strong> Constructors <strong>Manual</strong>Pre-Paint>Fuselage>Undercarriage>Assemble main gearFit the wheel to the stub axle and secure with the axle extension, fitting an AN3-12A boltthough the extension and the axle from the top with a lock nut on the bottom.Take the U channel backing plates and thesteel lock nuts. Fit a bolt through thebacking plate from the pad side and into thenut and very carefully apply a drop ofSuperglue to 2 opposite flats of the steellock nut and then pull the steel lock nutback into the U channel as shown arrowedat right to glue the nut into the U channel:Take care not to glue the bolt into the nut!Look carefully at the drawing on theprevious page to see how the brake assembly fits together.Pull bolt back this wayGlue nutin hereAs you can see from the drawing the outer pad goes on the outside of the wheel disc, whilethe inner pad goes between the wheel disc and the brake mounting plate and the hydrauliccaliper goes behind or inboard of the inner mounting plate.2 AN4-14A bolts, each with a washer, secure the whole assembly and each bolt has a springthat is fitted over the bolt and which holds the brake pads apart. In the factory we fit the topbolt first with no spring in order to get the correct alignment and then fit the bottom bolt andspring, then go back to the top bolt and fit the spring.Wednesday, April 7, 2010 35 of 327
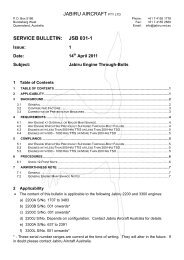
Adjust the brakes<strong>Jabiru</strong> <strong>J160</strong> Constructors <strong>Manual</strong>Pre-Paint>Fuselage>Undercarriage>Assemble main gearThe objective is to have a wheel that will turn freely while at the same time not having thebrake pads too far away from the disc.In order to achieve this it may be necessary to slightly bend the brake mounting plate awayfrom the disc – loosen the main bolts just enough that the outer pads are 1 or 2mm away fromthe disc and check just the clearance between the inner backing plate and inner pads.If the inner pad is rubbing and making it difficult to turn the wheel, gently bend the brakemounting plate slightly away from the disc until the wheel can turn freely but with the padjust touching the disc.Now tighten the main bolts up until the outer pad just starts to bind on the disc and then backthe bolts off slightly, perhaps one third to one half of a turn. At this point the wheel shouldturn freely and the brake pads should still be very close to the disc.In the photo at right youcan see the finished brakeassembly, fully adjusted.Note that there is very littleclearance between the discand the brake pads.Note also the springs onthe bolts that hold the padsapart.At the left of the photo youcan see the spat bracketwith the captive nut visible.Brake mountingplateBrake discBrake caliperInner padOuter padMain boltTireThis completes the Pre-Paint>Fuselage>Undercarriage>Assemble main gear task.Wednesday, April 7, 2010 36 of 327
<strong>Jabiru</strong> <strong>J160</strong> Constructors <strong>Manual</strong>Pre-Paint>Fuselage>Undercarriage>Fit main gearPre-Paint>Fuselage>Undercarriage>Fit main gearObjectives of this task:In this task you will permanently fit the main undercarriage to the fuselage. Both main gearlegs will be fitted to the fuselage at the same time and the mounting bolt reinforcing plateswill be flocked to the cabin floor as part of the fitting process.At this point in the build the fuselage should be upright and firmly mounted on 2 trestles thatplace the underside of the fuselage at 650mm high under the cabin.A standard builders sawhorse placed in front of the main gear recess would provide adequateclearance.Materials required:Card # J7 „Undercarriage‟Epoxy resin and flock10mm / 3/8” ID reinforced hose approximately 80mm long:Prepare and pre-fit the main gear legsFit the centre bolt to the inboard end of each leg: the AN6-24A bolt (the shortest 3/8” bolt onthe Card) goes through a flat washer, a machined aluminium washer and 2 rubber bushes,with the rubber bushes fitting into the gear leg as shown above left and centre.Fit the gear leg into the recess in the fuselage and fit the bolt up through the inner hole in thegear leg recess as shown above right. Place a Nyloc nut loosely on the thread for the moment.Cut out the yellow packers for the clamp plate and drill 3/8” holes in each end as marked –use the clamp late as a drilling jig.PlatesFuselagePackerClamp plateGear legGear legAssemble the clamp plates: fit 2 x AN6-26A bolts and washers to the clamp plate then fit theyellow clamp plate packer to one bolt only.Fit the assembly around the gear leg then fit the yellow clamp plate packer to the other boltand test fit by fitting the bolts up through the holes in the fuselage.Wednesday, April 7, 2010 37 of 327
<strong>Jabiru</strong> <strong>J160</strong> Constructors <strong>Manual</strong>Pre-Paint>Fuselage>Undercarriage>Fit main gearUse a pencil to mark the position of the clamp plate on the top and bottom of the gear leg –the clamp plate will be flocked onto the gear leg and the marks indicate where you will needto roughen the gear leg in order to provide a key for the flock.Remove the clamp plate; roughen the top of the plate and the marked areas on the top andbottom of the gear leg.Pilot‟s seatbackForwardouter boltCentre boltOn each side of the front seats are the centre and forward outer clamp holes for the main gear,while the rear outer clamp hole is on the floor behind the main beam, and each hole will havea reinforcing plate flocked over it. (The plates are on the Card, part numbers 6036094 and6037094, and can be seen the lower left-hand photo on the previous page.)Roughen the area around each hole and the back of each reinforcing plate to provide a key forthe flock. The surface around each hole is not absolutely flat, and no attempt should be madeto make it flat because doing so would require removal of glass fibre from the floor whichcould weaken the area.Fit the main gear legsMix a batch of resin, keep a small amount aside and add flock to the remainder.Apply a 2mm layer of flock to the top of the clamp plate and reassemble the clamp plates: fit2 x AN6-26A bolts and washers to the clamp plate then fit the yellow clamp plate packer toone bolt only.Fit the assembly around the gear leg then fit the yellow clamp plate packer to the other boltand fit the bolts up through the holes in the fuselage.Push the gear leg firmly up against the fuselage and use a softheaded hammer to drive theclamp bolts and centre bolt fully home.Wednesday, April 7, 2010 38 of 327
<strong>Jabiru</strong> <strong>J160</strong> Constructors <strong>Manual</strong>Pre-Paint>Fuselage>Undercarriage>Fit main gearWednesday, April 7, 2010 39 of 327
Fit the reinforcing plates<strong>Jabiru</strong> <strong>J160</strong> Constructors <strong>Manual</strong>Pre-Paint>Fuselage>Undercarriage>Fit main gearCut 4 x short lengths (~7mm) of reinforced hose (cut square) and slip one over each centrebolt, then fit the curved reinforcing plates, roughened side down with the curved side facingoutwards, followed by a flat washer and a Nyloc nut.Fit the other short lengths to the forward outer clamp bolts and then cut 2 x 12mm lengths ofreinforced hose and slip one over each rear outer clamp bolt, then fit each square reinforcingplate, roughened side down, followed by a flat washer and a Nyloc nut.Before --- Centre bolts --- AfterReinforcing plateReinforced hoseFloorFloorTighten each nut until the first thread on the bolt is just visible above the top of the nut – atthis point the bottom of the reinforcing plate will be very close to the cabin floor and thereinforced hose will be compressed to roughly half of its original thickness and will haveformed to suit the shape of the floor so it will completely seal the bolt from any flock.Tap each plate around until it is squarely aligned in relation to the console or the sides of thefuselage as appropriate.The clamp bolt reinforcing plates have the holes drilled off-centre: the widest part of the plateshould be closest to the higher part of the floor.Brush some resin on the floor under each reinforcing plate and then pack flock in and aroundeach plate until all voids are filled.Use a clean mixing stick dipped in resin to smooth any excess flock from around the platesand also from around the clamp plates under the gear leg.Leave overnight to cure.Next day the clamp bolts can be tightened until 2½ threads protrude beyond the nut, which inturn will provide the required tension.Tighten the centre bolts until the rubber bush between the gear leg and the aluminium washerhas been compressed to half its original height.The main gear is now permanently fitted to the fuselage and the saw stool or trestle can beremoved from beneath the cabin, however the trestle that is supporting the tail of the aircraftwill need to remain in place until the nose wheel and engine have been fitted.This completes the Pre-Paint>Fuselage>Undercarriage>Fit main gear task.Wednesday, April 7, 2010 40 of 327
Pre-Paint>Fuselage>Firewall forward>Fit firewallObjectives of this task:<strong>Jabiru</strong> <strong>J160</strong> Constructors <strong>Manual</strong>Pre-Paint>Fuselage>Firewall forward>Fit firewallTo fit the stainless steel firewall plate to the fuselage. This task will require accuratemeasuring and bending of the firewall plate: it is possible to make an accurate bend byclamping the plate to the edge of a solid workbench between 2 lengths of heavy angle ironand use a solid length of timber or heavy angle iron to press the bend to a tight radius, but fora small fee many plumbers or sheet metal shops will bend the firewall plate for you, andprovided that your markings are accurate this may be a good choice for many builders.Note that the bends required are not sharp creases but rather tight radius (3mm) bends of 55°,which is the same type of bend that a plumber‟s sheet folder will make.Materials required:Firewall plate (stainless steel)Dow Corning silicone sealant (dark green tube in kit – shown above right)Firewall insulation sheet (white roll in kit – shown at right)38 x 73 AS 5/32” rivets and matching washersMark and bend the firewall plateThe technique that we use in our factory is to temporarily mount the firewall near the lowerbend with 2 self-tapping screws and mark the centre of the bend points, then bend the plate.SmallholesLargeholescrewed hereLevel hereStart by having someone help you to position the plate so that the bottom centre of the plate islevel with the bottom of the fuselage and the plate is equally spaced side to side. It isimportant that the plate is positioned the right way around: the small holes must be in theupper left and the larger hole must be in the upper right when viewed from the front. Refer tothe photo above left as an example of the correct positioning.Drill a 3/32” hole through the plate and into the plywood firewall each side (as arrowed in thephoto at above left) and fit a self-tapping screw, then mark the centre of the lower bend oneach side (as circled at above right). Bend the plate slightly back at the lower bend as areminder of the correct bend direction for later when you bend the plate.Wednesday, April 7, 2010 41 of 327
<strong>Jabiru</strong> <strong>J160</strong> Constructors <strong>Manual</strong>Pre-Paint>Fuselage>Firewall forward>Fit firewallMeasure from the centre of the lower bend back to the centre of the upper bend on thefuselage and transfer that measurement to the firewall plate – note that the measurement maybe slightly different from side to side so measure each side independently. Recheck yourmeasurements and then remove the plate, transfer the lower bend marks to the back of theplate and take the plate to the bender.It is particularly important that the bends are made in the correct direction: the lower bendshould take the plate towards the rear of the aircraft while the upper bend should take the plateupwards, parallel to the lower part of the plate. Take care to make the bends in the correctsense – the plate cannot be reversed if the bends are made backwards.These photos show the upper bend being made and the plate sitting in place. In our factory thebending process takes a skilled person about 15 minutes – it is not a complicated task so longas you take care to measure accurately and bend carefully and in the correct sense.Fill the lower plywood firewallDue to the moulding process there may be a slight depression in thelower centre of the plywood firewall where the nose gear will bemounted. Mix 80 grams of flock and apply to the area, then use theside of a mixing stick to level the area as shown at right.Wednesday, April 7, 2010 42 of 327
Fit the firewall plate<strong>Jabiru</strong> <strong>J160</strong> Constructors <strong>Manual</strong>Pre-Paint>Fuselage>Firewall forward>Fit firewallRun a ¼” drill through the engine mount holes in the upper firewall (shown circled in thephoto below left). This will make fitting the top engine mount much easier.Apply a generous bead of the Dow Corning silicone sealant about 1” in from the edge of theplywood firewall all the way around the perimeter and also in a zigzag pattern across thefirewall and then lay one insulating sheet onto the plywood firewall to the midpoint of thefirewall so that it is held by the sealant. Lay the other sheet and butt up to the first sheet in themiddle of the firewall. Pat the sheet into place and then cut to size with a sharp knife.Apply the Dow Corning silicone sealant to the back of the firewall plate in the same manner:around the outside and across the rest of the back, then place the plate onto the insulatingsheet and push firmly into place using the lower part of the firewall sheet as a reference.Secure temporarily with 2 self-tapping screws at the base of the upper bend on both sides and2 more in the holes just below the upper bend.Wednesday, April 7, 2010 43 of 327
<strong>Jabiru</strong> <strong>J160</strong> Constructors <strong>Manual</strong>Pre-Paint>Fuselage>Firewall forward>Fit firewallOnce the plate is held in place in this manner you can start to fix it permanently with poprivets, working carefully around the plate, drilling through the pre-drilled holes in the plateand through the plywood and taking care to always put a washer on the back of each rivet(circled above centre) – unless you have long arms you will probably need another person tohelp you with this step by holding the washers in place while you rivet.Be particularly careful when drilling though the plywood firewall – if you push too hard thenthe drill can chip a section of ply out when it breaks through the back of the plywood, so drillusing gentle pressure only.Once the plate has been fully riveted into place use a sharp knife to trim away the insulatingsheet from around the edges of the firewall plate.Fit a temporary plate (plywood is fine, in the factory weuse aluminium) across the lower centre of the firewall tohold the plate firmly against the flock filler. 3 screws (2top, 1 bottom, arrowed) are sufficient to hold the plate inplace overnight while the flock cures.Next day remove the plate.This completes the Pre-Paint>Fuselage>Firewall forward>Fit firewall task.Wednesday, April 7, 2010 44 of 327
<strong>Jabiru</strong> <strong>J160</strong> Constructors <strong>Manual</strong>Pre-Paint>Fuselage>Firewall forward>Firewall fittingsPre-Paint>Fuselage>Firewall forward>Firewall fittingsGeneral:This task requires the drilling of several holes through the stainless steel firewall. Stainlesssteel is hard, and the best way to drill it is to use very sharp drill bits and drill very slowly:drill too fast and your drill bit will very quickly become blunt and the stainless will workhardenas well. For the larger holes you will need a hole saw and a few drops of cutting oil onthe teeth will make the cutting easier, once again using a slow speed.Materials required:Card #‟s J10 ‘Firewall’, J11 „Fuel components’, J25 „Cabin heater’, Dow Corning sealantAir box and cable collars295mmThe air box needs to have a small amount ground out to allow for the cable collar: mark andremove the area indicated in the photo above left. Position the air box so that it sits flat on thefirewall just above the upper bend, then measure in 295mm from the left hand edge of thefirewall to the left hand main side of the air box. Check that the air box is level and then fix itin place temporarily with a strip of cloth tape along the top edge.With the air box held in place, hold the cable collar in the ground out area as circled at aboveright and mark the centre of the collar. Remove the air box and drill a 22mm hole through thefirewall for the cable collar then fit the cable collar with 6G stainless steel screws (drill 1/8”holes through the firewall plate only for these screws, they will self-tap into the plywoodfirewall).Apply a bead of the Dow Corning sealant around the mounting surface of the air box and fixit in place with 8 x 5/32 pop rivets, 1 on each corner and 1 at top and bottom centre, with awasher on each side of each rivet (rivets arrowed in red).Apply extra sealant around thecable collar so that there is agood seal with no possibility ofair leaks.Wipe away any excess sealantwith a clean cloth.Wednesday, April 7, 2010 45 of 327
Fit the right hand cable collar: measure in280mm from the right hand side of thefirewall and up 60mm from the upper bendand drill a 22mm hole through the firewallthen fit the cable collar with 6G stainlesssteel screws (drill 1/8” holes through thefirewall plate only for these screws, they willself-tap into the plywood firewall).<strong>Jabiru</strong> <strong>J160</strong> Constructors <strong>Manual</strong>Pre-Paint>Fuselage>Firewall forward>Firewall fittings280mm60mmBattery box and battery50mmRun a 3/16” drill through the 2 pairs of holes on the right hand mid section of the firewall andbolt the tie down brackets into place with AN3-6A bolts as shown. Position the battery box50mm up from the lower bend and fix in place with 4 x 5/32 pop rivets, with a washer on eachside of each rivet.Put the battery in the battery box with the terminals to the top and secure it with a tie downstrap: loop the strap through the brackets and through the locking buckle with the free end ofthe strap pointing down at the front, then loop that free end back through the bottom bracketand tie it off around the strap and cut to length as shown. Use a flame to melt the cut end.Wednesday, April 7, 2010 46 of 327
Cabin heater<strong>Jabiru</strong> <strong>J160</strong> Constructors <strong>Manual</strong>Pre-Paint>Fuselage>Firewall forward>Firewall fittingsMeasure up 180mm from the lower bend and in 340mm from the left hand side of the firewallstep and drill a pilot hole, then drill a 1 5/8” (41mm) hole for the cabin heater firewall fitting.The fitting is in several parts: press the machined end of the short section of tube into the holeon the side of the main body. Assemble the shaft, flap and actuating arm and then push thethreaded end of the main body through the firewall.Spring bracketCable holeSpring bracketTurn the main body so that the pressed-in tube faces the left of the aircraft and fit a smallscrew into the notch in the flange to prevent the main body from turning (circled above).Drill a 1/8” hole in the firewall above the main body and directly below the shaft: pop rivetthe right-angled spring bracket into this hole and connect the spring to it. Drill a 5/16” holefor the cable directly in line with the end of the actuating arm. Fit the retaining nut to thethreaded end of the main body on the inside of the firewall and tighten firmly.Wednesday, April 7, 2010 47 of 327
<strong>Jabiru</strong> <strong>J160</strong> Constructors <strong>Manual</strong>Pre-Paint>Fuselage>Firewall forward>Firewall fittingsFuel fittingAssemble the firewall fuel line fitting: Press the flat plate of the brass bulkhead fuel fittinginto the top of the aluminium sleeve (this sleeve connects to the plastic fuel sheath on theinside of the firewall), and bond it into place with 5-minute Araldite.Drill through the pre-drilled hole in the firewall and fit the assembly, fit the washer and Nylocnut and tighten.Wednesday, April 7, 2010 48 of 327
Electrical components<strong>Jabiru</strong> <strong>J160</strong> Constructors <strong>Manual</strong>Pre-Paint>Fuselage>Firewall forward>Firewall fittings30mm20mmUse some 3mm aluminium to make backing plates for the solenoid and the earth terminal asshown below – these are to spread the load and minimise crushing of the plywood firewall.Place the starter solenoid as shown with the top of the terminals 30mm below the top of thefirewall. Fix the solenoid into place with 2 AN3-7A bolts, washers and Nyloc nuts.Fit the main electrical earth terminal (maroon arrow above) by drilling through the pre-drilledhole in the firewall and fix into place with an AN3-7A bolt, washer and Nyloc nut.Place the regulator module 20mm in from the side and in line with the bottom of the batterybox (green lines above). Fix the module in place with AN3-12A bolts, washers and Nylocnuts. The optional strobe unit is placed as shown and secured with 6G self-tapping screws.Inside viewSolenoidCable collarsAir box rivetsEarthterminalregulatorCabinheaterFuelfittingBatteryThis is how the finished job will look from the inside.Wednesday, April 7, 2010 49 of 327
<strong>Jabiru</strong> <strong>J160</strong> Constructors <strong>Manual</strong>Pre-Paint>Fuselage>Firewall forward>Firewall fittingsAir box outlet tubeRemove the cover from the air box: it is held in place by 4 screws, one at each corner.15°Cut a hole in the bottom of the angled lower front part of the cover and fit the supplied shortlength of fibreglass tube and fit in place so that when the cover is laying on the workbench asshown at above left the tube angles upwards at an angle of 15°.Fix the tube in place with a mixture of 5 minute Araldite and flock, filling the area around theinside and outside of the join.Use enough of the Araldite/flock mixture to completely fill the area surrounding the tube onthe inside of the cover as shown above right. You may need a second mix to complete this.When the Araldite/flock mix has cured, grind the protruding lip on the inside of the coverdown until it forms a wide radius into the tube so that the air has a smooth flow from the airbox and into the tube – any sharp edges at this transition can have the effect of restrictingairflow to the carburettor so take your time and get the curve just right.Fit the cover back onto the air box.This completes the Pre-Paint>Fuselage>Firewall forward>Firewall fittings task.Wednesday, April 7, 2010 50 of 327
<strong>Jabiru</strong> <strong>J160</strong> Constructors <strong>Manual</strong>Pre-Paint>Fuselage>Firewall forward>Assemble and fit nose gearPre-Paint>Fuselage>Firewall forward>Assemble and fit nose gearObjectives of this task:To assemble and fit the nose gear including the front wheel to the stage where the aircraft isstanding on its own 3 wheels, the main gear having been fitted previously.Materials required:Card # J7 ‘Undercarriage’Card # J19 „Nose leg’Card # J20 ‘Nose wheel’Epoxy resin and flockSteps1. Assemble the nose leg2. Assemble the nose leg housing3. Fit the nose leg housing4. Assemble the nose wheel5. Fit the nose leg and nose wheelAssemble the nose legAssemble the nose leg by reference to the drawing 2 pages over.Press the nylon bush through the tube at the bottom of the leg (photoat right) and flock in place if needed, then fit the machined yoke withan AN4-72A bolt, washer and castellated nut. Use a split pin to retainthe castellated nut. Fit the lower retaining collar to the machinedsection of the nose leg (arrowed above) with an AN3-22A bolt.Fit the lower part of the suspension shaft to the yoke, placing thenylon bush through the bottom hole, superglue a washer on each side and secure in the yokewith an AN5-15A bolt, washer and Nyloc nut as shown circled in yellow in the photos below.Slip the tapered lower washer onto the lower suspension shaft and place the red suspensionrubbers over the upper shaft as shown above right. Note that in the photos above the nose leghas been left out for clarity.Wednesday, April 7, 2010 51 of 327
<strong>Jabiru</strong> <strong>J160</strong> Constructors <strong>Manual</strong>Pre-Paint>Fuselage>Firewall forward>Assemble and fit nose gearLeverMain rubbersNose legAN3-07A boltRebound rubberFit the machined washer and rebound rubber to the top of theinner suspension shaft and secure to the shaft with the retainingcollar and an AN3-06A bolt and Nyloc nut. Clamp the yoke ina vise and use a long bar inserted into the top of the nose leg asa lever to compress the rubbers until the inner shaft can besecured with an AN3-07A retaining bolt (arrowed above left).Compressing the rubbers will require substantial pressure: thelower part of the leg will need to be almost horizontal in orderto fit the retaining bolt. Take care that the yoke is firmly heldby the vise and apply downward pressure on the lever smoothly.Tighten the Nyloc nut firmly and then slowly release the pressure on the lever.Assemble the nose leg housingAssemble the top and bottom plates to the spacer with the supplied cap screws – clean thethreads, use a drop of Loctite 620 on each cap screw and tighten firmly. Clean the nylonbushes and the matching holes in the top and bottom plates with Acetone and sand all surfacesto be bonded and then fit the bushes into the plates, pushing both bushes from the outside intowards the middle. Align the flats on the bush collars to clear the cap screws.Fit the assembly onto the nose leg with a retaining collar or yoke bolted to the top and checkfor freedom of movement. When you are satisfied that there is no binding, mix a small batchof flock and flock the bushes into the plates, taking care not to get any flock onto the nose leg.Use a mixing stick to smooth the flock as shown at above right and leave overnight to cure.Drawings of the nose leg and nose leg housing follow on the next 2 pages.Wednesday, April 7, 2010 52 of 327
<strong>Jabiru</strong> <strong>J160</strong> Constructors <strong>Manual</strong>Pre-Paint>Fuselage>Firewall forward>Assemble and fit nose gearWednesday, April 7, 2010 53 of 327
<strong>Jabiru</strong> <strong>J160</strong> Constructors <strong>Manual</strong>Pre-Paint>Fuselage>Firewall forward>Assemble and fit nose gearWednesday, April 7, 2010 54 of 327
Fit the nose leg housing<strong>Jabiru</strong> <strong>J160</strong> Constructors <strong>Manual</strong>Pre-Paint>Fuselage>Firewall forward>Assemble and fit nose gearLevel the aircraft laterally: a straightedge across the bottom of the front doorframes or acrossthe front wing attachment lugs will provide a good reference, then pack under the mainwheels as required in order to level the aircraft in the lateral or rolling plane.5mmPlace a straightedge or ruler under the centre of the fuselage and measure up 5mm. This is theposition for the bottom of the square outer backing plate for the nose gear housing.Centre the outer backing plate on the lower firewall and drill one top ¼” hole only and push abolt through, then fit up the nose gear housing and place a digital protractor or a spirit levelacross the top of the white bush as shown above and carefully level the nose gear housing.Once it is level, drill the other top hole and recheck for level then drill the bottom holes andbolt the nose gear housing in place. You will need to flock the 2 internal braces in place at thistime – trim to length then sand and clean the surfaces to be bonded. Mix a small batch offlock and coat the back of each brace then press into place and secure with 2 x AN4-16A boltsat the top and 2 x AN4-22A bolts at the bottom and tighten the Nyloc nuts firmly.10mm85mmDrill the holes for the steering links: measure out 85mm from each side of the centre plate anddown 10mm from the bottom side of the top plate and mark and drill a pilot hole, then use a1¼” hole saw to drill through the firewall.Drill the top holes of the internal braces (arrowed in purple above right) from the back of thefirewall and then fit the bolts from the firewall side with 1 penny washer under the head ofeach bolt and a normal washer and Nyloc nut on the inside of the firewall.Wednesday, April 7, 2010 55 of 327
Assemble the nose wheelPress a bearing into each side ofthe hub until the bearing reachesthe bottom of the machined hole– use a large socket or piece ofheavy tube that is slightlysmaller in diameter than theoutside of the bearing to pressagainst the outer rim of thebearing. A small hand press or abench vise would be ideal for thepurpose. Do not press againstthe inner rim of the bearing –this can damage the bearing.<strong>Jabiru</strong> <strong>J160</strong> Constructors <strong>Manual</strong>Pre-Paint>Fuselage>Firewall forward>Assemble and fit nose gearFit the bearing spacers into thebearings with a drop of Loctite 480 and slide the axle through the spacers.Check each end of the axle and spacer: both ends should be exactly level. If this is not thecase then grind either the axle or the spacer until they are level. If the width of the wheel andspacers are wider than the length of the axle this will put a side load of the wheel bearings.Partially inflate the inner tube with the valve out, then liberally coat the tube with talcumpowder, fit it into the tyre and place the tyre on the hub with the valve stem facing up and thenfit the rim to the hub, making sure that the valve stem is through the hole in the rim, bolt therim to the hub, taking care not to pinch the inner tube, and inflate the tyre to 35 PSI.A drawing of the nose wheel can be found on the next page.Fit the nose leg and nose wheelSlide the nose leg up into the nose leghousing with the steering yoke (arrowed butnot shown in photo) fitted over the nose legbetween the top and bottom bushes and withthe arms of the yoke swept back towards thefirewall and fit the nose leg in place with theretaining collar above the top bush. Securethe collar to the nose leg with an AN3-22Abolt and Nyloc nut.Roll the front wheel into the machined yokeand fit with the AN4-72 bolt. Use a washerand castellated nut, tighten the castellated nutand secure it with a split pin.The aircraft is now sitting on its own wheels,however it will still need a trestle under theempennage until the engine has been fitted inthe next task.Wednesday, April 7, 2010 56 of 327
<strong>Jabiru</strong> <strong>J160</strong> Constructors <strong>Manual</strong>Pre-Paint>Fuselage>Firewall forward>Assemble and fit nose gearThis completes the Pre-Paint>Fuselage>Firewall forward>Assemble and fit nose gear task.Wednesday, April 7, 2010 57 of 327
<strong>Jabiru</strong> <strong>J160</strong> Constructors <strong>Manual</strong>Pre-Paint>Fuselage>Firewall forward>Fit engine mount and enginePre-Paint>Fuselage>Firewall forward>Fit engine mount and engineObjectives of this task:In this task the engine mount will be fitted to the firewall at the top attach points only, theengine will be attached to the engine mount, then the engine angle of incidence will be set andfinally the engine mount will be fitted to the bottom attach points on the firewall.The engine angle of incidence is particularly important, both to the general flying qualities ofthe aircraft as well as making the fitting of the cowls more straightforward, and should be setcarefully and precisely. You will need either a portable engine lifter or a few strong friends tohelp you mount and position the engine in this task.From this point on the engine will remain fitted to the fuselage.Parts required:Engine mount sets: AN4-20A & -31A bolts plus washers, spacers, rubber mounts ►From Card # J10 ‘Firewall’, the 4 x 4025094 backing plates (photo below right)From Card # J23 ‘Engine’, the washers and lock nuts in “Engine mount hardware”Fit the engine mount to the firewallNow would be a very good time to paint the engine mount! We prefer gloss black.Drill the top engine mounting holes through the stainless steel firewall plate from the inside,through the pre-drilled holes in the plywood firewall that you cleaned in the previous task.Attach the engine mount to the firewall with the top (AN4-20A) bolts only: fit each bolt fromthe front, through the mount, firewall, and the backing plate (shownat right) and fit a washer and Nyloc nut.Tighten the Nyloc nut firmly but without crushing the plywoodfirewall. Do not bolt the bottom of the engine mount to the firewallat this stage; leave it until the engine angle of incidence has beenset. Note that the bottom centre section of the engine mount restsagainst the penny washers of the top internal brace bolts but doesnot rest on the heads of the bolts.Backing plate viewed fromback of firewallWednesday, April 7, 2010 58 of 327
Fit the engine to the engine mount<strong>Jabiru</strong> <strong>J160</strong> Constructors <strong>Manual</strong>Pre-Paint>Fuselage>Firewall forward>Fit engine mount and engineFit the female rubbers to the top mounts and the machined spacers and male rubbers to thebottom mounts – refer to the drawing on the next page for details.With the rear of the aircraft supported and with the main wheels chocked, lift the engine intoposition and fit the rear engine mount plate onto the bottom engine mounts first: you mayneed to tilt the engine slightly down at the front to do this. Use AN4-31A bolts fed from therear of the mounts with the lock nuts towards thefront.Lift the front of the engine and fit the top rear enginemount plate onto the top mounts and fit the malerubbers, machined washers, flat washers and locknuts to both top mounts. Fit the female rubbers, flatwashers and lock nuts to both bottom mounts. Notethat these are steel lock nuts and not Nylocs.It may be necessary to compress the mount rubbersin order to get the steel lock nuts on: use a “G” clampor similar and clamp across a socket on the head ofthe bolt and the side of the machined washer besidethe steel lock nut, as shown at right. The clamping points have been circled in yellow.Torque each of the 4 steel lock nuts to 11 Nm (8 foot pounds).Level the aircraftFor the next step the aircraft must be absolutely level in both the lateral (rolling) andlongitudinal (pitching) planes.Lateral plane: place a 3” block on the top of each front wing mounting lug and place a spiritlevel or a digital protractor across the top of the cabin so that it rests on both blocks. Pack themain wheels as required to level the aircraft.Longitudinal plane: the objective is to level the fuselage along the “waterline” – the line ofthe join between the upper and lower sections of the fuselage. Use a spirit level or a digitalprotractor and pack under the nose wheel or empennage until the waterline is level.Once the aircraft is satisfactorily levelled make sure it stays that way: chock the wheels andconsider lashing the empennage to the packing with a tie-down strap.Wednesday, April 7, 2010 59 of 327
<strong>Jabiru</strong> <strong>J160</strong> Constructors <strong>Manual</strong>Pre-Paint>Fuselage>Firewall forward>Fit engine mount and engineWednesday, April 7, 2010 60 of 327
Set the engine angle of incidence<strong>Jabiru</strong> <strong>J160</strong> Constructors <strong>Manual</strong>Pre-Paint>Fuselage>Firewall forward>Fit engine mount and engineIn this step the engine will be adjusted until a level or digital protractor (pictured below)placed on the top of the crankcase reads completely level fore and aft, which indicates anangle of incidence of 0° (zero degrees).In our factory we usually find that the angle of incidence is correct with the standard mount,however the following procedure should still be followed.Recheck that the aircraft is completely level and then measure the angle of incidence and usea hydraulic jack under the crankcase to lift the front of the engine to a point where the enginehas a very slight (0.5° if using a digital protractor) nose-up attitude then drill the bottomengine mount holes through the firewall and fit the AN4-20A bolts, backing plates, washersand Nyloc nuts. Now release the jack and recheck the angle of incidence. If the engine isslightly down at the front you can fit up to a maximum of 3 penny washers under each bottomengine mount to adjust the angle of incidence. Bear in mind that a small adjustment at thefirewall will result in a large change at the propeller flange.Check the lateral angle of the engine while the aircraft is completely level: it should be veryclose to level.Once you‟re happy with the alignment you can permanently install the lower engine mountbolts, taking care to remember the backing plate (pictured on the first page of this task), andtightening the Nyloc nuts enough to hold firmly but without crushing the plywood firewall.If penny washer spacers were used on the lower engine mounts then equivalent thicknessspacers will need to be used behind the bottom bar on the mount. Drill these mounting holesat 3/16”, fit the appropriate spacers if required, and finally fit 2 x AN3 bolts through thebottom bar and the firewall and fit washers and Nyloc nuts.This completes the Pre-Paint>Fuselage>Firewall forward>Fit engine mount and enginetask.Wednesday, April 7, 2010 61 of 327
<strong>Jabiru</strong> <strong>J160</strong> Constructors <strong>Manual</strong>Pre-Paint>Fuselage>Firewall forward>Fit propeller flange extensionPre-Paint>Fuselage>Firewall forward>Fit propeller flange extensionObjectives of this task:To remove the universal propeller flange that is shipped with the engine and fit the modelspecificpropeller flange extension to the crankshaft. While this is a straightforwardmechanical task it is most definitely a critical task and care must be taken.The universal propeller flange is lock wired in place, however the depth of the propellerflange extension makes the use of lock wire almost impossible and so we use a strong Loctiteto keep the flange securely fitted. This means that the cleanliness of all threads is critical.This task will require 2 people: 1 to stop the crankshaft from moving and 1 to loosen and latertighten the cap screws. This task is intended to be performed by the kit builder with the enginemounted to the aircraft. In the factory we do this task while the engine is fitted to a mobileengine stand so some of the photos will be slightly different to what the kit builder couldexpect to see.Materials and equipment required:Loctite 620 and lockwireThread cleaner – Loctite 7471 or Acetone5/16” Hex drive socket, or alternately a 5/16” Allen key cut straight and fitted to a 5/16”socketTorque wrench, set to 30 ft/lbs or 40 NmRemove the universal flangeThe universal flange is held in place by 6 x 3/8” UNF Allen head cap screws, all of which willbe reused.Cut and remove the lock wire from the 6 cap screws, then heat the cap screws with a heat gunin order to loosen the Loctite.Lock the engine from turning by holding a large blade screwdriver in the ring gear teethbetween the starter motor and the adjacent alloy block (circled in the photo above right).Crack each cap screw in turn to break the Loctite seal and remove each cap screw and therelated washer.Set the cap screws and washers aside for later use.Remove the flange and discard.Wednesday, April 7, 2010 62 of 327
Clean and prepare the screws and hub<strong>Jabiru</strong> <strong>J160</strong> Constructors <strong>Manual</strong>Pre-Paint>Fuselage>Firewall forward>Fit propeller flange extensionClean the cap screw threads with a wire brush – make sure that there is no residual Loctite inthe threads. Clean all threads with cleaning solvent (Loctite 7471 cleaner or Acetone) and dry.Run a 3/8” UNF flat bottomed tap all the way into each bolt hole in the hub, apply a cleaningsolvent (Loctite cleaner or Acetone) into each hole and then blow dry with compressed air.Check that each thread is absolutely clean and dry before proceeding.Fit the propeller flange extensionSet your torque wrench to 30 ft/lbs or 40 Nm and place it on top of the engine.Apply a few drops of Loctite 620 to each screwhole, place the propeller flange extension on thehub and fit the 6 cap screws and washers.Have your helper lock the engine from turning andtighten all the cap screws firmly then torque eachcap screw to 30 ft/lbs or 40 Nm, working in a crisscrosspattern as shown at right. Re-check each capscrew, applying steady pressure on the torquewrench until the torque value is reached.Re-check the torque values again and then lockwireeach pair of cap screws together. Lockwiring capscrews in extended propeller flanges is verydifficult. <strong>Jabiru</strong> only lockwire cap screws instandard propeller flanges.This completes the Pre-Paint>Fuselage >Firewall forward>Fit propeller flange extensiontask.523416Wednesday, April 7, 2010 63 of 327
<strong>Jabiru</strong> <strong>J160</strong> Constructors <strong>Manual</strong>Pre-Paint>Fuselage>Firewall forward>Fit oil coolerPre-Paint>Fuselage>Firewall forward>Fit oil coolerObjectives of this task:In this task the oil cooler will be fitted to the base of the sump, the oil filter adapter will befitted under the oil filter and the whole assembly plumbed up and the oil overflow bottle willbe fitted to the firewall. There are 2 types of oil overflow bottles, fibreglass moulding or aplastic moulding.Fireproof sleeving will be used to protect the oil lines.Materials required:Card # J24 „Oil Cooler Kit‟Pipe sealing compound (rated working pressure of 2.6 Mpa, “Holdtite” brand or similar)Mount the oil coolerMount the rails to the sump: fit the 3/16” cap screws through a flat washer and the rail andinto the threaded holes in the sump and tighten. Drill each of the 4 large holes in the coolerout to 9/16” and fit a rubber grommet, then fit a Bundy tube in the bolt hole and mount thecooler to the rails using AN3 bolts fitted from the rear and steel lock nuts with a penny washerunder each lock nut as shown above. Note that the penny washer will need one side cut away.Refer to the drawing on the next page for detail.Wednesday, April 7, 2010 64 of 327
<strong>Jabiru</strong> <strong>J160</strong> Constructors <strong>Manual</strong>Pre-Paint>Fuselage>Firewall forward>Fit oil coolerWednesday, April 7, 2010 65 of 327
Fit the oil lines<strong>Jabiru</strong> <strong>J160</strong> Constructors <strong>Manual</strong>Pre-Paint>Fuselage>Firewall forward>Fit oil coolerFit the 2 brass male barb fittings to the inlet and outlet of the cooler - apply a smear of pipesealing compound to the threads and tighten each fitting firmly into the cooler. Take care notto over tighten these fittings, as the brass threads will strip if excess pressure is applied.Remove the spin-on oil filter and fit theadaptor (circled at right) under it with the O-ring side towards the engine block. Apply asmear of clean engine oil to the O-rings onthe adaptor and the oil filter, refit the oil filterand tighten gently until resistance is felt asthe seal first contacts the housing and thentighten exactly one full turn from that point.Absolute cleanliness is required here: theremust be no dirt or contaminants anywherenear the oil filter or adaptor fitting area.Size the blue oil lines by holding one end beside the fitting on the right-hand side of the oilcooler and cutting to length to fit the rear adaptor fitting. Allow for a smooth routing.Repeat the process for the other side of the oil cooler to the front adaptor fitting and then cut 2lengths of fireproof sleeve to the same length as the oil lines and fit them over the oil lines.The fireproof sleeve can be difficult to fit, but blowing compressed air into the gap betweenthe oil line and the sleeve while pulling the sleeve over the oil line works rather well.Roll the last inch or so of the fireproof sleeve back on each end as shown above left and fiteach oil line into place, securing each end with the supplied hose clamp and cutting off theexcess length of the hose clamp screw.Now roll the fireproof sleeve over the hose clamp and lock wire into place as shown in thephoto above right, using a double loop and twisting off.This provides fireproofing to the full length of each oil line.The completed oil line arrangement is shown on the next page.Wednesday, April 7, 2010 66 of 327
<strong>Jabiru</strong> <strong>J160</strong> Constructors <strong>Manual</strong>Pre-Paint>Fuselage>Firewall forward>Fit oil coolerCompleted oil line arrangement between the adaptor and the oil coolerOil overflow bottleFibreglass moulded oil bottle mounting.The oil overflow bottle, as shown inthe photo on the right, fits into afibreglass bracket that is mounted onthe lower right side of the firewall.Position the oil bottle with thebracket fitted so that the inlet linefrom the engine oil filler will curvesmoothly down to the top fitting inthe oil bottle without rubbing againstthe inside of the cowl, and so that theoutlet from the oil bottle can berouted over the lower engine mountas shown in the photo at right.Mark the position of the bracket,then remove the oil bottle from thebracket and drill 2 x 5/32” holes inthe flat back part of the bracket.Place the bracket on the marks anddrill through the firewall and fit thebracket with 2 x 5/32” rivets withplain washers behind.Inlet OutletBracketOil bottleFibreglass Oil overflow bottle shown final fittedRemove the oil bottle and set aside for later fitting in the Post-Paint>Fuselage>Firewallforward>Final assembly task.Wednesday, April 7, 2010 67 of 327
<strong>Jabiru</strong> <strong>J160</strong> Constructors <strong>Manual</strong>Pre-Paint>Fuselage>Firewall forward>Fit oil coolerPlastic moulded oil bottle mounting.The oil overflow bottle, plasticmoulded type, as shown in thephoto on the right, is mounted tothe firewall with a saddle clampon the lower outlet, on the lowerright side of the firewall. Theoutlet is identified by analuminium tube inserted in theconnection stub, and is the largerdiameter of the 2 connectingstubs.Position the oil bottle so that theinlet line from the engine oil fillerwill curve smoothly down to thetop fitting in the oil bottle withoutrubbing against the inside of thecowl, and so that the outlet at thebottom can be routed into thecutaway in the firewall as shownin the photo at right.Place the saddle over the lower oilbottle outlet and mark the positionto drill through the firewall to fitthe saddle clamp with 2 selftapping screws 6G x 1/2" long.Saddle ClampInletOutlet directed tocutaway in firewallPlastic moulded oil bottleRemove the oil bottle and set aside for later fitting in the Post-Paint>Fuselage>Firewallforward>Final assembly task.This completes the Pre-Paint>Fuselage>Firewall forward>Fit oil cooler task.Wednesday, April 7, 2010 68 of 327
<strong>Jabiru</strong> <strong>J160</strong> Constructors <strong>Manual</strong>Pre-Paint>Fuselage>Firewall forward>Fuel pump fittingsPre-Paint>Fuselage>Firewall forward>Fuel pump fittingsObjectives of this task:In this task the drip tray will be prepared and fitted to the fuel pump and then the fuel lineswill be fitted from the firewall fitting to the fuel pump and then to the carburettor.Materials required:5-minute Araldite and flockLoctite 518 gasket sealant, lock wireCard #11 „Fuel components‟, Card #15 „Spares‟Fit the fuel pump drip trayRemove the drip tray (shown circled in the photo at bottom right) from the Spares card andprepare it: drill a hole in right rear corner, which will be the lowest point when the tray isfitted, and flock the drain fitting into place with 5-minute Araldite and flock.Put a piece of tape over the inside of the tray and over the fitting and leave to cure.Remove the fuel pump from the engineFit the fuel drip tray to the engine-driven fuelpump: remove the fuel pump carefully andalong with the fibre spacer block, leaving thegasket on the engine block.Clean the threads of the cap screwsthoroughly and apply a drop of Loctite 262 toeach screw.Smear some gasket cement on both sides ofthe spacer block and then refit the wholeassembly: hold it together with the Allenhead cap screws through a flat washer, thedrip tray, the pump flange, the spacer blockand the gasket and screw into the engineblock and tighten the cap screws firmly.Clean the gasket and the spacer blockRe-fit the fuel pump with the drip tray underneathWednesday, April 7, 2010 69 of 327
Fit the fuel lines and drain hoses<strong>Jabiru</strong> <strong>J160</strong> Constructors <strong>Manual</strong>Pre-Paint>Fuselage>Firewall forward>Fuel pump fittingsThe fuel lines are connected in 2 runs: from the firewall fitting to the engine-driven fuelpump; and from the engine-driven fuel pump to the carburettor fuel inlet fitting. If you arefitting a fuel flow or fuel pressure sensor it should be inserted into the fuel line between thefuel pump and the carburettor at a point near the midpoint of the line.Cut some black fuel line to length for each run, allowing enough length for the fuel line to berouted smoothly between each pair of fittings. Cut some fireproof sleeving to the same lengthas each fuel line. Slip the fireproof sleeving over the fuel lines and roll the ends back so thatyou can fit the hose clamp over each end of the fuel line. Make sure that each fuel line is clearby blowing through it to remove any dust or debris before fitting.Note that the fuel pump inlet is on theside of the pump and the outlet is on thetop of the pump as pictured at right.Use the flow arrows in the 2 photos onthis page to help you visualise the fuelflow to and from the fuel pump.Fit the top fuel line into place: this lineruns from the top fitting on the fuel pumpto the fuel inlet fitting on the carburettor.Fit the lower fuel line into place: this lineruns from the fuel fitting on the firewall tothe side fitting on the fuel pump.Fuel outFuel inBreatherDrainFuel tocarbFuel frompump to carbFuel outFuel inBreatherFuel from firewallfitting to pumpDrainRoll the fireproof sleeving over the hose clamps and lock-wire the sleeve into place using adouble loop of lock wire around both sides of the hose clamp.Fit the fuel breather and fuel pump drain (clear) hoses, route back to the firewall and zip tie tothe lower right engine mount tube and leave enough length for the hoses can be routed back tothe firewall and end 50mm below the bottom of the firewall step.This completes the Pre-Paint>Fuselage>Firewall forward>Connect fuel pump task.Wednesday, April 7, 2010 70 of 327
<strong>Jabiru</strong> <strong>J160</strong> Constructors <strong>Manual</strong>Pre-Paint>Fuselage>Firewall forward>Fit ram air cooling ductsPre-Paint>Fuselage>Firewall forward>Fit ram air cooling ductsObjectives of this task:In this task the ram air cooling ducts will be assembled and fitted to the engine.The final step, where the front of the ducts are trimmed to length to match the bottomcowling, cannot be performed until the bottom cowling has been fitted to the fuselage and sothat step is included as part of the Fit cowling task that follows this task.Air enters the front of the ducts and is routed up by low air dams, through the fins on thecylinder heads and barrels and then downwards at the rear by a pre-fitted angled baffle.An aluminium tube directs cooling air from each duct to the nearest magneto coil.Materials required:Epoxy resin and AF303 glass fibre cloth (from the bag labelled “Extra Cloth”)5-minute Araldite and flockAssemble the ductsUse a length of masking tape on thejoin line at the bottom of each ductinlet to hold the join firm and preventAraldite/flock from leaking through.Mix a small batch of 5-minuteAraldite and flock and apply to the topof each join as shown at right:Next the front air dams will need to be cut to size. Take the length of glass fibre sheet with thecurved edge, hold it against the rear of the duct inlet with the curve towards the top rear of theduct and mark around the bottom of the duct then cut to shape as shown above.Tape the air dam into place. Mix a small batch of 5-minute Araldite and flock and use it to fixthe air dam into place. Leave to cure, then sand away any rough edges.Remove the masking tape and roughen the underside of the duct and the back of the air dam.Mix a small batch of resin and brush 2 layers of AF303 glass fibre cloth to the underside ofeach duct, covering the join line and wrapping up around the back edge of the air dam.Leave overnight to cure.Wednesday, April 7, 2010 71 of 327
<strong>Jabiru</strong> <strong>J160</strong> Constructors <strong>Manual</strong>Pre-Paint>Fuselage>Firewall forward>Fit ram air cooling ductsTest fit the ductsOil lineFitting the ducts will require adjustments to be made in several areas: firstly the oil line to therockers will need to be accommodated, then the rear baffle and the air dams will need to beadjusted and then the sequence repeated perhaps 2 or 3 times until the fit is correct.Remove the front and rear rocker cover cap screws (circled top), test fit the duct and mark thelocations for the cutouts around the oil line (arrowed above). File out a notch for the oil lineuntil the duct clears it by 1-2mm all round. Leave the cap screws out and set aside until thefinal fitting of the ducts is complete.Right-hand ductLeft-hand ductThe front air dams will need to be trimmed to fit around the fins on the cylinder heads andbarrels. The final fit must have the air dams only just touching the fins as shown above.It may take few trial fits so take your time and get the fit just right.Wednesday, April 7, 2010 72 of 327
<strong>Jabiru</strong> <strong>J160</strong> Constructors <strong>Manual</strong>Pre-Paint>Fuselage>Firewall forward>Fit ram air cooling ductsLeft-hand duct, shownhere upside down.The pencil marking ison the rear baffleThe baffles at the rear of each duct will need to be trimmed to allow the duct to sit downcorrectly. Test fit and trim until the inside of the duct sits down on the barrels, between thefins as shown above right, and the outside sits just on the top of the rocker covers.Once the rear baffle and air dams are fitting correctly you can mark and drill both of therocker cover holes (circled in the photo at the top of the previous page) to ¼” and temporarilymount both ducts using the cap screws.Mark a point on the inside of the duct directly aboveeach front cylinder and drill a 3/32” hole, then flockand rivet the supplied right angle spring bracket intoplace as shown at right, placing a washer on the rivetinside the duct.Fit a loop of lock wire around the cylinder between thethird and fourth fin and through the bottom of thespring and twist it off.The spring may be unhooked at the bracket end toremove the duct.Fitted left-hand ductWednesday, April 7, 2010 73 of 327
Fit the magneto coil cooling tubes<strong>Jabiru</strong> <strong>J160</strong> Constructors <strong>Manual</strong>Pre-Paint>Fuselage>Firewall forward>Fit ram air cooling ductsLeft-hand magnetocoil – cut the tubeparallel to the side ofthe coilStarting with the left-hand duct, drill a ½” hole at the top centre rear of the duct and slip thecurved aluminium tube into place until the mark on the tube reaches the duct. Aim the lowerend of the tube at the centre of the left-hand magneto coil, mark the tube at an angle parallelto the side of the coil, remove the tube and cut along the mark. Shorten the top end of the tubeas required – it should fit about 1½” to 2” (40-50mm) inside the duct.Refit the tube to the duct and hold it in position with masking tape. Mix a small batch of 5-minute Araldite and flock and fix the tube to the duct. Leave to cure, then remove the ductand apply flock around the tube on the inside of the duct to provide strength. Leave to cure.Repeat the procedure on the right-hand duct:Refit both ducts and leave them in place.This completes the Pre-Paint>Fuselage>Firewall forward>Fit ram air cooling ducts task.Wednesday, April 7, 2010 74 of 327
Pre-Paint>Fuselage>Fit windscreen<strong>Jabiru</strong> <strong>J160</strong> Constructors <strong>Manual</strong>Pre-Paint>Fuselage>Fit windscreenThe windscreen is an integral structural component of the airframe, providing strength andrigidity, and the correct fitting method is very important.The windscreen is made from strong but brittle Perspex and caremust be taken to avoid marking or cracking the windscreen while itis being fitted. The use of sharp or new drill bits must be avoided:use an old drill bit and blunt it before use by drilling into someconcrete, and then grip the bit loosely with a pair of pliers whilerunning the drill (see photo at right) to remove any roughness fromthe flutes that might bind and cause damage to the Perspex.Any shaping of the windscreen that may be required must be done with an 80 grit sandingdisc, and you must never use a jigsaw. Photos are of a J200: the same process applies to all.Materials required:Epoxy resin and flock¼ x ¼” adhesive-backed foam strip (not included in kit)Pre fit the windscreenStart by carefully sanding away all of the gel coat from the joggle, then fit a length of the ¼”foam strip around the very inside of the joggle (the grey line in the photo above right) – thiswill keep the flock from making a messy line around the inside of the windscreen and give anice clean edge when the windscreen has been flocked into place.Test fit the windscreen, holding it in place temporarily with a strip of cloth tape on each sideas shown above. The arrows show the side screw positioning – refer to next page.Note that the protective plastic cover has been folded back from the edges of the windscreen.Check around the entire perimeter of the windscreen for any areas where the Perspex does notfit neatly inside of the joggle and carefully sand away the Perspex until it fits. In most casesthe windscreen will fit correctly without any alteration, but nonetheless check carefully.Wednesday, April 7, 2010 75 of 327
<strong>Jabiru</strong> <strong>J160</strong> Constructors <strong>Manual</strong>Pre-Paint>Fuselage>Fit windscreenDrill the screw holesWith the windscreen still held firmly in place by the tape, the next step is to drill a series of11/64” holes around the perimeter at the positions shown above. Note that 11/64” is slightlybigger than the screws – this is to make sure that the threads will not bind in the holes andpossibly chip or break the Perspex.Drill slowly with a blunt drill bit and don‟t lean on the drill - let the bit do the work.The holes are drilled well in from the edge of the Perspex at a point where they just miss the¼” foam tape – this gives the maximum amount of „meat‟ for the screws to grab. Note that thebulk of the structural strength is provided by the flock: the main purpose of the screws is tohold the windscreen firmly and accurately in place while the flock cures.Start by drilling at each corner, then drill halfway between each corner and then drill halfwaybetween those holes until you have the holes as shown above and on the previous page.Once all of the holes have been drilled they will each need to be countersunk to a depth wherethe head of each countersunk M4 x 12 screw will be just below the surface of the Perspex.Prepare the windscreenRemove the windscreen carefully and clean away any burrs from around the holes and blowaway any dust and debris from the joggle.Place the windscreen face down on the bubble wrappacking material, taking care not to allow anything toscratch the surface, and sand around the entire insideedge with emery tape – roughen to a point level with theinside of the bolt holes.By holding the emery tape as shown you can use yourfinger to control the width of the sanded area.When the sanding is complete blow away the dust andthen use a clean soft cloth and wipe right around thewindscreen. Do not use any cleaning agents.Wednesday, April 7, 2010 76 of 327
<strong>Jabiru</strong> <strong>J160</strong> Constructors <strong>Manual</strong>Pre-Paint>Fuselage>Fit windscreenFit the windscreenMix 160 grams of flock and fill the entire joggle up to the level of the foam strip. Carefullyplace the windscreen onto the bed of flock – start at one corner and position the windscreenwith a rivet or similar to get the alignment of the holes and then lower it into position.Once the windscreen is in place start fitting the screws and locknuts, working from thecorners first and then the middle screws and so on in much the same manner as the holes weredrilled. Take care not to over tighten the screws, tighten them just enough so that the edge ofthe windscreen is level with the adjacent fuselage.Check all around to see that the flock has keyed to thewindscreen: the sanded surface of the windscreenedge will appear to go clear with no bubbles when theflock is in full contact with it. It may be necessary togently squeeze the windscreen to remove anybubbles, although if you have filled the joggle withflock there should be full contact anyway.In the photo at right you can see that the flock is infull contact all the way around. Note the flock hasbeen wiped off level at the outside of the joggle andthat there is no flock at all on the surface of thewindscreen.When you are satisfied that the windscreen is positioned correctly wipe away the excess flockwith a clean mixing stick, taking care not to smear any resin or flock over the windscreen:always wipe out and away from the windscreen. Do not use any cleaning agents; use only aclean soft cloth.Leave overnight to cure.This completes the Pre-Paint>Fuselage>Fit windscreen task.Wednesday, April 7, 2010 77 of 327
Pre-Paint>Fuselage>Fit control cables and linesObjectives of this task:<strong>Jabiru</strong> <strong>J160</strong> Constructors <strong>Manual</strong>Pre-Paint>Fuselage>Fit control cables and linesThe rudder, elevator, elevator trim cables, static line and VHF antenna cable, along with anyelectrical wiring, will be routed from the empennage to the cockpit for later connection.The trim cable will be routed from the front edge of the pilot‟s seat and into the longitudinalrib and out the bottom of the empennage, the elevator cable will be routed from the consolethrough the longitudinal rib and out the rear of the empennage, and the rudder cable will berouted beside and into the longitudinal rib and out of the lower console while the rear of thecable runs up through the fin stub.Cable connections will be performed in the appropriate tasks later in this manual.Materials required:Cloth tapeIdentify the cablesEach control cable is fitted with a white identification tag permanently attached and a brightorange identification tag just beside it. In every case these tags identify not only the cable butalso the inboard or control end of the cable and you should plan to have the tagged ends endup inside the cabin when each cable is finally fitted.Identify the exit holes in the consoleAll electrical cabling and the fuel line exit the console at the top front of the lower console,just before the rudder pedals. This slot was enlarged in the Prepare fuselage task.The trim cable exits the console at the right front of the pilot‟s seat against the console.The elevator cable exits the console from the right hand side of the centre armrest.The rudder cable exits the console midway between the front of the pilot‟s seat and thefirewall just above the floor.Run the electrical cabling and static tubeThe rudder cable will be used to push all of the electricalcabling through from the rear of the fuselage and throughthe holes in the ribs then into the lower longitudinal rib tothe wiring hole in the lower forward top of the console.Use cloth tape to bundle all electrical cabling (2 fuel pumpwires, VHF antenna cable, strobe light wires (if fitted)) andstatic tube to the end of the elevator cable as shown aboveright. You may want to include a drawstring for any wiring that you decide to add later.Feed the bundle in from the rear and through the holes in the ribs beside the lowerlongitudinal rib and into the slot in the lower longitudinal rib under the lateral beam behindthe seats and into the lower forward part of the console.Wednesday, April 7, 2010 78 of 327
Use a wire hook to pull the static tube downthough the rearmost slot underneath theempennage as shown at right.The static tube from the static probe in thevertical fin will be routed down and throughthe same slot and a joiner will connect the 2tubes – both tubes can be seen in the photo atright, tied together to prevent them slippingback into the empennage.<strong>Jabiru</strong> <strong>J160</strong> Constructors <strong>Manual</strong>Pre-Paint>Fuselage>Fit control cables and linesWhen the bundle is visible in the cable hole at the lower frontof the console pull it through until the cloth tape can beremoved, then withdraw the rudder cable slightly whileholding the electrical cables and the static tube from movingback – tape them to the side of the console if necessary.Pull the electrical cables and the static tube up until they arelevel with the top of the windscreen – this will give enoughlength for later connection.The VHF antenna cable and the strobe wiring can be left trailing out the rear of the fuselage atthis point – they will later be routed up into the vertical fin. The 2 fuel pump wires can becoiled up behind the seats for later fitting into the header tank enclosure, and any wingtipstrobe wiring can be coiled in the same position for later connection.Fit the trim cableFeed the trim cable (untagged end first) inthough the hole in the front edge of thepilot‟s seat and feed it back into thelongitudinal rib (you may need to use a wirehook through the access slot behind the seatsto lift the cable over the main gear hump)until it can be seen though the front slotunder the empennage, then hook it out of thatslot (the rear of the trim cable can be seen inthe photo above right) and pull it throughuntil it is roughly level with the trim horn.Fit the elevator cableFeed the elevator cable (untagged end first)into the slot on the right-hand side of thearmrest and back though the longitudinal rib.You may need to use a wire hook through theaccess slot behind the seats to lift the cableover the main gear hump.Feed the cable back and out the “T” shapedhole at the lower rear of the empennage.Wednesday, April 7, 2010 79 of 327
Clamp the elevator cable into place using thesupplied clamp bracket, taking care to fit thepressed locating section of the clamp in thegroove around the outer cable. The clampconsists of a saddle and a backing plate, andthe whole clamp must be fitted onto a taperedprofile plate with the thin end of the wedgefacing the rear of the aircraft and secured tothe fuselage by 2 x AN3-6A bolts and Nylocnuts. Tighten firmly.<strong>Jabiru</strong> <strong>J160</strong> Constructors <strong>Manual</strong>Pre-Paint>Fuselage>Fit control cables and linesFit the rudder cableThe rudder cable was partly fitted with theelectrical cabling, so all that is left to do is tofeed the rear of the cable up and out of theslot on the right hand side of the fin stub, asshown at right: the photo has been taken fromthe rear of the empennage looking forward.The front of the rudder cable can be seeninside the console near the rudder slot on theleft-hand side of the lower console, so use ahook to pull it through the slot and pull itabout 150mm through and into the cabinfootwell.StaticlineRuddercableThis completes the Pre-Paint>Fuselage>Fit control cables and lines task.Wednesday, April 7, 2010 80 of 327
<strong>Jabiru</strong> <strong>J160</strong> Constructors <strong>Manual</strong>Pre-Paint>Fuselage>Empennage>Fit vertical tail finPre-Paint>Fuselage>Empennage>Fit vertical tail finObjectives of this task:To fit the vertical tail fin to the fuselage, including fitting the static probe, static tube, optionalstrobe light wiring and the VHF antenna coax cable.Materials and equipment required:Card # J3 „Rudder’ for theVHF antennaGlass cloth and peel clothbags labelled: “Tail Fin” and“Outer Reo Tail Fin”Epoxy resin and flock5-minute Araldite and flock2 lengths of 2” aluminiumangle, waxed, each one atleast the length of the joinPlumb bob and string lineBuilders levelCompleted vertical fin fitted to the fuselageFit the spar extenderSpar extenderTail sparSand the matching surfaces of the pre-fitted tail spar and the spar extender. Make sure that the2 pieces match and then fix the spar extender in place with 5-Minute Araldite.When the Araldite has cured sand the front and back surfaces of the spar, mix a batch of resinand coat both surfaces and then brush on 3 layers of AF303 glass fibre cloth to each surface(front and back) and finish with a layer of peel cloth.When ready to fit the fin remove the peel cloth and carefully trim the glass cloth from thesides of the extended tail spar. A heat gun will make the edges of the cloth easier to trim witha sharp knife.Wednesday, April 7, 2010 81 of 327
Prepare the vertical fina jigsaw to join the two holes.<strong>Jabiru</strong> <strong>J160</strong> Constructors <strong>Manual</strong>Pre-Paint>Fuselage>Empennage>Fit vertical tail finStart by laying the vertical fin on its side and drilling outthe marked inspection hole on the left-hand side with a holesaw.Turn the vertical finover and cut out themarked slot for therudder cable: drill eachend of the slot then useRemove any burrs – the exact sizing of the hole and slotwill be finalized once the vertical fin has been fitted intoplace.Remove the peel cloth from both sides of the joining surface. Use a scraper to remove anyedge strips of the peel cloth that have not peeled off cleanly.Using a round file, enlarge the static probe mount hole in the top front of the fin – it needs tobe large enough to pass the static tube and draw wire through easily. The finished hole size isnot critical. Take care not to file through the pre-installed drawstring: for this reason using adrill is not recommended. If fitting the optional strobe to the top of the fin then you should fitthe mounting base now: flock the base to the forward top of the fin and screw in place.Pull the static tube and the VHF cable through the finLay the vertical fin beside the fuselage on trestles set at about the same height as the finmounting stub. Lay the strake across the mounting stub.Locate the drawstring inside the fin that will be used for the VHF cable and the static tube – itis tied in a loop around the internal foam rib. Cut the bottom of the loop to separate thedrawstring into 2 parts: the static tube/strobe wiring and the VHF cable.Run the static tube/strobe wiring up from thefuselage into the rear section of the fin, throughthe hole in the internal foam rib and into the frontsection of the fin – do not let the static tube layunder the rib or it will be squashed against thestub when the fin is fitted. This is critical!Tie a length of wire to the static tube drawstringand pull it through – the friction of the static tubebeing pulled may cause a string to break.NOTunderhere!Throughhere:Front:StatictubeWednesday, April 7, 2010 82 of 327
<strong>Jabiru</strong> <strong>J160</strong> Constructors <strong>Manual</strong>Pre-Paint>Fuselage>Empennage>Fit vertical tail finTie the drawstring to the VHF cable and the draw wire to the static tube/strobe wiring. Thephotos below show how: loop the draw string or wire around the cable or tube to be pulledthen tape the end of the draw wire or string so that when it is pulled it will tighten the knot.Tape the end of the cable or tube to be pulled to streamline it and avoid it catching onanything. Cloth tape is stronger than masking tape and is recommended for this purpose.Pull the static tube/strobe wiring and the VHF cable through the fin and out of their respectiveholes, then tie a knot or tape a mixing stick across the end at right angles to prevent themsliding back inside the fin.Test fit the vertical finTape the rudder cable threads then push the cable forwards until it can be tucked inside theslot in the mounting stub. Lift the fin up and over the tail spar and slide the fin down intoplace. You may have to trim as small amount out of the fuselage behind the tail spar to clearthe fin spar. A jigsaw is ideal for this task.Check the fit along the entire joining line and mark and remove as required to achieve a goodfit. Take extra care to ensure that the join at the front of the strake (at the yellow arrow in thephoto below) is smooth so that there is one continuous line along the entire length of thestrake – if there is any discontinuity it will look extremely disappointing when paint is appliedso take care to get it exactly right at this time.Too high hereRemove fromhereWednesday, April 7, 2010 83 of 327
Level the aircraft<strong>Jabiru</strong> <strong>J160</strong> Constructors <strong>Manual</strong>Pre-Paint>Fuselage>Empennage>Fit vertical tail finBecause the alignment of the vertical fin is important the aircraft should be fixed in a “wingslevel” attitude prior to the final fit. Place a 3” block on the top of each front wing mountinglug and place a spirit level across the top of the cabin so that it rests on both blocks. Pack themain wheels as required to level the aircraft.Fit the vertical finYou will need a second person to help you position and fit the vertical fin.When you are satisfied that the fin will fit correctly, prepare the mounting stub on the fuselageby sanding all of the gel coat from the surface of the joggle.Lightly sand the inner surface of the vertical finand the mating surfaces of the tail spar and finspar.Mix a batch of resin and carefully coat allsurfaces to be joined. Add flock and mix, thenapply a 3 – 5mm coat to one side of all surfaces tobe joined: both sides of the mounting stub and theback of the tail spar.Do not be overly concerned about getting a precisely even layer of flock – the pressure of the2 surfaces being squeezed together will ensure that the flock is evenly distributed.With one person holding each side of the vertical fin, lift the fin into position and lower itdown while holding the sides of the fin apart as shown below.Wednesday, April 7, 2010 84 of 327
Take care not to let the fin just slide downinto place because it will push all the flockout of the join, and do not let the fin slidedown past the joggle! You may want to fit2 x self-tapping screws at either side of therear of the empennage just where thejoggle steps out to prevent this happening.When the fin is all the way down push thefin all the way forward and allow the sidesto push in and onto the flock. Check the fit,particularly at the strake/fuselage join.<strong>Jabiru</strong> <strong>J160</strong> Constructors <strong>Manual</strong>Pre-Paint>Fuselage>Empennage>Fit vertical tail finTie a plumb bob to a string line and fix thestring line to the top of the vertical fin thenalign the fin until it is precisely vertical:the string line should be exactly in the centre of the fin when viewed from the rear. Recheckthis vertical alignment at every step from here on.Once the alignment is correct, secure the fin inposition. You could use a strip of heavyadhesive tape from the outside edge of thehorizontal fin, over the top of the vertical finand down to the other side of the horizontal fin.Recheck the vertical alignment.Now hold the fin forward and fix the fin spar tothe tail spar with 2 self-tapping screws asshown at right. Recheck the vertical alignment.Rivet the front of the strake into place with acountersunk pop rivet at each side of the strakeand then rivet at each side of the inspection hole and the rudder cable and remove the selftappingscrews. Recheck the vertical alignment.Wax one side of each of 2 lengths of aluminium channel so that the flock will not stick andplace as a rail along each side the full length of the join line and secure with clamps as shownbelow. Recheck the vertical alignment. Leave overnight to cure.Next day remove the aluminium channels and the peel cloth, then use a hole saw to open theinspection hole and a drill and jigsaw to recut the rudder cable slot. File out any rough edges.Wednesday, April 7, 2010 85 of 327
<strong>Jabiru</strong> <strong>J160</strong> Constructors <strong>Manual</strong>Pre-Paint>Fuselage>Empennage>Fit vertical tail finFit the VHF antenna15mmLowersectionflockEnsure that the VHF coax cable exit hole is on the hinge (left-hand) side of the vertical fin –elongate the hole with a file if it is not. Sand the back of the lower section of the VHF antennaand place it so that it is exactly 15mm below the upper section and fix it in place with 5-minute Araldite.Note that the factory fitted upper section of the antenna has been offset slightly to the left toallow for rudder movement: keep the lower section of the antenna exactly in line verticallywith the upper section.Ensure that the threaded hole for the electrical connection is at the top of the lower section asshown above right.Mix some resin and lay up 2 pieces of glass fibre cloth across each section of the antenna in 3places, using flock to fill the gaps at each side of the antenna before placing the cloth. Leaveovernight to cure.Next day, shorten the VHF coax cable to length, and fit ferrite toroids, crimp 4.5mm electricalring terminal connectors to the inner cable and the outer coax sheath and fit heat shrink tubingover the terminal joins, as shown in the sketch below.Screw the inner cable to the TOP section and the braided coax sheath to the LOWER section.Tuck any excess cable back into the vertical fin and seal completely with silicone sealant.Wednesday, April 7, 2010 86 of 327
Fit the static probe assembly<strong>Jabiru</strong> <strong>J160</strong> Constructors <strong>Manual</strong>Pre-Paint>Fuselage>Empennage>Fit vertical tail finAssemble the static probe: using a drop of Loctite fit the bullet-nose end to the static tube,making sure that the vent hole (circled) will be horizontal when the static probe is installed.Put a smear of super glue around the base of the static tube then slide the PVC tube over thebase of the static tube by at least 25mm and fix firmly in place with 2 lock wire ties.Take particular care that the PVC tube is well secured to the static tube because once the staticprobe assembly has been flocked in place there will be no access for repair work.Push the static probe assembly back into the hole at the front top of the vertical fin so that thestatic probe assembly is parallel with the top of the vertical fin and centred laterally in the fin.Secure the static probe assembly in place with 5-minute Araldite and hold it in place while theAraldite dries. Mix up a batch of resin and coat the area around the base of the static probeassembly, and then add some flock to make a firm mix and shape around the base of the staticprobe assembly to form a smooth transition from the static probe to the fin. Leave to cureovernight and then sand to a smooth tapered finish.This completes the Pre-Paint>Fuselage>Empennage>Fit vertical fin task.Wednesday, April 7, 2010 87 of 327
Pre-Paint>Fuselage>Empennage>Fit elevatorObjectives of this task:<strong>Jabiru</strong> <strong>J160</strong> Constructors <strong>Manual</strong>Pre-Paint>Fuselage>Empennage>Fit elevatorTo fit the elevator to the horizontal stabiliser, to fit the trim tabs to the elevator and the endcaps to the elevator and the horizontal stabiliser.This task is performed on trestles prior to the fitting of the horizontal stabiliser to the fuselage.The trim tabs and end caps may be fitted after the horizontal stabiliser and elevator have beenfitted to the fuselage, although it is usually easier to fit them as part of this task.Materials required:Card # J17 “Elevator” for the hingesEpoxy resin and flockPrepare the horizontal stabiliser and the elevatorRemove the peel cloth from the horizontal stabiliser and the elevator.Mark the top and bottom of the horizontal stabiliser and the elevator: the horizontal stabiliseris pre-marked and the drive arm of the elevator must face downwards.Lay the horizontal stabiliser and the elevator on the work surface in the finished position witha 1mm gap (use 2 equally spaced mixing sticks) between them. You will need to place awedge under the rear of the elevator. Make sure that that the ends are aligned and thenmeasure and mark a centreline on each surface. Lightly clamp or tape the horizontal stabiliserand the elevator in position.Mark and drill the elevator hingesMark out the hinge positions: mark the centreline of the tailplane and then use the drawing onthe next page and mark the correct hinge locations, which will be the same on each side.Place the hinges in those locations with the flat side of each hinge facing upwards and thehinge pin aligned in the centre of the gap between the horizontal stabiliser and the elevator.Do not place the hinge flat side down – if you do then the holes will not line up correctlywhen you come to fit the hinge.Use a 3/32” drill to make a pilot hole opposite the pin side of each rivet hole: this is to allowfor the slight slope of the hinge at this point, then check that the hinge and hole positioning iscorrect and then carefully expand to 3/16” holes.Wednesday, April 7, 2010 88 of 327
<strong>Jabiru</strong> <strong>J160</strong> Constructors <strong>Manual</strong>Pre-Paint>Fuselage>Empennage>Fit elevatorWednesday, April 7, 2010 89 of 327
Fit the elevator hinges<strong>Jabiru</strong> <strong>J160</strong> Constructors <strong>Manual</strong>Pre-Paint>Fuselage>Empennage>Fit elevatorTest fit the hinges using 2 Clecoes per side and slide the hinge pin into place as shown above.Fit the 2 outer hinges first – this will hold the elevator in place while the inner hinges arefitted.Each hinge pin is inserted from the inside towards the outside of each hinge. Mark thelocation of the end of each hinge pin (circled at above right). Check that the elevator canswing freely with no binding in the hinges: adjust the hinge mounting holes if required.Check that the horizontal stabiliser to elevator gap is even along the full length then removethe elevator and hinges. Leave the horizontal stabiliser clamped down.Sand the flat side of each hinge and the locations where they will be fitted, then mix a smallbatch of resin and coat each area. Add flock to the remaining resin and apply a 2mm layer offlock to each hinge and flock into place using clean Clecoes in the outer holes as before.Using a 120° countersink bit carefully countersink the 4 inner holes just enough so that acountersunk rivet head will sit flush with the surface when fitted and rivet the 4 inner holeswith countersunk rivets. Now remove the Clecoes from the outside holes one at a time,countersink each hole and fit a countersunk rivet until each hinge has 8 countersunk rivets.Take care to keep flock away from the hinge pins during this step: clean the hinges while theflock is still wet and then separate both parts (horizontal stabiliser and elevator) and leaveovernight to cure. Clean the Clecoes in acetone after use.Next day use a rat tail file to make a slot into the horizontal stabiliser ateach hinge pin mark (example circled at above right), fit the hinge pinand the hinge pin retainer, mark the retainer screw hole and drill a 3/32”hole. Pop rivet an anchor nut under each screw hole using 2 x 3/32”countersunk rivets. The drawing on the previous page shows detail.Fit the trim tabsMark the trim tab locations on the elevator from the dimensions given on the drawing on theprevious page. Note that the trim tabs fit onto the top of the elevator and face downwards.Clamp the trim tabs in position using spring clamps and drill the 3 holes as shown on thedrawing. Lightly sand the surfaces to be joined, then mix a small batch of resin and coat thesurfaces to be joined. Add flock to the resin and stir in thoroughly, then apply a 2mm layer offlock to each trim tab and fit into place with 3 x 6G self-tapping screws.Clean away any excess flock with the mixing stick, leaving a smooth radius around the entirejoin, and leave overnight to cure. Next day heat and remove the self-tapping screws.Wednesday, April 7, 2010 90 of 327
Fit the elevator end caps<strong>Jabiru</strong> <strong>J160</strong> Constructors <strong>Manual</strong>Pre-Paint>Fuselage>Empennage>Fit elevatorAssemble the horizontal stabiliser and the elevator by inserting all of the hinge pins and setthe elevator to a level position.Use a knife to trim out some of the foam in the end of the elevator and then test fit each endcap. Ideally you want a gap between the end of the horizontal stabiliser and the elevator endcap (yellow arrows above) the thickness of 2 mixing sticks. When this gap has been achieved,align the rear of the end cap with the rear of the elevator and fit with self-tapping screws.Check that the elevator can swing freely: if there is any binding or rubbing between the endcap and the horizontal stabiliser locate the source and fix it, either by moving the end capposition slightly or by sanding away part of the inside of the end cap.Remove the end caps and sand all surfaces to be joined, then mix a batch of resin and coat thesurfaces to be joined. Add flock to the remaining resin and apply a 2mm layer to the end capstub then fit the end cap to the elevator and fix in place with the self-tapping screws. Smoothaway any excess flock with a mixing stick, recheck the alignment and leave overnight to cure.Next day remove the self-tapping screws.Fit the horizontal stabiliser end capsWith the horizontal stabiliser and the elevator still assembled, test fit the horizontal stabiliserend caps: the gap between the elevator end cap and the horizontal stabiliser end cap shouldalso be the thickness of 2 mixing sticks (green arrows above). When this is correct fit the endcap with 3 self-tapping screws: 1 at each back corner and 1 at the leading edge. Check forfreedom of movement then remove the end cap and prepare the surfaces and flock the endcops into place and fix with the self-tapping screws. Smooth away any excess flock with amixing stick, recheck the alignment and leave overnight to cure. Next day remove the selftappingscrews.Separate the horizontal stabiliser and the elevator. The horizontal stabiliser will be fitted to theempennage in the task Pre-paint>Fuselage>Empennage>Fit horizontal stabiliser and theelevator will then be fitted to set the up and down stops.This completes the Pre-Paint>Fuselage>Empennage>Fit elevator task.Wednesday, April 7, 2010 91 of 327
<strong>Jabiru</strong> <strong>J160</strong> Constructors <strong>Manual</strong>Pre-Paint>Fuselage>Empennage>Fit horizontal stabiliserPre-Paint>Fuselage>Empennage>Fit horizontal stabiliserObjectives of this task:To fit the horizontal stabiliser to the fuselage and glass it in place. Note that the elevatorhinges were fitted in the previous task Pre-Paint>Fuselage>Empennage>Fit elevator.Materials required:Epoxy resin and flockGlass fibre cloth and peel cloth in the bag labelled: “Horizontal Stabiliser”Steps1. Level the aircraft2. Fit the stabiliser3. Glass the stabiliserLevel the aircraftThe aircraft should be fixed in a “wings level” attitude prior to fitting. Place a 3” block on thetop of each front wing mounting lug and place a spirit level across the top of the cabin so thatit rests on both blocks. Pack the main wheels as required to level the aircraft.Clamp a straightedge (a 2 or 3 metre length of aluminium angle works well) across the backof the door frames at the height of the fuselage join line: ensure that the straightedge is level.This will be your main reference for aligning the horizontal stabiliser.Wednesday, April 7, 2010 92 of 327
Fit the stabiliser<strong>Jabiru</strong> <strong>J160</strong> Constructors <strong>Manual</strong>Pre-Paint>Fuselage>Empennage>Fit horizontal stabiliserPrepare the stabiliser by taping up the inboard elevator hinges to prevent any resin getting intothe hinge pins. From the previous task you will have a marked centreline on the stabiliser: testfit the stabiliser to the rear of the fuselage using the stabiliser centreline as a lateral locationguide against the fuselage centreline.Push the stabiliser fully forward into the rear of the fuselage and check that each end of thestabiliser is an equal distance back from the straightedge – use 2 tape measures as showncircled above, one each side, and carefully move the stabiliser until the measurements areexactly the same. (The photos above show a 200 series fuselage but the principle is the same.)Sight along the fuselage from the rear and confirm that the stabiliser is level and lined up withthe straightedge. The chord line of the stabiliser is to be angled down 3 degrees at the leadingedge. Make any adjustments necessary.When the stabiliser is aligned correctly, secure the stabiliser to the fuselage with self-tappingscrews, using 10 screws per side. These screws will be removed after the stabiliser has beenfinally fitted. Run a pencil line around the stabiliser along the fuselage join.Remove the stabiliser from the fuselage and remove the peel cloth from the rear of thefuselage, then lightly sand all the surfaces to be joined – the pencil line on the stabiliser willact as a guide for where to sand and where to coat with resin.Mix a batch of resin and divide into 2 parts. Coat all the surfaces to be joined. Add flock toone part of the resin and apply a layer to the rear of the fuselage then slide the stabiliser in toplace, pushing it fully forward. Open the join and use a mixing stick to force flock into thesides and rear of the join, then smooth the flock along the outside. Fix the stabiliser in placewith the self-tapping screws, do a final check of the alignment and leave overnight to cure.Next day, remove the self-tapping screws that were used to temporarily fix the stabiliser inplace. If they are difficult to remove heating each screw with a soldering iron will help.Wednesday, April 7, 2010 93 of 327
Glass the stabiliserIn this step the hole at the fuselage join at the front ofthe stabiliser will be glassed over with 3 layers ofAF303 glass fibre cloth.Start by lightly sanding all surfaces, then mix a batchof resin and coat the surfaces where the glass fibrecloth will be placed.Cut 6 squares of AF303 glass fibre cloth (3 per side)to cover the root of the join as shown at right andbrush each layer into place.Brush a layer of peel cloth over the join and leaveovernight to cure.Next day remove the peel cloth and trim away excessglass fibre ends with a sharp knife.<strong>Jabiru</strong> <strong>J160</strong> Constructors <strong>Manual</strong>Pre-Paint>Fuselage>Empennage>Fit horizontal stabiliserThis completes the Pre-Paint>Fuselage>Empennage>Fit horizontal stabiliser task.Wednesday, April 7, 2010 94 of 327
Pre-Paint>Fuselage>Empennage>Fit rudderObjectives of this task:<strong>Jabiru</strong> <strong>J160</strong> Constructors <strong>Manual</strong>Pre-Paint>Fuselage>Empennage>Fit rudderTo fit the rudder to the vertical fin, align the rudder and fit the rudder stops and rudder cable.Materials required:Card # J3 „Rudder‟Epoxy resin and flockAlign the rudderThe first step is to line up the top of the fin andthe top of the rudder: the vertical alignment.Tape a mixing stick to the fin at the 2 positionsindicated by the yellow arrows at right and sitthe rudder in place.Place mixing stick(s) as required at the bottomof the rudder to get an even gap.It may be necessary to adjust the vertical gapslightly or sand the top of the fin or rudder inorder to get a precise and visually pleasingalignment.Once the vertical alignment is correct the foreand aft alignment can be addressed: the secondstep is to equalise the gaps between the fin andrudder and the top of the fin and the rudderhorn.It may be necessary to sand part of the forwardsection of the rudder horn and/or the back ofthe fin ahead of the rudder horn away, takingcare not to make either area too thin.Take your time and get this alignment exactly right – the tail fin/rudder is a very visible partof an aircraft and time spent now will reward you with the pleasure of a great looking tail onyour aircraft. Leave the mixing stick alignment spacers taped in place at this stage.Use the photo of a finished example above as a guide of how the rudder should look.Pre fit the hinges, mount and swing the rudderMark the initial hinge locations onto the vertical fin from thedrawing 2 pages down, then number the hinges on both sidesas well as the matching positions on the fin, including anarrow for “up” on each hinge.Notice that the flat side of the hinge faces out.With the rudder still in place, hold each hinge centred over thegap between the vertical fin and the rudder and mark the finalmounting position of each: the hinge pin should sit in thecentre of the fin to rudder gap.Wednesday, April 7, 2010 95 of 327
<strong>Jabiru</strong> <strong>J160</strong> Constructors <strong>Manual</strong>Pre-Paint>Fuselage>Empennage>Fit rudderRemove the rudder and set it aside while the hinges are fitted to the tail fin.Hold a hinge in position and drill the top hole only and temporarily fit the hinge in place witha rivet as shown above, then carefully reposition the hinge so that the hinge pin is parallel tothe back of the rudder and drill the bottom hole and fit a rivet in that hole, then drill theremaining 2 holes. Repeat this process for each hinge.Put the rudder back in place using the spacers that you left taped in place. Make sure that thealignment is still correct, then drill the top hole of the top hinge and fix in place with a rivet,and then drill a hole in the bottom hinge and fix that in place with a rivet. Repeat the processuntil all holes are drilled and each hinge is temporarily fixed to the rudder with 2 rivets.Test fit the rudder using Clecoes to hold each hinge in the final mounting position, which isinside the fin and inside the rudder as shown above. Remove the spacers and check that therudder can swing freely left and right at least 100mm from the centreline as measured at therear of the rudder. If there is any binding locate the source and correct it.Mark the location of the end of each hinge pin (circled at above left), then remove the rudderand all hinges.Wednesday, April 7, 2010 96 of 327
<strong>Jabiru</strong> <strong>J160</strong> Constructors <strong>Manual</strong>Pre-Paint>Fuselage>Empennage>Fit rudderWednesday, April 7, 2010 97 of 327
Fit the rudder<strong>Jabiru</strong> <strong>J160</strong> Constructors <strong>Manual</strong>Pre-Paint>Fuselage>Empennage>Fit rudderThe objective now is to refit the rudder as before with Clecoes but with a 2mm bed of flockunder each hinge, do a final check of the alignment and rivet the hinges into place.Lightly sand the flat side of all hinges and the inside of the fin and the rudder where thehinges will be placed. Mix a batch of resin and coat the hinge mounting areas inside the finand the rudder, then mix in flock and coat the fin half of each hinge. Clecoe the hinges inplace on the fin as before. Now apply flock to the rudder half of each hinge and mount to therudder in the same way: with Clecoes in the centre holes.Check the rudder for free movement and once you are satisfied that there is no binding thencountersink each hole with a 120° countersink bit and rivet each hinge with countersunk rivets– top and bottom holes first, rechecking for free movement at each step, then take the Clecoesout and countersink and rivet the centre holes. Take care to keep any flock away from thehinge pins during this step.Do a final check for free rudder movement, then carefully remove the hinge pins and rudder,clean away any excess flock with a clean mixing stick and leave overnight to cure.Next day use a rat-tail file to make a slot into the fin at each hinge pin mark, fit the hinge pinand the hinge pin retainer, mark the retainer screw hole and drill a 3/32” hole. Pop rivet ananchor nut under each screw hole using 2 x 3/32” countersunk rivets.Fit the rudder stopsMake a template that will sit over the rear of the empennage and tape it in place. Find thecentreline of the fuselage and mark a 5mm offset to the right onto the template, then mark80mm each side of the offset as shown above. Refit the rudder.Swing the rudder to the left-hand mark on thetemplate and mark the position of the rear rudderstop and fit it in place with 2 countersunk selftappingscrews. Swing the rudder to the right and fitthe front stop the same way. It may be necessary tosand inside the right-hand side of the fin to clear therudder at full right deflection.It may also be necessary to sand away part of thelower right of the fin (arrowed at right) to allowclearance for the rudder arm at full right rudder deflection.Check the swing both ways and adjust the stops if required. Once the positions are correctremove the stops and sand the base of each stop as well as the position in which they will bemounted, then mix a small batch of resin, coat the joining surfaces and flock both stops inplace, holding each in place with the self-tapping screws. Smooth away any excess flock andleave overnight to cure.Wednesday, April 7, 2010 98 of 327
Fit the rudder cable bracket clamp<strong>Jabiru</strong> <strong>J160</strong> Constructors <strong>Manual</strong>Pre-Paint>Fuselage>Empennage>Fit rudderFit a rod end to the rudder cable: thread it on to half the thread depth. The total cable travel is80mm: pull the inner cable all the way out and make a mark at 40mm from the outer cablethen push the inner cable in to that mark. This puts the cable at the centre of its travel.Fit the rod end to the rudder arm with a bolt.LocatinggrooveHalftravelHalftravelSecure the rudder in the „5mm right of centre‟ position on the template, then hold the ruddercable horizontal and mark the location of the locating groove in the outer cable.Hold the cable clamp in place and drill a 3/32” pilothole into the fin through each hole in the clamp,then check the holes from the back through theaccess hole (as pictured at right) – there needs to beenough room above the top hole and below thebottom hole to fit the head of the bolt in place.Make any vertical adjustments that may be requiredthen drill to 3/16”. Test fit the cable clamp: feed thebolts from the inside and through the side of the fin,then place the angled cable clamp packer againstthe side of the fin with the wider part of the packerto the rear of the aircraft, then the cable clamp shimand finally the cable clamp. Secure temporarilywith plain nuts – final assembly will require Nylocnuts.Top of stubFuselageClearanceClearanceTest the movement of the rudder and rudder cable: make sure that the rudder can be moved toeach stop by use of the cable without any binding.Remove the rudder cable fittings and the rudder and set aside for painting, put all hinge pins,hinge pin retainers and rudder cable fittings into a labelled container for reassembly afterpainting has been completed.This completes the Pre-Paint>Fuselage>Empennage>Fit rudder task.Wednesday, April 7, 2010 99 of 327
Pre-Paint>Fuselage>Fit cowlingObjectives of this task:<strong>Jabiru</strong> <strong>J160</strong> Constructors <strong>Manual</strong>Pre-Paint>Fuselage>Fit cowlingTo fit the top and bottom cowl to the fuselage. This is a big task that will require time andpatience: the cowl will need several test fittings and small adjustments to get the fit just right:take your time and your reward will be a perfectly fitting, great-looking cowl.Materials required:Card # J13 „Cowl components‟ and the piano hinges pack (pictured below)Epoxy resin and flock5-Minute AralditeMatch the cowl joins and cut the propeller shaft holeStart by standing the top and bottom cowls on their bases, align the front of each sectioncarefully and then tape both sections together using cloth tape (circled above).Look along the side joins and check the alignment: the top and bottom sections should butt upto each other with no gaps as shown at above left. Sand away any areas that overlap until eachjoin is straight and true. Mark the centre front of the propeller boss area then mark a 105mmcircle and use a jigsaw to cut the hole out. In the factory we use a circular jig as shown in thesecond photo but the hole can easily be scribed with a compass. Sand any rough edges.Fit the top cowl to the fuselageOnce the front of the top cowl is correctly positioned andcentred on the propeller shaft extension, move to the backof the cowl and ensure that it is centred side-to-side: markthe fuselage waterline on each side of the fuselage (photo atright) and measure up to the cowl from that line then movethe cowl side to side until the distance is equal on bothsides. Recheck that the front of the cowl is still centred.When the cowl is centred at the front and back, mark thecentreline on the cowl and on the fuselage in front of thewindscreen and then tape the cowl to the fuselage.In this step we will need to make up a spacing jig (shown atleft) that will keep the front of the top cowl 20mm behind thepropeller flange and 15mm above and centred on the propellershaft extension, plus a 3mm spacer on top of each ram airduct. Wooden blocks cut to size are fine for the purpose.Tape the jig into place and test fit the top cowl.WaterlineSame bothsidesWednesday, April 7, 2010 100 of 327
<strong>Jabiru</strong> <strong>J160</strong> Constructors <strong>Manual</strong>Pre-Paint>Fuselage>Fit cowlingMark and cut the cowls to lengthIn the next 2 steps we will need to cut both cowls to length so that they will fit into the joggle.Line upthis edgeTo markand cutthis edgeFront edge oftape exactlylevel withjoggle stepBack edgeof tapeFront edge oftape exactlylevel withjoggle stepIn the factory we have a handy technique that we use to mark the cut: we run masking tape allthe way around the outside of the joggle on the fuselage with the front edge of the tapeexactly level with the step of the joggle (left photo above) and then when the cowl is in placewe run another strip of masking tape around the cowl but with back edge of the cowl tape inline with the back edge of the fuselage tape (left photo below), so we use the width of the tapeas a way to accurately mark where to cut. ¾” masking tape is ideal for the purpose.Line up the backedges of thefuselage and cowltapesCut along thefront edge of thecowl tapeIn the photo above left the back edge of the cowl tape is being aligned with the back edge ofthe fuselage tape, while in the photo above right the cut is being made in line with the frontedge of the cowl tape. Sand any rough edges away with a long sanding block and refit the topcowl, using the centreline mark to position the cowl at the back and checking that the front ofthe cowl is still centred, then tape the top cowl into place.The same “masking tape” technique will be used to cut the bottom cowl to length.Drill 3 x 3/32” holes through the top cowl and into the fuselage: each hole should be 10mm infrom the edge of the cowl, with 1 on the cowl centreline and 1 each side 30mm up from thecowl join. Temporarily fix the top cowl into place with 6G stainless steel screws.Now that the top cowl has been positioned we can fit the bottom cowl to match it.Wednesday, April 7, 2010 101 of 327
Fit the bottom cowl to the fuselage<strong>Jabiru</strong> <strong>J160</strong> Constructors <strong>Manual</strong>Pre-Paint>Fuselage>Fit cowlingOffer the bottom cowl up to the top cowl – a well padded saw stool can be used to hold thecowl up – and fit the locating section at the front of both cowls to position the bottom cowl.Butt the joins together and tape the bottom cowl tothe top cowl.Using the same technique that you used on the topcowl, use masking tape to mark the cowl to thecorrect length then remove the bottom cowl andcut along the front of the masking tape. Sand allcut surfaces with a long sanding block.Refit the bottom cowl and tape into place, thenmark and drill 5 x 3/32” holes on each side, each10mm in from the edge of the cowling and each at60mm away from each bend plus one screw nearthe bottom of the cowl – the lines in the photoabove show the positions.Temporarily fix the bottom cowling to thefuselage with 6G stainless steel screws.Trim and finish the ram air ducts10mm3mm ram airduct spacer12mmCowlRemove the top cowl and mark the front of the ram air ducts 10mm back from the inside ofthe bottom cowl as shown above left.Remove the ram air ducts and trim to the mark, sanding away all rough edges.Mix up a small batch of 5-minute Araldite and flock and bond the rubber sealing strips aroundthe front of each ram air duct as shown above right, holding the strips in place at 12mm infront of the ram air duct with spring clips while the flock dries.Remove the bottom cowl and take both cowls to a cleared workbench.Wednesday, April 7, 2010 102 of 327
Pre-fit the cowl hingesYou will need some Clecoes for this step. The objective isto position and pre-fit the hinges using the Clecoes and thenflock and rivet the hinges permanently into place.Lay both hinge pairs side by side on the bench. The hingewith the first loop at the very end will be the bottom hinge.Mark the “Top” and “Bottom” part of each hinge pair andthen mark each pair “Left” or “Right”. Mark and drill 3/32”holes along the centre of each hinge starting at 10mm infrom the end and then at 100mm centres.<strong>Jabiru</strong> <strong>J160</strong> Constructors <strong>Manual</strong>Pre-Paint>Fuselage>Fit cowlingAssemble each hinge pair by sliding the long hinge pin through the full length of the hinge.Note that the hinge pin is much longer than the hinge – do not trim the hinge pin to length!The extra length will be used when the hinge pin is fitted through from the door jamb and intothe hinge later in this task. Put a cloth tape flag on the exposed end of the hinge pin to preventpossible accidents.30mmRoll the cowl around to theother join and repeat the entireprocess for the other hinge.At this stage the hinges holdboth cowls together as shown atright, with Clecoes fixing thehinges to the cowls.Mark each hinge and the cowlhalf that it belongs to and thenremove the Clecoes and thehinge pins.Fit both cowls together, fitting the locating sectionat the front of both cowls first and then butt theside joins together. Tape the cowls together withcloth tape on both the inside and outside of thejoins. Now roll the cowl so that one side join is onthe bottom and place the appropriate hingeassembly 30mm in from the back edge of the cowl– shorten the hinge if required. Take care that thehinge is placed so that the hinge pin is exactly inline with the join and with the side of the hingemarked “Bottom” in the bottom cowl.Hold the hinge firmly in place and drill a single3/32” hole through the cowl at the back end of thebottom hinge and fix the hinge in place with aClecoe.Now align the front of the bottom hinge, drill andClecoe into place. Repeat the process on the tophinge then drill and Clecoe every other hole. Drillthe remaining holes though the cowl.Wednesday, April 7, 2010 103 of 327
Fix the cowl hinges<strong>Jabiru</strong> <strong>J160</strong> Constructors <strong>Manual</strong>Pre-Paint>Fuselage>Fit cowlingSand the bonding surface on each cowl half and the backs of each hinge half to give the flocka good key to bond to. Clean your Clecoes in Acetone and dry them. Keep the tin of Acetonehandy for later (in fact storing your Clecoes in Acetone can be a good idea because it keepsthem free of oil and other contaminants that could affect an efficient bond).Mix a batch of resin and coat the bonding surface of each cowl then add some flock to theremaining resin and then, working on one half of one hinge at a time, apply an even layer offlock approximately 2mm thick to the hinge and fix the hinge in place with clean Clecoes inevery other hole and then rivet the remaining holes before removing the Clecoes.Working on one hole at a time, drill a 3/32” hole and usea 120° countersink bit to carefully countersink theoutside of each rivet hole just enough to allow acountersunk rivet to sit slightly below the surface of thecowl (example circled at right) then rivet each holebefore moving on to the next hole.Drop each Clecoe in the Acetone as you remove it to clean the flock out of it. Clean away asmuch flock as possible from around the hinge pin holes, smooth the flock along the other sideof the hinge with a mixing stick and leave the flock to cure overnight.Next day test fit the hinge pins and remove any remaining flock from the hinges.In the factory we use a special drill bit (shown above) that is just a standard drill bit weldedonto the end of a spare hinge pin and we clean the hinges through with that (top photo), usinga low drilling speed to prevent any whipping of the long bit. It is important that the hinge pinsfit easily into the hinges without any restrictions.Wednesday, April 7, 2010 104 of 327
Fit the hinge pin guides<strong>Jabiru</strong> <strong>J160</strong> Constructors <strong>Manual</strong>Pre-Paint>Fuselage>Fit cowlingThese guides are the 2 lengths of aluminium tube on the Card that are used to guide the hingepins through the door jambs and into the cowl hinges. When the cowls are finally installed theends of the hinge pins will be bent in at right angles and the door will hold them in place.Refit the bottom cowl to the fuselage and hold the hinge in against the joggle then mark a linebeside the firewall and directly behind the hinge. Drop the cowl and drill a ¼” hole at thispoint as shown above left: it will be just inside of the fuselage skin.Mark a point on the front of the door jamb 10mm in and in line with the cowl join as shownabove right, which will be very near to the waterline, and drill a ¼” hole towards the hole thatyou have just drilled. Use a file to round the ends of the guide tubes slightly.Cut offflush hereAraldite/flockalong this areaGuide tubeDoor jambRibFirewallContinue to drill through the rib until the guide tube can be pushed all the way from the doorjamb and through the firewall.Allow the guide tube to protrude very slightly,about ¼” as shown circled at right.Check that the hinge pin will line up with thebottom cowl in place and then fix the guide tubesin place with 5-minute Araldite and flock.Hint: a strip of masking tape under the tube acts asa dam to keep the Araldite/flock mix in placewhile it cures. Once the Araldite/flock mix hascured use a hacksaw to cut the tube off flush withthe door jamb.Clean any burrs and flock out of the guide tube.Repeat the process for the other side of the fuselage.Wednesday, April 7, 2010 105 of 327
Final fit the cowlingFit the top and bottom cowls to thefuselage and insert the hinge pinsfrom the front door openings. Drillone 5/16” hole through each side ofthe propeller boss for a Camlocfitting (shown circled at right).<strong>Jabiru</strong> <strong>J160</strong> Constructors <strong>Manual</strong>Pre-Paint>Fuselage>Fit cowlingStarting with the bottom cowl, remove one 6G stainless steel screw at a time and drill the holeout to 3/16”, then drill the 3 holes in the top cowl to 5/16”.Remove the cowls and fitthe captive nuts (acomplete captive nutassembly shown at right)to the 3/16” holes in thebottom of the fuselage.Use the captive nut itself as a jig to drill the rivet holes as shown at above right – thread thescrew part way through the captive nut from the back and fit the exposed end of the threadinto the hole in the fuselage, then drill the 2 x 3/32” rivet holes.Repeat this process for each captive nut and then fit the captive nuts to the inside of thefuselage, countersinking each rivet hole and riveting from the outside of the fuselage.Use a similar technique for the 5 Camloc fasteners in the topcowl (3 at the back, 2 around the propeller boss): hold thecaptive part of the Camloc centred over the hole and drill the3/32” rivet holes then fit the captive part inside the fuselage,once again countersinking the rivet holes on the outside of thefuselage. A complete Camloc assembly is shown at right:Countersink the holes in the bottom cowl enough to allow the Tinneman washers to seatsnugly. Do not countersink the holes in the top cowl, just deburr them.Fit the machined oil doorLocate the marked position on the right side of the top cowl.Lay the oil door on the marking and mark around it, thenmove the oil door forward 2mm and remark the front – thisslightly larger gap (circled at right) is to allow for the forwardmovement of the hinge when the oil door is opened.Assemble the door to the hinge and fit to the hinge surround.Sand around the inside of the oil door opening and then test fitthe door assembly, taking care to keep the door centredsideways and to the rear of the opening with the hinge to thefront. Tape the door to the cowl with 2 strips of cloth tape tokeep the correct position.Mix a batch of 5-minute Araldite and flock, then lift the hingeframe up, apply the Araldite/flock mix to the hinge frame andseat the hinge frame to the cowl. Take particular care that noAraldite/flock gets into any part of the hinge.Wednesday, April 7, 2010 106 of 327
Fit the cabin air inlet flange<strong>Jabiru</strong> <strong>J160</strong> Constructors <strong>Manual</strong>Pre-Paint>Fuselage>Fit cowlingDrill a 30mm hole on the left front of the lower cowl, 100mm below the bottom lip of the airinlet and 180mm to the leftof the propeller centreline.Sand the back of the flange(from Card # J25) andaround the inside of the cowlaround the hole.Mix a small batch of 5-minute Araldite and flockand fix the flange into place.Fit the induction air (NACA) duct180mm100mmThe induction air duct is fitted to the left hand side of the bottom cowl.90mm140mmAssemble the duct with 5-minute Araldite. Hold the scoop on the outside of the cowl in theposition as shown above, keeping the rear edge of the scoop at right angles to the hinge lineand mark around the outside of the unit and then make a second line inside the first about thesize of the actual opening.Cut the opening and fit the scoop to theinside of the cowl, holding it in placewith 5 x 6G stainless steel screws andadjust the opening to match the shape ofthe scoop. Mix a batch of 5-minuteAraldite and flock and fix the scoop intoplace, holding it in place with thescrews.When the Araldite/flock has cured, heat and remove the screws, mix a small batch of resinand apply a single layer of AF303 glass fibre cloth on the inside of the cowl over both sidesand across the rear of the scoop. Leave overnight to cure.Next day apply filler to blend the cowl opening smoothly into the scoop.Do a final test fit then remove and store the cowls and hinge pins until you are ready to paint.This completes the Pre-Paint>Fuselage>Fit cowling task.Wednesday, April 7, 2010 107 of 327
<strong>Jabiru</strong> <strong>J160</strong> Constructors <strong>Manual</strong>Pre-Paint>Fuselage>Fit flap drive shaft bearing blocksPre-Paint>Fuselage>Fit flap drive shaft bearing blocksObjectives of this task:In this task you will position and flock the flap drive shaft bearing blocks to the inside of thefuselage.Note that the flap drive shaft will be fitted in the Post-Paint section: only the bearing blockswill be fitted in this task.Materials required:Card # 16 „Flaps’Resin and flockPrepare the drive shaftThe flap drive shaft is only used for bearing block alignment at this stage, so you will need toremove all the fittings: one drive arm from each end and the lever arm from one end, until youhave just the bare tube. Note that there are actually 2 tubes, one inside the other: make surethat both tubes are still together when this task is completed and the shaft is reassembled.Position the bearing blocksPlace the drive shaft through the pre-drilled¾” holes (circled) so that the shaft protrudesan equal amount from each side of thefuselage, then slip one bearing block on eachend with the screw holes to the top.Level the top of the block, hold it firmly inplace and drill 2 x 3/16” holes through thefuselage skin, using the bearing block as adrilling jig as shown below right:Mark the blocks to indicate which side of theaircraft they fit to as well as an arrowtowards the front of the aircraft, then removethe flap drive shaft and the bearing blocks.Wax each end of the shaft – it will be used toalign the bearing blocks as you flock theminto place and the wax will prevent any flocksticking to it.Countersink the outside of the screw holes tosuit the Tinneman washers.Wednesday, April 7, 2010 108 of 327
Fit the bearing blocks<strong>Jabiru</strong> <strong>J160</strong> Constructors <strong>Manual</strong>Pre-Paint>Fuselage>Fit flap drive shaft bearing blocksRoughen the inside of the fuselage around the area where the bearing blocks will be mountedand sand the backs of the bearing blocks, mix a small batch of resin and coat the area to bebonded then add flock to the resin and apply a 3mm bed of flock to the back of each block,then slip them onto the shaft with the flocked sides facing out and fit the shaft to the fuselageone end at a time, working from inside the cabin.Move each block out and bed it against the fuselage and secure it with countersunk screwsand Tinneman washers from the outside of the fuselage and washers and Nyloc nuts on theinside The photo above shows the bearing blocks (circled) flocked into place with the driveshaft keeping them in alignment: the photo has been taken from the front of the aircraft facingtowards the rear.Tighten the nuts just enough to hold eachblock in place while leaving the shaft freeto turn. Clean away any excess flock fromaround the block and leave overnight tocure. The photo at right shows the fittedblock from the outside with the driveshaft still in place, while the photo belowshows the block from the inside with theshaft removed.Next day tighten the Nyloc nuts firmly and doa final check for binding, then remove the flapdrive shaft completely: pull it out through oneside of the fuselage, clean off the wax, makesure that the inner and outer shafts are fittedtogether then reassemble the drive fittings tothe shaft and store for later use.This completes the Pre-Paint>Fuselage>Fit flap drive shaft bearing blocks task.Wednesday, April 7, 2010 109 of 327
<strong>Jabiru</strong> <strong>J160</strong> Constructors <strong>Manual</strong>Pre-Paint>Fuselage>Interior>Console>Pre-fit handbrakePre-Paint>Fuselage>Interior>Console>Pre-fit handbrakeObjectives of this task:To pre-fit the handbrake master cylinder and lever to the centre console. At the completion ofthis task the handbrake will be removed and stored until final fitting following painting andinstallation of the interior trim.Completed handbrake master cylinder,handbrake lever and locking cam, as viewedfrom the right-hand side ►LockingcamMaterials required:Card # J8 „Brakes‟Loctite 577Fit the master cylinderUsing a small bead of Loctite 577 on the thread,attach the brass compression fitting to themaster cylinder and tighten firmly. Put a pieceof masking tape over the hole to keep foreignobjects out.Drill the upper and lower mounting holes out to5/16” (arrowed below), then, working throughthe side access holes in the console, fit the brakelever mount into the front of the console (referto drawing 6A027A0D-3 on the next page fordetail) using two hex head bolts in the top andbottom holes, then mount the master cylinder tothe brake lever mount with the cap screws– thephoto at right shows the orientation of thecomponents: note that the brake lever mount hasthe pivot hole to the top.The photos below show the fitting of the brakelever mount and the master cylinder to theconsole.CompressionfittingWednesday, April 7, 2010 110 of 327
<strong>Jabiru</strong> <strong>J160</strong> Constructors <strong>Manual</strong>Pre-Paint>Fuselage>Interior>Console>Pre-fit handbrakeWednesday, April 7, 2010 111 of 327
Fit the handbrake lever<strong>Jabiru</strong> <strong>J160</strong> Constructors <strong>Manual</strong>Pre-Paint>Fuselage>Interior>Console>Pre-fit handbrakeAssemble the two red knobs to the handbrake lever, with the longer knob to the left of thelever (the same side as the machined recess) and secure with the supplied bolt and nut.Fit the handbrake lever cam to the right-hand side of the handbrake lever with the suppliedbolt and Nyloc nut and with a ¼” Bundy tube bush in place to allow free movement of thehandbrake lever locking cam.The lever assembly can now be fitted to the brake lever mount. It may be necessary to file thecut-out on top of the console in order to achieve full fore and aft travel of the handbrake leveras well as the correct side clearance for the handbrake lever locking cam.Check that the handbrake lever has full movement and that the handbrake lever locking camdoes not bind against the sides of the console cutout, then remove the entire handbrakeassembly and put aside until the Paint and Interior Trim tasks have been completed.This completes the Pre-Paint>Fuselage>Interior>Console>Pre-fit handbrake task.Wednesday, April 7, 2010 112 of 327
<strong>Jabiru</strong> <strong>J160</strong> Constructors <strong>Manual</strong>Pre-Paint>Fuselage>Interior>Console>Pre-fit trim controlPre-Paint>Fuselage>Interior>Console>Pre-fit trim controlObjectives of this task:To pre-fit the trim pivot assembly, trim stops and the dual trim levers to the centre consoleand fit the trim cable clamp to the seat base. At the completion of this task the trim levers willbe removed and put aside until the final fitting following painting and installation of theupholstery.Trim leverRod endPivot bushTrim cableTrim stopsThis task is broken down into three items, which should be done the following order:1. Align & fit the trim pivot bushes2. Align & fit the trim stops3. Align & fit the trim cable clampMaterials required:Card # J2 „Trim System‟Epoxy Resin and Flock5 minute Araldite260 x 160mm 3-ply for templateWednesday, April 7, 2010 113 of 327
<strong>Jabiru</strong> <strong>J160</strong> Constructors <strong>Manual</strong>Pre-Paint>Fuselage>Interior>Console>Pre-fit trim controlTrim pivot and trim levers:Trim leversFriction washersPivot bushesPivot barrelAlign and fit the trim pivot bushesPivot shaftPilot holes for the pivot bushes are pre-drilled in the console. Start by enlarging the holes forthe pivot bushes slightly with a round file until the pivot bushes can be fitted snugly and thefile sits level through the holes and square to the console when viewed from above.Screw the left-hand pivot bush firmly into the pivot barrel.Push the pivot barrel through the console and flock into placethen loosely fit the right-hand side pivot bush. Line up theleft-hand side rivet holes and secure the left-hand side pivotbush with three TLR rivets as shown at left.Push the pivot shaft through the pivot bushes and temporarilyfit the trim levers, including the friction washers, and tightenthe castellated nut onto the pivot bolt by hand until the trimlevers are held securely onto the pivot shaft.Move the trim levers fore and aft: both trim levers should maintain an even distance out fromthe console. If this is not the case the hole for the right-hand pivot bush may need to beelongated slightly to correct the alignment. Note that if the right-hand hole has been elongatedyou will need to rotate the right-hand pivot bush 1/6 of a turn and drill three new rivet holesfor that side only.Once the trim levers can move freely fore and aft while maintaining an even distance out fromthe console, flock and tighten the right-hand pivot bush firmly into place and secure with threeTLR rivets, fitted one at a time and rechecking the trim levers alignment after each rivet hasbeen placed.Smooth any surplus flock with a small amount of resin on a clean mixing stick.Wednesday, April 7, 2010 114 of 327
<strong>Jabiru</strong> <strong>J160</strong> Constructors <strong>Manual</strong>Pre-Paint>Fuselage>Interior>Console>Pre-fit trim controlAlign and fit the trim stopsMake the template from a piece of 3-ply plywood as shown below and position the hole at thebottom of the template on the pivot shaft and the top level with the top of the forward console.Mark the locations for the trim lever stops on the left hand side of the console only and lightlysand the areas underneath to ensure a solid joint. Using 5 minute Araldite and flock, fit thetrim lever stops in position, temporarily secure each with a self-tapping screw and leave tocure, then remove the screws and fill the holes.trim stopstrim pivot bushWednesday, April 7, 2010 115 of 327
Align and fit the trim cable clamp<strong>Jabiru</strong> <strong>J160</strong> Constructors <strong>Manual</strong>Pre-Paint>Fuselage>Interior>Console>Pre-fit trim controlIt is important that the trim cable clamp is accurately positioned against the left-hand side ofthe console in a way that minimises any bending loads on the trim cable. The procedure is asfollows: with the trim cable in place and working from the left-hand side of the console, put arod end fully onto the cable end: thread the rod end all the way onto the cable end, then boltthe rod end to the left-hand trim lever as shown in the first photo below.Rod endBolt to trim leverInner cablePush the inner trim cable all the way into the outer cablethen put the trim lever against the rear trim stop as shown atleft. This is the correct position for the outer cable to besecured by the cable clamp. Fit the cable clamp to the outercable and make sure that thecable clamp grips thelocating groove on the outercable (circled at right).Position the trim cable clamp against the console in such away as to line the trim cable up with the rod end on the trimlever and drill 2 x 3/16 holes through the cable clamp packerand into the side of the console as shown in the photo shownbelow at right. Temporarily position with 2 x AN3 bolts.packerlocatinggrooveoutercableclampinnercableouter cableBond the cable clamp packer into place and leave to cure. Remove the aligning bolts. Fit thecable clamp shim, the trim cable and the cable clamp and mount with 2 x AN3 bolts placedfrom the inside of the console and secured with Nyloc nuts on the outside of the cable clamp.Remove the trim levers, pivot bolt and pivot shaft and put aside for later fitting after paintingand upholstery have been completed.This completes the Pre-Paint>Fuselage>Interior>Pre-fit trim control task.Wednesday, April 7, 2010 116 of 327
<strong>Jabiru</strong> <strong>J160</strong> Constructors <strong>Manual</strong>Pre-Paint>Fuselage>Interior>Console>Fit control stickPre-Paint>Fuselage>Interior>Console>Fit control stickObjectives of this task:In this task you will fit the elevator cable to the console and then align and fit the two controlcolumn bushes into the console, set up the endplay of the control column and fit the controlstick to the console.Materials required:Card # J17A „Elevator System and Control Stick‟Epoxy Resin and FlockFit the elevator cable clampThe elevator cable runs through theconsole and through to the rear of thefuselage inside the longitudinal rib.Drill the existing 3/16” holes throughand place both bolts through themounting holes from the inside of theconsole, through the cable clampbacking plate and then through thesaddle clamp.Take care to align the locating groovein the outer cable with the matchingpoint on the saddle clamp, then secure with Nyloc nuts and mark the nuts with TorqueSeal.Press fit the rear bushThe metal rear bush must first be pressed into themounting plate - a bench vise is the mostconvenient way to do this as shown in the pictureat the right.Note that the flange on the rear bush goes on theoutside face of the mounting plate.The two photos below show the rear bush fullypressed into the mounting plate.Wednesday, April 7, 2010 117 of 327
<strong>Jabiru</strong> <strong>J160</strong> Constructors <strong>Manual</strong>Pre-Paint>Fuselage>Interior>Console>Fit control stickWednesday, April 7, 2010 118 of 327
Fit the bushes to the consoleFit the stick pivot plate carefully into thecontrol shaft and secure with 2 x AN3-13A bolts, spacers, washers and Nylocnuts. The nuts should face the left-handside of the aircraft when fitted.Slip the front nylon bush over thecontrol shaft.With the rear bush and mounting platetaped in place, fit the control shaft intothe console from the front and throughthe rear bush, seating the front bush.Mount the aileron bellcrank onto the rearof the control shaft, taking care to keep thebellcrank square to the shaft, and temporarily secureit by easing an AN3 bolt through the bellcrank andthe shaft as shown below right.Do not force the bolt through the holes: ensure thatthe holes are aligned exactly before fitting the bolt.Now the control shaft is held in the console by boththe front and rear bushes. At this point make anyadjustments necessary to allow the control shaft torotate freely in the bushes – you may need to filesmall amounts out of the console to correct thealignment of the front or rear bushes.Take your time with this step: you want theabsolute minimum of turning resistance!<strong>Jabiru</strong> <strong>J160</strong> Constructors <strong>Manual</strong>Pre-Paint>Fuselage>Interior>Console>Fit control stickControlshaftMake sure that the rear mounting plate is pushedfully into the console and then move the front nylonbush out as required to take up any endplay: yourequire only a very small amount of endplay, nomore than the thickness of a single sheet of paper.Front bushRear bush and mountStick pivotplateAileron bellcrank fittedRight sideFront bushes flocked into placeLeft sideWednesday, April 7, 2010 119 of 327
<strong>Jabiru</strong> <strong>J160</strong> Constructors <strong>Manual</strong>Pre-Paint>Fuselage>Interior>Console>Fit control stickIt is very important that the rear bush and mounting plate are fitted to the console at precisely90° to the control shaft, and that there is no friction between the bushes and the shaft.When you are satisfied with the alignment of both bushes and the endplay is correct, removethe aileron bellcrank and pull the bushes out enough to coat each bush with flock, then pushboth bushes back into place. Refit the aileron bellcrank and reset the endplay very carefullyand leave to cure, taking care not to get any flock onto the control shaft. Smooth off anysurplus resin with a small amount of resin on a clean mixing stick.Rear bushes and mounting plate flocked into placeRight sideLeft sideWhen the flock has cured, remove the temporary bolt from the aileron bellcrank and withdrawthe control shaft. Clean any flock from the control shaft and from around the bushes thenreinsert the control shaft, check that the control shaft can rotate freely and that the endplay isminimal and then remove the control shaft and the aileron bellcrank and set aside until thefuselage has been painted.This completes the Pre-Paint>Fuselage>Interior>Console>Fit control stick task.Wednesday, April 7, 2010 120 of 327
<strong>Jabiru</strong> <strong>J160</strong> Constructors <strong>Manual</strong>Pre-Paint>Fuselage>Interior>Fit rudder pedal mount blocksPre-Paint>Fuselage>Interior>Fit rudder pedal mount blocksObjectives of this task:In this optional task the lower rudder pedal mounting blocks will be checked for verticalalignment and if necessary the lower blocks will be flocked into place on the floor brackets.This task shows how to ensure that the blocks are aligned correctly.Materials required:Rudder pedal mounting blocks (3 pairs)3 x ¼” and 2 x 3/16” bolts, 3” or longerRudder pedalsEpoxy Resin and FlockCheck the alignmentFit the rudder pedals into place as shown above, with the mount blocks supporting the pedalassembly. Check each lower block to see if it is touching both the floor mounts and the rudderpedal assembly main bar. If any block can be moved up and down then you should follow thisprocedure, otherwise skip this task and go to the next task.Align the Mount BlocksThe key to correct alignment is the use of a bed of flock under each mount block to allow forany unevenness in the height of the three floor mounts – sometimes there may be a slightheight difference that, if not corrected, could lead to binding of the rudder pedals.Position the three mount blocks by placing a centre bolt through the centre hole of each mountblock only. Mark a pencil line around each mount block and then remove the mount blocks.Wednesday, April 7, 2010 121 of 327
<strong>Jabiru</strong> <strong>J160</strong> Constructors <strong>Manual</strong>Pre-Paint>Fuselage>Interior>Fit rudder pedal mount blocksSand a slightly bigger area than the marked area and sand the bottom of each mount block toensure a good key for the flock.Mix a small batch of flock and apply to the marked areas, taking care to keep flock out of thethree captive nuts under the centre mount block, then loosely place each mount block intoposition again with a single bolt in each centre hole. Gently place the rudder pedals shafts intothe blocks and apply a slight downward pressure to seat all three mount blocks firmly into theflock.Now fit the top of the mount blocks: working on one mount block at a time, remove the centrebolt, place the top of the mount block in place and replace the centre bolt. Place all three boltsin the centre mount block and do them up by hand until the bolts reach the bottom of thecaptive nuts – this will ensure that no flock will get into the threads.Carefully rotate the rudder pedal shafts by moving the rudder pedals forwards and backwards– there should be no binding whatsoever.Smooth off any excess flock with a small amount of resin on a clean mixing stick. Leave tocure, taking care that no flock has contacted the rudder pedals. When the flock has gone offand is firm, carefully remove the bolts. Once the flock is completely cured remove the top ofeach mount block and the rudder pedals and set them aside until after the paint and upholsterytasks have been completed.Run a drill through the holes in the left and right mount blocks to remove any excess flock.This completes the Pre-Paint>Fuselage>Interior>Fit rudder pedal mount blocks task.Wednesday, April 7, 2010 122 of 327
<strong>Jabiru</strong> <strong>J160</strong> Constructors <strong>Manual</strong>Pre-Paint>Fuselage>Interior>Fit aileron cable bracketsPre-Paint>Fuselage>Interior>Fit aileron cable bracketsObjectives of this task:In this task the aileron cable brackets will be positioned and mounted to the seat backs.Positioning of the aileron cable brackets is absolutely critical and great care must be taken inthis task.Materials required: Card # J5 „Aileron System‟Epoxy Resin and Flock3/16” TLR rivets from the hardware pack220 x 270mm plywood or heavy cardboard for the alignment templatePosition and fix the aileron cable bracketsPreparationcompleted aileron cable mounts as viewed from the rear facing forwardsStart by making the positioning template from the drawing on the next page. Heavy cardboardis quite adequate for the template as long as care is taken to cut the lines and drill the holesaccurately.It will be necessary to redrill the top rivet holes in the aileron cable brackets – scribe a lineparallel to the top of the bracket and in line with the centre of the existing hole.Centre-punch and drill 2 new 3/16” holes as shown at right.Make sure that you leaveenough clearance around eachhole for a 3/16” washer.Clean around each hole andtest a rivet in each hole – itshould be a snug fit.Wednesday, April 7, 2010 123 of 327
Aileron cable bracket positioning template<strong>Jabiru</strong> <strong>J160</strong> Constructors <strong>Manual</strong>Pre-Paint>Fuselage>Interior>Fit aileron cable bracketsWednesday, April 7, 2010 124 of 327
Align the templateand mark the bracketpositionsTemporarily attach thetemplate to the controlyoke with 2 bolts placedthrough the yoke and intothe template as showncircled at the bottom ofthe photo at right.<strong>Jabiru</strong> <strong>J160</strong> Constructors <strong>Manual</strong>Pre-Paint>Fuselage>Interior>Fit aileron cable bracketsLevel the top of thetemplate in line with thetop of the seat backs.Working with one bracketat a time, hold the bracketin place in the angled partof the template (circled atthe top of the top photo)and carefully mark aroundthe outside and bottomedges.Remove the template.Drill the aileron cable bracket rivet holesWorking from the rear of the seats, hold each bracket against the seat back so that the outsideand bottom of the bracket is in line with the marks on the seat back. Hold the bracket firmlyand drill the bottom outside hole through the seat back.Place a rivet into the hole in the bracket to position it, check that the bracket is still lined upwith the marks and drill the inside top hole.Place another rivet into the inside top hole and drill the outside top hole.Make sure that all the rivets fit snugly through the seat back and into each bracket, thenremove all the rivets and clean all the holes carefully – there must be no burrs or rough edgesremaining.Wednesday, April 7, 2010 125 of 327
Attach the aileron cable brackets<strong>Jabiru</strong> <strong>J160</strong> Constructors <strong>Manual</strong>Pre-Paint>Fuselage>Interior>Fit aileron cable bracketsSand the back of each aileron cable bracket as well as the positions on the seat backs wherethey will be placed.Clean all surfaces to be joined.Prepare a small mix of resin and use a brush to undercoat the positions on the seat backswhere the aileron cable brackets will be placed.Add flock to the resin and apply an even layer of flock approximately 2-3mm thick to theback of each aileron cable bracket.Working on one bracket at a time, place a rivet through the bracket and into the seat back andrivet in place. Repeat the process with the top outside and top inside rivets.Using a little resin on a clean mixing stick, clean any squeezed-out flock from the brackets.This completes the Pre-Paint>Fuselage>Interior>Fit aileron cable brackets task.Wednesday, April 7, 2010 126 of 327
Pre-Paint>Fuselage>Interior>Fuel systemObjectives of this task:<strong>Jabiru</strong> <strong>J160</strong> Constructors <strong>Manual</strong>Pre-Paint>Fuselage>Interior>Fuel systemTo install the fuel system from the wing tank connectors to the firewall fitting.The fuel system consists of wing tanks (covered in the Wings tasks) that flow to a header tanksituated behind the right-hand seat and then through a filter and an electronic pump to ashutoff valve located beside the pilot and then through a firewall fitting to the engine.Note that the fuel lines to the wing tank fittings and the fuel line to the firewall will all befitted in this task and then sealed off for later final connection.Materials required:Card # J11 „Fuel Components‟Fuel header tank ►Blue fuel line, black fuel line and clear fuel line sheathingLock wireEpoxy Resin and Flock, 5-minute AralditeAssemble and test the header tankStart by assembling the fuel fittings and pressure testing theheader tank. Make sure that there are no foreign objects in thetank, then loop the inlets and breather holes (all at the topfront of the tank) together with short lengths of line (it doesn‟tmatter in what order – this is just to seal the tank for thepressure test) then fit the quick drain with a drop of Loctite577 and tighten firmly. Fit an O-ring to the finger filter and fitinto the outlet hole, once again with a drop of Loctite 577 andtighten firmly, then connect a short length of line to the fingerfilter and apply a small amount of pressure by blowing intothe line, seal and check for leaks by spraying soapy water overthe tank and fittings and check for bubbles.Fit the header tank to the enclosureThe header tank sits in the header tank enclosure behind the right-hand seat (the enclosurewas fitted in the Prepare fuselage task) and is held in place with the enclosure lid, which alsoforms the luggage floor when it is fitted.Fit the 2 brass nipple fittings to the inlet and outlet of the pump – in each case use a drop ofLoctite. Fit the electronic fuel pump, with the flow arrow facing towards the front of theaircraft, to the floor of the enclosure with 3/16” countersunk screws and Tinneman washersfrom underneath the fuselage, through the pump mount and secure with Nyloc nuts.Araldite a square of rubber sheet and a piece of sponge to the inboard side of the pump, theside that will contact the side of the tank. Araldite a 50mm square of rubber sheer to the frontof the enclosure and then sit the tank in place and check that the quick drain is centred in thehole. Add more rubber sheet to pack the tank back if required.Now fit a length of rubber sheet to the floor of the enclosure that is wide enough to preventthe tank from contacting the floor at any point.Wednesday, April 7, 2010 127 of 327
<strong>Jabiru</strong> <strong>J160</strong> Constructors <strong>Manual</strong>Pre-Paint>Fuselage>Interior>Fuel systemAt this point the tank is positioned fore and aft by the quick drain fitting through the floor andthe rear of the tank is touching the padded side of the electronic fuel pump, so now you willneed to cut dense foam or timber packers to hold the tank from moving sideways orbackwards.The photo at right shows a fitted tank – note the location of the3 packers (circled): 1 at the rear of the enclosure and 1 on eachside. Each packer has a piece of rubber sheet on the end thattouches the tank and the other end of each packer is flocked tothe side of the enclosure.Note that the packers do not go all the way to the bottom of theenclosure – the space under the packers is where the fuel line isrouted from the tank to the filter and then to the pump.Cut and fit the packers and when you are satisfied with the fitthen flock each packer to the side of the enclosure. When fittedcorrectly you will be able to take the header tank out of andinto the enclosure. Add a strip of foam to the top of the tankwhere it will touch the lid and the tank is fitted.Plumb from the header tankAs you can see in the photo above right, the filter is located just behind the right-hand packer,so cut a short length of blue fuel grade tubing to suit, then cut a longer length to run from theoutlet of the filter to the inlet of the fuel pump. Check that the filter is correctly positioned,with the flow arrow facing in the direction of the fuel flow, which is from the header tank tothe filter and from the filter to the pump, then use the supplied hose clamps to fit each lengthof tubing into place. Wrap the filter with rubber sheet and fix in place with 2 zip ties. 5 minuteAraldite the supplied bracket (arrowed above) in place and zip tie the filter to the bracket.Plumb to the header tankCut 3 lengths of blue fuel grade tubing at 990mm and another 3 at 1300mm. The shorter oneswill run from the header tank to the right-hand connector and the longer ones will run fromthe header tank to the left-hand connector. Cut 2 lengths of the clear sheathing, 1 at 950mmand 1 at 1250mm.Fit the 3 shorter lengths of blue fuel grade tubing to the ferrules on the right-hand front of theheader tank, and mark the other end of each line by wrapping short length of cloth tapearound the line and marking it either Breather, Front or Rear as appropriate.Fit a hose clamp to each line and tighten firmly.Feed the lines out through the greyplastic fittings in the upper side of theenclosure (arrowed in yellow at right)and slip the sheathing over the fuellines and over the grey plastic fitting(arrowed in purple at right) and thenlock wire the sheath to the grey plasticfitting.Repeat the process for the left-hand fuellines, which will pass in front of thesupport rib as shown at right.OutletWednesday, April 7, 2010 128 of 327
<strong>Jabiru</strong> <strong>J160</strong> Constructors <strong>Manual</strong>Pre-Paint>Fuselage>Interior>Fuel systemFit the tank connectorsThe tank connectors must be fitted thecorrect side of the aircraft: when fitted outthrough the slots in the tops of the cabinwalls the brass ferrules must face forwards,towards the front of the aircraft, while thecircular sleeve and ferrules will facedownwards inside the cabin, allowing thefuel lines to run smoothly to the header tank.Working on one side at a time, place the tankconnector through the slot in the top of thecabin wall and check the length of the fuelline sheath, which will be slightly too long.Trim the sheath to length then fit each fuel line to the correctfitting on the circular inboard part of the connector: theBreather line connects to the outside ferrule, while the Frontline connects to the centre and the Rear line connects to theinside.Fit the sheath over the circular ring and lock wire into place asshown at right. Note that the right-hand side connector isshown. Seal the open ends of the connector with tape andrepeat the process on the left-hand side.LeftBackFrontBreatherRightFit the fuel tap and fuel lineRemove the lever from the fuel tap and set it aside.Look for a mark or pilot hole on the left-hand side ofthe centre console around 50mm in front of the baseof the armrest and 30mm below the forward sectionof the console as shown at right:Drill a 16mm hole at that position.Working through the access hole in the right-handside of the console, hold the fuel tap in positionagainst the inside of the left-hand side of the consoleand mark the positions for the alignment pin and screw holes, which will be visible throughthe fibreglass, then remove the fuel tap and drill the holes. Pre-fit the fuel tap with the twoscrews and then remove the tap and set it aside.Cut a length of blue fuel hose of sufficient length to reach from the fuel tap all the way backto the electronic fuel pump outlet plus ~100mm, and a length of black fuel hose of sufficientlength to reach from the fuel tap down along the floor and back up to the firewall fitting plus~100mm.Fit both fuel hoses to the fuel tap and secure with thesupplied hose clips, making sure that the flow arrowon the face of the fuel tap is facing towards the black(outlet) fuel line.Wednesday, April 7, 2010 129 of 327
<strong>Jabiru</strong> <strong>J160</strong> Constructors <strong>Manual</strong>Pre-Paint>Fuselage>Interior>Fuel systemPlace a length of fuel line sheathing over both fuel lines and secure with lock wire to eachboss on the fuel tap.Fit the fuel line/sheath and tap assembly: tape over both ends of the fuel lines to preventforeign objects from entering and then insert the blue fuel line end into the console throughthe access hole in the right-hand side and feed the blue fuel line down and back towards therear of the fuselage and into the lower part of the console.Feed the fuel line back until it can be seen in the hole in thelower longitudinal rib under the beam behind the seats, then,using a length of wire with a hook in one end, lift the fuel lineand sheath out of the lower longitudinal rib and run it backbeside the header tank enclosure.Keep feeding the fuel line back until the end of the black fuelline and sheath can be inserted into the access hole in theconsole and then feed the fuel line/sheath down and forwards,taking care to route the line under the trim pivot, until it canbe lifted out of the hole in the forward section of the lowerconsole behind the rudder pedals.Using a length of wire with a hook in one end, reach downinto the console through the right-hand access hole and lift thefuel line assembly up and move the fuel tap into position.Mount the fuel tap to the console with the two screws.Cut the end of the blue fuel line and sheath to the correctlengths and connect to the electric fuel pump with a suppliedhose clip and then lock wire the sheath to the grey plasticferrule on the header tank enclosure (arrowed at right).Cut the black fuel line and sheath to length and clamp the fuel line to the firewall fitting andlock wire the sheath to the firewall fitting collar. Cover the open (top) end of the firewallfitting to prevent dust or dirt from entering the fuel system.ChecksAt this stage you should have connected the fuel lines all the way from the fuel tankconnectors through to the fuel header tank, then to the fuel filter, the electronic fuel pump, thefuel tap in the console and the black fuel hose which is connected to the firewall fitting.Check that all the flow arrows on the fuel filter, the electronic fuel pump and the fuel tap arepointing in the correct direction, which is away from the header tank and towards the engine.Check that all of the fuel line sheathing is lock wired in place and that the sheathing does sealthe fuel lines correctly.Check that all fuel lines are routed smoothly with absolutely no kinks and that there are norough edges anywhere nearby that could rub against the fuel lines or sheathing, and thencheck that all of the open ends of the fuel lines are sealed so that no foreign objects can enter.Coil the tank connectors and related fuel lines behind the seats where they will not bedamaged during construction.This completes the Pre-Paint>Fuselage>Interior>Fuel system task.Wednesday, April 7, 2010 130 of 327
Pre-Paint>Fuselage>Interior>Fit seatbelt anchorsObjectives of this task:<strong>Jabiru</strong> <strong>J160</strong> Constructors <strong>Manual</strong>Pre-Paint>Fuselage>Interior>Fit seatbelt anchorsThis task shows how to fit the seatbelt anchors. While this is quite a simple task it is also anextremely important one – the seat belts must be anchored correctly because if you ever reallyneed your seat belt (and here‟s hoping that you never do) it has to be attached to the airframein the designed manner for maximum safety.The photos that follow are of the pilot‟s seat: the same applies to the other seat but in reverse.Materials required:Card # J9 „Seatbelts‟Bottom anchor bracketsBoth inner bottom anchor brackets are attached to the main beam that runs behind the seats.50mmPilot‟s seatback100mmInner bracketConsoleOuter bracketStart by marking a horizontal line 100mm up from the base of the main beam on the inside ofeach seat, and then mark a vertical line 50mm out from each side of the centre console.Hold a bottom inner bracket inside and below where each pair of lines meet and drill a 3/16”hole through the top hole and slip a bolt through and then check each anchor bracket forsquare and drill the bottom hole. Fix each inner anchor bracket in place with AN3 boltsthrough the bracket, the beam, the rectangular backing plate, a washer and a Nyloc nut.The bottom outer brackets are held with a singleAN3 bolt and the hole is drilled from the outsideof the fuselage: 25mm up from the main gear legrecess and 65mm back (left-hand side) and75mm back (right-hand side) from the front ofthe recess: each bracket should sit in the lowest,rearmost corner inside.Fix in place with an AN3 bolt through thefuselage from the outside, through the bracketwith a flat washer and a Nyloc nut.Tighten all the Nyloc nuts firmly.65mm LHS75mm RHSLeft-hand sideshown25mmWednesday, April 7, 2010 131 of 327
<strong>Jabiru</strong> <strong>J160</strong> Constructors <strong>Manual</strong>Pre-Paint>Fuselage>Interior>Fit seatbelt anchorsTop anchor bracketsThe top anchor brackets mount behind thewhalebone with the centre of the bracketprecisely level with the bracing rib in front ofthe whalebone as shown at right.Hold the bracket in position and drill a 3/16”hole at the top of the bracket and slip a boltthrough then line up the bottom of thebracket and drill the second hole.The top bracket will not be finally fitted untilthe aircraft has been painted and theupholstery has been installed.Pre-fit the bracket in place with an AN3 boltthrough the bracket, the whalebone, thebacking washer and a Nyloc nut.Front of aircraftWhaleboneBracingribRemove and store the top brackets for later final fitting.This completes the Pre-Paint>Fuselage>Interior>Fit seatbelt anchors task.Wednesday, April 7, 2010 132 of 327
Pre-Paint>Fuselage>Pre-fit doorsObjectives of this task:<strong>Jabiru</strong> <strong>J160</strong> Constructors <strong>Manual</strong>Pre-Paint>Fuselage>Pre-fit doorsIn this task you will size and pre-fit the doors to the fuselage and pre-fit the striker plate, all ofwhich will be finally fitted after the fuselage has been painted.In the photos that follow the pilots door is shown, however the exact same technique is usedfor each door.Materials required:Card # J1 „Doors‟5-minute Araldite and flockSize the doorThe door may require a slight trim to fit the opening: either tape the door in place or have afriend hold it firmly in place. Working from the inside, make sure that the door is centred inthe opening and mark the inside of the door around the edge of the opening.Remove the door and use a sanding disc to trim the door to the mark. Hold the door in theopening and carefully mark and sand as required until the door is a good snug fit all round.Fit the hingesFit the top and bottom hinges to the arms on the door, thentape the door back into position and mark the centreline(vertically and horizontally) of each hinge screw. Remove thedoor and extend the marks to locate and drill each hole.Trial fit the door with the hinge screws fitted and check thatthe door is sitting flush with the fuselage. If it requiresadjustment outwards then an Araldite/flock mixture will beused to pack the hinges out the required amount.Remove the door and roughen the area around each hingescrew hole to provide a good key for the Araldite/flockmixture. Apply wax to the hinge and screw to prevent themsticking to the flock and refit the door.Loosely fit the hinge screws, then mix up a small batch of 5-minute Araldite and flock and pack the flock mixture behindthe hinges as required, check that the alignment of the doorand the fuselage is correct and leave the flock mix to cure.Open and close the door a few times and mark any points thatare binding then use a long sanding block to remove thosepoints – the door should open and close smoothly withnothing rubbing at any point right around the opening.Wednesday, April 7, 2010 133 of 327
Pre-fit the striker plateHold the outside door latch in the open (forward) position andclose the door until the rear of the door is sitting flush with thefuselage and with an even gap top and bottom and, workingfrom the inside of the cabin, carefully mark the verticalposition of the latch pin on the door jamb.Open the door and measure the horizontal distance from theouter door skin to the centre of the latch pin and mark that onthe door jamb then drill a ½” hole at the point where the 2lines cross.Temporarily tape the striker plate to the door so that the latchpin is just through the hole in the plate then close the doorcarefully and, working from the inside of the cabin, mark thetop and bottom of the striker plate onto the door jamb.Remove the striker plate from the door and pre-fit it to thedoor jamb as shown in the photo above, with the plate sittingagainst the lip of the door jamb.<strong>Jabiru</strong> <strong>J160</strong> Constructors <strong>Manual</strong>Pre-Paint>Fuselage>Pre-fit doorsDo not rivet the striker plate into place; it will be finally fitted after the painting is complete.Fit the top latchMeasure back 35mmfrom the top of the curveat the front of the doorand drill a pilot hole andthen a ¾” hole downthrough the door frame.Refer to photo at right:Fit the latch barrel upthrough the hole until it isTopabout 2mm above the tophandleof the door jamb andmark that position, thenflock the barrel into position with 5-minute Araldite and flock.30mmTop latch35mmMake sure that the open end of the barrel faces upwards as shown in the photo above.Smooth the flock to a uniform radius around the top and bottom of the barrel and leave tocure.With the door closed, hold the top front of the door flush with the fuselage and drill a 3/8”hole up through the latch-pin hole in the barrel and through the door jamb.Open the door and fit the latch pin to the barrel from the bottom with the rubber sleeve andcirclip fitted from the top as shown above. Test the latch for free but firm movement.Fit the top handle 30mm behind the top latch – mark and drill the screw holes through bothsurfaces then drill the top holes to ½” for access to the screws.Wednesday, April 7, 2010 134 of 327
Final fit the door<strong>Jabiru</strong> <strong>J160</strong> Constructors <strong>Manual</strong>Pre-Paint>Fuselage>Pre-fit doorsShut the door using both latches and check right around the door to see if there are any areasthat need final adjustment, for example if the door does not fit easily inside the opening, andsand to fit as required.Fit the fairing to the top hingeCentre the fairing on the top hinge and tape it in place thentest that the door can open and close freely and makeadjustments to the hinge arm slot as required then fix in placewith 5-minute Araldite and flock.Test that the door can open and close freely and adjust theclearance of the hinge arm slot if required.Cut and fit a section of glass sheet to the hinge arm (arrowedat right) to suit the opening in the fairing and fix to the hingearm with an Araldite/flock mixture and leave to cure.Fit the fairing to the bottom hingeCentre the fairing on the bottom hinge and tape it in placethen test that the door can open and close freely and makeadjustments to the hinge arm slot as required then fix in placewith 5-minute Araldite and flock.Test that the door can open and close freely and adjust theclearance of the hinge arm slot if required.Cut and fit a section of glass sheet to the hinge arm (arrowedat right) to suit the opening in the fairing and fix to the hingearm with an Araldite/flock mixture and leave to cure.Wednesday, April 7, 2010 135 of 327
<strong>Jabiru</strong> <strong>J160</strong> Constructors <strong>Manual</strong>Pre-Paint>Fuselage>Pre-fit doorsFit the key lock30mm130mm60mm20mmMark a position 30mm out from the rear of the opening and 130mm up from the bottom ofthe opening and drill a pilot hole, then drill out to 18mm and elongate the hole with a roundfile until the door lock barrel can be mounted snugly into the hole.Now mark and cut a slot 60mm long and 6mm wide 20mm in from the fuselage skin in thedoor opening, with the bottom of the slot square with the bottom of the lock hole. This is theslot that the lock arm will operate through. Close and latch the door and mark the slot onto theback of the door – use a builder‟s pencil or any similar thin marker and mark through the slot.UnlockedLockedCut the slot in the back of the door and check that it matches the slot in the door opening.Fit the lock barrel into the 18mm elongated hole and secure with the large nut, then fit thelock arm, which will need to be bent slightly in order to swing freely into the slot.Turn the key so that the top of the key moves forward and fit the arm in the locked position.Test that the door can be locked and unlocked with no binding of the lock arm.Leave the doors fitted for now, they will be removed later in Painting>Pre-paint disassembly.This completes the Pre-Paint>Fuselage>Pre-fit doors task.Wednesday, April 7, 2010 136 of 327
Pre-Paint>Fuselage>Fit windows<strong>Jabiru</strong> <strong>J160</strong> Constructors <strong>Manual</strong>Pre-Paint>Fuselage>Fit windowsThe windows are formed from strong but brittle acrylic and care must be taken to avoidmarking or cracking the windows while they are being fitted. The windows are fixed in placewith flock and without screws, however screws are used around the windows to hold thewindows in place while the flock cures and are then removed.Any minor shaping of the windows that may be required must be done with an 80 grit sandingdisc or a hand-held sanding block: you must never use a jigsaw on acrylic.The description and photos that follow show the window being fitted to a pilot‟s door, and theexact same technique should be used for any window.Materials required:Epoxy resin and flock, wax¼ x ¼” adhesive-backed foam strip8G self-tapping screws in heavy duty (coax) cable clamps:Pre fit the windowStart by carefully sanding away all of the gel coat from the joggle, then fit a length of the ¼”foam strip around the very inside of the joggle (the dark grey line in the photo below) – thiswill keep the flock from making a messy line around the inside of the window and give a niceclean edge when the window has been flocked into place.Close and latch the door and then test fit the window, holding or taping it in place and makingany minor adjustments that may be required so that the window fits snugly inside the joggle.Remove the window and, working very carefully, drill 1/8” screw holes in the door frame justoutside of the joggle as shown arrowed above. Note in the photo of a completed windowabove that the protective plastic sheet has been folded and taped back from the edges of thewindow so that the bulk of the window area is still protected from scratching.Wednesday, April 7, 2010 137 of 327
Prepare the window<strong>Jabiru</strong> <strong>J160</strong> Constructors <strong>Manual</strong>Pre-Paint>Fuselage>Fit windowsRemove the window carefully and clean and blow away any dust and debris from the joggle.Place the window face down on the bubble wrap packingmaterial, taking care not to allow anything to scratch thesurface, and carefully sand around the entire inside edge withemery tape – sand only to a point just short of the inside of thejoggle, level with the centre of the ¼” foam strip.By holding the emery tape as shown you can use your fingerto control the width of the sanded area.When the sanding is complete blow away the dust and thenuse a clean soft cloth and wipe right around the window.Do not use any cleaning agents on the window.Fit the windowClose and latch the door, wax the self-tapping screws and cable clamps and then wash and dryyour hands to prevent wax from getting onto the window or the joggle.Mix a batch of resin and coat the joggle, then add flock to the resin and fill the entire joggleout to the level of the foam strip. Carefully place the window into the bed of flock - start atone corner and position the window until the alignment is correct and it fits inside the joggle -and then gently press it into position.Once the window is positioned correctly, take the self-tappingscrews and cable clamps and start fitting them around the doorframe as shown at right, working from the corners first andthen the middle screws and so on.The clamps will pull the window into the joggle level with thedoor frame and the wax will allow easy removal once theflock has cured, while the screw holes will be filled during thePaint Preparation tasks. Take care not to over tighten thescrews, tighten them just enough so that the edge of thewindow is level with the adjacent door frame.Check all around to see that the flock has keyed to the window: the sanded surface of thewindow edge will appear to go clear with no bubbles when the flock is in full contact with it.It may be necessary to gently squeeze the window to remove any bubbles, although if youhave filled the joggle with flock there should be full contact anyway.When you are satisfied that the window is positioned correctly wipe away the excess flockwith a clean mixing stick, taking care not to smear any resin or flock over the window: alwayswipe out and away from the window. Refer to the photo of a completed window on theprevious page for an example of how it should look. Leave overnight to cure. Next dayremove the screws and cable clamps.The same process should be used for all the remaining windows. You may do more than onewindow at a time if you are confident of your ability to do so but we would suggest that onewindow at a time is a great way to start.This completes the Pre-Paint>Fuselage>Fit windows task.Wednesday, April 7, 2010 138 of 327
Pre-Paint>Fuselage>Wheel alignmentObjectives of this task:To ensure that the main wheels are correctly aligned.Overview:<strong>Jabiru</strong> <strong>J160</strong> Constructors <strong>Manual</strong>Pre-Paint>Fuselage>Wheel alignmentSome aircraft have reported shuddering through the undercarriage and airframe on rotation orlanding. The amount of shuddering seems to be variable, depending on the all up weight ofthe aircraft. Investigations on factory built aircraft have revealed that this phenomenon iscaused by a combination of two factors: toe-in or -out and the camber of the main wheels.This procedure outlines how to check the wheel alignment and make the necessaryadjustments to correct the issue. It‟s a fairly basic technique, but we‟ve had success with it.Procedure:Firstly, a reference point is required from centerline (longitudinal axis) of the fuselage. Thiscan be achieved by dropping a plumb bob down from the tip of the spinner, and one from theventral fin and then, using a string line, join the two points. As seen in the picture below, wehave used the join line in the concrete slab as the reference line.Place a straightedge (we‟ve found a length of boxsection to be the best) along the outside wall of thetire, and eyeball from above to check that both thetire and the straight edge are parallel.Wednesday, April 7, 2010 139 of 327
<strong>Jabiru</strong> <strong>J160</strong> Constructors <strong>Manual</strong>Pre-Paint>Fuselage>Wheel alignmentMark the position of the straightedge in both forward and aft positions and join the two points,repeating the same procedure for the opposite side.Take measurements from the straight edge positions to the centreline of the fuselage, repeatfor the opposite side and compare the numbers to see if the wheels have toe-in or toe-out. Thewheels will naturally want to rotate outwards when the aircraft is at gross weight, so it isrecommended to have a slight amount of toe-in to allow for this.If adjustments are required, washers are used as spacers between the stub axle and theundercarriage leg. Typically 2 washers are required on each of the lower stub axle mountingbolts to give the wheel slightly less camber, and usually only one half size washer installed oneither the front or the back two stub axle bolts is sufficient to shift the toe in/out.Pack with flock, reinstall and tighten and leave overnight to cure before using the aircraft.Wednesday, April 7, 2010 140 of 327
Pre-Paint>Fuselage>Pre-fit wheel spatsObjectives of this task:<strong>Jabiru</strong> <strong>J160</strong> Constructors <strong>Manual</strong>Pre-Paint>Fuselage>Pre-fit wheel spatsTo pre-fit the spats to the main wheels and the nose wheel. This is a task that will requireseveral trial fits, and it should be done in the stages described below.Main wheel spatsThe main wheel spats are held in place by a single bolt on the outside that fits into the axleextension and 4 screws on the inside that fit to the spat mounting plate. The inside holes(arrowed at centre right) should all be countersunk to accommodate Tinneman washers.Prepare the spats by trimming out the bottom of the wheel opening as shown above – once thebottom opening is correct the spat can be test fitted and the gear leg opening shaped to suit.55mmMark back 55mm from the axle bolt hole and drill a 1 1/8” hole for access to the valve asshown above left. Slip the spat down over the wheel until the outside axle bolt hole lines upwith the axle extension: you will probably have to trim the main gear leg opening slightly toget the spat fully down over the wheel. A typical inside cut is shown marked above right, butcheck your own spat to main gear leg fitting then mark and trim accordingly.Fit the spat into position with the axle bolt and theinside screws and make sure that there is a gapbetween the main gear leg and the top of the spatthat will allow the hydraulic brake line to passthrough without any risk of chafing on the spat.Loosen the 2 top bolts that hold the spat mountingplate – one hole is slotted to allow adjustment – androtate the spat until the top rear is 9” (230mm)above the ground, then tighten the bolts.9”(230mm)Wednesday, April 7, 2010 141 of 327
<strong>Jabiru</strong> <strong>J160</strong> Constructors <strong>Manual</strong>Pre-Paint>Fuselage>Pre-fit wheel spatsCheck that the tire has about 5mm clearance all round the bottom of each spat, then removethe spats and set aside for painting. Completed main wheel spats are shown above.Nose wheel spatThe nose wheel spat is in 2 sections, front and back. The front section is fitted to the nosewheel with the axle bolt and a single threaded screw into each side of the nose leg yoke, whilethe rear section is attached to the front section with 8 x 3/32” screws into captive nuts.Start by fitting both sections together andtaping them to each other, then drill 3/32”holes around the join, 4 on each side, for thecaptive nuts that will hold the 2 halvestogether as shown at right.Captivenuts andscrewsMachinescrewAxlenutValveaccessCountersink the screw holes in the frontsection and fit captive nuts (shown above) tothe rear joggle – use countersunk 3/32” rivetsto hold the captive nuts in place.Screw both halves of the spat together andcheck the fit around the gear leg opening inthe top of the spat. Trim the gear leg openingso that it is even on both sides. The openingshould look like the example shown at right:note that the rear of the opening (arrowed ingreen) is slightly behind the join line.While the spat halves are screwed together,measure back 55mm from the axle bolt onthe left-hand side only and drill a 1 1/8” holefor access to the tire valve.Grind out a gentle notch in the joggle of therear section of the spat (as circled at right) toallow clearance for the front axle spacers.Captive nuts fitted to the joggle can be seenin the photo at right.Wednesday, April 7, 2010 142 of 327
Now both halves of the spat can be fitted to the nosewheel and held in place with the axle bolt, then thespat can be aligned and the hole for the machinescrew in the yoke can be marked.Support the front of the aircraft so that the nosewheel is off the ground and remove the front axleand wheel.Fit the front of the spat over the yoke and refit thefront wheel and the axle, passing the axle throughthe spat, yoke and wheel as shown at right.Lower the nose wheel back onto the ground.<strong>Jabiru</strong> <strong>J160</strong> Constructors <strong>Manual</strong>Pre-Paint>Fuselage>Pre-fit wheel spatsFit the rear of the spat to the front section and move the back of the spat up or down until thewhole spat sits level or slightly low at the back (the back will tend to move up as weight isadded to the aircraft), then hold the spat in that position and mark the location of the holes forthe machine screws on each side of the yoke. A completed nose wheel spat is shown below.Support the front of the aircraft again so that the nose wheel is off the ground and removeboth spat halves along with the front axle and wheel. Leave the wheel out of the yoke for themoment so that you will not accidentally drill through the yoke and into the tire.Drill a 9/64” hole in each side of the yoke at the marked locations and thread to 3/32” UNFthen refit the spat and wheel again, this time fitting the short 3/32” screws into the yoke.Lower the nose wheel back onto the ground and check that the alignment is satisfactory andthat the tire has about 5mm clearance around the bottom of the spat, then remove both halvesof the spat, set them aside for painting and refit the nose wheel.This completes the Pre-Paint>Fuselage>Pre-fit wheel spats task.Wednesday, April 7, 2010 143 of 327
Pre-Paint>Wings>General<strong>Jabiru</strong> <strong>J160</strong> Constructors <strong>Manual</strong>Pre-Paint>Wings>GeneralIn our factory we combine several smaller tasks on the wing into the one three day operation:we work on the top surface first, starting with the fuel filler body and then the winglet, thenwe move to the wing root and install the fuel fittings, fit the breather tube and cut the recessfor the flap arm. The next day we turn the wing over and work on the bottom surface, cuttingthe aileron cable mount inspection hole, fitting the flaps and the quick drains, and then on thethird day we fit the ailerons. Other minor tasks, such as fitting the strobe mounts, can be doneat any time.In this section of the manual each step of the operation is broken out as one of a series of tasksthat are ordered in the sequence that we would normally perform them.The homebuilder could (and should) follow the same sequence but with the whole operationspread over several days, perhaps at a rate of one task per day.We support each wing on a pair of trestles that place the wing at a convenient height forworking, about 900mm high or bench height, and we cover the tops of the trestles in carpet toprotect the wing surface. When working on the bottom of the wing we use a foam wedge oneach trestle under the rear of the wing to stop the wing from rocking when the curved surfaceis facing downwards.Tools may be placed on the wing surface while you are working but you must take care not todrop anything onto the wing surface – the surface is not designed for that type of loading, sotreat it with respect and place your tools carefully and gently onto it.Wednesday, April 7, 2010 144 of 327
Pre-Paint>Wings>Fit fuel tank filler bodyObjectives of this task:<strong>Jabiru</strong> <strong>J160</strong> Constructors <strong>Manual</strong>Pre-Paint>Wings>Fit fuel tank filler bodyIn this task the fuel tank filler body location will be determined for each wing, a hole will bedrilled into the upper wing surface and a smaller hole will be drilled into the wing tank andthen the filler body will be fitted and then flocked into place and covered with peel clothwhile the flock cures.Materials required:from Card # J11 „Fuel Components’ 2 x fuel tank filler bodies:Epoxy resin and flockMark the position of the openingFirst we need to mark the side-to-side distance from the wing root to the centre of the fillerbody opening and in order to do this we must determine the exact length of the wing tank. Todo this take the supplied breather tube and shape the end to a point as shown below. Feed thebreather tube into the tank from the top front wing root fitting and carefully work it past thetank ribs until you find the end of the tank.Mark the breather tube level with the wing root at that point then withdraw the tube and markwhere the position of the end of the tank on the top of the wing. Measure back 150mm fromthat point and that is the initial side-to-side location of the filler body. Repeat the process offinding the end of the tank and measuring back 150mm on the other wing and then make anyadjustments that may be required to make both filler bodies the same distance from each wingroot. Mark this final side-to-side position of each filler body.Take a set square and place it under the wing and against the leading edge and then measureback 365mm from the leading edge – mark this fore and aft position of each filler body.Wednesday, April 7, 2010 145 of 327
Cut the opening<strong>Jabiru</strong> <strong>J160</strong> Constructors <strong>Manual</strong>Pre-Paint>Wings>Fit fuel tank filler bodyNow we can drill through the outer surface of the wing with a hole saw, clean away excessfiller and then drill a slightly smaller hole into the wing tank.During cutting care must be taken to prevent any drilling waste from falling into the tank.If you have a compressor and an air line with a variable flow valve you could place a line intothe tank through one of the wing root fittings and very slightly pressurise the tank, but becareful to only use a small amount of pressure – too much pressure may rupture the tank!Otherwise you could have someone hold a strong vacuum cleaner nozzle near the hole sawwhile you are drilling, but whatever you do make sure that no waste falls into the tank.Drill a 66 - 68mm hole into the upper wing surface only, and not into the fuel tank. Hold thedrill at right angles to the wing surface and very gently drill until you can see darkness at thebottom of the cut (as indicated in the yellow circles in the photo above right) this will meanthat you have reached the gaps in the expandable filler between the upper wing surface andthe fuel tank.Lever out the cut out piece and carefully grind away all of the filler until you reach the top ofthe wing tank, then drill a 54mm hole into the tank, taking care not to drop anything into thetank.In these photos, taken in our factory, the tank has been slightly pressurised so that all waste isblown away from any opening, but a vacuum cleaner hose held close to the surface being cutcould achieve much the same result.Wednesday, April 7, 2010 146 of 327
<strong>Jabiru</strong> <strong>J160</strong> Constructors <strong>Manual</strong>Pre-Paint>Wings>Fit fuel tank filler bodyFit the filler bodyNow, working slowly, enlarge the hole in the tank (sandpaper taped to a section of tubing isuseful for this) just enough so that the filler body is a good firm fit into the tank. Remove thefiller body and clean all of the area surrounding the holes. Sand/roughen the outside of thefiller body and place masking tape around the inside to keep flock from entering.Mix a batch of resin and coat the outside of the filler body and the top of the wing tank areawhere it will be mounted. Add flock to the resin and carefully fill the area around the fillerbody, working the flock into the gap between the tank and the wing surface first and thenfilling back towards the opening, making sure that any bubbles are worked out.Place the filler body in position, aligning the locating holes (circled at above right) fore andaft and with the earth wire hole facing forwards, and level the upper rim of the filler body withthe top of the wing surface. Flock and fill back around the filler body.Wednesday, April 7, 2010 147 of 327
<strong>Jabiru</strong> <strong>J160</strong> Constructors <strong>Manual</strong>Pre-Paint>Wings>Fit fuel tank filler bodyWhen the flock is almost level with the top of the wing surface, cut a piece of peel cloth andcarefully brush it into place with no wrinkles or bubbles. Leave overnight to cure.Next day remove the peel cloth and seal the opening with a square of plastic or heavy cardsecured with masking tape to keep the tank free of dust and dirt.Final filling of any slight depressions in the flock will be covered in the Painting>Pre-paintpreparation task.This completes the Pre-Paint>Wings>Fit fuel tank filler body task.Wednesday, April 7, 2010 148 of 327
<strong>Jabiru</strong> <strong>J160</strong> Constructors <strong>Manual</strong>Pre-Paint>Wings>Prepare wing rootPre-Paint>Wings>Prepare wing rootObjectives of this task:To fit all of the fuel and breather fittings in the wing root and trim the flap arm cutouts.Materials required:Card # J11 “Fuel Components”Steps1. Fit the fuel fittings2. Fit the breather tube3. Cut out the flap arm recessFit the fuel fittingsBreatherBlankFuel gaugeFinger filtersStart by removing all the protective tape from the openings, then thread a finger filter intoeach of the bottom fuel fittings and remove – this will clear any surplus sealant that may haveaccumulated around the fittings. Clean the finger filters and apply a smear of Loctite 577 tothe threads then refit the filters and tighten firmly. Take care not to cross-thread any fittings.Apply a drop of Loctite 577 to the threads of the blanking plug and fit to the top rear fitting.Assemble the fittings onto thebreather tube as shown and theninsert the breather tube into thefront top fitting and work it fullyinto the wing tank – there are cutoutsin the top of the tank ribs toallow the breather tube to fit alongthe top of the tank and it may benecessary to gently manoeuvre thetube through them. A very slightbend about 200mm back from theend of the tube can be useful. Pushthe tube in until the end of the tankis felt and then back it out roughly5mm.Once the tube is in place, apply a smear of Loctite 577 to the threads of the brass nipple andtighten it into the fitting, then do the same with the gland nut. The 90° curved end of thebreather tube should face the rear of the wing and be horizontal when finally fitted.Place a square of tape over the fuel gauge opening for the moment. Due to the breakablenature of the fuel gauge it will be calibrated and installed after the wing has been painted.Wednesday, April 7, 2010 149 of 327
<strong>Jabiru</strong> <strong>J160</strong> Constructors <strong>Manual</strong>Pre-Paint>Wings>Prepare wing rootFit the breather tube and the fuel capThe breather tube will now be visible through the fuel filler opening on top of the wing.Move it to the rear of the opening and behind the filler body, then take the plain earth wireand thread it into the tank from the filler and work it along the bottom of the fuel tank andthrough the gap in the bottom of each tank baffle towards the wing root as shown in the photoabove. Proceed carefully until the entire length of plain earth wire is inside the tank.Fuel FillerBodyAluminiumBreather Tube6g x ½” selftapperEarth wire & fuel capretaining wirePlastic“P” clip6G “SpeedNut”Fit the speed nut onto the “P” clip, fit the “P” clip around the breather tube and then fit the 6gself-tapping screw through the 4mm ring terminal, through the fuel filler body and into thespeed nut on the “P” clip. See the drawing on the next page.You may need to make up a tool to assist in the fitting of the“P” clip – here is a photo of the tool that we use in our factoryfor the purpose. The end (circled) is used to push the breathertube up and towards the fuel filler body so that the screw canbe fitted. The tool is shown in use on the next page.Wednesday, April 7, 2010 150 of 327
<strong>Jabiru</strong> <strong>J160</strong> Constructors <strong>Manual</strong>Pre-Paint>Wings>Prepare wing rootThe drawing above shows the components and the process of assembly so that you can seehow the parts all fit together, while the photo below right shows the actual fitting taking placein the fuel filler opening.Note that the blue ring terminal will bepushed down to a horizontal position beforethe screw is tightened so that the earth wireswill not foul the fuel cap when it is fitted.The braided length of the earth cable is thefuel cap retaining cable and it should now beconnected to the bottom of the post on thefuel cap with a ½” machine screw with adrop of Loctite 242 on it.The fuel filler cap, which comes partlyassembled on the card, can now be placedinto the opening with the locating dowelfitted into the recess at the rear of the opening and tightened in place and the vent tubeopening can be taped over until after painting.The vent tubes will be fitted to the fuel filler caps when the wings are being prepared for finalfitting in the Post-Paint>Wings>Prepare wings for fitting task.Wednesday, April 7, 2010 151 of 327
<strong>Jabiru</strong> <strong>J160</strong> Constructors <strong>Manual</strong>Pre-Paint>Wings>Prepare wing rootCut out the flap arm recessYou will need to cut out the marked flap arm recess in the top of the wing root. Care is neededaround the wing attachment lug (circled): under no circumstances must any material beremoved from the lug.When using a jigsaw near the wingattachment lug you will need to makesure that the shoe of the jigsaw iscompletely level when cutting near thewing attachment lug as shown above.Use a hacksaw in a holder to removethe final section of the wing skin abovethe wing attachment lug, finishing offcarefully with a flat file as shownabove.Cut down the rear of the wing as shown at right, angling out from where the saw is in thephoto to finish the cut level with the bottom surface of the wing, shown indicated the red line.Sand all cut surfaces to a smooth finish.This completes the Pre-Paint>Wings>Prepare wing root task.Wednesday, April 7, 2010 152 of 327
Pre-Paint>Wings>Cut aileron cable openingsObjectives of this task:<strong>Jabiru</strong> <strong>J160</strong> Constructors <strong>Manual</strong>Pre-Paint>Wings>Cut aileron cable openingsCheck the position of the wing rib near the aileron cable inspection openings and then check,mark and cut the aileron cable openings.Check and cut the aileron cable inspection openingTurn the wing upside down and pack under the trailing edge so that the wing is stable.Start by drilling a 38mm hole in the centre of the shaded rectangular area, and then place aruler into the hole towards the wing root until it touches the rib. Mark a reference line on thewing (140mm has been used as the reference circled in the photos above).Now remove the ruler from the hole and lay it on the wing with the reference mark lined upand mark where the end of the ruler lies, which is where the outboard side of the rib islocated, and draw a line fore and aft at that point. Measure 12mm from that line towards thewing root and draw another line: this marks both sides of the wing rib.20mm min65mm maxThe position of the inspection hole should be no closer than 20mm from the outboard side ofthe rib and no more than 65mm from the trailing edge of the wing. If it is not then you willneed to move the markings accordingly.Use a jigsaw to cut the rectangular inspection hole slightly undersize and then carefully widento 80mm wide and 120mm front to back with rounded corners to fit the clear cover (drawingon next page). Set the clear cover aside until after painting.Wednesday, April 7, 2010 153 of 327
<strong>Jabiru</strong> <strong>J160</strong> Constructors <strong>Manual</strong>Pre-Paint>Wings>Cut aileron cable openingsWednesday, April 7, 2010 154 of 327
Now look into the hole that you have just cut –look for the black marks (arrowed at right) onthe rib that shows the location of the aileroncable clamp bolt holes. Drill a second 38mmhole as shown at right, slightly inboard of thewing rib with the fore and aft alignment beingexactly in line with the aileron cable clampbolt holes. This hole will be used to access therear of the cable clamp bolts.This completes the underwing work, now weneed to check the aileron cable slot marking onthe upper wing surface.Check and cut the aileron cable exit slot<strong>Jabiru</strong> <strong>J160</strong> Constructors <strong>Manual</strong>Pre-Paint>Wings>Cut aileron cable openingsWith the wing still upside down, lay a setsquare on the wing and use it to transfer the locationof the outboard side of the wing rib to the upper wing surface. Mark the rib location and thenturn the wing right side up.It is critical that the aileron cable slot be accurately positioned in relation to the wing ribbecause the aileron cable will be clamped to the wing rib and it must align with the ailerondrive arm. The aileron drive arm and thus the aileron is positioned in relation to the slot in thelater task Pre-Paint>Wings>Fit ailerons.The marked slot should be slightly (~2mm) outboard of the wing rib. If that is not the casethen move the slot marking laterally until it is slightly outside of the wing rib. The fore and aftposition of the slot will be correct as marked and the overall slot dimension should beapproximately 15mm wide and 70mm long.Once the location has been confirmed then cut the slot out: drill each end of the slot slightlyundersize and use a jigsaw the join the holes then widen to the marked size with a file.If the aileron cable inspection hole on the underside of the wing has been correctly markedthen the aileron cable slot will usually be correct too, but it is still good practise to checkcarefully before cutting – it is much better to check first and then cut.This completes the Pre-Paint>Wings>Cut aileron cable openings task.Wednesday, April 7, 2010 155 of 327
Pre-Paint>Wings>Fit quick drain sumpsObjectives of this task:<strong>Jabiru</strong> <strong>J160</strong> Constructors <strong>Manual</strong>Pre-Paint>Wings>Fit quick drain sumpsTo flock the quick drain sumps into the wing tanks at the rear of each wing root and thenclean and seal the fuel tanks.Materials required:Epoxy resin and flockCard # 11 „Fuel components‟Mark and drill the wingTurn the wing upside down and wedge the wing so that the top surface is level and solid.If you have a compressor and an air line with a variable flow valve you could place a line intothe tank through one of the wing root fittings and very slightly pressurise the tank, but becareful to only use a small amount of pressure – too much pressure may rupture the tank!Otherwise you could have someone hold a strong vacuum cleaner nozzle near the hole sawwhile you are drilling, but whatever you do make sure that no waste falls into the tank.Now we can drill through the outer surface of the wing with a hole saw, clean away excessfiller and then drill a smaller hole into the wing tank.Measure the distance from the wing root to the first rib, which should be between 55mm and60mm: that defines the inboard end of the wing tank. Now measure a further 40mm into thetank for a total of approximately 95mm to 100mm and mark a line, then measure back 580mmfrom the leading edge and mark another line. Where these lines cross is where the quick drainsump will be fitted.Drill a 1¾” hole into the outer wing surface only, and not into the fuel tank.Hold the drill at right angles to the wing surface and very gently drill until you can seedarkness at the bottom of the cut: this will mean that you have reached the gaps in theexpandable filler between the wing surface and the fuel tank.Lever out the cut-out piece and carefully grind away all of the filler until you reach thesurface of the wing tank, then drill a 3/8” hole into the tank, taking care not to drop anythinginto the tank. You could turn the wing right side up for this step if you wish.In these photos, taken in our factory, the tank has been slightly pressurised so that all waste isblown away from any opening, but a vacuum cleaner hose held close to the surface being cutcould achieve much the same result.Wednesday, April 7, 2010 156 of 327
<strong>Jabiru</strong> <strong>J160</strong> Constructors <strong>Manual</strong>Pre-Paint>Wings>Fit quick drain sumpsFit the quick drain sump bodyClean away any dust then sand and test fit the quick drain body.Mix a small batch of resin and coat the quick drain body and the mounting hole, then addflock and bed the quick drain body into place.Add flock to build up to surface level and smooth away any excess with a clean mixing stick.Make sure that no flock sets across the drain hole – clean away any excess inside the drainhole with a length of wire or similar. Leave overnight to cure.The flock will be partly covered by the glass fibre cloth lay up for the flaps and any roughnessin the finish will be rectified in the Painting>Pre paint preparation task.Clean the wing tanksThe fuel system will be flushed through in the Testing phase prior to flight.Next day thoroughly clean the fuel tanks to remove any dirt or debris that may have falleninto the fuel tanks during the construction process: vacuum inside the fuel gauge opening thenremove the cover from the fuel filler cap and blow compressed air into the tank to movedebris and at the same time hold a vacuum cleaner nozzle at the fuel filler and fuel gaugeopenings so that you have a continuous airflow through the tank.When you are satisfied that the tank is clean, seal all openings into the tank: the fuel filleropening, the quick drain fitting, the fuel gauge opening and all wing root fuel fittings.This completes the Pre-Paint>Wings>Fit quick drain sumps task.Wednesday, April 7, 2010 157 of 327
Pre-Paint>Wings>Mount flapsObjectives of this task:<strong>Jabiru</strong> <strong>J160</strong> Constructors <strong>Manual</strong>Pre-Paint>Wings>Mount flapsIn this task each flap will be positioned and the flap brackets will be glassed onto the wing.The flaps are designed to stow in the flaprecess at the rear of the wing with the frontupper surface of the flap fitting snugly underthe lip at the top of the flap recess as shownarrowed in the drawing at right.In order to achieve an aerodynamic fit thetop rear of the wing must be carefullyprepared before the flap can be positionedand the flap brackets glassed into place.Flap mounting is a critical issue that can affect the aerodynamic efficiency of the wing as wellas general flight characteristics and considerable care must be taken with this task.This is probably the single most important task in the <strong>Manual</strong>!Materials required:Card # J16 ‘Electric Flaps’Glass fibre cloth bag labelled „Hollow Wing‟, Epoxy resin and flockPrepare the wingTurn the wing upside down and pack under the trailing edge so that the wing is stable.There are 4 squares of peel cloth under the gel coat at the trailing edge of the wing where theflap brackets will be located – carefully cut one corner then lift and remove the peel clothfrom each area then lightly sand the area under the peel cloth.The rear of the wing as supplied should be a uniform distanceback from the rear of the flap recess. The photo at rightshows the workshop tool that we use to check the depth and aline (in black, near the edge) that has just been marked.If your wings have a black line like this marked along therear of the underside of the wing then you should trimcarefully to that line before starting on the next step.Note that the wing is upside down in all photos in this task.Wednesday, April 7, 2010 158 of 327
<strong>Jabiru</strong> <strong>J160</strong> Constructors <strong>Manual</strong>Pre-Paint>Wings>Mount flapsPosition the flapThe flap is positioned in 3 stages:Initial flap position: lay 2 lengths of aluminium angle on the wing surface between the outerpeel cloth squares and fix to the forward part of the wing with cloth tape as shown above.Place the front of the flap onto the lip at the trailing edge of the wing and clip the trailing edgeof the flap to the aluminium angle with spring clips (circled in yellow above).Lateral flap position: the intention now is to position the flap so that the distance from thecentreline of the wing mounting bolt holes to the first rib of the flap will be 8mm.In the factory we use a method that entails measuring the distance from the centre of the wingmounting bolt hole to the outside of the wing mounting lug, then adding 8mm to that distance,which gives us the distance that the first rib of the flap must be from a ruler or straightedgeheld against the wing mounting lugs.Move the flap gently until you are satisfied that the distance from the centreline of the wingmounting bolt hole to the first rib of the flap is exactly 8mm. When that position is correctmark the wing and the flap with 2 ruled lines fore and aft over the gap between the flap andthe wing (use a marker pen) so that you can easily realign the flap to the wing.Wednesday, April 7, 2010 159 of 327
<strong>Jabiru</strong> <strong>J160</strong> Constructors <strong>Manual</strong>Pre-Paint>Wings>Mount flapsFlap to wing spacing: tape 6 pairs of mixing sticks together. Place 1 pair into each end of thegap between the flap and the wing (green arrow above right) and 1 pair under the aluminiumangle on each side of the flap to wing gap (blue arrows above right) to create the requiredcurve to the underside of the wing as shown above left. Check that the flap is pushed forwardsuntil the pairs of mixing sticks are being held firmly in place.Match the flap to the wingLook under the wing at the point where the flap touches the trailing edge of the wing: theobjective in this step is to fit the trailing edge of the wing to exactly match the flap, so markthe trailing edge of the wing where the flap touches and then carefully grind the trailing edgeaway until the flap sits snugly into the wing recess. Shaping should be done with a longsanding block: all shaping should be gentle in contour.Leave the rear of the trailing edge of the wing straight and concentrate on shaping theunderside of the lip (which is currently on top because the wing is upside down) on thetrailing edge where the flap fits to an angle of approximately 30 degrees as shown above right(the angle has been emphasised with red lines in the photo) – this will allow the flap to retractand seat snugly under the lip with virtually no gap.Shaping of the trailing edge will require several adjustments and each time the flap must berealigned onto the wing, using the marks that you made earlier, and the areas to be shaped aremarked and then the flap is removed and the trailing edge of the wing is sanded to suit.Wednesday, April 7, 2010 160 of 327
Take your time and get each flap exactlyright: effort applied at this stage will berepaid in flying pleasure later.When the angle shaping is finished use astraightedge to do a final check of the rear ofthe wing (which should be absolutelystraight), while the angled underside of thetrailing edge of the wing will be a precisematch to the shape of the flap.<strong>Jabiru</strong> <strong>J160</strong> Constructors <strong>Manual</strong>Pre-Paint>Wings>Mount flapsPrepare to flock the flap bracketsPosition the flap onto the wing again. Place some very thin spacers (paint thickness, or about0.2mm) between the top of the flap and the lip at the rear of the trailing edge. Reset the lateralflap position and refit the mixing stick spacers as described at the top of the previous page.Be very particular about the flap positioning at this time because you are about to mount theflaps permanently, and once they are mounted it will be extremely difficult to make anychanges without causing considerable damage!Remove the peel cloth from the outside and the inside of the flapbrackets. Lightly sand the inside and outside of each bracket.Lightly sand the entire peel cloth area where each bracket will bemounted to ensure a good bond.Using regular brown packing tape, gently tape over the gap betweenthe flap and the wing as shown at right to prevent any flock fromentering the gap. Take care not to move the flap in any direction!Check that the mixer stick spacers are still correctly positioned.Place a bush in each flap post and carefullysand off the sharp edges from the rounded endof each flap post (circled at right).Cut the glass fibre cloth from the bag marked„Hollow Wing‟ as marked – cut slightly outsidethe marked area.There will be 3 pieces of glass fibre cloth foreach flap bracket. Lay them on the wing infront of each flap bracket position.Make a final check of the flap alignment and make any final adjustments that may berequired: remember, this next step will be almost impossible to undo so be absolutely surethat the flap is correctly aligned before moving on to the next step.Wednesday, April 7, 2010 161 of 327
Fit the flap brackets<strong>Jabiru</strong> <strong>J160</strong> Constructors <strong>Manual</strong>Pre-Paint>Wings>Mount flapsIn this step the flap brackets will be flocked into place and then covered with 3 layers of glassfibre cloth. This all needs to be completed in the one continuous operation. In our factory thisstep takes over an hour with an experienced person, so allow perhaps 2 hours or slightly more.Mix a batch of resin and coat the inside of the flap brackets and the wing surface where theflap brackets will be attached. Mix a small separate firm batch of flock and fill the inside ofthe angled end of the flap brackets as shown above right.Place each bracket: holding the bracket clear of the wing, insert the bolt through the bracketand the bush, then let the bracket rotate down to the wing. Do this for each bracket.At this point recheck the marker pen mark across the wing and flap to be sure that nothing hasmoved.Once all four brackets have been placed apply a gentle downward pressure to seat each oneand then round off any excess flock around the base of each bracket to an even contour withthe rounded end of a mixing stick. This rounded contour will help to avoid air bubbles whenyou apply the glass fibre cloth in the next step.Wednesday, April 7, 2010 162 of 327
<strong>Jabiru</strong> <strong>J160</strong> Constructors <strong>Manual</strong>Pre-Paint>Wings>Mount flapsWorking on one bracket at a time, wet an area around each bracket that is slightly wider thana piece of the glass fibre cloth that you cut out in the “Prepare to flock the flap brackets” stepabove, then place a piece of glass fibre cloth onto the bracket and brush it on, working downthe sides of the bracket and onto the wing, taking care to brush out any air bubbles and payingparticular attention to the curved flock join between the bracket and the wing.Repeat this process for each of the 3 layers.Note that the first layer should be slightly „wetter‟ than the following 2 layers.The photos above show the second layer being applied.There will be some excess cloth that will cover the brown packing tape – this will be cut offafter the resin has cured.Leave overnight to cure.Next day heat the excess cloth along the wing-to-flap gap and cut it away carefully with asharp knife.Remove the brown packing tape and clean away any excess fibre and flock.Remove the flap from the wing, taking care to save the pivot bushes and bolts, and store forlater painting.Wednesday, April 7, 2010 163 of 327
Check the slot size<strong>Jabiru</strong> <strong>J160</strong> Constructors <strong>Manual</strong>Pre-Paint>Wings>Mount flapsAt this point you have mounted the flap to the wing with the flap upper surface correctlyaligned in relation to the trailing edge of the wing. Now the slot size – the gap between thetrailing edge of the wing and the leading edge of the flap – must be checked.The slot size is very important – when the flap is extended the airflow through the slotprovides control of the airflow velocity over the flap, and thus the slot or gap size must beidentical along the width of the flap or there could be a rolling moment when the flaps areextended.To check this, turn the wingright side up and fit the flap,taking care to fit the bushbefore each bolt.Deflect each flap to as close to39.5° as you can and hold theflap in that position at each endwith cloth tape.Now measure the slot size ateach flap post as shown in thedrawing at right: the slot sizeshould be as shown, but thecritical measurement is that theslot size should be the sameacross the full width of the flapand the slot size should be the same for both wings at the same flap deflection.If you have been careful in the initial flap alignment the slot size should fall within theacceptable tolerance range, but if you need to make adjustments then they should only beminor and these adjustments should be made with a long straight sanding block, starting byslightly altering the angled under-face of the trailing edge of the wing and only if necessarythen altering the trailing edge of the wing itself.Final adjustments will be made in the Testing>Flight testing task.This completes the Pre-Paint>Wings>Mount flaps task.Wednesday, April 7, 2010 164 of 327
<strong>Jabiru</strong> <strong>J160</strong> Constructors <strong>Manual</strong>Pre-Paint>Wings>Fit wing tipsPre-Paint>Wings>Fit wing tipsMaterials required:Epoxy resin and flockFit the wing tipsIf you intend to fit strobe lights to the wingtips, drill a hole in the wing root and use a long rodto route the strobe wiring along behind the leading edge and out of the wing root. The wiringwill need to be routed out through the strobe mount before fitting the wingtips.Pre-fit the wing tip to the end of the wing and make sure that the wing tip sits firmly insidethe wing and that the leading edge of the wing tip is level with the leading edge of the wing.Make adjustments as required – some material may need to be removed from the joggle inorder to clear the end of the spar (circled in the top photo below).The wing tip should fit in hard against the joggle step.Hold the wing tip in position and fix in place with 6G self-tapping screws, then remove thewing tip. Remove the peel cloth from the wing tip and sand the surfaces to be joined.Mix a batch of resin and coat the surfaces then add flock to the remainder. Apply a 2mm layerof flock to the wing tip and fit the wing tip into place: hold the wing tip slightly closed as youplace it over the end of the wing and then let the wing tip expand into the wing so that theflock is not pushed out ahead of the wing tip. Fix in place with the 6G self-tapping screws.Wipe away any excess flock with a clean mixing stick and leave overnight to cure.Leave to cure overnight and then remove the screws. The screw holes will be filled later aspart of the Pre-Paint preparation task.Wednesday, April 7, 2010 165 of 327
Fit the strobes (optional)<strong>Jabiru</strong> <strong>J160</strong> Constructors <strong>Manual</strong>Pre-Paint>Wings>Fit wing tipsShould you elect to fit strobe lights to the wingtips you will find a shaped fibreglass strobemounting base in with the strobe packing. Decide exactly where you want the strobe to fit andin what position, and then shape the underside of the strobe mount so that it will fit in thedesired location and fix it in position with flock and hold it with 2 self-tapping screws untilthe flock has cured.You will then need to route the wires out through the strobe base before fitting the wingtip.This completes the Pre-Paint>Wings>Fit wing tips task.Wednesday, April 7, 2010 166 of 327
Pre-Paint>Wings>Fit aileronsObjectives of this task:<strong>Jabiru</strong> <strong>J160</strong> Constructors <strong>Manual</strong>Pre-Paint>Wings>Fit aileronsIn this task the ailerons and the pre-mould strips will be sized and trimmed, then flocked ontothe wings and glassed in place, and the next day the ailerons will be fitted to the wings.Materials and equipment required:Card # J5 “Aileron” for the hingesEpoxy resin and flockLength of flat timber 150m x 1250mm, one side covered in brown packing tapePavers or half bricks for weights to hold the pre-mould strip in place while the flock curesSize the ailerons and pre-mould stripsFor this step you will need to work on both wings together.Mount the flaps temporarily with just the bolts and spacers, holding them in the fully retractedposition with strips of tape over the top of the flap onto the wings.Check the distance from the inside of the wing tip to the outboard end of the flap: the distanceshould be very close to equal for both wings, and in the range of 1215mm to 1220mm. If thedistance is not equal for each wing then it may be necessary to trim the end of one flapslightly, but check the aileron lengths first.With each wing right side up, lay theaileron in place on the wing and use a ruleror straightedge to line the aileron drive armup with the aileron cable slot that was cutpreviously in the Pre-Paint>Wings>Cutaileron cable inspection opening task. Thedrive arm should very slightly (~1-2mmmax) overlap the slot.With the aileron held in this position markthe outboard end of the aileron where ittouches the wing tip/winglet and mark theinboard end where it touches the flap.Aileroncable slotRepeat the process with the other aileron onthe other wing. Both ailerons should nowbe marked to an equal length in the range of1215mm to 1220mm, ideally 1218mmoverall, with the aileron drive arms both located either outboard or inboard of the slot.AileronAilerondrive armAt this point if the aileron or flap needs to be trimmed then you can make adjustments asrequired to equalise the length, mark carefully and trim with a hacksaw or jigsaw and sand toa smooth finish. Take care to make accurate cuts that exactly match the adjoining surface.At this stage each aileron should fit snugly into the gap between the wing tip and the flap withvery little or no clearance at each end: when the ailerons have been finally fitted into placethen the finished clearance can be adjusted with a sanding block.Now cut the ends of the pre-mould strip so that it fits snugly between the wing tip and theflap. You may need to trim the lower outboard end of the curved “T” rib slightly.WingWednesday, April 7, 2010 167 of 327
<strong>Jabiru</strong> <strong>J160</strong> Constructors <strong>Manual</strong>Pre-Paint>Wings>Fit aileronsPrepare and fit the pre-mould stripTurn the wing upside down and wedge the wing so that the top surface is level and solid.Remove the peel cloth from the pre-mould strip (front of the flat part and both sides of thecurved rib) and sand lightly. Remove the peel cloth from the wing recess in front of theaileron and sand carefully. Remove all dust from the area.Protect the outboard end of the flap from any excess resin or flock by covering it in brownpacking tape. For each wing, mix a 280g batch of resin, and divide into a 240g batch and a40g batch. Add flock to the 240g batch of resin and mix it in thoroughly.Apply a layer of flock to the recess on the wing – the layer should be around 3 to 5mm abovethe level of the wing.Using the 40g batch of resin, coat the curved part of the wing and the front of the curved ribon the pre-mould strip, then apply a D-shaped layer of flock to the bottom of the curved rib –the layer should be as wide as the bottom of the curve and about 10mm deep.Wednesday, April 7, 2010 168 of 327
<strong>Jabiru</strong> <strong>J160</strong> Constructors <strong>Manual</strong>Pre-Paint>Wings>Fit aileronsFit the pre-mould strip into place – position carefully slightly above the final location and thenpress gently forwards and then down into place. Wipe away any excess flock.Place the tape-covered board on top of the pre-mould strip and weight with several pavingblocks or half-bricks. Wipe away any excess flock along the bottom of the curved rib, thenbrush on 3 layers of glass fibre cloth around the gap at the wing tip end of the pre-mould stripas circled in the photo at above right.Apply a coat of resin to the back of the curved rib/wing join and lay in a single length of glassfibre cloth (from the Wing bag). The lower edge should be slightly in from the trailing edge ofthe wing. Brush the layer in carefully taking care to avoid any bubbles or gaps.Leave the wing/pre-mould assembly for 24 hours to cure before continuing with this task.Wednesday, April 7, 2010 169 of 327
Check and cut the aileron recessNext day turn the wing right side up.Lay the aileron on top of the wing and align the rear edge of theaileron with the rear edge of the flap and the rear edge of the wingtip/winglet and check that the pre-marked aileron recess on the topof the wing is parallel to the front edge of the aileron.Make any required corrections to the markings.Put the aileron to one side and cut out the recess with a jigsaw,then sand to a smooth finish with a long sanding block.<strong>Jabiru</strong> <strong>J160</strong> Constructors <strong>Manual</strong>Pre-Paint>Wings>Fit aileronsFit the aileronTurn the wing upside down again and wedge the wing so that thetop surface is level and solid.Fit the aileron in place and clipthe trailing edge of the aileronthe flap and the wingtip/winglet. The front edge ofthe aileron should be sitting ontop of the pre-mould strip.Check that the trailing edges arelined up correctly and thenmark the pre-mould strip alongthe front edge of the aileronwith a felt marker pen.flapaileronRemove the aileron and cut along the marked line with a jigsaw then sand to a smooth finishwith a long sanding block.DrivearmAileronRefit the aileron and align the trailing edges again.There are 3 hinges per aileron: 1 at each end of the aileron and 1 inside of the drive arm.Mark the hinge locations – the outside of the end hinges should be 50mm in from each end ofthe aileron and the distance from the end of the aileron to the nearside of the inner drive armhinge should be 360mm as shown above.Mark each hinge location and identify both sides of each hinge: Hinge “A”, Hinge “B”, etc.Wednesday, April 7, 2010 170 of 327
<strong>Jabiru</strong> <strong>J160</strong> Constructors <strong>Manual</strong>Pre-Paint>Wings>Fit aileronsPlace the aileron hinges in those locations with the flat side of each hinge facing upwards andthe hinge pin aligned in the centre of the ~1mm gap between the aileron and the wing.Do not place the hinge flat side down – if you do then the holes will not line up correctlywhen you come to fit the hinge.Use a 3/32” drill to make a pilot hole opposite the pin side of each rivet hole, check that thehinge and hole positioning is correct and then carefully expand to 3/16” holes.Test fit each hinge with 4 Clecoes and fit the hinge pin into place as shown above. Each hingepin is inserted from the inside towards the outside of each hinge. Mark the location of the endof each hinge pin (circled at above right). Number each hinge and its location.Check that the aileron to pre-mould strip gap is even along the full length then remove theaileron and hinges.Sand the flat side of each hinge and the locations where they will be fitted, then mix a smallbatch of resin and coat each area. Add flock to the remaining resin and apply a 2mm layer offlock to each hinge and flock into place using clean Clecoes in the outer holes as before.Using a 120° countersink bit carefully countersink the 4 inner holes just enough so that acountersunk rivet head will sit flush with the surface when fitted and rivet the 4 inner holeswith countersunk rivets. Now remove the Clecoes from the outside holes one at a time,countersink each hole and fit a countersunk rivet until each hinge has 8 countersunk rivets.Take care to keep flock away from the hinge pins during this step: clean the hinges while theflock is still wet then leave both parts (wing and aileron) separate and leave overnight to cure,then store the ailerons for later painting. Clean the Clecoes in acetone after use.Next day use a rat tail file to make a slot into the wing at each hinge pin mark (examplecircled at above right), fit the hinge pin and the hinge pin retainer, mark the retainer screwhole and drill a 3/32” hole. Pop rivet a captive nut under each retaining screw hole using 23/32” countersunk rivets.Wednesday, April 7, 2010 171 of 327
Fit the hinge gussetsTurn the wing right side up for this final step.The hinge gussets provide strength andprevent flexing of the pre-mould strip aroundthe aileron hinges. Each hinge will have agusset flocked in place at each side.Cut 6 gussets per wing (for a total of 12gussets) and fit each gusset to the pre-mouldstrip as shown in the drawing at right:Each gusset will need to be sanded to a goodfit, then flock one gusset in place at each sideof each hinge – refer to the photo below for anexample of gusset placement.<strong>Jabiru</strong> <strong>J160</strong> Constructors <strong>Manual</strong>Pre-Paint>Wings>Fit aileronsPosition each gusset carefully into place on a bed of flock, then use a clean mixing stickdipped in resin to round the flock off to a smooth R6 fillet.An R6 fillet is about a “finger wipe” radius. Do not wipe away any more flock or the load willnot be transferred correctly and the gusset may break away in use.WingPre-mouldstripAileronThe photo above shows a typical gusset fitting.Leave the gussets overnight to cure.This completes the Pre-Paint>Wings>Fit ailerons task.Wednesday, April 7, 2010 172 of 327
<strong>Jabiru</strong> <strong>J160</strong> Constructors <strong>Manual</strong>Pre-Paint>Wings>Fit pitot tube to strutPre-Paint>Wings>Fit pitot tube to strutObjectives of this task:To fit the Pitot head and tube to the right-hand strut prior to painting.Take the right hand strut and measure down 340mm from the upper/wing end of the airfoilshapedsection, mark and drill a 10mm hole in the front of the strut.Feed the supplied ¼” ID plastic tubing intothe hole and down the strut until it can beseen at the bottom, then fit the top end of thetube over the pitot fitting and superglue andlock wire the tube in place as shown at right.Feed all the tube into the strut until the pitothead mounting plate sits against the strutthen pop rivet the plate in place as shown inthe photo below.Refer the drawing on the next page fordetails.340mmTie the excess plastic tube to the outside ofthe strut and set the strut aside for test fittingand painting.PitotheadLockwireWednesday, April 7, 2010 173 of 327
<strong>Jabiru</strong> <strong>J160</strong> Constructors <strong>Manual</strong>Pre-Paint>Wings>Fit pitot tube to strutThis completes the Pre-Paint>Wings>Fit pitot tube to strut task.Wednesday, April 7, 2010 174 of 327
Pre-Paint>Wings>Test fit wingsObjectives of this task:<strong>Jabiru</strong> <strong>J160</strong> Constructors <strong>Manual</strong>Pre-Paint>Wings>Test fit wingsTo test fit the wings and flaps to the fuselage prior to painting. This task is intended purely tomake sure of the fit and to make any adjustments that may be required so that there will be noissues during the final fit after the wings and fuselage have been painted.Each wing will be held in place with 4 bolts in this task and no nuts will be used – this ispurely a test fit task after which the wings will be removed and prepared for painting.In our factory we use 3 people for this task, so ask 2 friends over to help you.Do not try to do this task with less than 3 people or you risk dropping the wing.While the wings are in place the strut to wing fairings will be fitted and the strut/main gear tofuselage fairings will be pre-fitted and then removed for painting.Equipment required2x4” timber for wing support – see the 3 rd page of this task for detailsPreparationPlace 2 trestles beside the fuselage and lay the wing on them.It is very important that the AN4-14A wing attach bolts fit snugly through the holes in theattach bushes on the wing and the aluminium wing attach lugs on the fuselage. Test fit a boltin each hole, and if the bolt will not fit through to full depth then very carefully ream theholes with a hand reamer out until the bolts fit correctly.It is also very important that the AN175-15A strut attach bolts fit snugly though the holes inthe strut attach lug under the wing, the lower fuselage mount and the top and bottom holes inthe strut itself. Test fit a bolt in each hole, and if the bolt will not fit through to full depth thenvery carefully ream the holes with a hand reamer out until the bolts fit correctly.Do not ream any more than is absolutely necessary to get a snug fit, and do not use a drill inplace of a reamer!These are critical fit items and great care must be taken!Using a sanding block, lightly sand bothsides of each wing attach lug and the upperand lower strut mounts to clean any debrisaway.Fit the bottom of the strut to the lowerfuselage mount with an AN175-15A bolt.Rest the outboard end of the strut against asaw stool as shown at right.Lay 2 AN4-14A wing attach bolts on top ofthe fuselage where you can easily reachthem.Now you are ready to test fit the wings.Wednesday, April 7, 2010 175 of 327
Test fit the wing<strong>Jabiru</strong> <strong>J160</strong> Constructors <strong>Manual</strong>Pre-Paint>Wings>Test fit wingsBecause the precise alignment of the wing bolts is critical the bushes in the wing attach lugsin the wing root that the bolts pass through are mounted in a bed of flock to allow for fineadjustment during fitting.The process that we use in our factory is to get the wing prepared and ready to fit, then heatup the wing root bushes and fit the wing. Heating of the bushes is done by placing a solderingiron in each bush as shown above and waiting until the other side of the bush is too hot totouch comfortably. This gives 3 or 4 minutes working time, which is usually enough.One person holds the outboard end of the wing while the other 2 hold the front and back ofthe wing root. Walk the wing in to the fuselage and guide the wing attach lugs into thealuminium wing attach brackets on the fuselage. The fit will be tight and it may take somecareful positioning of the wing to get them to fit – the outboard end of the wing may need tobe moved forward or backwards to get the correct alignment. As soon as one bolt can be fittedthough then do so and then that bolt can be used as a pivot to work the other lug into place.The wing attach bolts are fed in from the front and back of the wing toward the centre of thewing.The fit of the bolts will be tight and you will have to tap the bolts into place using a softhammer and a brass drift/punch. Be careful and resist any temptation to tap the bolt too hardbut rather gently encourage each bolt to pass through the bracket and the wing bush.While the wing is being fitted the strut mount bush under the wing can be heated by the samemethod so that it will be ready. Once both wing root bolts are in place the top of the strut canbe fitted to the strut mount and the wing is fitted.Wednesday, April 7, 2010 176 of 327
The important thing at this stage is to relieve the weight of thewing while the flock cools and sets in the correctly alignedposition, and this is done by lifting the outboard end of thewing up about 35mm from the resting position and supportingit overnight.We use a simple wooden support for this (pictured at right)but an even simpler “T” shape of 2x4 timber cut to lengthwould be fine. Leave the wing undisturbed overnight and thenext day the support can be removed and the other wing fittedin exactly the same way.Once both wings and the flaps and strut fairings have all beensatisfactorily test fitted the wings can be removed and setaside for painting.<strong>Jabiru</strong> <strong>J160</strong> Constructors <strong>Manual</strong>Pre-Paint>Wings>Test fit wingsTest fit the flapsWe use 2 people in the factory to carry out this step and we recommend that you do the same,as the flap is too long for one person to handle comfortably and safely.Flap fittingEach flap post bolt hole has a short length of Bundy tube spacer fitted inside (tip: a smear ofgrease will hold the spacer in place while fitting) and each post fits into each flap hanger andis held in place with an AN3 bolt.Size the inboard end of the flapThe inboard end of each flap is manufactured slightly over length to allow for variations inflap hanger placement and it will now require trimming to allow it to clear the fuselage at fulldeflection.Ideally the flap should clear the fuselage by a small amount, nominally 5mm, when at fulldeflection. Full deflection in this case is defined as being 40° from the fully retracted position.The first step is to hold the flap in place and check for overall length with the flap in the fullyretracted position, then manually lower the flap by hand in stages until the end of the flaptouches the side of the fuselage. Take care that you do not scratch the rear window.Working in small stages, mark and trim the end of the flap until the flap can be lowered to thefull deflection position without touching the fuselage. In the factory we find that the use of amarker pen held flat against the fuselage to mark the underside of the flap at each stage can bequite useful. A jigsaw is used the trim the flap.Remember that the top of the flap will not be trimmed quite as much as the bottom of the flapdue to the shape of the fuselage at this location.Work slowly and in stages until the flaps clear the fuselage by 5mm at full deflection.When you are satisfied that the inboard end of each flap is correctly cut and shaped, use along sanding block to smooth off the cut surfaces.Wednesday, April 7, 2010 177 of 327
Fit the strut to wing fairing<strong>Jabiru</strong> <strong>J160</strong> Constructors <strong>Manual</strong>Pre-Paint>Wings>Test fit wingsWhile the wing and strut are fitted the strut to wing fairing can be fitted and the back half ofthe fairing can be flocked into place on the wing.Assemble each fairing on the bench – fit thefront section over the joggle on the backsection and fit the 2 halves together with 4 x6G stainless steel self-tapping screws on theoutside and 1 screw on the inside and thentake them apart again. Refer to the photo atright for the outside screw placement.Now reassemble each fairing around the strutand locate the fairing on the wing: carefullyStrut to wing fairing, final fitted and paintedcentre the assembled fairing on the strut so that there is an even gap all around the strut andmake sure that the fairing is lined up fore and aft.Mark around the back half of the fairing and tape it into place, then drill 6 evenly spaced holesthrough the mounting lip of the fairing and through the surface of the wing. Do not drill anydeeper than 5mm or you risk hitting the fuel tank! Fix the back half in place with a few 6Gstainless steel self-tapping screws, then remove the screws and lower the fairing.Repeat the process on the other wing.Prepare the surfaces to be bonded: sand both surfaces and ensure that they are clean.Mix up a small batch of flock and flock the back half of each fairing to the wing, holding it inplace with 6G stainless steel self-tapping screws. Leave overnight for the flock to cure, thennext day remove the screws – use a soldering iron if necessary to loosen the screws in theflock.The join between the fairing and the wing will be filled and finished in the Painting task.FrontBackWednesday, April 7, 2010 178 of 327
Pre-fit the strut/main gear to fuselage fairing<strong>Jabiru</strong> <strong>J160</strong> Constructors <strong>Manual</strong>Pre-Paint>Wings>Test fit wingsThe strut/main gear fairing comes in 2 sections (left and right) and it covers the strut tofuselage join, the main gear to fuselage join and also fairs the main gear mounting recess.Right hand side strut/main gear fairing from below (top photo) and side on (above)Fit the right hand section first: fit the fairing into place and hold it there temporarily withsome cloth tape, then fit the left hand section of the fairing and tape it intoplace also and check all round each half of the fairing and adjust as requiredfor the best fit. When the fit is correct all round drill 5/32” holes around eachfairing and the fuselage in the pattern shown in the photos above.Remove the fairings and enlarge each fuselage hole to 13/64” and tap eachhole to a 1/4” UNC thread. Each hole will have a threaded insert (showncircled at right) recessed, screwed and super-glued into it, using the screw andspacer (also pictured) to drive the insert home in exactly the same manner asthe Ventral Fin in the Pre-Paint>Fuselage>Fit ventral fin and trim horn task.This completes the Pre-Paint>Wings>Test fit wings task.Wednesday, April 7, 2010 179 of 327
Paint>GeneralObjectives of this task:<strong>Jabiru</strong> <strong>J160</strong> Constructors <strong>Manual</strong>Paint>GeneralTo paint the aircraft, which involves disassembling the fuselage, empennage and wings, thenthe preparation – filling, sanding, priming and so forth, and finally application of the topcoat.Body filler adds weight to your aircraft and Q-Cell is the lightest filler available so we suggestthat you use Q-Cell for the larger fills and finish off with a lightweight body filler.Paint also adds weight to your aircraft and so we recommend that you keep the amount ofpaint to the minimum necessary to achieve a good finish: just enough of a light-colouredundercoat to cover filler and all of the bare spots, followed by a single topcoat.The topcoat must be white for heat rejection purposes, and any coloured striping or detail canonly be applied to vertical surfaces – all horizontal surfaces must be plain white.Filler and paint:In general we use automotive grade paint preparation products and automotive grade 2-packepoxy paint. The specific brands that we use here in Australia may not be available where youlive and you may have to find similar products locally.Lightweight body filler 2 tins “K&H Mercury” brand or similar (photo #1)Spot putty 4 tubes “Ever-Glaze” brand or similar (photo #2)2 pack epoxy primer undercoat 5 litres “Protec Autofleet” brand or similar (photo #3)2 pack polythane white topcoat 12 litres “Protec Barrier” brand or similar (photo #4)Q-Cell and polyester resin lightweight body filler – a 3-part mix consisting of:Q-Cell microspheres 1 kg mix with resin as required, about 20% by weightPolyester resin4 litres40% M.E.K.P. solution 20ml catalyst for the polyester resin/Q-Cell mixtureEtching primer 250ml for priming metal parts: noseleg, etcWax and grease remover 1 litre for final washdown prior to topcoatThinners, retardant, etc as required to suit the chosen products and conditionsTack cloth – available from automotive paint suppliers, removes fine dust prior to theapplication of the topcoat.Wednesday, April 7, 2010 180 of 327
Sandpaper:<strong>Jabiru</strong> <strong>J160</strong> Constructors <strong>Manual</strong>Paint>GeneralGenerally we recommend and use “3M” brand (or 150mm “Stickit” brand pads for a randomorbital sander) aluminium oxide sandpaper in the following grades and quantities: First all over sand 180-grit 1 box Filler sand 80 and 120-grit 1 box of each Spot putty and final sand 240-grit 2 boxesEquipment required:Cork or rubber sanding blocks, flat and curved.150mm random orbital sander, either electric or pneumatic, preferably with dust extraction.Compressor and spray gun – we use a low-pressure pot gun (~80psi) in the factory, but followthe instructions of your chosen paint supplier.Half-face respirator with suitable painting filters.Disposable coveralls, gloves, boots and safety glasses or goggles.Assorted saw stools, wire hooks and trestles will be required to support individual parts whilethey are being prepared and painted. In the paint booths at our factory we hang smaller partsin rows from roof-mounted rails, while wings are fitted to purpose-built supports that hold thewing root and support the outer end with a hook through the flap brackets.DisassemblyPreparation and painting is done with the aircraft completely disassembled - all parts will beprepared and painted separately and then reassembled after the paint has cured.We suggest that you bag all the hardware (bolts, nuts, washers, clips, etc) for each componentseparately and clearly label what each bag is for – this will make your life so much easierduring reassembly.Remove the ailerons and flaps from the wings, then remove the wings and wing struts.Remove the elevator, rudder and ventral fin from the empennage.Remove the wheel spats and any other fairings.Remove the doors and the engine cowlings.Remove the noseleg assembly and place a saw stool or prop under the attach point, oralternately leave the noseleg in place and mask around it.Remove any other small items such as ventilation doors, oil door and so on.Clean everything thoroughlyThe entire aircraft should be disassembled (see above) and then everything should be blownout thoroughly with compressed air and then vacuumed out to remove dust and debris fromevery part of the airframe. You do not want dust being blown into the finish because it didn‟tget cleaned out properly beforehand.While you are cleaning, take the time to clean out your work area too – blow and sweep alldust and rubbish from the walls, benches and floor and get into the habit of doing this at theend of every work day so that when you come to apply the paint the work area will besubstantially clean to start with and you won‟t get any little “surprises” in the finish.Wednesday, April 7, 2010 181 of 327
Paint>Masking<strong>Jabiru</strong> <strong>J160</strong> Constructors <strong>Manual</strong>Paint>MaskingGeneral: we recommend and use regular automotive masking tape and brown masking paper.We do not recommend the use of newspaper for masking due to its porous/absorbent nature.We recommend and use “Fine Line” brand edging tape (photo below left) to define the edgesof windscreen and windows then follow up with normal 1” wide tape and brown paper to fill.The windscreen, door and side windows will all need to be masked very carefully, payingparticular attention to the shape of the masked area, which should closely match the shape ofthe underlying glass fibre structure. Use the “Fine Line” tape and mask slightly (~5mm)inside of the structure line and then use a folded piece of 240-grit paper and sand right up tothe tape to provide a good key for the paint to adhere to. Take your time with this – you willsee the shape of your windscreen and windows every time that you fly so make them even andpleasing to the eye. The photo above right shows a side window fully masked – note the blue“Fine Line” tape defining the edge and the regular masking tape and paper infill.Do not rush the masking stage, but rather take your time and do it carefully: care at this stagewill save you a lot of time and grief later – overspray is not easy to remove, particularly with2-pack paint, so mask up very carefully. Overspray will sneak though the smallest gaps.Mask all control surface hinges on both the control surface and on the adjoining structure.Mask the VHF antenna and static tube.Mask inside the door openings so that thedoor opening will be painted but overspraywill not get inside the cabin and foul theinside of the windows.Mask the engine and engine bay back to theoutside edge of the firewall – wrap the entireengine and engine mounts in masking paperand seal off at the firewall.Mask the main wheels and brakes.Mask the suspension rubbers on the noseleg.Masked and undercoated J170 fuselageWednesday, April 7, 2010 182 of 327
Paint>Surface preparation<strong>Jabiru</strong> <strong>J160</strong> Constructors <strong>Manual</strong>Paint>Surface preparationIt is true that any paint job is only as good as the preparation – shiny paint will most definitelynot hide anything, and in fact shiny paint will only magnify any lack of preparation so surfacepreparation will be the most time-consuming (and ultimately rewarding) part of the paintingprocess. If you want a slick-looking finish this is how to get it: prepare carefully!The surface preparation process is: sand everything with 180 grit paper; fill where required(Q-Cell for larger areas and lightweight body filler for smaller areas, nicks etc); sand the fillersmooth with 80 and then 120 grit paper; apply undercoat; fill pinholes and small nicks withspot putty; sand spot putty with 240 grit paper; touch up with undercoat; final sand with 240grit paper; wash with wax and grease remover, dry off and wipe over with a tack cloth.Wear your half face respirator all the time during the sanding and painting process – there willbe a lot of fine dust generated and your lungs will thank you for it.Lets get started!Sand the entire surface of the aircraft and all parts to be painted with 180-grit sandpaper – weuse a random orbital sander for this task and for most of the sanding in the factory. This willprovide a key for filler and undercoat to bond to. Be careful not to sand through the gelcoatand into the structural glass fibre – if you do go through the gelcoat do not sand any deeper.Filler is used to fill imperfections in the surface to be painted, so you will use filler for thingssuch as filling in ripples or dents. When filling large areas we have found that the use of avery wide (~9”) spatula (make your own from plastic) provides a good finish with little waste.Mix up a large batch of Q-Cell and polyester resin to a creamy consistency and keep it in asealed tin: this mix will last about 5 days. Stir the Q-Cell mix thoroughly before each use andthen scoop out one hand-sized amount at a time onto a flat mixing board, add 3% of M.E.K.P.catalyst/hardener and mix it in thoroughly - this will give you about 15 minutes working time- and apply with a wide spatula. Allow to cure for a few hours until it cannot be scratchedwith your fingernail and then sand back to a smooth finish with 80 and 120 grit paper.Smaller areas can be filled with lightweight body filler and sanded back in the same manner.You might find it easier to work on one area at a time when applying filler so that you don‟tloose track of where you are. If you decide that this way or working appeals to you, you mightwant to consider working on a specific area until you are happy with the finish and thenundercoating that area before moving on to the next area. Working in this manner means thatyou are less likely to miss anything and the undercoat allows you to see where you have been.Metal surfaces such as the noseleg must be cleaned and primed with an etching primer.Now spot putty can be used to fill smaller imperfections such as pinholes and the like. Spotputty is applied with a spatula, left to dry and sanded back with 240-grit paper. Work yourway around all surfaces in this manner and then apply undercoat to all spot puttied areas.By now many days will have passed and all surfaces should be smooth and undercoated.All surfaces can now be hand-sanded with 240-grit paper as the final stage in surfacepreparation, then all dust can be blown away and everything can be wiped down with a cleancotton cloth. Wash everything with warm water and detergent and then with automotive waxand grease remover and then allow all surfaces to dry off completely.At this point the entire work area must be thoroughly cleaned and the floor and walls washedwith water to wash away and damp down any dust.Wednesday, April 7, 2010 183 of 327
Paint>Topcoat<strong>Jabiru</strong> <strong>J160</strong> Constructors <strong>Manual</strong>This is what you have been working towards – the application of the topcoat.Paint>TopcoatThis is a critical task where you only get one chance to get it right. If you are unsure of yourability to apply the topcoat then you may want to hire a professional painter – perhaps thelocal car painter would do the final coat for you on an hourly rate, or maybe you have a friendwho is good at such things. You could even find someone who can teach you how to paint;perhaps there is an adult education facility near you who could help.The work area should have all dust and debris removed and then be thoroughly wetted downto minimise the chance of dust settling into the final finish. Hose the floor and sweep it out.All parts should be supported or suspended in such a way that you can paint them and leavethem to dry (it might be necessary to paint the fuselage separately from the smaller parts ifyou are working in cramped conditions).Ensure that you have plenty of ventilation while painting and that any air being directed overthe work surface is clean air – in our paint booths we use automotive grade air filtration acrossthe inlets to each booth with large extractor fans that vent above the booth, however youshould be able to achieve a reasonable level of filtration by drawing air from openings that areabove ground level and screening them with clean insect screens with muslin or similar openweave cloth placed over them. If using the prevailing breeze you may have to wait for a daywhen the wind is blowing in the right direction before painting, or perhaps you could use anindustrial fan as an extractor fan to draw clean air over the work surface.It bears repeating here that the topcoat must be white – under no circumstances must anyother colour be used, and any coloured trim can only be applied to vertical surfaces: never useany colour other than white on the horizontal surfaces.Finally all surfaces should be wiped over carefully with a new tack cloth.It is not possible to give written instructions regarding painting technique and so all that canbe written has to be this: read the directions from your chosen paint supplier very carefullyand follow them to the letter. Expect to use about 4 litres for the fuselage, 4 litres on the wingsand 3 litres on the remaining parts.Mix your paint and hardener together thoroughly and in the exact ratio given in the paintmanufacturers instructions, clean and lay out your air hoses so that you will not trip over themand make sure that you wear your coveralls and respirator at all times while painting.Take your time, apply the paint in an even pattern and good luck!Once you have finished painting leave the area and keep the ventilation system running for afew hours. Leave the paint to cure undisturbed – read the manufacturers directions forguidance on how long to wait – and resist the temptation to rest anything on the newly paintedsurface for at least a few days as it might make a mark in the still curing paint.Peel the “Fine Line” tape back very carefully from around the windscreen and windows,taking care to peel back along the masked line, which will give you a nice clean edge.Unmask the engine and the door openings, refit the noseleg and nose wheel and remove allother masking. In general peel masking back away from the painted surface.Reassembly will be addressed in the next major section of this manual: Post-Paint.This completes the Painting task.Wednesday, April 7, 2010 184 of 327
Post-Paint>GeneralObjectives of this section:<strong>Jabiru</strong> <strong>J160</strong> Constructors <strong>Manual</strong>This is the beginning of the Post-Paint section of the Constructors <strong>Manual</strong>.Post-Paint>GeneralAt this point you should have a shiny white painted fuselage and a large number of paintedaircraft parts along with boxes of upholstery, wiring and instrumentation in your workshop.The task at hand now is to assemble all of these parts into a complete and flyable aircraft, andthe sequence of assembly can make this process either enjoyable or painful depending on howyou choose to proceed.The suggested sequence that follows is exactly the same as we use in our factory and ingeneral it involves leaving the wings off until the very last, which will save you a lot ofducking and bumps on the head. The wings have been pre-fitted at the end of Pre-Paint soyou know that they will fit correctly, but we suggest that you forego the final fitting until last.That beautiful shiny white paint should be left for at least 5 days to cure before starting onreassembly – fresh 2-pack paint is surprisingly vulnerable to marking until it is fully curedand such marks can be difficult to touch up, so it is far better to let all the painted surfaces sitand cure fully before starting work. Patience will be rewarded in this case.During this paint curing time we suggest that you start by fitting the panel mounted throttle tothe instrument panel housing and assembling and wiring up the instrument panel, all of whichis done out of the aircraft on the workbench.The assembly sequence then is to fit all of the upholstery apart from the seat covers: firewall,console, floor/sides/roof, etc, electrical wiring can then be fitted and terminated, then installall of the controls and the static and pitot systems, brake system and fuel system (all of whichhave all been pre-fitted during Pre-Paint).The instrument panel housing is now fitted, engine control cabling is connected, theinstrument panel is fitted to the housing and the seat covers are fitted.Moving back to the empennage, the elevator and rudder are fitted and the trim system isinstalled, although the ventral fin will be left off until final adjustments are made.Finally the doors and door seals can be fitted and the interior is complete.Now we can move to complete the engine bay and fit the propeller and spinner and fit thecowlings. The front and main wheel spats are also fitted at this time.Now that the fuselage is complete the wings can be assembled (aileron cables, ailerons andflaps) and fitted to the fuselage and the fairings are fitted. This completes <strong>Construction</strong>.Now you are into Testing: rigging checks can be performed and final adjustments can bemade as required. The ventral fin can now be fitted.A weight and balance check can be conducted, then the fuel tank levels can be calibrated andthen interior placards and decals can be affixed.Registration markings and stripes are fitted at this time along with all fairings.A thorough pre-flight checklist must now be completed and the aircraft can be prepared for atest flight.Each of the foregoing tasks will now be described in detail.Wednesday, April 7, 2010 185 of 327
<strong>Jabiru</strong> <strong>J160</strong> Constructors <strong>Manual</strong>Post-Paint>Fuselage>Fit panel mounted throttlePost-Paint>Fuselage>Fit panel mounted throttleObjectives of this task:To fit the panel mounted throttle linkage to the instrument panel housing.Materials required:Resin and flockCard # J4 “Panel Mount Throttle”Bearing blocksInput leversOutput leverCross shaftFit the cross shaft bearing blocksThe throttle cross shaft is used to determine the side-to-side position for the bottom half ofeach bearing block, so the first task is to assemble the cross shaft as shown above.Input leverRear view of the panel showing the bearing blocks in place and the cross shaft ready for assembly.Rod endOutput lever50mmNow, working from the rear of the panel, make amark 50mm in from the bottom of the rear lip oneach side (as shown at left) and position the bottomhalf of each bearing block behind each mark. Sit theassembled cross shaft in each bearing block andmove the bottom half of each bearing block outuntil the cross shaft has no side-to-side movement.Make sure that the cross shaft is evenly spaced infrom each side of the panel, then mark the positionof each bearing block and flock each block in place,using the cross shaft to keep the blocks inalignment. Leave overnight to cure.Next day run a 3/16” drill through each hole in the bearing block and drillthrough the panel housing, then grease the throttle cross shaft, put each bearingblock cap in place and fix it to the panel housing with 3/16” screws, bearingplates (shown at right), washers and Nyloc nuts and tighten the nuts to safety.Too much tension will make the throttle stiff to move, so test the amount offriction as you tighten the nuts.Wednesday, April 7, 2010 186 of 327
<strong>Jabiru</strong> <strong>J160</strong> Constructors <strong>Manual</strong>Post-Paint>Fuselage>Fit panel mounted throttleFit the rod ends to the inside of the input levers with AN3-8A bolts fitted through the inputlevers, then an AN960-416 (3/16”) flat washer, then the rod end followed by an AN960-515(1/4”) flat washer and a Nyloc nut as shown in the photo on the previous page.Fit the input shaft pivot blocksIn this step we will fit the input shaft pivot blocks to the sides of the panel housing.With the cross shaft secured in place, put the panel housing onit‟s back so that the panel opening faces upwards. Screw thethrottle input shafts onto the rod ends on the input levers witha drop of Loctite 242 on the threads and tighten firmly.Temporarily fit the instrument panel to the panel housing withcloth tape, making sure that the throttle input shafts gothrough the correct holes in the instrument panel. Centre eachthrottle input shaft in its hole in the panel by using a smalllength of rubber hose as shown arrowed at right.30mm80mm3/16” holePivotblockPivot blockmount spacer12mm½” holeFront ofpanelFront ofpanelOutside right-hand side of panel housingInside right-hand side of panel housingMark a line on each side of the panel housing along the centreline of each throttle shaft.Remove the instrument panel and set aside. Mark and drill the 3/16” and 1/2” holes as shownin the photo at above left.Mix a small batch of flock and apply to the base of the pivot block mount spacer and then boltthe pivot block mount spacers to each side of the housing with an AN3 bolt through the 3/16”hole as shown in the photos above.Drill 3 x 3/16” holes evenly spaced around the flange of the pivot block mount spacer and fitin place with TLR pop rivets as shown in the photos above. Leave overnight to cure.Cut a length of Bundy tube to fit through the bolt hole in the pivot blocks.Next day slip a throttle stop ring and a pivot block over each throttle input shaft and boltthrough the pivot block and Bundy tube and the pivot block mount spacer with an AN3-17Abolt with a penny washer under the Nyloc nut tighten the nuts to safety.The 1/2” hole will be used later for throttle idle stop adjustment.Wednesday, April 7, 2010 187 of 327
Fit the instrument panel retaining nutsAt this point tape the instrument panel back in place anddrill through the instrument panel mounting holes in thepanel with a 5/32” drill.Remove the panel and fit captive nuts behind each hole –use the captive nut as a jig (a complete captive nutassembly is shown below right) as a jig (shown at right)to drill the rivet holes– thread the screw part-waythrough the captive nut from the back and fit the exposedend of the thread into the hole, then drill the 2 x 3/32”rivet holes for the countersunk rivets.Countersink the rivet holes just enough to make acountersunk 3/32” rivet sit flush and rivet the captivenuts in place and then enlarge the 5/32” holes in thepanel to 3/16” to provide clearance for the screw threads.<strong>Jabiru</strong> <strong>J160</strong> Constructors <strong>Manual</strong>Post-Paint>Fuselage>Fit panel mounted throttleNow the excess lip in the panel housing can be trimmed away around the captive nuts – marka line and trim generally as shown in the photo above.Leave enough of a lip for the panel to sit against, about 10mm, and mark around the captivenuts. Leave the solid section across the bottom of the panel – this will support the Carb Heat,Choke and Cabin Heat knobs later.There may need to be some fine adjustment of the trimmed edge once the instrument panelhas been assembled in the next task, after which the panel housing can be covered with yourselected upholstery fabric.This completes the Post-Paint>Fuselage>Fit panel mounted throttle task.Wednesday, April 7, 2010 188 of 327
Post-Paint>Fuselage>Assemble instrument panelObjectives of this task:<strong>Jabiru</strong> <strong>J160</strong> Constructors <strong>Manual</strong>Post-Paint>Fuselage>Assemble instrument panelTo fit all instruments into the instrument panel, fit all of the electrical wiring and terminate tomulti-pin connectors ready for installation into the instrument panel housing.There are 5 panel options as well as builder variations and so this task will address the fittingof hardware and both analogue and digital instrumentation in general terms and will usephotos of Standard (analogue) and Jumbo (digital) panels to illustrate various aspects of thetask. Refer also to the Post-Paint>Fuselage>Electrical wiring diagrams task.Fitting of the hardware and instrumentation to the panel is not particularly difficult but theactual wiring is a task that requires considerable care and attention to detail.A kit builder can do the wiring provided that he or she is careful and methodical. If you arenot experienced at electrical wiring and the reading of electrical wining diagrams then youmay wish to consider having the wiring of the panel done by a specialist technician, orpossibly a friend or acquaintance may have the necessary skills.Materials and tools required:Card #14 “Option 1 & 2 Hardware” or “Option 3 & 4 Hardware” or “Option 5 Hardware”Card #16 “Electric Flaps” specifically the flap actuating switch and flap switch handleWire stripping and crimping toolsPrepare the work areaYou will need a clean well lit workbench and a piece of foam about the same size as the panelso that the panel can be placed face down without any risk of scratches to the front face of thepanel or the faces of the instruments.All electrical connectors should be close at hand and your heat gun will be needed to shrinkthe coloured tags onto the wiring. All tools should be within easy reach.There will be a lot of packing waste so empty your rubbish bin before starting.Unpack the hardware and fittingsStrip all of the hardware and fittings from the Cards – use a knife to cut around each item andthen peel the plastic shrink-wrap back and away from the item. Be very careful when cuttingthe noise suppression filter out of the wrap: do not cut near or through the wires.Sort all of the items into groups: switches, circuit breakers, wiring, lights, etc.Empty the bag of electrical connectors onto your bench top and sort the items into groups:note that the red female spade connectors are for single wires and the blue ones are for 2wires. Do the same with the screws and fittings bag: select the black screws (2 lengths) andnuts, the silver screws and Nyloc nuts (M3 and M4) and the gold anodised captive nuts. Theremaining items should be put aside for later use when installing the panel into the aircraft.The M3 silver screws and Nyloc nuts will be used for busbar to circuit breaker connections,the M4 silver screws and Nyloc nuts will be used to fix hardware to the panel, while the blackscrews will be used to mount instruments to the panel. The gold anodized captive nuts will beclipped into the analogue instruments as each instrument is being fitted.On factory built aircraft we sandblast and paint the heads of the M4 silver screws satin blackso that they blend into the panel. You may wish to do the same before assembling your panel.Wednesday, April 7, 2010 189 of 327
Fit the hardware to the panel<strong>Jabiru</strong> <strong>J160</strong> Constructors <strong>Manual</strong>Post-Paint>Fuselage>Assemble instrument panelThe panel assembly sequence is: prepare and fit the circuit breakers, then the switches andpanel lights, then the instruments, radio(s), intercom and transponder.The Standard panels have a single long earth busbar while Jumbo panels have 3 earth busbars,1 for the circuit breakers, 1 for the panel lights and 1 for general use.Circuit breakers end of the earth busbarPrepare the circuit breakers and switches earth busbar by filing a 6mm notch on each side ofeach circuit breaker hole in order to clear the circuit breaker attachment clips as shown above.Rear view of the panelPrepare the panel for the circuit breakers by very carefully filing a 6mm wide 45° recess onthe back of the panel at each side of each circuit breaker hole as shown above – this allowsthe circuit breaker attachment clips to seat firmly into the holes. Work carefully and take carenot to mark the front of the panel. File the recess on all circuit breaker holes, even spares.Prepare the 5 and 10 amp circuit breakers only by carefully drilling out the hole in eachbottom spade connector to 3.3mm. This allows the main busbar to be bolted to the connectors.Support the connectors while drilling by placing a piece of plywood between them.Fit the circuit breakers to the panel from the front – check the etched labels on the panel andthe circuit diagram and fit the correct value circuit breaker to each hole. Press each circuitbreaker in until the attachment clips click into place. Standard panel shown above.Wednesday, April 7, 2010 190 of 327
<strong>Jabiru</strong> <strong>J160</strong> Constructors <strong>Manual</strong>Post-Paint>Fuselage>Assemble instrument panelLay the panel face down on a soft surface and fit the earth busbar over the back of the circuitbreakers. Fit the switches though the earth busbar and though the panel. Each switch has 2retaining nuts: one nut will remain behind the panel and be used to tighten the switch in placeand the other nut will be fitted to the front of the switch on the panel face.Each 2-way switch is labelled on one side with the direction of the OFF and ON positions.All 2-way switches follow the convention of UP = ON and DOWN = OFF which means thatfor most switches the machined groove in the threaded barrel of the switches will facedownwards. The Magneto switches will be the opposite, where the DOWN position willconnect the magneto to earth while the UP position will remove the earth and make themagnetos live. Accordingly the magneto switches will have the groove facing upwards.The 3-way flap switch should be fitted with the groove facing downwards.Place all the switches into the panel and tighten the front nuts finger tight, then check thateach nut is flush with the end of the threaded barrel. Adjust the rear nuts to suit.Lay a metal ruler along the bottom flats of the front retaining nuts as shown above and gentlyadjust each nut until all the flats are in line, then use a spanner to tighten the rear nuts firmly.Recheck each switch for alignment and make any final adjustments that may be needed.Drill through the 2 mounting holes in the earth busbar between the circuit breakers and boltthe busbar to the panel with 2 M4 screws and Nyloc nuts (shown circled above). Don‟t tightenthe nut closest to the centre of the panel just yet (shown as the right hand nut above); themaster earth will fit under this later during the wiring process.Wednesday, April 7, 2010 191 of 327
<strong>Jabiru</strong> <strong>J160</strong> Constructors <strong>Manual</strong>Post-Paint>Fuselage>Assemble instrument panelFit the LED lights through to the panel and busbar. The green light is the Master light; the restwill be red lights. The connectors are labelled [+] and [-] – align all the [+] connectors to facein the same direction. Tighten the retaining nuts firmly. Fit the Electric Turn Coordinator(ETC) OFF/ON switch near the instrument.Fit the Starter button and the keyed Master switch if using one, tighten using pliers.The earth busbar(s) have earthing tags that must now be bent up 90° - use a screwdriver andpliers to bend each tag up, circled in photo below. These tags will be used as earth terminals.Bolt the main busbar across the lower side of the bottom contacts on the 5 and 10 amp circuitbreakers only using the M3 silver screws and Nyloc nuts as shown above. Tighten firmlyonly: these screws and nuts are very small so take care not to over-tighten them.Note that the main busbar does not connect to the Master 15 amp circuit breaker.Fit the black “U” shaped safety bracket between the Mag switches.Now the Avionics busbar can be fitted.Standard panelDigital panelFor a Standard panel the avionics busbar is located behind the “No Smoking” label above theengine instrumentation, see photo at left above – hold the busbar against the front of the paneland carefully mark and drill through the hole in each end of the busbar, first positioning thebusbar so that the screw holes will not obscure the labelling.For a Jumbo panel the avionics busbar will be located vertically to the right of the analogueinstruments as shown in the photo above right.Wednesday, April 7, 2010 192 of 327
<strong>Jabiru</strong> <strong>J160</strong> Constructors <strong>Manual</strong>Post-Paint>Fuselage>Assemble instrument panelThere are 2 nylon standoffs in the hardware pack – these must be used to isolate the avionicsbusbar from the panel itself, as the panel will be earthed. It will be necessary to countersinkthe screw holes at each end of the busbar to allow the screws to thread into the nylon standoff.Mount the avionics busbar to the panel and tighten the mounting screws firmly.Unpack the instruments and radiosEach instrument box will have a <strong>Jabiru</strong> stock number written on the top in marker pen. Takeeach instrument out of its box, cut the tagged end of the box off and discard the box. Write the<strong>Jabiru</strong> stock number on the tagged end and put it aside – this information along with all otherinstrument serial numbers will be entered on the Aircraft Identification form in this <strong>Manual</strong>.Discard any “O” rings from around the instruments: these will not be required.The Microair VHF radio and Transponder can be removed from their boxes at this time. Eachunit is wrapped in a silver electrostatic bag. Do not cut the bag open at the end, but rather cutthe bag open along the side of the bag and remove the unit. Cutting across the end of thesilver bag risks cutting into the face of the unit and must be avoided at all costs.Unpack the Microair VHF radio/intercom and Transponder wiring harnesses.If fitting a GPS unit you will need the appropriate mounting bracket and wiring harness.If the GPS is a Garmin product the mountingbracket must be removed from the end of theclamp assembly and screwed to the <strong>Jabiru</strong>panel mount bracket as shown at right.To mount the Garmin 296/495 in a Standardpanel, refer to the photo at right for drillingdimensions:If the GPS is an AvMap unit the suppliedpanel mount bracket will be used.If the GPS is any other brand or model referto the manufacturers literature for mountinginstructions.50mm118mm180mm122mm55mmWednesday, April 7, 2010 193 of 327
Fit analogue instrumentation<strong>Jabiru</strong> <strong>J160</strong> Constructors <strong>Manual</strong>Post-Paint>Fuselage>Assemble instrument panelAnalogue instrumentation (ASI, ALT, VSI, ETC, engine instruments) will require eachindividual wire to be connected to the back of each instrument. There are 3 methods of fittinganalogue instruments: screws though the panel and into the instrument (flightinstrumentation), or retaining brackets or retaining screw rings (engine instrumentation).The photo above shows the analogue instrumentation for a Standard panel. Note the GarminGPS bracket above the circuit breakers. The angle of the bracket faces the GPS unit towardsthe pilot: in the photo above the bracket has been bent to face the GPS slightly upwards too.When fitting the flight instruments the gold anodized captive nuts are first inserted into therear of the screw holes in the instrument and then held in place with a finger while the screwis fitted from the front, through the panel and the instrument, and tightened.There is not a lot of room around the instruments so the order of fitting is important.Generally the approach is to start from the centre of the panel with the engine instruments:CHT, Oil pressure and temperature and Voltmeter, and then move to the Tacho and then theVSI and ETC.At this time the 2 points at the bottom of the panel should be placed on a known level surfaceand the balance ball (circled above) should be checked to see if it is in the centre.If it is not, remove the instrument and enlarge the mounting holes slightly (to about 3/16”)then refit the instrument and rotate it until the balance ball sits correctly when the panel isheld level then tighten the screws.Now the Altimeter and ASI can be fitted along with the wing tank fuel level digital gauges.Wednesday, April 7, 2010 194 of 327
Fit digital instrumentation<strong>Jabiru</strong> <strong>J160</strong> Constructors <strong>Manual</strong>Post-Paint>Fuselage>Assemble instrument panelDigital instrumentation (EFIS, EMS, radio(s), transponder, intercom, GPS) will usually havea pre-wired harness and a multi-pin connector fitting at the rear of the instrument.The Dynon brand EFIS displays are supplied with mounting hardware and the fitting methodis to fit the instrument through the panel and lay the panel face down, then place the mountingbracket over the instrument and carefully mark the position of the mounting holes on thepanel with a sharp drill. Remove the instrument, drill the holes through and fix the mountingbracket into place with M4 screws and Nyloc nuts and then fit the instrument into the mount.D100 EFISMountingbracketsD10 EMSThe photo above shows a Dynon D100 EFIS (top) and a D10 EMS (bottom) fitted to a Jumbopanel. Note the mounting brackets (arrowed) that attach each instrument to the panel.FinishingFor both the Standard and Jumbo panels you can now fit the intercom unit and faceplate orsticker, the VHF radio(s) and the transponder to the panel. Each unit is retained by screws thatare supplied with the unit.Any blank spaces remaining in the panel can be covered with the supplied plate(s) or plugs.Wednesday, April 7, 2010 195 of 327
Wiring standards<strong>Jabiru</strong> <strong>J160</strong> Constructors <strong>Manual</strong>Post-Paint>Fuselage>Assemble instrument panelBefore you start wiring the panel we suggest that you follow a few wiring standards:All wires and connectors will be identified by a colour coded heat-shrink tag or label,Wiring insulation will be stripped back 4mm for all connectors,All wires will be crimped into the appropriate connectors using a crimping tool,No more than 2 wires will be crimped into any one connector.Heat shrink tubing should be cut into short lengths (about 2 or 3mm) and used for taggingeach electrical connector or wire in the following manner: Red = positiveBlack = negative (earth)White = signalCut about 20 of each colour to start with and cut more as needed.Put a strip of masking tape along the bottom rear of the panel under the switches and circuitbreakers and label each one – this will save you having to keep lifting the panel to read thelabels on the front and that will make the wiring a little bit easier.Wiring the panelThis is a one-wire-at-a-time process that cannot be rushed.The objective is to use lengths of wire that can later be zip-tied together to form a tidy wiringloom. The before and after photos below show how factory wiring is arranged into a loom:From this:(We use precutwirelengths forour standardpanel layouts)To this:Wednesday, April 7, 2010 196 of 327
<strong>Jabiru</strong> <strong>J160</strong> Constructors <strong>Manual</strong>Post-Paint>Fuselage>Assemble instrument panelThe process is to put one wire on at a time, soif you were to start with the wire from theAvionics circuit breaker to the Avionicsswitch you would strip 4mm of insulation offone end of the wire and crimp a red femalespade connector to it then heat shrink a redtag to the connector. Push that connector ontothe circuit breaker terminal and measure outenough wire to reach the Avionics switchwhile allowing a bit of height above the panelas shown in the photo at right. Cut the wire,strip 4mm of insulation off, slip another redtag on and crimp another red female spade connector in place and heat shrink the tag on.With that wire fitted in place you can then square off the wire by bending it and then fit thenext wire so that it would end up being the same height above the panel and then keep addingone wire at a time until the panel is fully wired, then you can use zip ties to tidy up the wiringinto a loom as shown in the bottom photo on the previous page.Note that there are 2 main wire sizes: 16 gauge, which is used for most of the wiring; and 10gauge, which is used for the main battery wiring, all shown on the electrical wiring diagrams.Some wires will be common, such as the power supply to the engine instruments. In thesecases the suggested approach is to loop from instrument to instrument by crimping 2 wiresinto each blue connector. Do not crimp more than 2 wires into a single connector or you runthe risk of having some of the wires pull out of the connector, so stay with 2 wires maximum.Quite a lot of wires will go to other parts of the aircraft, and these wires are terminated intoone of five multi-pin connectors for ease of installation and maintenance. If one end of a wirewill go to a multi-pin plug then you must label that end clearly (use masking tape for thelabel) before going to the next wire. If you do not label it you risk having a real problem later.Multi-pin connectors are supplied in 2, 4, 6 and 8 pin types depending on the instrumentationoptions that you have ordered with your kit. In all cases the pins are standard male and femalespade connectors, just the same as the normal wiring connectors except without the insulation,and each connector will be crimped on to the wire in the same manner. The connectors willthen be pushed into the respective half of a connector body until they click into place.With the male spade connectors (that fit intothe female connector body) care must be takenthat the stripped end of the wire does notextend beyond the end of the crimp area of theconnector, otherwise the connector will not beable to clip into place in the connector body.The photo at right shows the wrong way andthe right way to crimp a wire into a male spadeconnector. Note that in the “Wrong” examplethe bare wire has been pushed too far into thecrimp area of the connector, as indicated bythe red arrow, while in the “Right” examplethe wire stops at the end of the crimp area ofthe connector, as indicated by the green arrow.WrongRightWednesday, April 7, 2010 197 of 327
Fitting the multi-pin connectors<strong>Jabiru</strong> <strong>J160</strong> Constructors <strong>Manual</strong>Post-Paint>Fuselage>Assemble instrument panelWhat follows is the pin layout that is used in our factories. Some pins may not be used onyour particular panel in which case simply leave that pin unwired, and the connector layouthere will be referred to again in the Post-Paint>Fuselage>Install electrical wiring task.Each connector is assigned a group of wires that go to a similar physical location.The connector pairs should be marked from A, B, C, D or E as shown on the next page, and amark should be made on the corner beside pin #1 for each connector. If you have more than 1QK6 connector you should plan to fit 1 male and 1 female QK6 connector to the panel tolessen the possibility of plugging the wrong pair of QK6‟s together.The diagram below shows the pin numbering convention for each of the 4 connector types:Wednesday, April 7, 2010 198 of 327
<strong>Jabiru</strong> <strong>J160</strong> Constructors <strong>Manual</strong>Post-Paint>Fuselage>Assemble instrument panelGroup the wires for each plug together and trim each group to an even length, then strip 4mmfrom the insulation of each wire and fit the appropriate connector type to each wire: malespade connectors for a female connector body and female spade connectors for a maleconnector body. References to male or female will mean the connector body.Hold the connector body in the correct orientation and insert each spade connector from therear of the connector body: push into place until a solid click is felt – this indicates that thespade connector is correctly seated in the connector body.If a spade connector is not seated correctly it may be forced back and out of the connectorbody when the 2 halves are joined, so double check that each spade connector is fully seated.The connector pin assignment shown below will be referred to again when the other side ofeach connector is fitted in the Post-Paint>Fuselage>Install electrical wiring task:Connector A: Engine instrumentation, QK8 connector, 16 gauge wire1 CHT positive 5 CHT negative2 Tacho positive 6 Tacho negative3 Left MAG 7 Right MAG4 Oil temperature 8 Oil pressureConnector B: Electrical, QK6, 16 gauge wire1 Starter 4 Regulator to main busbar2 Starter pilot light 5 EFIS negative3 Charge pilot light 6 Fuel pressureConnector C: Main power, QL2 connector, 10 gauge wireNote the use of the heavier 10 gauge wire to this connector.1 Battery positive 2 Battery negative (earth)Connector D: Wings 1, QK6 (or QK4 if no landing light) connector, 16 gauge wire1 Fuel pump positive 4 Fuel pump negative (earth)2 Flaps UP 5 Flaps DOWN3 Landing light positive 6 Landing light negativeConnector E: Wings 2, QK6 connector, 16 gauge wire1 Strobe positive 4 Strobe negative2 Right wing fuel gauge positive 5 Right wing fuel gauge negative3 Left wing fuel gauge positive 6 Left wing fuel gauge negativeYou will have used one half of each connector by now. Because you will not be using theother halves until the Post-Paint>Fuselage>Install electrical wiring task, store the remainingconnector parts in the plastic boxes that they came in until you need them. This simple actionwill make your life much easier when wiring the rest of the aircraft so do it now: put all theboxes into a plastic bag, label it clearly and put it aside where you can easily find it later.Fit the noise suppression filter into the power wire from the Avionics busbar to the VHF radio(use male and female spade connectors) and zip tie the filter to the loom.Wednesday, April 7, 2010 199 of 327
Fit digital wiring harnesses<strong>Jabiru</strong> <strong>J160</strong> Constructors <strong>Manual</strong>Post-Paint>Fuselage>Assemble instrument panelThe digital wiring harnesses can now be fitted to the plugs at the rear of the digitalinstruments and the VHF radio, transponder and intercom. Tighten the plug screws by hand.There is an MP3 player input socket on the intercom harness and this may now be fitted to thepanel if desired. Select a location on the panel where the cable to the MP3 player will notobscure any instruments and drill a 6mm hole through the panel and mount the socket.Use zip ties to hold the digital harnesses to the wiring loom.Tube up to the pressure instrumentsFit the nylon fittings to the rear of the pressure instruments – decide first where the statictubing will run and use elbows and tees to suit. Take care not to cross-thread the nylonfittings. Run the static tubing as required and leave it about 200mm below the bottom of thepanel. Run the pitot tubing from the ASI and trim to the same length. Mark the pitot tubingclearly so that it will not be mistaken for the static line.Zip tie the pressure tubes lightly (do not crush them) to the wiring loom.StandardJumboThis completes the Post-Paint>Fuselage>Assemble instrument panel task.Wednesday, April 7, 2010 200 of 327
Post-Paint>Fuselage>Electrical wiring diagrams<strong>Jabiru</strong> <strong>J160</strong> Constructors <strong>Manual</strong>Post-Paint>Fuselage>Electrical wiring diagramsWednesday, April 7, 2010 201 of 327
<strong>Jabiru</strong> <strong>J160</strong> Constructors <strong>Manual</strong>Post-Paint>Fuselage>Electrical wiring diagramsWednesday, April 7, 2010 202 of 327
<strong>Jabiru</strong> <strong>J160</strong> Constructors <strong>Manual</strong>Post-Paint>Fuselage>Electrical wiring diagramsWednesday, April 7, 2010 203 of 327
<strong>Jabiru</strong> <strong>J160</strong> Constructors <strong>Manual</strong>Post-Paint>Fuselage>Electrical wiring diagramsWednesday, April 7, 2010 204 of 327
<strong>Jabiru</strong> <strong>J160</strong> Constructors <strong>Manual</strong>Post-Paint>Fuselage>Electrical wiring diagramsWednesday, April 7, 2010 205 of 327
<strong>Jabiru</strong> <strong>J160</strong> Constructors <strong>Manual</strong>Post-Paint>Fuselage>Electrical wiring diagramsThis completes the Post-Paint>Fuselage>Electrical wiring diagrams task.Wednesday, April 7, 2010 206 of 327
Post-Paint>Fuselage>Interior>Fit upholstery 1Objectives of this task:To fit all of the stage 1 upholstery into the aircraft.<strong>Jabiru</strong> <strong>J160</strong> Constructors <strong>Manual</strong>Post-Paint>Fuselage>Interior>Fit upholstery 1This task assumes that you will be using the <strong>Jabiru</strong> upholstery kit. If you are using the <strong>Jabiru</strong>kit it contains extremely detailed instructions, however you may want to use your ownmaterials in which case this task can be used for more general guidance.Materials required:<strong>Jabiru</strong> upholstery kit or equivalentHigh heat contact adhesiveAdhesive thinners and/or Acetone (for cleanup)Dry fitStart by cleaning your workshop floor and then lay out the contents of your upholstery kit andwork out what panel goes where. In general the unedged panels are fitted before the edgedpanels, so the unedged panels will be for the larger areas: sidewalls and roof coverings and thelike, while the edged panels will be the finishing panels where the edges will be seen.Take your time and test fit each panel – it is much easier to do this now without adhesive!Consider labelling the location of each panel with a sticky paper tag on the good side.AdhesiveEach panel will be glued in place with contact adhesive – the back of the panel and thesurface to which it will be attached are both coated and the adhesive is allowed to dry, thenwhen both surfaces are pushed together they are there to stay. Needless to say you want to bereally sure of your positioning before pushing the surfaces together.In our factory we spray the adhesive onto the back of the fabric and use a brush to apply it tothe fibreglass but you can brush both surfaces. Do not apply too much adhesive – if you do itcan bleed though the fabric. Just a thin coat is quite enough.Sequence1161. Console – fit the tailored console cover, taking care to align the seams correctly. Fitalong the top first, then carefully roll the cover down the console and fit along the sides,working on one side at a time, until the cover is fitted.Wednesday, April 7, 2010 207 of 327
<strong>Jabiru</strong> <strong>J160</strong> Constructors <strong>Manual</strong>Post-Paint>Fuselage>Interior>Fit upholstery 1332446 612. Firewall – glue the 10mm foam layer to the firewall and then glue the fabric to thefoam. Cut around the ribs as required. Lower firewall – fit the fabric down and backalong the floor slightly and also over the rudder pedal mounts.3. Windscreen pillars and firewall surrounds. These areas are covered by several smallpieces that each cover a rib or brace. Note: the fuel tank wiring should be fitted inside thefront pillars before covering them. Refer to the Install electrical wiring task.4. Front sidewalls – cut out the vent openings after the panel has been fixed in place.75655105. Crossbeam (front and back) and middle sidewalls behind the front doors.6. Seat sides and base up to the bottom of the door sills.7. Seat backs – cut around the aileron cable brackets (circled in yellow) before fixing thepanel in place.Wednesday, April 7, 2010 208 of 327
<strong>Jabiru</strong> <strong>J160</strong> Constructors <strong>Manual</strong>Post-Paint>Fuselage>Interior>Fit upholstery 18a8b8a8. Front hood lining/roof: main panels (a) then the longitudinal rib (b)9. Rear hood lining/roof as for the front (not applicable to <strong>J160</strong>/J170)10. Rear sidewalls (not applicable to <strong>J160</strong>/J170)11. Door panels12. Door pockets – attached with snap fasteners and Velcro13. Instrument panel housing14. Cable covers and all other small trim items.Clean up any excess glue with adhesive thinners or Acetone. Do not get any adhesive thinnersor Acetone on vinyl or leather.This completes the Post-Paint>Fuselage>Interior>Fit upholstery 1 task.Wednesday, April 7, 2010 209 of 327
Post-Paint>Fuselage>Install electrical wiringObjectives of this task:<strong>Jabiru</strong> <strong>J160</strong> Constructors <strong>Manual</strong>Post-Paint>Fuselage>Install electrical wiringTo install all of the electrical wiring in the aircraft and connect to the multi-pin plugs.Each wire will need to be cut from the supplied coils of aircraft grade wire. The lengthrequired will vary depending on how you choose to route the wire and so it is difficult to giveany exact lengths, but generally you should allow a little extra length to be on the safe side.Study the photos in this task to see how we route our factory wiring before starting work.Materials required:Wiring Kit, as well as both the Electrical wiring diagrams and Assemble instrument paneltasks for reference and for pin assignment for the multi pin connectors.PreparationBefore heading out to the aircraft there are a couple of things that need to be prepared:The 2 tachometer (tacho) sender unit wires willneed to be soldered to 2 x 700mm lengths of 16gauge wire as shown at right.Because soldering hardens the wire there is arisk of the wire breaking just beyond the solderjoint, so the wires are joined by twisting the bareends of the tacho wire around the bare ends ofthe 16g wire and soldering them together andthen doubling the thinner wires back andcovering each, and then both, wires with heatshrink tubing, all as shown below.This method provides a much safer joint thatallows the wire to flex without the danger ofbreaking near the solder joint. Label each whitewire as being positive (red) or negative (black).The CHT sender plug halves can now beconnected and then the connector halves can befixed together with 2 zip ties as shown at right.Cut off the ends of the zip ties.Wednesday, April 7, 2010 210 of 327
Engine wiring<strong>Jabiru</strong> <strong>J160</strong> Constructors <strong>Manual</strong>Post-Paint>Fuselage>Install electrical wiringAll wires will need to be long enough to route from the respective sources, around the enginein the manner shown, and either to a connection point on the firewall in some cases or throughthe firewall plus about 300mm for connection to a multi-pin plug for the majority of cases.All wires to multi-pin plugs must be labeled (use masking tape) to avoid later confusion.Refer to the Electrical wiring diagrams task (found immediately before this task) to see whereeach wire will be connected to and plan the lengths accordingly.Careful consideration must be given to the routing of wires around the engine. All wiring inthe engine compartment must be kept well away from all hot and/or moving parts.The supplied white wire is all aircraft grade and has high temperature insulation but care muststill be taken to route away from obvious heat sources such as the exhaust system.Wire the oil temperature and pressure sendersThese senders are located on the left front of the engine and the single wire from each unit isrouted back under the cylinders to the rear of the engine and zip tied to the pushrod tubes.Strip 4mm of insulation from each wire and crimp a redfemale spade connector and a black heat shrink tag to each.You will need to cut the insulation from the oil temperatureconnector as shown at right to allow it to fit over the „button‟pin on the oil temperature sender. Note the black heat shrinktag – this sender unit measures the resistance to earth.Connect to the oil temperature sender unit, which is locatedjust above the drain plug on the sump. Crimp over the end of the connector when it has beenfitted to prevent it from slipping off the sender unit. Label each wire.Fit the other connector to the oil pressure sender unit, which is located above the oil filter.Note the black heat shrink tag – this sender unit also measures the resistance to earth.Route both wires back under the cylinders and zip tie them to the pushrod tubes – you willneed to bend the zip ties into a “U” shape first in order to fit them around the pushrod tubes.In the photos above you can see the 2 wires running back under the pushrod tubes and then upbehind the rear cylinder. You can also see the earth wire from the left magneto (with a blacktag again because it is used to earth the magneto to turn it off). These wires will all need to belong enough to be routed around the rear of the engine and 300mm into the cabin.Wednesday, April 7, 2010 211 of 327
Fit the tacho sender unitFor this step you will need to rotate theengine, which may cause 1 or 2 of the sealingplugs to pop off of the exhaust pipes andpossibly some preserving oil may drip out, soplace some rag under the engine until thisstep is complete. You will require a lever toturn the engine – in our factory we use a toolthat fits onto the propeller flange.Rotate the engine until a tacho timing tag canbe seen under the tacho sender mount (thethreaded fitting at the left rear of the engine)- refer to the photo at right for detail.Remove one lock nut from the sender unitand screw it into the fitting, then carefullyscrew it down until it just touches the timingtag. Unscrew the sender unit one full turn andtighten the lock nut finger tight.<strong>Jabiru</strong> <strong>J160</strong> Constructors <strong>Manual</strong>Post-Paint>Fuselage>Install electrical wiringNow rotate the engine one half of a turn until the other timing tag is under the sender unit andscrew the sender down until it just touches that tag, which should be one full turn. Back thesender unit out one half of one turn and firmly but carefully tighten the locking nut.Wire the magnetosTacho sendermountTacho timingtag (on theflywheel)Front ofengineFeed a plain length of 16 gauge wire through the hole in the side of each magneto, strip 4mmof insulation off and crimp a red female spade connector to the wire with a black heat shrinktag. A black tag is used because the magneto wire is used to earth the magneto to turn it off.Left magnetoRight magnetoFit the CHT (Cylinder Head Temperature) plug and wiringZip tie the CHT connecting plug to the front of the left hand top engine mount with the hightemperature wire facing back. The sensor will be fitted to the left rear spark plug later in thistask. The main photo on the next page shows the CHT connecting plug fitted.Wednesday, April 7, 2010 212 of 327
<strong>Jabiru</strong> <strong>J160</strong> Constructors <strong>Manual</strong>Post-Paint>Fuselage>Install electrical wiringEngine wiring routingCut the zip ties that hold the alternator wiresto the engine and bend the wires to the right.At this stage you will have wires at the topleft rear of the engine for oil pressure andtemperature, left magneto, CHT and tacho.Group these wires and zip tie them as shownat right, so you will have 3 white 16 gaugewires (oil pressure, oil temperature, leftmagneto) and 2 pairs of red and black wires(CHT and tacho).CHT plugTacho senderRightmagnetowireLeftmagnetowireAlternator wiresNow run the wires across the machined aluminum beam behind the flywheel as shown above.Add the alternator wire pair into the group as shown, but before you do, twist the wire pairseveral times so that the there are no lengths where the wire pair is straight– the full length ofthe alternator wires should be twisted. This will help to minimize inducing noise into thewiring harness from the alternator.From here the wiring bundle can be routed up to the top right engine mount and then backalong the mount tube to the firewall. Include the right magneto wire in the wiring bundle atthis point.The 16 gauge wires for oil pressure, oil temperature, left and right magnetos, CHT and Tachocan all be passed through the right hand cable collar in the firewall and 300mm left free insidethe cabin for later fitting to Connector A.If you are using the optional fuel pressure sensor it can be connected at this time and the wiresincluded in the wiring bundle for later fitting to Connector B.The 2 wires from the alternator can be routed along the firewall and down to the regulatorplug for connection in the next step.Don‟t zip tie the wiring bundle to the engine mount just yet - there are some more wires to beadded to the bundle over the next few steps.Wednesday, April 7, 2010 213 of 327
Wire the regulator connector<strong>Jabiru</strong> <strong>J160</strong> Constructors <strong>Manual</strong>Post-Paint>Fuselage>Install electrical wiringPower from the alternator will go to the regulator through the regulator connector, and powerfrom the regulator will go to the positive and negative sides of the battery as well as the powerto the main bus and to the optional low voltage warning light, also through the regulatorconnector.Crimp a male spade connector to each of 2 x 1m lengths of 16 gauge wire and plug them intothe female connectors from the alternator. Cover each connector with heat shrink tubing.Route the wires into the wiring bundle that runs along the top right-hand engine mount,around the firewall and down to the regulator connector.Alternator 16g - Battery 10g Alternator 16gLow voltagelight 16g+ Main bus 16g+ Battery 10gWire the male half of a QK6 connector as shown above – note that the positive and negativewires to the battery are both 10 gauge (heavier) wire, shown above as light blue, while the restare all 16 gauge (lighter) wire, shown above as purple.The colour coding of the pins in the diagram above indicates the colour of the wires comingfrom the regulator to the connector.Route the 10 gauge positive wire from the red pin to the front post on the starter solenoid.Route the 10 gauge negative wire from the black pin to the earth terminal on the firewall.Route the 16 gauge wires from the yellow pin to the main bus and from the green pin to theoptional low voltage warning light - pass both wires through the right hand cable collar in thefirewall and leave 300mm free inside the cabin for later fitting to Connector B. Carefully labeleach wire with masking tape.Once you have allowed enough wire length to enable routing in a tidy manner, strip 4mmfrom the end of each wire, carefully crimp a female spade connector to each wire, and then fiteach connector carefully into the connector housing.Refer to the Engine bay wiring routing step later in this task for an example of how to routethe wires from the Regulator plug to the battery and the cable collar.Wednesday, April 7, 2010 214 of 327
<strong>Jabiru</strong> <strong>J160</strong> Constructors <strong>Manual</strong>Post-Paint>Fuselage>Install electrical wiringWire the starter solenoidFrom batterypositive: heavyorange cableFrontTo main busbar 15A circuitbreaker 10gFrom regulatorplug 10gTo starterbutton 16gTo starter pilotlight 16gTo startermotor: heavyorange cableF I R E W A L LRoute the short heavy orange cable from the positive side of the battery to the front post of thestarter solenoid. Fit an 8mm yellow ring terminal and a red heat shrink tag to each of 2 lengthsof 10 gauge wire (shown above as light blue) and route one wire to the red pin in the regulatorplug and the other wire from the front post to the main bus 15A circuit breaker: pass the wirethrough the right hand cable collar in the firewall and leave 300mm free inside the cabin forfitting to Connector C.Fit a red female spade connector and a red heat shrink tag to 2 x 1m lengths of 16 gauge wire(shown above as purple) and route one wire from the left-hand middle connector on thesolenoid to the starter button and one wire from the right-hand middle connector to the starterpilot light - pass both wires through the right hand cable collar in the firewall and leave300mm free inside the cabin for fitting to Connector B.The large and small spade terminals on the front post of the starter solenoid are not used.Connect the starter motorEarth the starter motor by fitting the long heavy orange cable under the top bolt that holds thefront of the starter motor housing in place – this provides maximum current to the starter unit.Loosen both starter bolts slightly and then remove the top bolt and fit the cable under it.Apply a drop of Loctite and retighten both bolts firmly. Route both orange cables back alongthe top right engine mount strut.The positive cable (the one that goes inside the starter motor) can be fitted to the rear post ofthe starter solenoid and the earth cable can be fitted to the negative side of the battery.Wire the firewall earth tagThe following 3 x 10 gauge wires are fitted to yellow 6mm ring terminals with black heatshrink tags and connected to the firewall earth tag with a single AN3-5A bolt and Nyloc nut:1. The negative wire from the black pin in the regulator plug;2. The negative wire to the earth bus - pass this wire through the right hand cable collarin the firewall and leave 300mm free inside the cabin for later fitting to Connector C;3. The negative wire to the negative post of the battery. Do not connect this wire to thebattery at this time.Wednesday, April 7, 2010 215 of 327
Engine bay wiring routing<strong>Jabiru</strong> <strong>J160</strong> Constructors <strong>Manual</strong>Post-Paint>Fuselage>Install electrical wiringThe engine wiring bundle can now be zip tied to the right top engine mount and then thestarter cables and the breather tube can be zip tied over top of those wires. Take some time toroute all of the wires neatly and zip tie any loose wires together. When all wires have been ziptied you can trim off the excess ends of the zip ties.SolenoidEarth tagCablecollarRegulatorconnectorFuelpressure(optional)RegulatorIn the photos above you can see the general arrangement of the engine bay wiring.Wire the strobes (optional)Fit the strobe unit to the left side step on the firewall and feed all of the strobe wiring throughthe left-hand cable collar in the firewall – this separates the high voltage strobe wiring fromthe low voltage signal wiring that passes through the right hand cable collar.Connect the strobe power supply wiring to Connector E and connect the strobe output wiringto the strobe wires that were fitted in the Pre-Paint>Fuselage>Fit control cables and linestask. Fit the strobe unit to the top of the fin and connect the wiring.Wingtip strobe units will be connected after the wings have been fitted to the fuselage.Seal the cable collarsOnce all wiring has been routed through the 2 cable collars, each collar must be sealed withautomotive exhaust sealer putty, which is available from any auto supply shop.Push the putty into the cable collars from the firewall side until it can be seen inside the cabinand then smooth both sides off with your thumb. This will provide a fire resistant plug sealthat will delay an engine fire from reaching the cabin through the cable collars.Connect the high-tension leads and CHT sensorRemove the ram air ducts from the cylinder heads. Remove the left rear spark plug and fit theCHT sensor under the plug. Refit the spark plug.The high-tension leads are zip tied in pairs and grouped for each side of the engine, and thelengths of the leads are such that each pair will only fit properly to one cylinder. Test fit theleads with the ducts off, and then feed them through the rubber grommet in the rear of eachduct and push the spark plug leads firmly onto the spark plugs. Replace the ram air ducts.Wednesday, April 7, 2010 216 of 327
Wire the fuel pump<strong>Jabiru</strong> <strong>J160</strong> Constructors <strong>Manual</strong>Post-Paint>Fuselage>Install electrical wiringTwo fuel pump wires were fitted through the console to the fuel pump in the Pre-Paint>Fuselage>Fit control cables and lines task: one wire will be the positive and one wire will bethe negative or earth to the fuel pump. Determine which wire will be the positive wire andwhich will be negative or earth wire and label each end of each wire with masking tape. Theforward or firewall end of both wires will be fitted to Connector D.Route the firewall end of both wires so that there is enough length for Connector D and thentrim the rear ends of both wires so that they end beside the fuel pump.Fit a red female spade connector and a red heat shrink tag to the positive wire and a red malespade connector and a red heat shrink tag to the red wire from the fuel pump. Connect thepositive wire to the red wire from the fuel pump.Crimp one 4mm ring terminal with a black heat shrink tag to each of the following wires:1. The negative or earth wire from Connector D;2. The black wire from the fuel pump;3. A 100mm length of 16 gauge wire – this will earth the header tank quick drain:4. 2 lengths of 16 gauge wire 100mm longer that the fuel lines – these wires will earththe wing tank quick drains. Crimp both wires into the one ring terminal.Drill a 4mm hole through the floor near the fuel pump and fit a 4mm countersunk screw witha Tinnerman washer from under the fuselage, then place all 4 ring terminals over the screwand secure them with an M4 Nyloc nut and washer. Tighten firmly. This will ensure a securefixed earth point for the entire fuel system that cannot accidentally become disconnected.Feed the 100mm length of 16 gauge wireunder the header tank, out of the quick drainhole and through a small hole in the side ofthe quick drain fairing, trim to length and fita 4mm ring terminal with a black heat shrinktag and fix to the side of the quick drainfairing with a stainless steel self tappingscrew as shown at right.Run a length of twisted lock wire from the quick drain fitting to the same point, fit a 4mmring terminal with a black heat shrink tag and connect it under the same self tapping screw asshown above. This will lock the quick drain fitting in place and also earth the header tank.Run the wing tank earth wires along the outside of the protective sheath with the fuel lines tothe wing tanks and zip tie the wires in place. These wires will be connected when the wingshave been fitted. Label both wires [Earth] with masking tape.Wire the flaps and optional landing lightsRun a pair of 16 gauge wires from the firewall through the console, along the back of the frontseats and up behind the door to the flap motor. Fit male and female spade connectors toconnect to the flap motor.Landing light wires follow the same path through the console and are then routed out throughthe floor and up inside the left hand wing strut.Label each pair of wires for later fitting to Connector D.Wednesday, April 7, 2010 217 of 327
Fuel gauge wiring from the wing tank fuel gauges<strong>Jabiru</strong> <strong>J160</strong> Constructors <strong>Manual</strong>Post-Paint>Fuselage>Install electrical wiringBefore completing the upholstery around the windscreen the 2 wires from the wing tank fuelgauges must be routed down the windscreen pillars.Drill a 5mm (arrowed above) hole slightly infront of the forward wing mounting lug oneach side and feed 2 wires out of the hole andback towards the rear wing mounting lug asshown above and tape them to the fuselage.Centre cowlfastenerRun the inside portion of the wires down thewindscreen pillar, holding them in place with short lengths of cloth tape as shown above right.The wires from both sides need to meet slightly to the right of centre as shown above left.Leave the wires hanging down about 300mm and make sure that the wires from each side areclearly labeled [Left] and [Right] – use masking tape to label them. There is no polarityrequirement for these wires. These wires will be fitted to Connector E.Note that these wires are quite separate from the wing tank earth wires that were fitted earlier.The upholstery strips can now be glued into place to cover the wires – refer to the Post-Paint>Fuselage>Upholstery 1 task for detail. In the factory we place these wires before theupholstery is fitted, which is shown in the photos above, however you could equally install allof the upholstery apart from the windscreen strips and then fit them once the wires have beenplaced.The top ends of these wires will be connected to the wing tank fuel gauges when the wingshave been fitted to the fuselage. Leave them taped to the fuselage until then.Wednesday, April 7, 2010 218 of 327
Connect the multi pin connectors<strong>Jabiru</strong> <strong>J160</strong> Constructors <strong>Manual</strong>Post-Paint>Fuselage>Install electrical wiringEach wire inside the cabin has been labeled with masking tape as it was fitted in order toclearly identify where it came from. If any wires have not been labeled then use a circuittester to trace the wire to its source and then label it clearly.Use the multi pin connector diagrams from the Assemble instrument panel task to sort andgroup the wires for each connector together. Trim each group to an even length, then strip4mm from the insulation of each wire and fit the appropriate connector type to each wire:male spade connectors for a female connector body and female spade connectors for a maleconnector body.The connector bodies that will be used are the matching halves of the connectors that wereused in the Assemble instrument panel task – these were store at the completion of that task.Use the connector diagrams and pin numbering assignments from the Assemble instrumentpanel task to very carefully fit each spade connector into the connector body until it clicksinto place in the same manner as you did in the Assemble instrument panel task.Take your time with this step – the wiring to each pin must be absolutely correct!RF SuppressorBeforeAfterNotice the clear labeling of each connector in the photo above right.Clip a ferrite RF Suppressor (shown opened at right)around each wiring bundle as it exits from the cablecollar in the firewall, taking care not to crush anysingle wire when you clip it shut.Use a zip tie around the wiring bundle to hold the RFSuppressor from sliding down the wires.Wednesday, April 7, 2010 219 of 327
Fit the VHF radio wiring harness<strong>Jabiru</strong> <strong>J160</strong> Constructors <strong>Manual</strong>Post-Paint>Fuselage>Install electrical wiringThe Aircraft Harness pack includes the wiringharness and all of the necessary hardware: thePush To Talk (PTT) buttons for the control stickand the headset jacks for the top of the crossbeam outboard of the seat backs. All wires areclearly labeled and the headset jacks are colourcoded as well for ease of installation. The harnessgoes through the console and exits in 2 places:the PTT wires exit under the control stick and theheadset wires exit each side of the console behindthe seats. The multi-pin plug connects to thedigital harness behind the panel so leave the plugabout 400mm above the console. Note that in all cases the grey wires are the earth wires.Use a flexible rod inserted from the access hole behind the seats to draw these wires backthrough the console, then work through the access hole in the side of the console to feed thecontrol stick PTT wires only around and out of the hole under control column as shownarrowed below right. Fit a rubber grommet to the hole first to prevent chafing of the wires.For a dual stick: feed both groups of PTT wiresup and into the left underside of the control stick,taking the Pilot group up the left hand side andthe Co-Pilot group up the right hand side.For a single stick: feed the Pilot group up andinto the stick and route the Co-Pilot group intothe right seat base. You will need to cut an accesshole under the right-hand seat in this case.Both groups contain 2 pairs of wires: the blue andgray wires are for the PTT button while the greenand gray wires are for the optional remotememory feature. Route the wires as shown in thephoto at right, leaving enough room for full andfree movement of the control stick.Fit the wires to the PTT buttons and push the PTT buttons intothe top of the control stick, or in the case of a single stick fitthe Co-pilot‟s PTT into the front of the right seat base.Separate the pilot and co-pilot headset wires (both sets arelabeled as shown at right) and route them out of holes in eitherside of the console across behind the seat back to the jacklocations. Strip the ends of the wires and solder them to thetags on the jacks, (the jacks are colour coded to match thewiring) and then fit the jacks into place.We suggest that you mount the jacks in the top of the beambetween the seat back and the side of the fuselage. This tendsto keep the headset wires out of the way in flight.Zip tie the wires up under the rear lip of the beam – drill 3holes along the bottom of each seat back for the zip ties.Wednesday, April 7, 2010 220 of 327
Connect the VHF antenna cable<strong>Jabiru</strong> <strong>J160</strong> Constructors <strong>Manual</strong>Post-Paint>Fuselage>Install electrical wiringThe VHF coaxial antenna cable was installed in the Pre-Paint>Fuselage>Fit control cablesand lines task and connected to the VHF antenna in the Pre-Paint>Fuselage>Empennage>Fit vertical tail fin task. Trim the cable off level with the top of the firewall and fit the BNCconnector that is supplied with the wiring kit (fitting instructions are included).Fit the transponder encoder, antenna and cableStart by mounting the encoder unit to thefirewall with the connecting plugs endfacing downwards – the encoder unitattaches to a base (both shown at right)with a thumbscrew so the base can bemounted to the firewall with 3 stainlesssteel self-tapping screws and then the boxis fitted into it. Make sure that theencoder will mount above the throttleshaft and not foul the back of anyinstruments when the panel is fitted.The static line up from the console willneed to be branched with a “T” piece toconnect to the encoder before connecting to the other static instruments.Fit the supplied wiring harness plug to the encoder unit, tighten the plug retaining screws byhand and leave the other end free for later connection to the transponder unit when theinstrument panel is fitted.Mount the transponder antenna under the fuselage (shown fitted below right)– you will needto drill a 22mm hole through the floor of the aircraft on the centerline 415mm back from thebase of the firewall. The antenna must be mounted facing down with the ground plane (thelarge round plate) fitted against the fuselage and held in place with the antenna flange. Smearthe top of the ground plane with white silicone sealer before fitting to seal it to the fuselage.The retaining nut and washer can then befitted from inside the fuselage – you willhave to work inside the front section ofthe console for this step.Tighten the retaining nut firmly: do notover-tighten, then wipe away any excesssilicone sealer that may have squeezedout from around the ground plane.Connect the supplied coaxial antenna cable to the back of the antenna and route the cable outof the console and up the firewall for later connection to the transponder unit when theinstrument panel is fitted. Route the coaxial cable so that all bends are gentle and take care toavoid crushing the coaxial cable in any way.This completes the Post-Paint>Fuselage>Install electrical wiring task.Wednesday, April 7, 2010 221 of 327
<strong>Jabiru</strong> <strong>J160</strong> Constructors <strong>Manual</strong>Post-Paint>Fuselage>Interior>Fit console controlsPost-Paint>Fuselage>Interior>Fit console controlsObjectives of this task:To fit all of the console controls: the control stick, elevator trim and brake system.Materials required:Card # J17 „Elevator System and Control Stick‟Card # J8 „Dual Brakes‟Card # J2 „Trim System‟Control stickFit the 2 eccentric aileron stops to the rear end platewith 2 Allen head cap screws as shown at right.The control stick should still be partly assembled fromthe Pre-Paint>Fuselage>Interior> Console>FitControl Stick task. Clean any debris from the front andrear bushes and apply a small amount of lubricant to thebushes. Fit the control shaft into the console from thefront, wipe away any lubricant from the rear of thecontrol shaft and fit the aileron bellcrank to the rear ofthe shaft with an AN3-16A bolt and Nyloc nut, with thebolt fed up through the bellcrank.Refer to the drawing on the next page for detail.Fit the control stick to the pivot plate with an AN3-13A bolt, taking care to fit a flat nylonwasher on each side between the stick and the plate. Connect the elevator cable rod end to thecontrol stick with an AN3-21A bolt, spacer, 1/4” flat washer and a Nyloc nut as shown in thephoto above and in the drawing on the next page.Check for full and free movement of the control stick.Wednesday, April 7, 2010 222 of 327
<strong>Jabiru</strong> <strong>J160</strong> Constructors <strong>Manual</strong>Post-Paint>Fuselage>Interior>Fit console controlsWednesday, April 7, 2010 223 of 327
Brake system<strong>Jabiru</strong> <strong>J160</strong> Constructors <strong>Manual</strong>Post-Paint>Fuselage>Interior>Fit console controlsCut a short length of sheet aluminium the width of the brake lever slot and about 40mm inlength. Bend the aluminium strip in half, apply a smear of Araldite inside the bend and crimpit to the front of the brake lever slot – this is the bearing surface for the brake lever cam.The brake lever should still be assembled from the Pre-Paint>Fuselage>Interior>Console>Pre-Fit Handbrake task: fit the brake lever mount bracket to the front inside of the consoleand secure with 2 x ¼” by ½” UNC Allen head cap bolts and flat washers. Fit the lever intothe bracket with an AN4-11 bolt and castle nut, with a thin flat washer on each side of thelever, tighten the castle nut firmly and lock it in place with a split pin.Hint: a magnet will help you place the flat washers.Refer to the drawing on the next page for detail.Fit the master cylinder to the front of the consolewith 2 x ¼” by ¾” UNC Allen head cap bolts andfit the clevis to the bottom of the lever with anAN5-11 bolt and castle nut, tighten the castle nutfirmly and lock in place with a split pin.Drill a ½” hole near the top left of the front face ofthe console and feed the brake hose into the consolethen down and out of the hole behind the top of themain undercarriage legs. Fit a rubber grommet overthe brake hose at the front of the console, blow thehose clear and fit it to the brass fitting on the mastercylinder. Tighten the fitting firmly. Leave the brakehose about 50mm below the fuselage and trim off.Fit a brass “T” connection to the hose, then run alength of brake hose down each main undercarriageleg to each brake assembly as shown in the photo atright. The short length of PVC tubing over thebrake hose is to protect against chafing from thewheel spat. Zip tie the brake hose to the leg.Check that all of the brake hose fittings are tight.Fill the reservoir on the master cylinder with therecommended brake fluid, loosen the bleed valveson the wheel cylinder units (circled in yellowabove) and slowly pump clean brake fluid throughthe brake lines.Pay careful attention to the brake fluid level in the master cylinder reservoir during thisprocedure and keep the fluid level topped up, otherwise you run the risk of drawing air backinto the lines, which would mean starting all over again.When brake fluid reaches the wheel cylinders close off each bleed valve and then pressurebleed each wheel cylinder in turn until no more air remains in the brake lines and the brakelever feels firm and not at all spongy when pressure is applied.When you are satisfied with the brake pressure, top up the fluid and replace the reservoir cap.Wednesday, April 7, 2010 224 of 327
<strong>Jabiru</strong> <strong>J160</strong> Constructors <strong>Manual</strong>Post-Paint>Fuselage>Interior>Fit console controlsWednesday, April 7, 2010 225 of 327
Elevator trim lever assemblyConnect the trim cable rod end to the lefthandtrim lever with an AN3-10A bolt, 3/16”and 1/4” flat washers and a Nyloc nut. Cleanany debris away from the trim bush and fitthe trim shaft and levers, with soft washersunder the levers, and secure the levers to theshaft with an AN3-35 bolt and castle nut. Thecastle nut should be fitted to the left-handside of the console, tightened firmly andlocked in place with a split pin as shown inthe photo at right.Check for full fore and aft stop-to-stopmovement of the trim levers.Pitot tubing<strong>Jabiru</strong> <strong>J160</strong> Constructors <strong>Manual</strong>Post-Paint>Fuselage>Interior>Fit console controlsUse a flexible rod to draw a length of ¼” ID PVC tubing through from the wiring access holein the lower front of the console, through the console and out of the hole under fuselage wherethe brake line exits.Leave enough length so that the top of the tubing is just below the bottom of the windscreenand so that the bottom of the tubing reaches across to the right-hand strut bushing.The top end of the pitot tubing will be connected in Post-Paint>Fuselage>Interior>Fit theinstrument panel and the bottom end will be connected once the wings have been fitted.Fuel tapFit the red fuel tap handle to the fuel tap shaftas shown in the photo at right.Position the “L” shaped plastic guard in frontof and below the tap, drill holes for the endpegs and Araldite the guard into place.PlacardsPlace the fuel tap placard behind the fuel tap.Place the trim placard above the trim lever ontop of the console with the front of theplacard level with the front of the brake leverslot.Place the brake lever placard behind thebrake lever slot with the rear of the placardlevel with the rear of the trim placard.This completes the Post-Paint>Fuselage>Interior>Fit console controls task.Wednesday, April 7, 2010 226 of 327
<strong>Jabiru</strong> <strong>J160</strong> Constructors <strong>Manual</strong>Post-Paint>Fuselage>Interior>Controls>Fit rudder pedalsPost-Paint>Fuselage>Interior>Controls>Fit rudder pedalsObjectives of this task:To fit the rudder pedals and steering links to the aircraft, and fit the rudder cable to the rudderpedals and set the deflection of the rudder.Materials required:Card # J3 “Rudder”Card # J19 “Noseleg” for the steering yokeFit the pedalsThe rudder pedal assembly will be fitted to 3 sets of bearing blocks, 2 on the moulded floormounts and 1 on the lower front of the console. Sit the pedals in the lower mounting blocks onthe mounts and clean the front and back holes in the mounts with a 3/16” drill. There arecaptive nuts in the centre holes in each mount so do not drill any centre holes.Apply a thin layer of grease to the half-round cutouts in the upper and lower rudder pedalblocks and then fit the rudder pedals into place in the lower blocks. Seat the pedal assembliesin the blocks and fit the upper blocks and clamp plates and secure with an AN4-25A centrebolt to each block to hold it in place. Check for minimal side-to-side movement.Place a flat washer under the head of each bolt.BlocksStopsFloor mountsDetail shownbelowNow fit the bottom clamp plates in place inside the floor mounts one at a time: start with thefront AN3-25A bolt and Nyloc nut – the front nut can be awkward to fit but if it is super gluedto the plate then the plate can be held in place and the bolt can be threaded down into it.Fit the rear AN3-25A bolt and Nyloc nut all as shown at right.When all bolts and nuts have been fitted, tighten each nut to safetyand then tighten the centre bolts down firmly.Check for free fore and aft movement of the rudder pedals.It may be necessary to adjust the tension on the bolts slightly if thepedals are binding.Fit the ¼” UNF Allen head cap screws through the pedal travelstops beside the pilot‟s side right rudder pedal on the rear bar andfit ¼” UNF plain nuts behind. These will be set later in this task.Wednesday, April 7, 2010 227 of 327
Assemble and fit the steering yoke<strong>Jabiru</strong> <strong>J160</strong> Constructors <strong>Manual</strong>Post-Paint>Fuselage>Interior>Controls>Fit rudder pedalsTrim off the moulding lip from around the hole in the rubber bush with a sharp knife ifrequired. Press the rubber bush into the smaller hole in the steering yoke as shown and apply asmear of grease to the mating surfaces between thesoft connection link and the steering link. Press thespacer tube into the rubber bush.Fit the steering assembly to the noseleg: havesomeone hold the tail of the aircraft down andlower the nose leg until the steering yoke and softlink can be fitted between the upper and lowerbushes with the arms of the yoke facing rearwards.Lightly grease the top and bottom of the nose legand then push the nose leg back up and lower thenose of the aircraft. Refer to the drawing below andthe photos on the next page for detail.Connect the soft link to the steering yoke with anAN4-16A bolt and large flat washer and securewith a washer and Nyloc nut and tighten the nut tosafety. If nose leg is not drilled, then centre thefront wheel so that it is pointed exactly straightahead, move the steering yoke assembly so thatboth arms are an equal distance from the firewalland then drill a 3/16” hole through the hole in thesoft link and all the way through the noseleg andfix the soft link in place with an AN3-22A bolt,washer and Nyloc nut and tighten the nut to safety.Rubber bushand spacerSoftlinkSteeringyokeWednesday, April 7, 2010 228 of 327
Fit the steering yoke and pushrods<strong>Jabiru</strong> <strong>J160</strong> Constructors <strong>Manual</strong>Post-Paint>Fuselage>Interior>Controls>Fit rudder pedalsFit the retaining collar to the top of the nose leg with an AN3-22A bolt, washer and Nyloc nutand tighten the nut to safety. The nose leg is now final fitted as shown below.Assemble the pushrods: thread a rod endwith a plain nut to each end of each pushrod.Do not tighten the nuts until the pushrodlengths have been adjusted.Cut 2 rectangles of rubber sheet toapproximately 30 x 50mm and punch a holein the centre of each just big enough to passthe pushrod through. These are dust coversand they will be fixed to the firewall at theend of this task. Slip one over each pushrodfor now.The pushrods are different lengths: the longerpushrod fits to the right-hand side of thesteering yoke and the shorter pushrod fits tothe left-hand side of the steering yoke.Fit the pushrods though the holes in thefirewall and then connect them to the steeringyoke with AN4-13A bolts.Each bolt is fed down from the top of theyoke with an AN960-516 flat washer fittedunder the head of the bolt, then the rod endand then a AN960-416L flat washer fittedbetween the rod end and the yoke and aregular AN960-416 flat washer and Nylocnut fitted below the yoke as shown at right.Tighten all of the Nyloc nuts to safety andmark each with TorqueSeal.The dust cover is shown fitted in the lowerphoto, however it will not be final fitted untilthe end of this task, which is when this photowas taken.Retaining collarSteering yokeSoftlinkPushrod androd end withplain nutWednesday, April 7, 2010 229 of 327
Adjust the push rod lengths and connect<strong>Jabiru</strong> <strong>J160</strong> Constructors <strong>Manual</strong>Post-Paint>Fuselage>Interior>Controls>Fit rudder pedalsNow the pushrods can be adjusted to length and connected to the rudder pedals.Set the nose wheel so that it is facing straight ahead – move the aircraft back a few meters andthen move it forward in a straight line so that the nose wheel is aligned correctly.Set the rudder pedals so that the tops of the pedals are all in line when viewed from the side,as shown in the lower left of the drawing at the end of this task.Adjust the length of the left-hand pushrod by screwing the rod ends in or out an equal amountat each end of the pushrod until the rod end lines up with the hole in the pilot‟s side rightrudder pedal arm without altering the position of the nose wheel and then fit the rod end to theoutside of the rudder pedal arm with an AN4-14A bolt through the pedal arm then an AN960-416L flat washer and then the rod end followed by an AN960-516 flat washer and Nyloc nut.Repeat the length adjustment procedure for the right-hand pushrod, still keeping the tops ofthe rudder pedals all in line, then fit the rod end to the outside of the co-pilot‟s side left rudderpedal arm with an AN4-14A bolt through the pedal arm then an AN960-416L flat washer andthen the rod end followed by an AN960-516 flat washer and Nyloc nut.Pushrod androd endwith plainnutRuddercable tabRuddertravel stopCheck that the rudder pedals can move the nose wheel freely from side to side and make anyfine adjustments that may be needed to have the tops of the rudder pedals all in line with thenose wheel tracking straight ahead.When the final adjustments have been made then all the plain nuts on the rod ends can belocked off, all the Nyloc nuts can be tightened to safety and all nuts can be marked withTorqueSeal.Wednesday, April 7, 2010 230 of 327
Connect the rudder cable<strong>Jabiru</strong> <strong>J160</strong> Constructors <strong>Manual</strong>Post-Paint>Fuselage>Interior>Controls>Fit rudder pedalsClamp the outer cable to the inside front of the cable housing with the notched saddle clampand backing plate and secure the clamp in place with 2 x AN3 bolts fitted from the outside ofthe cable housing and Nyloc nuts with flat washers under them. Tighten the nuts to safety.Connect the rudder cable rod end to the right of the tab at the top of the pilot‟s side rightrudder pedal (circled in yellow below) and secure with an AN4-6A bolt through the pedal tabthen an AN960-416L flat washer and then the rod end followed by an AN960-516 flat washerand Nyloc nut. Tighten the Nyloc nut to safety and mark with TorqueSeal.Move the rudder cable to half travel and then set the rear of the rudder to a position 5mm tothe right of the aircraft centreline (refer to the photos at the bottom of this page that show arudder position/deflection jig in place under the rudder) and hold it in that position with somecloth tape or have someone hold it in place for you.Set the rudder pedals to theneutral position, with the nosewheel facing straight ahead andthe pedals all lined up along thetops.Position the outer cable so thatit runs in as smooth a line aspossible from the cable entrycut-out in the console to therudder pedal tab and then markand drill the 5 x 7/32” holesthrough the cable housing andinto the console and rivet the cable housing (circled in green at right) to the console with 5 x7/32” TLR rivets.Adjust the rudder deflectionThe rear of the rudder should be able to be move 78mm to the left and 78mm to the right froma neutral position that is defined as being 5mm to the right of the aircraft centreline.This range of movement is controlled and limited by movement of the rudder pedals.The photos above show a rudder position/deflection jig in place under the rudder.The limits are adjusted by the rudder stop screws beside the pilot‟s side right rudder pedal:adjust the pedal travel by using the Allen head cap screws until the rudder deflection iscorrect. Lock off the Allen head cap screws with the plain nuts, recheck all deflections andmark the lock nuts with TorqueSeal.Wednesday, April 7, 2010 231 of 327
<strong>Jabiru</strong> <strong>J160</strong> Constructors <strong>Manual</strong>Post-Paint>Fuselage>Interior>Controls>Fit rudder pedalsFit the centring springsAnchor boltsRuddertravel stopThe centring springs are attached by links of chain bolted to the top of the centre rudderpedals with AN3-11A bolts and then anchored to the firewall by means of anchor bolts – referto the drawing at the end of this task for detail. Position the anchor bolts so that they areevenly spaced and then mark and drill 3/16” holes and fit the anchor bolts through the firewallwith a flat penny washer each side and a Nyloc nut tightened to safety.Fit the centring springs into place and use pliers to bend the hooked ends of the springs so thatthe springs cannot easily or accidentally be removed.Adjust the spring tension by altering the length of the anchor bolts so that the nose wheel willreturn to centre when there is no weight on the nose wheel (hold the tail down to do thischeck). When adjustments are complete tighten the anchor bolt nuts.Fit the dust coversThe last step is to fit the rubber dust covers into place –hold each cover so that it is square and level and fix it inplace by means of either contact adhesive or small screwsand washers.The photo at right shows a dust cover fixed in place withsilicone sealer and 4 small stainless steel self-tappingscrews and flat washers.The next page of this task shows a drawing of the rudder pedal and steering assembly.Wednesday, April 7, 2010 232 of 327
<strong>Jabiru</strong> <strong>J160</strong> Constructors <strong>Manual</strong>Post-Paint>Fuselage>Interior>Controls>Fit rudder pedalsThis completes the Post-Paint>Fuselage>Interior>Controls>Fit rudder pedals task.Wednesday, April 7, 2010 233 of 327
<strong>Jabiru</strong> <strong>J160</strong> Constructors <strong>Manual</strong>Post-Paint>Fuselage>Interior>Fit flap drive motorPost-Paint>Fuselage>Interior>Fit flap drive motorObjectives of this task:To fit the flap drive motor and actuating assembly.Materials required:Card J16 “Electric Flaps”Epoxy resin and flockFit the flap shaftRemove the inner flap drive arm from the flap drive shaft by removing the 2 x AN3 bolts andpulling the flap drive arm completely off of the shaft.Feed the bare shaft into the cabin through the flap shaftmount in the top right of the cabin, first taking care thatthe bolt holes for the flap drive arm will end up on theleft-hand side of the cabin, and slip the inner flap drivearm over the shaft before the shaft exits the cabinthrough the left side flap shaft mount.Ensure that the inner flap drive arm will be 180° awayfrom the outer flap drive arms as shown above in red.Refit the inner flap drive arm with the AN3 bolts, flatwashers and Nyloc nuts and tighten the nuts to safetyas shown in the photo at above right.Fit the outer flap drive arms to each end of the flapshaft and secure each with an AN3 bolt and Nyloc nutas shown at right. Tighten the nuts to safety.Prepare the flap drive motor assemblyBolt the mounting bracket to the post on the gear case of the flap motor assembly by placing aBundy tube through the post and then an AN3-12A through the bracket and the post. Fit a flatwasher and a Nyloc nut with the nut facing into the cabin and tighten the nut to safety.Refer to the photo on the next page for detail.Wednesday, April 7, 2010 234 of 327
<strong>Jabiru</strong> <strong>J160</strong> Constructors <strong>Manual</strong>Post-Paint>Fuselage>Interior>Fit flap drive motorFit the flap drive motor assemblyMountingbracketFlap shaft andflap drive armFlap motorassemblyRod endActuating shaftPilot‟s doorBolt the rod end of the flap drive motor assembly to the flap drive arm with an AN4-10A boltthrough an AN960-516 flat washer, the rod end, an AN960-416 flat washer, the drive arm, anAN960-416 flat washer and a Nyloc nut.Tighten the nut to safety and then swing the motor assembly forwards and up until themounting bracket sits on top of the door jamb as shown above. Align the flap drive arm to becompletely vertical (i.e. directly under the flap shaft) as pictured above.Measure forwards from the verticalcentre of the flap shaft 272mm andmark the front of the mounting bracketas shown at right. Drill and countersinkthe 2 x 3/16” mounting holes throughthe door jamb and mark the location ofthe mounting bracket.Cut away any upholstery and peel cloth from the where the bracket will be mounted androughen the bracket and the door jamb surface where the bracket will be bonded into place.Note that the flap drive motor will sit at a slight angle to the vertical due to the profile of thefuselage skin, so it may be necessary to make the mounting bolt holes slightly oversize toaccommodate the mounting angle. It is very important that the flap drive motor actuatingshaft can be extended and retracted with no binding at any point in its travel. In the factory wefit the flap drive motor in place with packing underneath and power up the motor (12v) andthen run the actuating shaft through its full range of travel to check for any binding beforeflocking the bracket into place.Flock the mounting bracket into place on an 8mm bed of flock and fix it loosely in place with2 x 3/16” waxed countersunk screws and Nyloc nuts and leave overnight to cure.Tighten the nuts to safety the next day.Wednesday, April 7, 2010 235 of 327
<strong>Jabiru</strong> <strong>J160</strong> Constructors <strong>Manual</strong>Post-Paint>Fuselage>Interior>Fit flap drive motorFit the flap indicatorAssemble the flap indicator: paint the outside of the indicator washer red and mark the 3 flappositions in a dark colour. Push the inner cable through theCrimp toolindicator body and through the indicator washer and then all theway into the long end of the indicator body. Slide the washer tothe last mark at the long end of the indicator body as circledabove right and crimp it to the inner cable. Using the suppliedcrimping tool, crimp the indicator body to the outer cable.Screw the “L” shaped bracket to the bottom of the motor assembly with a countersunk screw(circled in yellow above), then drop the AN3-16A bolt down through the actuating shaft andadd the 3 spacers and the 2 retaining nuts (circled in green above).Position the flap indicator on the left-handwindscreen pillar so that the cable follows theline of the door opening and remains clear ofthe opening and screw the flap indicator andcable into place with the supplied nylon clipsas shown at right.Check the outer cable for length and trim asrequired then crimp the threaded end in place.Fit the threaded cable end to the “L” bracketon the motor with 2 thin nuts and fit the innercable to the long bolt through the actuatingshaft, all as shown in the photo on the bottomof the previous page.Check that all bolts and nuts are tightened, route the power lead behind the motor assemblyand down behind the door opening for later connection in the Post-Paint>Fuselage>Interior>Install electrical wiring task. Adjustment of the flap motor and indicator will bedone in the Post-Paint>Wings>Fit flaps task.This completes the Post-Paint>Fuselage>Interior>Fit flap drive motor task.Wednesday, April 7, 2010 236 of 327
<strong>Jabiru</strong> <strong>J160</strong> Constructors <strong>Manual</strong>Post-Paint>Fuselage>Interior>Fit instrument panel housingPost-Paint>Fuselage>Interior>Fit instrument panel housingObjectives of this task:To fit the instrument panel housing to the aircraft. This task will require 2 people.Materials required:Card #4: “Panel mount throttle”Prepare the panel housingStandard panelJumbo panelInstrument panel housings come in 2 sizes: Standard and Jumbo. The Standard housing ismounted with 5 mounting bolts while the Jumbo housing uses 7 mounting bolts.Refer to the photos above for mount positioning (arrowed in yellow).Wednesday, April 7, 2010 237 of 327
<strong>Jabiru</strong> <strong>J160</strong> Constructors <strong>Manual</strong>Post-Paint>Fuselage>Interior>Fit instrument panel housingFit the rubber grommets and the machined aluminium washers to the rear lip of the panel –use a machined washer to mark the centre of each hole then drill each hole to 22mm and fit agrommet into each hole. Drill each machined washer out to 7/32” and fit into each grommet.Cut away the fabric under the Carb Heat,Choke and Cabin Heat nameplate and flockthe nameplate into place with 5-MinuteAraldite and flock – hold it in place withspring clamps as shown at right while theflock cures.Make sure that the nameplate is positionedwell down towards, and level with, thebottom of the panel as shown at right.Drill out the 3 cable holes to suit the cable outer fittings.This is a good time to fit the wet compass to the top of the panel: much easier now than whenthe panel has been fitted. Measure the exact centre of the panel and position the compass sothat it is square to the front face of the panel and mount with screws and Nyloc nuts.Tidy under the panelOnce the panel housing is fitted access under the panel will be restricted so take some timenow to tidy up under the panel – lock-wire the fuel line sheath to the firewall fitting, checkthat all the rudder pedal bolts are tightened correctly and generally clean the area out.Fit the panelThis will take 2 people, one to hold the panel and one to position the panel. Fit a 3/16” drillbit into your drill and have it handy inside the aircraft. The panel is held in place with AN3-12A bolts and steel lock nuts, with the lock nuts located inside the engine compartment.Hold the panel in place, which is centred in the fuselage and as high up the firewall as it cango. Move any wiring away from the area of the mounting holes and have the second personmeasure the distance in from the door jambs to the side of the panel and then move the paneluntil it is exactly in the centre of the aircraft.When it is correctly located, drill the topcentre hole through from the inside (shown atright) and fit a washer and steel lock nut.Check the aircraft for level and then checkthe panel for level and drill the top left bolt,then the top right and then each of theremaining bolts.Have the second person watch as each hole isdrilled and make sure that the drill bit doesnot come into contact anything in the enginecompartment – wiring, battery, etc.The drill bit will be visible as a point on the firewall before it breaks through and the personwatching must be vigilant to prevent any possible damage. It may only be necessary to movea wire or something before drilling further.Tighten all of the steel lock nuts to safety.Wednesday, April 7, 2010 238 of 327
Locate and fit the throttle cable<strong>Jabiru</strong> <strong>J160</strong> Constructors <strong>Manual</strong>Post-Paint>Fuselage>Interior>Fit instrument panel housingThe last step is to drill through the firewall for the throttle cable.The positioning of the hole is important to minimise the chance of the throttle cable binding inthe full forward/full throttle position: start by positioning the throttle linkage almost fullyforward until the input lever is about 10mm away from the front of the panel housing – thethickness of the tip of your index finger is about 10mm.With the linkage in that position, make a mark (circled above) directly ahead of the outputlever (which must face as shown) and then drill a pilot hole at that mark – rotate the throttlelinkage backwards to allow access for the drill and hold the drill firmly against the firewall tomake sure that it does not move about while drilling.As before, have the other person check that the drill will not cause any damage as it comesthrough the firewall and move any wiring out of the way if needed.Rotate the throttle linkage forwards and check that the pilot hole is precisely in front of theoutput lever and correct if necessary.You can now work from the front of the firewall and expand the pilot hole until the throttlecable (complete with the adjustment nuts) can just pass though the hole.Drill out 2 flat penny washers to fit over the outer cable and then cut a slot in each so that theycan be fitted over the throttle cable. One will fit to the cable on each side of the firewall.You will need to carefully grind both ends of the throttle cable to size – the manufacturingprocess often leaves some excess solder on both fittings and sometimes the ball end may havethe inner cable standing slightly proud, which will need to be ground back a little.Fit the throttle cable into place through the firewall. Connection and adjustment of all cablingwill be addressed in the task Post-Paint>Firewall forward>Engine control cabling.Fit the throttle input shafts through the pivot blocks and fully onto the rod ends on the inputlevers and Loctite each input shaft into place with a drop of Loctite 620. The pilot‟s side inputshaft will require a machined collar to be fitted on the shaft on each side of the pivot block.This completes the Post-Paint>Fuselage>Interior>Fit instrument panel housing task.Wednesday, April 7, 2010 239 of 327
<strong>Jabiru</strong> <strong>J160</strong> Constructors <strong>Manual</strong>Post-Paint> Fuselage>Interior>Engine control cablingPost-Paint> Fuselage>Interior>Engine control cablingObjectives of this task:To fit all engine control cabling from the instrument panel to the engine.Materials required:Cables: Throttle, Carb Heat, Choke, CabinHeat (optional – see Card #25)Size the outer cablesThe Carb Heat, Choke and the optional Cabin Heat outer cables willneed to be cut to length. This is done by removing the inner cablescompletely and then fitting the outer cables through the panel androuting them through the firewall to the appropriate locations and thentrimming each outer cable to length. The Choke and the optional CabinHeat cables will then need to have allowance made for the threadedend section, which is then crimped onto the cut end (use the crimpingtool, shown at right). The throttle cable is supplied ready to use.Fit the cables to the instrument panelThrottleChokeCarb heatCarb heatThrottleCabin heatChokeFit the Carb Heat, Choke and the optional Cabin Heat cables to the lower centre of theinstrument panel through the nameplate and secure each to the panel with a serrated washerand lock nut and then route the cables through the firewall as shown above.Fit the throttle cable through the firewall from the engine side with the ball end inside thecabin and secure with a slotted flat washer and nut on each side of the firewall as shown.Fit the ball end of the throttle cable into the drive arm on the throttle shaft.Wednesday, April 7, 2010 240 of 327
<strong>Jabiru</strong> <strong>J160</strong> Constructors <strong>Manual</strong>Post-Paint> Fuselage>Interior>Engine control cablingThrottle and chokeThrottlecableCarburettorbracketChokecableNote the cable routing shown above – this photo was taken looking straight down.Fit the throttle cable first: undo the front nut completely until it is resting on the inner cableand then fit the inner cable through the slotted top hole in the bracket and fit the threadedcable end into the bracket. Fit the lock nut onto the threaded cable end and tighten so that thelock nuts are in the centre of the threaded cable end.Fit the barrel end of the cable into the throttlelinkage on the carburettor with a washer eachside and a split pin through the hole in thebarrel end of the cable.Adjust the throttle cable until at full throttle(with the panel mounted throttle shafts fullyforward) the throttle linkage is just touchingthe front stop on the carburettor. Tighten all4 lock nuts firmly for the moment – fineadjustments will be made later.Put 1 lock nut on the threaded end of thechoke cable and fit it through the bottom holein the bracket. Fit the other lock nut,centering the threaded end in the bracket.ThrottleChokeRight hand side view of carburettor body showing cablesMake sure that the choke drive arm is fully forward and slip the brass ferrule over the innercable then fit the ferrule into the hole in the drive arm. Bend the inner cable at right angles infront of the ferrule. Cut the excess inner cable off. Slip the ferrule through the retaining collarand fit to the to the drive arm with a washer and split pin fitted to the brass ferrule on theunderside of the drive arm. Refer the photos and drawing on the next page for detail.Adjust the choke cable until with the choke all the way in the choke arm just touches the stopon the carburettor body. Tighten the lock nuts firmly.Wednesday, April 7, 2010 241 of 327
Carb heat<strong>Jabiru</strong> <strong>J160</strong> Constructors <strong>Manual</strong>Post-Paint> Fuselage>Interior>Engine control cablingRun the outer cable through the clamp and secure by tightening theclamp, then slip the brass ferrule over the inner cable.Make sure that the air valve drive arm is fully forward and then fit theferrule into the hole in the drive arm. Bend the inner cable at rightangles in front of the ferrule. Cut the excess inner cable off. Slip theferrule through the retaining collar and fit to the to the drive arm with awasher and split pin fitted to the brass ferrule on the underside of thedrive arm.Adjust the Carb Heat cable with the clamp until with the Carb Heat “T”handle all the way in the air valve drive arm is fully forward as shownabove. Tighten the clamp bolts firmly.Cabin heatPut 1 lock nut on the threaded end of the Cabin Heat cable and fit it upthrough the hole in the firewall beside the Cabin Heat valve. Fit theother lock nut, fixing the threaded cable end through the firewall.Make sure that the Cabin Heat valve drive arm is fully forward and then fit the ferrule into thehole in the drive arm. Bend the inner cable at right angles in front of the ferrule. Cut theexcess inner cable off. Slip the ferrule through the retaining collar and fit to the to the drivearm with a washer and split pin fitted to the brass ferrule on the underside of the drive arm.Adjust the Cabin Heat cable until with the Cabin Heat knob all the way in the Cabin Heatvalve is fully closed. Tighten the lock nuts firmly.This completes the Post-Paint>Fuselage>Interior>Engine control cabling task.Wednesday, April 7, 2010 242 of 327
<strong>Jabiru</strong> <strong>J160</strong> Constructors <strong>Manual</strong>Post-Paint>Fuselage>Interior>Fit the instrument panelPost-Paint>Fuselage>Interior>Fit the instrument panelObjectives of this task:To pre- and final fit the instrument panel to the panel housing. This task will require 2 peopleso have a friend come over and help you for an hour or so.Pre-fit the panelRemove the throttle knobs from the throttle input shafts.Both people should sit in the aircraft with the panel held between them. The person in theright-hand seat should reach over the top of the panel and push all of the multi-pin connectors,instrument tubing, radio and GPS wiringfrom the panel back inside the panel housing.Working together, offer the panel up to thehousing. Lift the bottom of the panel over thecarburettor heat and choke knobs, thencarefully ease the top into place. You mayneed to grind small amounts out of thehousing to clear items such as the magswitches, so use a pen to mark what needstrimming and remove the panel. Trim awaythe marked areas, vacuum away any debrisfrom the grinding process and refit the paneluntil it slips neatly into place.Fit the panelRefit the panel as before, but this time the person in the right-hand seat should reach over thetop and connect the panel. Each multi-pin connector should have been clearly marked (“A”,“B”, “C”, “D” or “E”): join each connector pair by pushing them together firmly until thesafety clip clicks into place. Connect the VHF antenna cable and transponder cable.Fit the panel into the housing and secure it in place with machine screws.Now you will need to work from under the panel: connect the static line and pitot line withbrass tube joiners and plug in the radio wiring plug.If you are using a panel mounted GPS, lower the antenna to the floor and then route theantenna and cable out the bottom right of the panel and back up until the antenna can bevelcroed to the top right of the panel housing near the right corner of the windscreen. Theantenna wire can be tucked back into the small gap between the housing and the firewall andthe excess cable length can be coiled up and zip tied up inside the housing.Refit the throttle knobs and tighten them firmly.At this point there will be a large amount of wiring and tubing emerging from the access holein the lower front of the console and going up into the panel. In the upholstery kit there is apiece of upholstery fabric with a Velcro strip at each end: hold the wiring bundle together andwrap this fabric around it and let the Velcro strip hold it in place: this will tidy things up.Ideally no loose wiring should hang down under the panel housing, so tuck up any wires thatneed tidying and zip tie them into place.This completes the Post-Paint>Fuselage>Interior>Fit the instrument panel task.Wednesday, April 7, 2010 243 of 327
<strong>Jabiru</strong> <strong>J160</strong> Constructors <strong>Manual</strong>Post-Paint>Fuselage>Interior>Fit upholstery 2Post-Paint>Fuselage>Interior>Fit upholstery 2Objectives of this task:Fit the remaining interior trim to the aircraft, completing the interior fit out.Materials required:<strong>Jabiru</strong> upholstery kit or equivalentHigh heat contact adhesiveCard J9 “Seatbelts”Flap drive shaft and flap drive motor coverFlap driveshaftHeadsetbracketWrap the flap drive shaft in upholstery fabric and fix into place with contact adhesive. Thejoin line should be at the top rear of the shaft.Use Velcro tabs to hold the drive motor cover into place.Headset bracketPosition the headset bracket on the top longitudinal rib and fix in place with 2 TLR rivets asshown arrowed in yellow in the photo above.Floor coveringsTest fit the floor coverings first – you willneed to carefully cut the front covering to fitaround and under the rudder pedal mounts.The floor coverings should overlap thesidewall and console fabric slightly so that nofibreglass can be seen.Fix the floor coverings into place withcontact adhesive.Wednesday, April 7, 2010 244 of 327
<strong>Jabiru</strong> <strong>J160</strong> Constructors <strong>Manual</strong>Post-Paint>Fuselage>Interior>Fit upholstery 2Fuel line coveringWrap both sheathed fuel lines with thesupplied lengths of Velcro-edged fabric –position the Velcro join line so that it facestowards the outside of the aircraft. Use zipties to secure the sheathed fuel lines to therear of the fuselage rib as shown at right.Rear bulkhead sound curtainGlue 8 evenly spaced Velcro strips aroundthe rear bulkhead and attach the soundcurtain by pressing it onto them.Seat coversIdentify the left and right side seat covers. Slip each seat cover over the correct seat back andpull the cover as far down as you can, then roll the lower part of the cover over the seat baseand press the Velcro strip along the front edge into place.Wednesday, April 7, 2010 245 of 327
Seatbelts<strong>Jabiru</strong> <strong>J160</strong> Constructors <strong>Manual</strong>Post-Paint>Fuselage>Interior>Fit upholstery 2Aileronbellcrank coverBolt the seatbelts to the seatbelt fittings – the shoulder harness fits to the outside of each seatwhile the lap part of the harness fits beside the console.Each seatbelt fitting is fitted to the outside of the mounting bracket (away from the seat) withan AN3 bolt with one washer under the head, through the mounting bracket, the seatbeltfitting, then the heavy flat washer (from the “Seatbelts” card) and a plain washer then theNyloc nut, all as shown in the photo above. Tighten the Nyloc nuts to safety.Aileron bellcrank coverNote that this cover is fitted after the wings have been fitted and the aileron cables have beenconnected and adjusted. It is included in this Upholstery 2 task for convenience.Slip the cover over the rear of the console as shown in the photo above: check that the aileroncables slots are correctly positioned and they do not cause any restriction to the aileron cablesand fit the cover in place with 3 x 6G stainless self tapping screws: 1 each side at the front ofthe cover and 1 at the rear of the cover.This completes the Post-Paint>Fuselage>Interior>Fit upholstery 2 task.Wednesday, April 7, 2010 246 of 327
<strong>Jabiru</strong> <strong>J160</strong> Constructors <strong>Manual</strong>Post-Paint>Fuselage>Fit rudder, elevator and elevator trimPost-Paint>Fuselage>Fit rudder, elevator and elevator trimObjectives of this task:To fit the rudder, and elevator and elevator trimassembly to the empennage.Fit the rudderHold the rudder up to the vertical fin and fit it intoplace with the hinge pins: the top pin will be fitted upthrough the hinge from the bottom while the 2 lowerpins will be fitted down from the top. Check for freemovement of the rudder from stop to stop.Locate the ends of the hinge pins in the retaining slotsand secure each pin in place with pin retainers – thelocations are arrowed at right.Each pin retainer will be held in place with a 5/32”machine thread screw.Mark each retainer screw with TorqueSeal.Connect the rudder cableWithdraw the rudder cable from the slot atthe base of the vertical fin and pull it outuntil the locating groove in the outer cable islevel with the 2 mounting bolt holes in theside of the fin.Clamp the outer cable to the fin with 2 xAN3-6A bolts fed from inside the fin, thenthe angled aluminium plate with the narrowside facing the front of the aircraft, the clamp Rudder cable hardwarebacking plate, the saddle clamp (taking careto locate the locating key on the saddle clamp in the locating groove in the outer cable), thenflat washers and Nyloc nuts, all as shown in the photo below.Rudder cable fittedFit the rod end to the rudder drive arm with an AN3-8A bolt fitted from the top and downthrough the drive arm, then an AN960-416 (3/16”) flat washer, then the rod end followed byan AN960-515 (1/4”) flat washer and a Nyloc nut as shown above.Tighten each Nyloc nut to safety and mark the end of each nut with TorqueSeal.Wednesday, April 7, 2010 247 of 327
<strong>Jabiru</strong> <strong>J160</strong> Constructors <strong>Manual</strong>Post-Paint>Fuselage>Fit rudder, elevator and elevator trimAdjust the rudder travelMake a template that will sit over the rear of the empennage and tape it in place. Find thecentreline of the fuselage and mark a 5mm offset to the right of the centreline onto thetemplate, then mark 78mm each side of that offset mark as shown in the photos above.Place a saw stool under the front of the fuselage to lift thenose wheel off the ground and then adjust the ruddercable length so that the rudder sits on the 5mm right markwith the rudder pedals centred, with the pedals all level.Lock both rod end lock nuts firmly and mark each onewith TorqueSeal.Now use the rudder pedal adjustment set screws (shownarrowed at right) to adjust the rudder travel so that therudder deflects exactly 98mm to each side of the offsetcentre mark as shown in the photos above.When this has been done tighten up both of the lock nutsfirmly and mark each one with TorqueSeal.The rudder is now adjusted.Fit the elevatorHold the elevator up to the horizontal stabiliser and fit the hinge pins in place: all pins arefitted by pushing them in from the outside of the hinge and towards the rudder.Check for free movement of the elevator from stop to stop.Locate the ends of the hinge pins in the retainingslots, push the trim lever on the console fullyforward and then apply a length of Wotan cloth tapeto the top of the gap between the elevator and thehorizontal stabiliser as shown at right, pressing thetape over the top of the hinge pins so that they breakthrough the tape surface. Use one length of tape oneach side of the tailplane, make sure that there areno wrinkles and press the tape firmly down.Secure each hinge pin in place with pin retainers.Each pin retainer will be held in place with a 5/32”machine thread screw.Mark each retainer screw with TorqueSeal.Rudder pedal adjustment detailWednesday, April 7, 2010 248 of 327
Connect the elevator cableFit the drive arm extension to the elevator drive arm:secure with an M4 x 25 bolt, washer and Nyloc nutthrough the top hole. Tighten firmly and trim off anyexcess bolt length.Fit the elevator cable rod end to the elevator drive armwith an AN3-10A bolt fitted through the lower hole inthe elevator drive arm and the centre hole in the drivearm extension. Fit an AN960-416 (3/16”) flat washer,then the rod end followed by an AN960-515 (1/4”) flatwasher and a Nyloc nut.Do not tighten the Nyloc nut or the rod end lock nut untilthe cable length has been adjusted in the next step.Adjust the elevator travel<strong>Jabiru</strong> <strong>J160</strong> Constructors <strong>Manual</strong>Post-Paint>Fuselage>Fit rudder, elevator and elevator trimElevatordrive armElevatorcable rodendDrive armextensionElevator drive arm detailUse the supplied deflection templates to check the up and down travel of the elevator.DOWN elevator templateHold the control stick all the way forward (have someone help you) and check the amount ofdown deflection and adjust the cable length (by screwing the rod ends in or out an equalamount at each end of the cable) until the down deflection is correct.UP elevator templateNow have your helper hold full back stick and check the amount of up deflection: it should bevery close to correct if the down deflection is OK, however you may need to make some fineadjustments to equalise elevator travel until both up and down deflections are correct.The elevator must clear the rudder and the down stop by 2mm at full deflection.Recheck the up and down deflections and then lock the rod end lock nuts at each end of thecable and mark each rod end lock nut with TorqueSeal. The elevator is now adjusted.Wednesday, April 7, 2010 249 of 327
Assemble and fit the elevator trim assembly<strong>Jabiru</strong> <strong>J160</strong> Constructors <strong>Manual</strong>Post-Paint>Fuselage>Fit rudder, elevator and elevator trimRefer to the drawing on the next page: Assemble the trim pivot: press the 2 sealed bearingsinto the hub and then pop rivet the assembly together. Assemble the trim spring unit, adjustthe rod end to almost full thread depth and tighten the lock nut.Connect the trim spring unit to the trim pivot with an AN3-13A bolt through the black pivotblock in the middle of the spring assembly and the top hole in the trim pivot arm, takingcareful note of the arrangement of the washers and the sleeve between the two items.Connect the trim cable rod end to the trim pivot with an AN3-12A bolt through lower hole inthe trim pivot arm. Fit the trim pivot to the trim horn with an AN4-14A bolt.Fit the rod end of the trim spring unit to the bottom hole in the elevator drive arm extensionwith an AN3-07A bolt.Push the trim lever on the console fullyforward, hold the trim pivot arm fullyforward as shown at right, align the trimcable as shown, then drill the 2 x 3/16” trimcable clamp holes through the trim horn.If you are working alone you can wedge the trim pivot into position for this step.ElevatorcableTrim cableTrim cableclampElevatordrive armextensionTrim pivotTrim hornTrimspring unitTrim pivotblockTrim hornTrim pivotAttach the outer trim cable to the right hand side of the trim horn with 2 x AN3-06A boltsfitted through trim horn, the clamp backing plate and then the saddle clamp and securing withflat washers and Nyloc nuts, taking care to locate the locating key on the saddle clamp in thelocating groove in the outer cable before tightening the Nyloc nuts to safety.Use the supplied deflection templates to re-check the up and down travel of the elevator.Wednesday, April 7, 2010 250 of 327
<strong>Jabiru</strong> <strong>J160</strong> Constructors <strong>Manual</strong>Post-Paint>Fuselage>Fit rudder, elevator and elevator trimThis completes the Post-Paint>Fuselage>Fit rudder, elevator and elevator trim task.Wednesday, April 7, 2010 251 of 327
Post-Paint>Fuselage>Fit doorsObjectives of this task:<strong>Jabiru</strong> <strong>J160</strong> Constructors <strong>Manual</strong>Post-Paint>Fuselage>Fit doorsAt this stage the doors have been painted and now they can be refitted to the aircraft.Materials required:Door hardware from Card # J1 „Doors‟Fit the door sealsClean the inside of the door lip and fit the white door seal rubber around the entire outer edgeof the door. The door seal is adhesive backed: peel the backing paper back as you stick theseal into place. Start and finish at the top hinge.Refit the doorsFit the hinges to the door pivot arms using the screws and nuts that were used in the Pre-Paint>Fuselage>Pre-fit doors task and tighten the nuts to safety.Fit each door to the fuselage. Apply a single drop of Loctite 242 to each screw, then fit the topscrew first to hold the top of the door, then fit the bottom screw and check that the door closesin the centre of the door opening – there will be enough movement in the hinge screw holes toallow the door to be centred very accurately.Tighten both screws firmly while the door is shut and both latches are closed.Check that the door can be opened and closed easily and make any minor adjustments thatmay be required.Wednesday, April 7, 2010 252 of 327
<strong>Jabiru</strong> <strong>J160</strong> Constructors <strong>Manual</strong>Post-Paint>Fuselage>Fit doorsRemove the maskingBoth sides of the window will still be masked at this stage –carefully remove all of the masking until you only have theblue “Fine Line” masking tape left around the window andthen very carefully peel the “Fine Line” tape from the windowby pulling the tape back over itself and in towards the centreof the window as shown in the photo at right.This will allow the edge of the tape to cut the paint to a niceclean edge, which is the reason for using the tape.Never pull any masking tape towards the painted surface,always pull away from the painted surface.WindowPainted surfacePullFit the door swing strapsThese straps prevent the doors from swingingtoo far forward in windy conditions.Loop a length of black webbing through thebracket at the front of each door and measureout enough webbing so that the door can beopened to no more than 90° to the fuselageand the webbing can be wrapped around theinside the front of the door jamb.Cut the webbing to length and secure to theback of the door jamb with a countersunkscrew.Use your soldering iron to burn the bolt hole through the fabric –this will seal the edges of the hole.Seal the cut ends of the webbing with a flame.Fit the screw through the door frame: countersink the hole and fit thescrew with a Tinnerman washer under the head then place a pennywasher over the webbing as shown at right and secure with a Nylocnut tightened firmly.Fit the striker platePlace the striker plate on the door jamb and align the latch pinhole. Hold the striker plate in place with some tape and checkthat the door can be closed and that the latch pin will fitthough the striker plate – make any required adjustments andthen rivet the plate in place with 2 x 5/32” rivets as shown inthe photo at right.Repeat for the other door.Wednesday, April 7, 2010 253 of 327
Fit the door locksFit the door locks though the lock holes in the fuselage behindeach door and fix in place with the retaining nuts. Tighteneach retaining nut firmly.Fit the locking arm to the end of the shaft with the suppliedscrew: apply a drop of Loctite 242 to each screw.Check that the locking arm works in the correct sense and thatthe key can be removed at both the locked and unlockedpositions. It may be necessary to lengthen the slot slightly ifthe key cannot be removed in the locked position.<strong>Jabiru</strong> <strong>J160</strong> Constructors <strong>Manual</strong>Post-Paint>Fuselage>Fit doorsClean the windowsNow you can clean the windows: start with a smallamount of methylated spirits on a clean cloth andcarefully remove any dust and debris from the paintingprocess then, using a clean soft cotton cloth, polish bothsides of each window with a good quality cleaner suchas Novus Plastic Polish: start with Novus #2 and thenfinish with Novus #1. Novus #3 should only be used forbuffing out extremely heavy scratches.Support an open door with one hand while you polishthe window.Any cleaner/polish used must be safe to use on acrylic and must not contain any silicon.This completes the Post-Paint>Fuselage>Fit doors task.Wednesday, April 7, 2010 254 of 327
<strong>Jabiru</strong> <strong>J160</strong> Constructors <strong>Manual</strong>Post-Paint>Fuselage>Firewall forward>Final assemblyPost-Paint>Fuselage>Firewall forward>Final assemblyObjectives of this task:To complete all of the remaining firewall forward assembly work.Materials required:Card #15 “Spares‟Card #22 „Hot air mixer box‟Card #23 „Oil bottle‟Card #25 „Cabin heater‟Prepare the mufflerFit the inlet air heat shroud to the mufflerwith 2 large hose clamps: align the shroud aspictured with the cutaway in the shroud justtouching the exhaust pipe.Tighten the hose clamps firmly.Fit the cabin heater heat exchanger to theexhaust pipe and push up until it touches themuffler and tighten the Allen head capscrews.HeatexchangerShroudFit the mufflerRemove the red sealing caps from the endsof the exhaust pipes and fit the pipes into theinlet holes in the front of the muffler.Hold the muffler in place by fitting thesupplied springs from the tags on the mufflerto the tags on the exhaust pipes as shownarrowed in the photo at right.SpringsHoseclampsSetscrewCheck if the muffler is touching on the setscrews (arrowed in purple at right) that holdthe cover directly above the muffler: if themuffler is touching these screws it could eventually wear a hole in the muffler, so mark anyspots where the set screws are touching, remove the muffler and use a hammer to tap a smallindent into the top of the muffler. Refit the muffler and recheck.Wednesday, April 7, 2010 255 of 327
Connect the inlet air scat hoses<strong>Jabiru</strong> <strong>J160</strong> Constructors <strong>Manual</strong>Post-Paint>Fuselage>Firewall forward>Final assemblyCarb inletFlowHeated airCold airEngine bay viewed from above showing the inlet air hose arrangementAir is fed into the carburettor from 2 sources,cold and heated, through the air mixer box onthe firewall and then into the carburettor airinlet. In each case a scat hose is used to ductthe air and each scat hose is held in placewith hose clamps.Start by connecting the air box outlet to thecarburettor air inlet: remove the red sealingplug from the carburettor and connect thecurved air inlet horn to the mouth of thecarburettor and secure with a hose clamp,then cut a short length of scat hose to fitbetween the horn and the air mixer box outletand fit it into place. The scat hose should berouted in a smooth curve between the 2fittings as shown in the photo at right.Fit a length of scat hose to the lower air inletfitting on the air box, then hold the lowercowl in position and cut the scat hose tolength to fit the cold air inlet fitting on theleft-hand side of the cowl. Remove the cowland set aside for later fitting.Run a length of scat hose from the fitting onthe left rear of the muffler to the front fittingon the air box.Inlet air hornHeated airMufflerCarb inletInlet air ducting as viewed from the right hand sideWednesday, April 7, 2010 256 of 327
<strong>Jabiru</strong> <strong>J160</strong> Constructors <strong>Manual</strong>Post-Paint>Fuselage>Firewall forward>Final assemblyFit the equalising tubeAir mixer boxEq tubeEq tubeCarburettorRoute a length of 4mm clear tube from the fitting on the right of the air mixer box to thecompensator fitting on the right rear of the carburettor as shown in the photos above.Fit the oil overflow bottleClip the oil bottle into the bracket on thelower right of the firewall.Fit the oil tube from the engine oil fillerfitting, along the top engine mount and curveit down to the inlet. Cut the tube to length sothat it will not rub on the inside of the lowercowling and fit to the oil bottle with a hoseclamp.Cut a short length of oil tube as shown atright, so that it can be routed over the lowerengine mount and down. Fit the short lengthof alloy tube into the bottom of the outlettube with a hose clamp then fit the outlet tubeto the oil bottle with a hose clamp.Use the supplied saddle clamp to fit the outlethose to the firewall as shown at right.Route the 2 x 4mm clear drain hoses from the fuel pump breather and drain along the lowerengine mount and down through the saddle clamp as shown and trim to the same length as theoil outlet tube.Wednesday, April 7, 2010 257 of 327
<strong>Jabiru</strong> <strong>J160</strong> Constructors <strong>Manual</strong>Post-Paint>Fuselage>Firewall forward>Final assemblyConnect the cabin heaterRoute a length of the smaller size scat hose(Card #25) from the top fitting on the heatexchanger to the cabin heat valve on thefirewall.Route a length of scat hose from the cold airinlet in the front left of the lower cowling tothe bottom of the heat exchanger unit.Fit the lower engine cowling into place.Route the hose along the cowling and securewith zip ties through flocked-on holders asshown in the photo at lower right.Cold airinlet hoseCold air inletConnect the air inlet hoseFit the inlet air hose from the NACA duct onthe left side of the lower cowling to the airmixer box and secure with a hose clamp.Inlet airhoseThis completes the Post-Paint>Fuselage>Firewall forward>Final assembly task.Wednesday, April 7, 2010 258 of 327
<strong>Jabiru</strong> <strong>J160</strong> Constructors <strong>Manual</strong>Post-Paint>Fuselage>Firewall forward>Fit propeller and spinnerPost-Paint>Fuselage>Firewall forward>Fit propeller and spinnerObjectives of this task:In this task the propeller will be fitted to the engine and the spinner will be mounted.The propeller must be fitted before the engine can be rotated or run.This task covers the fitting of either the <strong>Jabiru</strong> or Sensenich propeller.The cylinder compression can cause the propeller to move unexpectedly when rotating theengine and so for safety reasons all spark plugs should be removed and set aside and the sparkplug holes should be covered with a clean cloth during this task.Materials and equipment required:Card # 23 „Spinner hardware‟, TorqueSeal inspection putty, small torque wrenchFit the propellerSand both sides of each spinner mounting plate flat in the flange/propeller mounting area.Turn the engine so that one set of flywheel magnets are at the top (circled above left). Thiswill ensure that the propeller will stop in a horizontal position. Fit the guide bushes from theback of the propeller flange and fit the rear spinner mounting plate over them with the cuppedface towards the rear. Fit the propeller so that the upper blade is closest to the 11 o‟clockposition when viewed from the front of the engine. Tap the bolts through with a soft hammer.Fit the front spinner mounting plate with the cupped face towards the front, followed by themachined aluminium mounting plate.On each bolt place pairs of Belleville washers in a „cup to cup‟ arrangement: ( ) ( ) (<strong>Jabiru</strong>prop: 4 pairs, Sensenich prop: 3 pairs) followed by a single flat washer and a Nyloc nut.Tighten the nuts until they are just firm and then torque each nut (<strong>Jabiru</strong> prop: 7 ft/lbs or 9.5Nm, Sensenich prop: 12ft/lbs or 16.25 Nm) working in a diagonal or criss-cross pattern.Wednesday, April 7, 2010 259 of 327
<strong>Jabiru</strong> <strong>J160</strong> Constructors <strong>Manual</strong>Post-Paint>Fuselage>Firewall forward>Fit propeller and spinnerThere must be more than 1½ threads and less than 3 threads showing through the Nyloc nuts.Pack behind the nuts with flat washers as required. Recheck the torque settings, applying aslow, steady pressure on the torque wrench until the correct torque value is reached.Add engine oilAt this time the engine should have the correct grade of oil added (2200 = 2.3l, 3300 = 3.5l)refer to the engine manual for the grade. Pour slowly to minimize the chance of spillage andrefit the dipstick. Remove the “Do Not Run: Contains No Oil” tag from the engine.Check and set the propeller blade trackingIt is important that the tips of both propeller blades track exactly in line with each other as thepropeller rotates – tracking must be adjusted tovery close tolerances, preferably less than0.25mm, in order to minimize engine and/orairframe vibration.To check the tracking you will need to make upan adjustable pointer (example shown arrowed atright) that can be clamped to the nose gear andplaced against the tip of the propeller blade as areference point (shown circled at right).Rotate the propeller and check that each tip isjust touching the pointer. If there is any variationthen the technique to be used is as follows:Coarse adjustment: if the difference between blades is greater than 1 to 1.5mm then a shimwill need to be made and placed between the propeller and the propeller flange.Remove the propeller. Cut a shim from a sheet ofstandard 80gsm paper (photocopier paper) asshown at right (use the discarded universalpropeller flange as a pattern) and fit on thepropeller flange on the side of rearmost blade.Re-fit the propeller and re-torque all the nuts tothe correct values, working in a diagonal or crisscrosspattern, and check the tracking.Add more shims if required. Note that a shim cut from a manila folder will correct a 2.5-3mmtracking error. Make fine adjustments as described next:Fine adjustment: if the variation between blades is 1mm or less then apply additional torqueof no more than 2 ft/lbs to the 3 nuts on the side of the front-most blade and check thetracking.When the blade tracking is less than 0.25mm, loosen off all of the nuts and then re-torquethem all to the correct values, working in adiagonal or criss-cross pattern.When blade tracking is correct and all the nutshave been set to correct torque, apply a dab ofTorque Seal inspection putty to the top of eachnut as shown at right. This gives a clear visualindication that no further work is required.Wednesday, April 7, 2010 260 of 327
Pre-fit the spinner<strong>Jabiru</strong> <strong>J160</strong> Constructors <strong>Manual</strong>Post-Paint>Fuselage>Firewall forward>Fit propeller and spinnerTest fit the spinner – it can be fitted in 2 positions, so try it each way and use the positionwhere the holes all line up the best while giving an even gap around the base of the propeller.When the mounting position has been decided, mark each component with a permanentmarker as shown above so that if there is any need to remove the spinner or propeller all theparts can be refitted in the same position relative to each other.Fit the spinner in place and line it up with the back of the rear mounting plate and then push a5/32” pop rivet though all of the holes that line up. Working on one remaining hole at a time,drill a 5/32” hole through the spinner and the rear mounting plate and temporarily place a5/32” pop rivet in each hole to keep the spinner and the mounting plate in alignment.Work your way around all 6 holes in this manner. Repeat the process for the 6 holes in thefront mounting plate. The spinner should resemble a porcupine at this stage, with pop rivetsprotruding from the 12 mounting holes. Remove the pop rivets and the spinner and drill all theholes in the spinner out to 3/16” to provide clearance for the screw threads.Countersink each hole so that the Tinneman washers will sit flush against the spinner.Fit the captive nuts to the inside of the spinner mounting plates - use the captive nut itself(a complete captive nut assembly is shown below left) as a jig (below right) to drill the rivetholes– thread the screw part way through the captive nut from the back and fit the exposedend of the thread into the hole, then drill the 2 x 3/32” rivet holes.Countersink the rivet holes just enough to make a countersunk 3/32” rivet sit flush and fix thecaptive nuts in place and then enlarge the 5/32” holes in the mounting plates to 3/16” toprovide clearance for the screw threads.Wednesday, April 7, 2010 261 of 327
<strong>Jabiru</strong> <strong>J160</strong> Constructors <strong>Manual</strong>Post-Paint>Fuselage>Firewall forward>Fit propeller and spinnerFit the spinnerFit the spinner using 5/32” countersunk screws and Tinnerman washers.Use a long sanding block to sand the rear mounting plate flush with the rear of the spinner.ReassemblyRefit the spark plugs – refer to the engine manual for the torque settings. Remember to fit theCHT sensor under the left rear spark plug.Refit the spark plug leads. Each cylinder pair can only be fitted to the correct cylinder.Push each spark plug cap until it clicks fully home onto the spark plug end.Refit the ram air cooling ducts: fit and tighten the tappet cover screws and clip the springretainers to the cylinders.Check that everything inside the cowling is as it should be – all wiring secure, hose clampstight, scat hoses all tight, etc.Refit the top cowling. Fit the piano hinge pins first. The cowl fittings come in 2 lengths: the 3shorter ones go across the rear of the cowling while the 2 longer ones go each side of the prophub.This completes the Post-Paint>Fuselage>Firewall forward>Fit propeller and spinner task.Wednesday, April 7, 2010 262 of 327
Post-Paint>Fuselage>Fit wheel spatsObjectives of this task:<strong>Jabiru</strong> <strong>J160</strong> Constructors <strong>Manual</strong>Post-Paint>Fuselage>Fit wheel spatsTo final fit the spats or wheel fairings to the main wheels and the nose wheel.Main wheel spatsEach main wheel spat is held in place by a single bolt on the outside of the spat that fits intothe axle extension and 4 screws on the inside that fit to the spat mounting plate.Fit each spat into position over the wheel and secure with an axle bolt and a flat washer andthen fit the inside 3/32” machine screws and Tinnerman washers to the backing plate.Fit the rubber blanking plug to the tire pressure inspection hole on the outside of each spat.Nose wheel spatSupport the front of the aircraft so that the nose wheel is off the ground and remove the frontaxle and wheel. Fit the front of the spat over the yoke and refit the front wheel and the axle,passing the axle through the spat, yoke and wheel as shown below. Fit a flat washer to eachside of the axle. Lower the nose wheel back to the ground.Fit the castellated axle nut and tighten to safety then secure the nut with a lock pin. Screw thespat to the yoke with a short 3/32” machine screw and Tinnerman washer to each side of thespat (arrowed in red in the photo below left).Fit the rear section of the spat to the front section with 8 x 3/32” machine screws andTinnerman washers as shown in the photo above right. Fit the rubber blanking plug to the tirepressure inspection hole on the left hand side of the spat.This completes the Post-Paint>Fuselage>Fit wheel spats task.Wednesday, April 7, 2010 263 of 327
Post-Paint>Wings>Install aileron cablesObjectives of this task:<strong>Jabiru</strong> <strong>J160</strong> Constructors <strong>Manual</strong>Post-Paint>Wings>Install aileron cablesTo install the aileron cables in the wings. The cable is tied to a pre-installed drawstring andcarefully drawn through the wing ribs. This task requires two people: one person to pull thedrawstring and a helper to feed the cable into the wing.Place the cableThe labelled end of the cable is the end that goes inside the cabin, so the unlabelled end is theend that goes out through the wing to the aileron. This task will describe feeding the cable infrom the wing root and out of the aileron access hole.Fit a rod end to the unlabelled end of the cable – the rounded end will aid the passage of thecable through the high-density foam ribs – and push the inner cable all the way in towards thelabelled end of the cable. This will make the pulled end of the cable shorter and thus it will bemore flexible to follow the curved path inside the wing (refer to the second photo below).There is a drawstring inside in the wing with extra string coiled around a stick at the aileronend that will be visible through the aileron cable inspection opening. Loosen the drawstringand check that it can be moved freely, then pull a short length out of the wing root (circledabove) and tie it firmly through the rod end. Wrap cloth tape around the cable end from therod end all the way back to the outer cable: this will ease the cable through the wing ribs.The aileron cable runs along the rear ofthe wing and then curves around andback and emerges at the aileron drivearm position as shown in the drawingexcerpt of the outboard end of the wingat right:Front of wingHave your helper feed the cable intothe wing while you pull gently on thedrawstring through the aileron cableinspection opening. Work slowly anddo not apply too much pressure butrather move the cable carefully and shake it if it seems to catch at any time.Aileron cableIt will help if your helper can slowly rotate the outer cable while you ease the cable aroundthe curve at the outboard end of the wing. Do not pull strongly on the drawstring: if you doyou will only succeed in cutting the string into the foam ribs and wedging the cable, whichwill make it extremely difficult to complete the task.Feed the cable through the wing until it can be pulled through the aileron cable inspectionopening, then discard the cloth tape and string and remove the rod end.Push the cable back into the aileron cable inspection opening and pull the end of it out of theaileron cable slot in the upper surface of the wing.Wednesday, April 7, 2010 264 of 327
Connect the aileron cable<strong>Jabiru</strong> <strong>J160</strong> Constructors <strong>Manual</strong>Post-Paint>Wings>Install aileron cablesThe cable is held to a strengthened rib inside the wing by a saddle clamp and 2 x AN3 boltsand Nyloc nuts. Access is from the aileron cable inspection opening and the 38mm holebeside it: the bolts are fed through from the back of the rib (through the 38mm hole) and thenthe clamp backing plate goes against the rib, then the cable and then the saddle bracket withthe aligning indentation fitting into the slot on the outer cable and the assembly is held inplace with Nyloc nuts. Check that the cable is correctly positioned and tighten both nutsfirmly. Mark each nut with TorqueSeal or similar.Fit the inspection coverAt this time you can fit the clear acrylic inspection cover to the inspection opening.Fit the threaded fairing sockets to the inspection cover and then position the cover inside thewing and fix in place with 8-32 button head screws, all as shown in the drawing above.This completes the Pre-Paint>Wings>Install aileron cables task.Wednesday, April 7, 2010 265 of 327
Post-Paint>Wings>Fit stall warningObjectives of this task:To fit the stall warning device to the left wing.Materials required:Card #6: „Stall warning‟5-minute Araldite and flockMark and drill the wing root<strong>Jabiru</strong> <strong>J160</strong> Constructors <strong>Manual</strong>Post-Paint>Wings>Fit stall warningMark a position in the left-hand wing root 75mm back from the leading edge and drill a10mm hole at that location in line with the wing attach bolt hole in the front lug.The clear plastic stall warning tube will enter the wing here.Assemble the stall warningUse 5-Minute Araldite and flock to fix the aluminium stallwarning funnel to the plate, about 4mm back from thefront edge, and then cut the stainless steel gauze to sizeand flock it by the edges to the front of the funnel asshown at right. Leave to cure, then round the front edgesof the plate carefully. Roughen the sides and bottom of theassembly.Mark and cut the leading edgeMeasure out 1195mm from the wing root of the left-handwing and mark the location. Use cloth tape to protect thepaint on the leading edge of the wing during this step.Using the drawing on the next page, locate the verticalcentre of the stall warning aperture and mark the location.Recheck your measurements carefully and drill a pilothole, then widen the hole to 10mm and file carefully outto a rectangle 12mm high and 19mm wide. The top of theopening should be precisely on the leading edge of thewing. Final size the hole to fit the stall warning assembly.Hold the lip at the bottom of the assembly with plierswhile fitting – be careful not to drop it inside the wing.Fit the stall warning assemblyUse a steel rod to feed the plastic tube in from the wingroot and through the wing ribs until it can be seen thoughthe hole in the leading edge, then pull the tube throughusing a wire hook and superglue and lock wire the tube tothe rear of the stall warning funnel.Apply 5-Minute Araldite and flock to the bottom andsides of the stall warning assembly and carefully slide itback into the wing until the gauze is flush with the leadingedge of the wing and leave to cure. Remove the protectivecloth tape.Wednesday, April 7, 2010 266 of 327
<strong>Jabiru</strong> <strong>J160</strong> Constructors <strong>Manual</strong>Post-Paint>Wings>Fit stall warningThis completes the Post-Paint>Wings>Fit stall warning task.Wednesday, April 7, 2010 267 of 327
Post-Paint>Wings>Prepare wings for fittingObjectives of this task:To prepare the wings prior to fitting them to the fuselage.Materials required:Resin and flockCard #16 „Flaps‟Prepare the flaps<strong>Jabiru</strong> <strong>J160</strong> Constructors <strong>Manual</strong>Post-Paint>Wings>Prepare wings for fittingRun a 3/16” drill though the bolt hole in each flap hanger to clear any paint and debris out ofthe holes. Clean out the 1/4” holes in the flap pivot arms in a similar manner.The flaps will be fitted to the wings after the wings have been fitted to the fuselage.Fit the aileronsHold the aileron in place and slide the hinge pins though each hinge, starting from the side ofthe hinge where the pin retaining slot was filed in the Pre-Paint>Wings>Fit ailerons task.Fit the pin retainers and hold them in place with a 5/32” machine thread screw.Place the ailerons in the neutral position and place a length of cloth tape over the top surfaceof the wing and the aileron. This will prevent the ailerons from dropping when the wing isturned right way up.Turn the wings over so that they are right way up.Fit the aileron cable rod end to the aileron drive arm with an AN3 bolt fitted through the drivearm, then an AN960-416 (3/16”) flat washer, then the rod end followed by an AN960-515(1/4”) flat washer and a Nyloc nut as shown in the photos above.Tighten the Nyloc nuts to safety and mark with Torqueseal.Wednesday, April 7, 2010 268 of 327
Fit the fuel gauges<strong>Jabiru</strong> <strong>J160</strong> Constructors <strong>Manual</strong>Post-Paint>Wings>Prepare wings for fittingRemove the masking tape from over the fuel gauge boss in the wing root and clean the area.Test fit each fuel gauge – feed the float unit into the wing tankand hold the gauge in place with 2 screws. Check the emptyindication – the needle should sit slightly below the “E” or“Empty” mark as shown in the photo at top right.If it does not then the gauge will need to be adjusted.The gauge needle is driven by a magnet that is turned by theaction of a float that sits inside the fuel tank. The gauge can bedisassembled by pulling the black nylon float drive out of thealuminium gauge body and the magnet can be twisted slightlyby hand. See the photos below for detail of the gauge unit.Gauge unit assembledFloatdriveMagnetGaugebodyThe gauge can then be reassembled and rechecked (and readjusted if necessary) until it readscorrectly.The nylon drive unit barrel should be a firm fit into the gaugebody: if the fit is not entirely to your satisfaction then a smear ofLoctite 577 Sealant should be applied to the barrel.When the gauges are fitted each of the 4 retaining screws andthe top and bottom gauge face screws should have a small dropof Loctite 242 Threadlocker applied before fitting.Carefully bend the electrical spade terminals out so that they areparallel to the face of the gauge as shown circled at right.Fit the fuel tank connector blocksFit the tank connector blocks through the slots in each side of the fuselage and push eachconnector block fully forward in the slot.Use the supplied layer plate as shown in thephoto at right to hold the connector blocks inthe fully forward position and fix to thefuselage with 2 x 8G stainless steel selftappingscrews.Wednesday, April 7, 2010 269 of 327
Fuel lines and fittings<strong>Jabiru</strong> <strong>J160</strong> Constructors <strong>Manual</strong>Post-Paint>Wings>Prepare wings for fittingThere are 3 fuel lines that need to be connected in the wing root: the bottom 2 carry fuel to theheader tank while the top line is the breather for the header tank. These fuel lines each need tobe fitted and then cut to an approximate length of 300mm behind the rear of the wing.All 3 lines exit the wing root towards the rearand both of the fuel lines will have a springfitted to prevent any chance of a kinkdeveloping when the lines are bent to the rear,while the breather line faces rearwards already.Fit each fuel line to the tank fitting and securewith a hose clamp. Slide a 100mm length ofspring over each fuel line, push all the way upto the hose clamp and fix in place with siliconesealer at the hose clamp end as shown in thephoto at right.Label the other end of each fuel line with tapeas shown at right. This is essential becauseonce the wing has been fitted it will be verydifficult to determine which line is which if ithas not been labelled.“B” = breather line“F” = front fuel line“R” = rear fuel lineFit the fuel gauge windowsLocate the clear, round fuel gauge windows and Superglue them over the outside of the fuelgauge holes in the wing root area of the fuselage.Wednesday, April 7, 2010 270 of 327
Fit the vent tubes to the fuel filler caps<strong>Jabiru</strong> <strong>J160</strong> Constructors <strong>Manual</strong>Post-Paint>Wings>Prepare wings for fittingThe fuel filler caps came partly assembled on the card and were fitted to the fuel filleropening on the wing in the Pre-Paint>Wings>Prepare wing root task to keep dirt out of thewing tanks, all that remains now is for you to fit the vent tubes to the fuel caps.Fuel cap Vent tube Vent ball Vent capWorking on one wing at a time, remove the fuel cap and place a clean cloth or a piece of tapeover the fuel filler opening so that no dirt or debris can fall into the tank during this process.Start by carefully cleaning away any paint from the top of the fuel cap and in particular fromthe vent tube hole in the top of the cap.Use a file to cut 4 notches each 1mm deep into the top of the vent tube. Remove all burrs.Fit the notched end of the vent tube to the vent cap – the vent tube should be a snug fit intothe vent cap, use fine sandpaper if required to size the tube to a good fit. Now, working upsidedown, drop the small white vent ball into the vent cap and use a smear of Loctite 620 to fixthe vent tube into the vent cap. Make sure that nothing has caught the vent ball – the ballshould still rattle in the vent cap when the assembled tube and cap is shaken.Fit the vent tube to the hole in the top of the cap – the vent tube should be a snug fit into thehole, use fine sandpaper if required to size the tube and then fix it in place with Loctite 620with the breather holes in the vent cap facing towards the outside of the fuel cap.This completes the Post-Paint>Wings>Prepare wings for fitting task.Wednesday, April 7, 2010 271 of 327
Post-Paint>Wings>Fit wingsObjectives of this task:<strong>Jabiru</strong> <strong>J160</strong> Constructors <strong>Manual</strong>Post-Paint>Wings>Fit wingsTo final fit the wings to the fuselage. This is a repeat of the Pre-Paint task but because youhave already pre-fitted the wings they can now be fitted into place more easily. This task willdiscuss the fitting of one wing at a time.In our factory we use 3 people for this task, so ask 2 friends over to help you.Do not try to do this task with less than 3 people or you risk dropping the wing.PreparationPlace 2 trestles beside the fuselage and laythe wings on them.Fit the bottom of the strut to the lowerfuselage mount and secure with an AN175-15A bolt inserted from the front and anAN960-516 washer MS20365-528 nut. Restthe outboard end of the strut against a sawstool as shown at right.Lay the AN4-14A wing attach bolts andsome AN960-416 washers on top of thefuselage where you can easily reach them.Fit the wingOne person holds the outboard end of the wing while the other 2 hold the front and back ofthe wing root as shown in the photo above.Carefully walk the wing in to the fuselage, feeding the aileron cables through the fuselageholes and feeding the fuel lines, stall warning tube and any electrical wiring, and guide thewing attach lugs on the wing into the aluminium wing attach brackets on the fuselage.The fit between the wing attach lugs on the wing into the aluminium wing attach brackets willbe tight and it may take some careful positioning of the wing to get them to fit – the outboardend of the wing may need to be moved forward or backwards to get the correct alignment.Wednesday, April 7, 2010 272 of 327
<strong>Jabiru</strong> <strong>J160</strong> Constructors <strong>Manual</strong>Post-Paint>Wings>Fit wingsEach AN4-14A wing attach bolt should be fitted with one AN960-416 washer under the headof the bolt and one AN960-416 washer under the nut.It will be necessary to gently tap the AN4-14A bolts into place – tap in until the head of thebolt is seated hard against the aluminium wing attach bracket and then put an AN960-416washer and a MS20365-428 nut and tighten up until the nut is in safety: there should be atleast 1½ threads showing though the nut but not more than 3 threads showing.DO NOT OVERTIGHTEN THESE BOLTS. They should be just tight enough to preventrotation. Over tightening may result in failure of the wing attach lugs.Fit the strutWhen both wing attach bolts are in place, lift the strut up to the underside of the wing and fitthe strut to the wing with an AN175-15A bolt inserted from the front and an AN960-516washer MS20365-528 nut and tighten up until the nut is in safety: there should be at least 1½threads showing though the nut but not more than 3 threads showing.DO NOT OVERTIGHTEN THESE BOLTS. They should be just tight enough to preventrotation. Over tightening may result in failure of the strut attach lugs.Repeat the fitting process for the other wing.Fit the stall warning hornTrim the stall warning tube to length and fit the stall warning horn to the end of the tube.Hold the stall warning horn to the cabin upholstery with Velcro strips.Test by sucking on the stall warning in the leading edge of the wing until you hear the horn.This completes the Post-Paint>Wings>Fit wings task.Wednesday, April 7, 2010 273 of 327
Post-Paint>Wings>Connect aileronsObjectives of this task:<strong>Jabiru</strong> <strong>J160</strong> Constructors <strong>Manual</strong>Post-Paint>Wings>Connect aileronsTo connect the aileron cables and set the aileron deflections. One person can do this task but itis much easier with 2 people: one to position the ailerons and one to make the adjustments.Fit the outer cablesAileron cablesWedge pins“R” clipsAileron bracketsFeed each aileron cable through the sameside bracket in the seat back: the left-handcable though the left-hand bracket and theright-hand cable through the right-handbracket.Fit the groove in the outer cable into theshaped hole and push the cable forward sothat the cable seats into the bracket, thenfit the retaining wedge pin in behind thecable, push the wedge pin firmly downand secure it in the bracket with theretaining spring clip as shown at right.Aileron cableWedge pin“R” clipDetail view of the aileron cable in the bracketSet the ailerons to the neutral positionSet the ailerons to the neutral position: a straightedge held under the wing must touch thefront and back of the wing and the back of the aileron as shown arrowed in the photo above.Keep the straightedge handy – this setting will need rechecking several times.Wednesday, April 7, 2010 274 of 327
Set the aileron cable lengths<strong>Jabiru</strong> <strong>J160</strong> Constructors <strong>Manual</strong>Loosen off the lock nuts on the rod ends at both ends of each aileron cable.Set the control stick so that it is centred laterally/from side to side.Post-Paint>Wings>Connect aileronsCheck that both ailerons are still set to the neutral position and then carefully adjust the rodends on each aileron cable by hand so that an AN3 bolt can be fitted though the rod end andthe aileron bellcrank on each side.Aileron cablerod endsAileronbellcrankAileronstop boltRear ofconsoleIt may be necessary to adjust the cable length at both ends of the cable, and ideally the rodends should be adjusted to be close to equal with the same amount of thread showing at eachend of the cable. Work on one side at a time and check that the aileron is still neutral and thestick is still centred, then move to the other side.Take your time with this step: it is easy to bump the control stick slightly while testing cablelengths and it may be necessary to repeat the process several times until both ailerons are setto neutral and the cable lengths are both correct.Ensure that the inboard end of the aileron cables are connected to the same side of the aileronbellcrank at the rear of the control column: the left wing cable must connect to the left side ofthe bellcrank and the right wing cable must connect to the right side of the bellcrank.When both aileron cable lengths have been set with the ailerons in the neutral position and thestick centered, fit the rod ends to the aileron bellcrank with an AN3 bolt. Fit an AN960-515(1/4”) flat washer, then the rod end followed by an AN960-416 (3/16”) flat washer, then thebellcrank, another AN960-416 (3/16”) flat washer and a Nyloc nut.Tighten the Nyloc nuts to safety and mark each nut with a dab of TorqueSeal.Tighten the rod end locknuts at each end of each aileron cable firmly and mark each locknutwith a dab of TorqueSeal.Wednesday, April 7, 2010 275 of 327
Set the aileron deflections<strong>Jabiru</strong> <strong>J160</strong> Constructors <strong>Manual</strong>Post-Paint>Wings>Connect aileronsOnce the aileron cables have been adjusted to length with the ailerons in the neutral positionand the stick centred, the full travel deflections can be set.In the kit there is an aileron deflection template. Place this template on top of the wing and setthe aileron to the full UP travel deflection as shown in the photo above (note the 3 arrowedpoints where the template touches) and then adjust the stop bolt on the aileron bellcrank sothat the bolt just touches the eccentric stop at full deflection.The eccentric stop that you fitted in the Post-Paint>Fuselage>Interior>Fit console controlstask can be rotated if required to give an equal length to the stop bolts.Repeat the process for the other aileron and tighten the stop bolt locknuts.Final checkRecheck each step:Check that the outer cables are firmly fixed into the brackets by the wedge pins and that thewedge pins are held by the “R” clips;Centre the control stick and check that both ailerons are in the neutral position. Make minoradjustments as required;Check that the aileron stops are set correctly for full deflection: when the control stick is atfull left deflection the left aileron should touch the aileron deflection template at all 3 pointsand when the control stick is at full right deflection the right aileron should touch the ailerondeflection template at all 3 points. Make minor adjustments as required;When all of the settings are correct check all 4 rod end lock nuts (2 on each cable) and the 2aileron stop lock nuts for tightness and mark each one with a dab of Torqueseal.This completes the Post-Paint>Wings>Connect ailerons task.Wednesday, April 7, 2010 276 of 327
<strong>Jabiru</strong> <strong>J160</strong> Constructors <strong>Manual</strong>Post-Paint>Wings>Connect wing tanksPost-Paint>Wings>Connect wing tanksObjectives of this task:To connect the fuel lines and earth the wing tanks to the fuel system.Size and connect the fuel linesBreatherBack pickupFront pickupHold the fuel lines under the connector block and cut each line to length so that they can befitted to the connector block as shown above. There must be no kinks in any fuel line.As you can see from the photos above and atright (taken from the Pre-Paint>Fuselage>Interior>Fuel system task) the back fuelpickup goes to the inside ferrule, the frontfuel pickup goes to the middle ferrule and thebreather goes to the outside ferrule.Working from the inside line to the outside,hold each fuel line in place with a hose clampand tighten each clamp firmly.Route the earth wiresRun a length of white aviation wire from the front of each wing, through the aileron hole inthe fuselage and into the top of the fuel linesheathing from each wing tank. Run the wireall the way down into the header tankenclosure and leave enough length to connectto the common earth post in the floor of theenclosure.Crimp a red ring terminal to the bottom ofeach wire and fit to the common earth post inthe header tank enclosure (arrowed at right) –the same earth post that connects the earthfrom the fuel pump and the quick-drainfitting on the header tank. The top of eachearth wire will be connected to the quickdrainfittings on each wing after the wingroot fairings have been fitted in the Post-Paint>Wings>Fit fairings task.Commonearth postThis completes the Post-Paint>Wings>Connect wing tanks task.LeftBackFrontBreatherRightWednesday, April 7, 2010 277 of 327
Post-Paint>Wings>Fit flapsObjectives of this task:<strong>Jabiru</strong> <strong>J160</strong> Constructors <strong>Manual</strong>Post-Paint>Wings>Fit flapsTo fit the wing flaps to the wings and adjust their deflection. We use 2 people in the factory tocarry out this task and we recommend that you do the same as the flap is too long for oneperson to handle and there is a risk of damaging the painted surface of the flap and the wing.Materials required:“Wotan” cloth tape to hold the flaps up while adjusting the flap push rod lengths.Fit the flap push rods to the flapsFit a rod end and plain locking nut to one endof each flap push rod and tighten the locknuts firmly. Lay the flaps upside down ontrestles and fit the flap push rods to theinboard end of each flap.Working through the access hole in the flap,feed an AN3-13A bolt with an AN960-416(3/16”) flat washer under the head from theinside of the flap through the drive post.Fit 3 x AN960-416 (3/16”) flat washers, thenthe rod end and an AN960-515 (1/4”) flatwasher and a Nyloc nut as shown in thephoto at right. Tighten the nut to safety.The flap push rods should now be centred inthe slot in the leading edge of the flap.AccessholeDrivepostFlappush rodInboard end of inverted flap showing push rod attachmentFit the flaps to the wingsEach flap post bolt hole has a short length of Bundy tube spacer fitted inside (tip: a smear ofgrease will hold the spacer in place while fitting) and the flap post fits into the flap hanger andis then secured with an AN3-8A bolt.Working on one flap at a time, fit the flap to the wing with the AN3 bolts with a 3/16” flatwasher under the head of each bolt. Fit a 3/16” flat washer and Nyloc nut and tighten each nutto safety. Check that the flap can be extended and retracted by hand, taking care not to scratchthe fuselage or the side window when the flap is near full deflection.TouchinghereGap equal to 2mixing sticks hereTouchinghereHold a straightedge under the wing and flap with a gap equal to 2 mixing sticks at the rear ofthe wing and touching at the front and back, all as shown in the photo above.Wednesday, April 7, 2010 278 of 327
Tape the flap into position with a length ofcloth tape as shown arrowed in the photo atright.Fit and set the other flap in the same manner.The flaps are now in the fully retractedposition and are ready for the flap push rodsto be connected to the flap drive arms in thenext step.<strong>Jabiru</strong> <strong>J160</strong> Constructors <strong>Manual</strong>Post-Paint>Wings>Fit flapsConnect and adjust the flapsApply power to the flap motor and extendthe actuating shaft fully as shown at right.Fit a rod end with a plain locking nut to thefree end of the flap push rods and screw therod end into the flap push rods until the holein the rod end lines up with the hole in theflap drive arm, then fit the rod end into theclevis in the flap drive arm as shown belowright with an AN3-10A bolt with a 3/16”washer under the head of the bolt andanother 3/16” flat washer and a Nyloc nutand tighten the nut to safety. Tighten theplain locking nut firmly.Repeat the process for the other flap. At thispoint the flaps have been fitted and adjusted.Apply power to the flap motor and extendthe flap to the first position and check bothflaps for clearance from the fuselage.Have someone watch each flap as youcontinue to extend the flaps to the second“full flap” position and check each flap forclearance from the fuselage until the full flapposition is reached.If you set your flap end clearances correctly in the Pre-Paint>Wings>Test fit wings task thereshould be no problems, but if the flaps do touch the fuselage then you will need to remove theflap and cut the end of the flap away to maintain a 5mm clearance from the fuselage.This completes the Post-Paint>Wings>Fit flaps task.Wednesday, April 7, 2010 279 of 327
Post-Paint>Wings>Fit fairingsObjectives of this task:<strong>Jabiru</strong> <strong>J160</strong> Constructors <strong>Manual</strong>Post-Paint>Wings>Fit fairingsTo fit the final trim: specifically the wing root fairings, the upper strut fairings, the lowerstrut/main gear recess fairings and the wheel spats.Wing root fairingThe wing root fairing comes in 2 parts: upperand lower. Fit the lower fairing first – tapethe fairing into place with the fairing justtouching the fuselage and then screw thefairing to the wing with 5 x evenly-spaced6G stainless steel self-tapping screws.Fit the fuel block fairing to the lower fairingwith 2 x 6G stainless steel self-tappingscrews.Fit the top fairing with the front returnoverlapping the lower fairing and screw inplace in the same manner.Repeat the process for the other wing.Refer to the photos at right for details ofplacement and screw spacing.Wing tank earthFit a length of lock wire to the quick-drainfitting under the wing and long enough toreach the rear fairing screw and twist it.Crimp a red ring connector to the lock wire.Trim the white earth wire that you fitted inthe Post-Paint>Wings>Connect wing tankstask so that it reaches the rear fairing screwand crimp a red ring connector to it. Fit bothring connectors under the rear fairing screwand tighten the screw firmly.Repeat the process for the other wing.Strut to wing fairingEarthingconnectionFuel blockfairingLock wireearthQuick-drainfittingEarthconnectionFit the front section of the fairing into place with 6G stainless steel self-tapping screws asshown in the photos above. Repeat the process for the other wing.Wednesday, April 7, 2010 280 of 327
<strong>Jabiru</strong> <strong>J160</strong> Constructors <strong>Manual</strong>Post-Paint>Wings>Fit fairingsLower strut/main gear fairingRight hand side strut/main gear fairing from below (top photo) and side on (above)Start by tucking the brake lines up into the main gear recess and zip tying them to the top rearof the main gear legs. Connect the pitot line from the right hand strut to the instrument panelline with a blue water trap connector and tuck the pitot line up into the main gear recess.Fit the right hand section first: tuck the blue water trap connector into the fairing and then fitthe fairing into place and hold it there temporarily with some cloth tape while you fit the5/32” machine screws and washers, then fit the left hand section in the same manner.This completes the Post-Paint>Wings>Fit fairings task.CONGRATULATIONS, you have completed construction!!Now, on to Testing.Wednesday, April 7, 2010 281 of 327
Testing>General<strong>Jabiru</strong> <strong>J160</strong> Constructors <strong>Manual</strong>Testing>GeneralHere we are: the <strong>Construction</strong> phase has been completed and the task in hand is to thoroughlycheck the aircraft in preparation for flight and then, finally, test fly the aircraft for first time.Many tasks need to be completed prior to the first flight:The aircraft must be carefully Weighed and Balanced and, if necessary, rebalanced tosuit your intended loadings and the information recorded in the Owners <strong>Manual</strong>;The Rigging (the deflection of the control surfaces) must be rechecked – eachdeflection was set as part of the relevant Post-Paint tasks so this is essentiallyconfirming your earlier work and making minor adjustments if required;The Fuel Gauges will need to be calibrated so that you will have an accurate indicationof fuel quantity;You will need to affix the required placards and decals as listed in Section 2.8 of theOwners <strong>Manual</strong>;You will need to fit the Registration Markings required by your country‟s aviationauthority;An extensive Pre-Flight Checklist must be completed: this checklist runs to 15 pagesand to complete it correctly will take you several days;And finally the Test Flight, which will require a disciplined approach and whichshould be conducted by a suitably experienced pilot.Resist any temptation to rush these final tasks; it is extremely important that all checks becompleted correctly before flight is attempted. Failure to do so could have severeconsequences, so take your time and be very thorough!So there is still quite a bit of work to do, but you are within a week or 2 of finishing yourbuild, depending of course on how much time you can devote to these tasks.This would be a good time to have a clean-up of both the aircraft and your workshop:Clean the aircraft interior: remove anything that is not part of the aircraft (tools, rags,sandpaper, etc) and vacuum out any dust and dirt.Wash the exterior with clean water with a little soap (most car washing products aresuitable) and chamois dry.Clean the windscreen and windows carefully and if necessary use some Novusproducts (refer to Post-Paint>Fuselage>Fit doors for details) to clear any minormarks or scratching.Clean your work area thoroughly and organise your tools.Locate your deflection templates: you will need them shortly.OK, let‟s get on with it – the end is in sight!Wednesday, April 7, 2010 282 of 327
Testing>Weight and balanceObjectives of this task:<strong>Jabiru</strong> <strong>J160</strong> Constructors <strong>Manual</strong>Testing>Weight and balanceTo calculate the Empty Weight and the balance point or Centre of Gravity of the aircraft.The Empty Weight Trim Index is calculated from these values and then various loadingscenarios are be tested to see if any rebalancing of the aircraft is required. Finally all valuesare entered into the Aircraft Empty Weight Record in Section 6.2 of the Owners <strong>Manual</strong>.Equipment required:3 bathroom scales capable of weighing up to 150KgPlumb bob and string line, set squareBuilders type spirit levelChalk and a builders chalk line to mark the reference positions onto the hangar floorPrepare the equipmentBefore you do anything else, check your scales for accuracy: use some objects of a knownweight, such as a few 20Kg bags of cement to see if your scales are reading correctly ataround the 100Kg range of the scale.If there is a problem then either adjust the scale or, if this is not possible, note how much thescale over/under reads and apply this as a correction to the weight displayed.Prepare the aircraftRemove all surplus items from the cockpit: tools, clothing, etc. and clean the interior of theaircraft with a vacuum cleaner. Clean the exterior of the aircraft: remove all dust and dirt witha damp cloth. Check that the engine oil is full to the bottom of the hatched marking on thedipstick. Turn the fuel tap on the console to the OFF position (lever facing up).Fill the header tank with fuel but leave zero fuel remaining in the wing tanks.The aircraft should contain everything required for flight except fuel in the wing tanks.Reference pointsIn this task you will be measuring the horizontal distances from the Datum, which is theleading edge of the wing, to the main wheel axles and the front wheel axle.Each reference point will be marked onto the hangar floor and then measured.Mark and measureRefer to the drawing on the next page for colour-coded details of the line markings.Use a chalk line to mark 2 lines at least as long as the aircraft on the hangar floor in a rightangle cross. Roll the aircraft directly along one line (coloured blue in the drawing) until themain wheels are directly over the second line (coloured green in the drawing).The main wheel axles must be directly over the second (green) line: use a square or a plumbline from the axle bolt centres in the main wheel spats to check this and move the aircraft asrequired. Leave the brakes off and chock the main wheels when the position is correct.Mark the Datum line (coloured purple in the drawing) on the floor by means of a plumb linehung from the leading edge of each wing, using a point about 300mm outboard of each mainwheel. Join both Datum line marks and mark a line across the floor with your chalk line.Wednesday, April 7, 2010 283 of 327
<strong>Jabiru</strong> <strong>J160</strong> Constructors <strong>Manual</strong>Testing>Weight and balanceMark a point on the floor directly under the centre of the front axle bolt on each side: use asquare or a plumb line from the axle bolts in the front wheel spat to check this.Now measure the distance from each side of the front axle (the red line above) to the Datumline: these are distances A and B. add them both together and divide by 2 to get the averagedistance – this will compensate if the front wheel is not set exactly straight ahead. Enter thedistance as a negative value in the Distance to Datum column on the chart on the next page.Measure the distance from the left main wheel axle to the Datum line and enter the value atdistance C in the chart on the next page. Do the same for the right main wheel (distance D).Wednesday, April 7, 2010 284 of 327
Weigh the aircraft<strong>Jabiru</strong> <strong>J160</strong> Constructors <strong>Manual</strong>Testing>Weight and balanceThe weighing part of this procedure should be conducted in a closed hangar with a level floor.Because the aircraft is very light any wind will adversely affect the weights, so a closedbuilding, without any doors being opened during the procedure, is required.Place a set of scales under each wheel and level the aircraft: use a builders level across thelower door sills to check for lateral level, and along each lower door sill to check forlongitudinal level. Pack under wheels as required to level the aircraft.Record the weight of each wheel under the “Weight” column in the chart below.Note: if you have access to only 1 set of scales you may weigh each wheel individually,however you will need to pack under the other wheels to level the aircraft before each weightis recorded.Calculate the Empty Weight and Centre of GravitySum all of the items in the Weight column and put the total at the bottom of the column.All distances aft of the Datum are considered positive and all distances forward of the Datumare considered negative in the calculation that we are about to do in this step.Calculate the Moment of each wheel: starting with the nose wheel, multiply the Weight by theDistance to Datum and record the result in the Moment column. Note that the Distance toDatum value for the nose wheel will be a negative value and the result will also be negative.Multiply the Weight by the Distance to Datum and record the result in the Moment column foreach main wheel. These results will both be positive values.Sum all of the items in the Moment column and put the total at the bottom of the column.Divide the total Moment by the total Weight and record the result in the red box at the bottomof the chart – this is the distance aft of the leading edge where the empty aircraft will balanceand is referred to as the Empty Aircraft Arm.ItemWeight(kg)X Distance to Datum =(mm)Nose wheel (A+B)/2 - -Left main wheel (C) + +Right main wheel (D) + +Column totals:Empty Aircraft Arm:Moment / WeightMoment(kg/mm)mm aft of DatumCalculate the Empty Weight Trim IndexMultiply the Empty Aircraft Weight by the Empty Aircraft Arm and divide the result by 1000to arrive at the Empty Weight Trim Index.This value can be used in the Load and Balance Worksheets in Section 6 of the Owners<strong>Manual</strong>.Wednesday, April 7, 2010 285 of 327
Examples of calculationBelow is an example calculation showing typical values:ItemWeight(kg)<strong>Jabiru</strong> <strong>J160</strong> Constructors <strong>Manual</strong>X Distance to Datum =(mm)Testing>Weight and balanceMoment(kg/mm)Nose wheel 75 - 780 - 58,500Left main wheel 108 + 475 + 51,300Right main wheel 108 + 475 + 51,300Column totals: 291 Moment / Weight 44,100Empty Aircraft Arm 151.55 mm aft of DatumEmpty Weight Trim Index: [(291 x 151.55) / 1000] = 44.1.Rebalancing the aircraftYou must now use the Load and Balance Worksheets in Section 6 of the Owners <strong>Manual</strong> totest all of the likely loading scenarios for your intended operations and see if any fall outsideof the envelope.For factory built aircraft we are required to use the CASA-approved standard passengerweight (currently 86kg) to calculate loadings, but as you are the builder you may choose touse the actual weights of yourself and your regular passenger(s) along with items that youintend to carry with you, such as tie downs, toolkit, suitcases, camping equipment and so on.If it seems possible that an intended loading could exceed, for example, the forward limit,then you would need to consider adding some ballast to the rear of the aircraft.If any rear ballast is required the preferred method is to add it in the form of lead shot mixedwith resin to the ventral fin. (Note: It is unusual to need forward ballast – if there is anintended loading that would require forward ballast it will usually be very close to MTOWanyway and should very probably be avoided all together.)Assuming that rear ballast is required you would measure the arm of the ballast station/location from the Datum and calculate the weight of ballast required, adjust the calculations toobtain a revised Empty Aircraft Weight, Empty Aircraft Arm and Empty Weight Trim Indexand then retest all of the likely loading scenarios for your intended operations and see if anystill fall outside of the envelope.Once you are satisfied that the majority of the likely loading scenarios for your intendedoperations will fall inside of the envelope, you may physically add the ballast and repeat theweighing procedure and then record the revised values in the Aircraft Empty Weight Recordin Section 6.2 of the Owners <strong>Manual</strong>.This completes the Testing>Weight and balance task.Wednesday, April 7, 2010 286 of 327
Testing>Rigging checkObjectives of this task:<strong>Jabiru</strong> <strong>J160</strong> Constructors <strong>Manual</strong>Testing>Rigging checkTo perform a final check of all control surface deflections and make any adjustments that maybe required prior to the first flight.Each control surface has had its deflections set as part of the appropriate fitting task, so thisfinal check is just to verify that nothing was missed during assembly.Materials required:Deflection templates for all control surfacesStraightedge 1 metre longRudderCheck the rudder travelTape the rudder template over the rear of the empennage.Place a saw stool under the front of the fuselage to lift thenose wheel off the ground and then adjust the ruddercable length so that the rudder sits on the centre markwith the rudder pedals centred and all level.Use the rudder pedal adjustment set screws (shownarrowed at right) if required to adjust the rudder travel sothat the rudder deflects to each full travel mark as shownin the photos above and mark each with TorqueSeal.FlapsRudder pedal adjustment detailHold a straightedge under the wing and flap with a gapequal to 2 mixing sticks at the rear of the wing and touching at the front and back, all asshown in the photo below. Adjust the flap pushrods if required until all 3 positions aretouching on each wing. Tighten the pushrod locknuts and mark each with TorqueSeal.TouchinghereGap equal to 2mixing sticks hereTouchinghereWednesday, April 7, 2010 287 of 327
<strong>Jabiru</strong> <strong>J160</strong> Constructors <strong>Manual</strong>Testing>Rigging checkAileronsCheck the control stick with the ailerons in the neutral positionSet the ailerons to the neutral position: a straightedge held under the wing must touch thefront and back of the wing and the back of the aileron as shown arrowed in the photo above.The control stick should be centred left to right at this position.Adjust the aileron cable lengths as required to centre the control stick.Check that all rod end jam nuts are tight and mark each with TorqueSeal.Check the aileron deflectionsPlace the aileron deflection template on top of the wing and set the aileron to the full UPtravel deflection as shown in the photo above (note the 3 arrowed points where the templatetouches) and then check and adjust the stop bolt on the aileron bellcrank so that the bolt justtouches the eccentric stop at full deflection.The eccentric stop that you fitted in the Post-Paint>Fuselage>Interior>Fit console controlstask can be rotated if required to give an equal length to the stop bolts.Repeat the process for the other aileron, tighten the stop bolt locknuts and mark each withTorqueSeal.Wednesday, April 7, 2010 288 of 327
<strong>Jabiru</strong> <strong>J160</strong> Constructors <strong>Manual</strong>Testing>Rigging checkElevatorCheck the elevator travelUse the supplied deflection templates to check the up and down travel of the elevator.DOWN elevator templateHold the control stick all the way forward (have someone help you) and check the amount ofdown deflection and adjust the cable length (by screwing the rod ends in or out an equalamount at each end of the cable) until the down deflection is correct.UP elevator templateNow have your helper hold full back stick and check the amount of up deflection: it should bevery close to correct if the down deflection is OK, however you may need to make some fineadjustments to equalise elevator travel until both up and down deflections are correct.The elevator must clear the rudder and the down stop by 2mm at full deflection.Recheck the up and down deflections and then lock the rod end lock nuts at each end of thecable and mark each rod end lock nut with TorqueSeal.This completes the Testing>Rigging check task.Wednesday, April 7, 2010 289 of 327
Testing>Calibrate fuel gaugesObjectives of this task:<strong>Jabiru</strong> <strong>J160</strong> Constructors <strong>Manual</strong>Testing>Calibrate fuel gaugesTo calibrate the fuel gauges so that they show the amount of fuel remaining correctly and tomark a fuel dipstick at the same time.In this task you will be working with flammable fuel and you should take precautions such ashaving a suitable fuel extinguisher close to hand and no naked lights of any kind nearby.In the task Post-Paint>Wings>Prepare wings for fitting you set the empty indication of thefuel gauges, now you must check the other indications: ¼, ½, ¾ and full.To do this you must have the following:A fuel supply of at least 135 litres of clean aviation fuel (AVGAS)An accurate means of measuring the fuel as it is dispensedClean, sealable fuel container(s) capable of holding around 135 litres2 metres of fuel grade tubing and a 1 litre containerA length of clean wood or aluminium about 300mm long to use as a fuel dipstickSome aircraft refuellers may allow you to use a part of their ramp area for this test providedthat you purchase your fuel from them. The calibration process should take less than an hour.Level the aircraftPark the aircraft on the level surface and chock the main wheels.Use a spirit level to check the aircraft for level: laterally level across the bottom of door sills;longitudinally level along the door sills. Pack under the wheels if and as required to level theaircraft. If the surface is exactly level you can measure the distance from each wingtip to theground as a final check of lateral level, but the spirit level is the best reference.The rest of this task depends on the aircraft remaining level throughout, so chock it carefully.Find the zero fuel levelRemove the upper engine cowling.Disconnect the fuel line in the engine bay at the firewall fitting and run a length of fuel linefrom the firewall fitting, down and out of the lower cowling and into a clean fuel container.Turn the fuel tap on the console to the ON position, with the lever facing forwards.Remove both fuel caps and pour a small amount of fuel into each wing tank. Allow the fuellevels to settle until some fuel runs out into the container. When the fuel no longer runs out ofthe line the header tank will be full and the wing tanks empty: this is your zero fuel level.Lock off the fuel linesNow that you are at the zero fuel level the fuel lines from each wing tank must be locked offbe clamping both the front and back fuel pickup lines. Remove the lock wire around the fuelsheathing at the rear of the wing root to expose the fuel lines as they enter the cabin.Clamping of the fuel lines must be done carefully so as not to stress the fuel line, so use arounded surface with no sharp edges to bear against the fuel lines and apply just enoughclamp pressure to close the line, no more. Medium size spring clamps will excerpt enoughpressure to clamp the lines shut.Wednesday, April 7, 2010 290 of 327
Calibrate the fuel gauges<strong>Jabiru</strong> <strong>J160</strong> Constructors <strong>Manual</strong>Testing>Calibrate fuel gaugesFit the fuel gauge calibration decal around each wing tank gauge opening in the wing rootwith the Zero indication on the decal placed against the fuel gauge needle – at this point thereis no usable fuel in either wing tank.The process now is to add 10 litres of fuel at a time to each tank in turn and mark carefullywhat each gauge needle indicates on each decal (use a pencil initially), and at the same timedip your fuel dipstick into each tank and mark carefully where the fuel level is on the dipstick.If you have installed an engine management EFIS please refer to the documentation suppliedwith the unit for details of how to calibrate the equipment during this task.If any fuel runs out of the temporary line from the firewall it indicates that there is not enoughclamping pressure on a fuel line, so check carefully for any dribbling when the first fuel isadded to each wing tank and make sure that it is corrected before proceeding.Continue adding fuel in 10 litre increments until each tank is full, noting at each stage thegauge needle position for each tank each and marking the appropriate end and side of the fueldipstick. Each wing tank will hold approximately 60 litres of fuel.Once both tanks are full and each decal and each end of the dipstick have all been marked,remove the clamps from the fuel lines and check very carefully for any sign of weeping orleaking from the part of the fuel lines where the clamps were applied.Any sign of a leak will require that the fuel be drained from both tanks (otherwise it will crossfeed from the full tank to the empty tank) and complete replacement of the leaking fuel line.Note that fracturing of the fuel lines after clamping is a rare occurrence that is only likely tohappen if the fuel lines are very old, for example in a long-delayed build that has sat for manyyears. If this is the case we strongly recommend that all fuel lines be replaced before flight –if one fuel line is weak then the others are very probably in a similar state.Even if your fuel lines are new you must check each line carefully for leaks after clamping.Once all of the fuel lines have been checked and there are no leaks the protective sheathingcan be refitted and lock wired back into place.Flush all of the quick drains thoroughly – drain at least 500ml of fuel out of each one, more ifthere is any sign of dirt or debris: flush until the fuel runs clean from each drain.Now you must drain all but 20 litres from each wing tank in preparation for test flying: usethe temporary line from the firewall fitting and let both tank drain down to the 20 litre mark –you can use your new calibrated fuel dipstick to check the fuel level.If you are using ramp space at the refuellers you may wish to push the aircraft back out of theway for the draining process, which can take some time. You may use the electric fuel pumpto speed the draining process up. Record the time taken to fill a 1-litre container both with andwithout the use of the electric fuel pump and save the result for the Final inspection checklist.Once the draining process is complete, reattach the fuel line from the carburettor to thefirewall fitting and tighten the hose clamp and then refit and lock wire the fireproof sheath.Mark the fuel gauge decals in a permanent manner. Keep your calibrated fuel dipstick in ahandy location such as a door pocket and consider making a spare copy, just in case.This completes the Testing>Calibrate fuel gauges task.Wednesday, April 7, 2010 291 of 327
Testing>Registration markingsObjectives of this task:To fit complying registration markings to the aircraft.<strong>Jabiru</strong> <strong>J160</strong> Constructors <strong>Manual</strong>Testing>Registration markingsYou will need to determine the requirements of the aviation authority in your own country.In Australia either the Recreational Aircraft Association (RAA) for recreational registration orthe Civil Aviation Safety Authority (CASA) for general aviation registration controls theallocation of aviation registration markings.Registration markings should be made from vinyl by a specialist sign-writing company andapplied by them, usually under the left wing and on each side of the empennage.The drawings above show the RAA requirements as an example.This completes the Testing>Registration markings task.Wednesday, April 7, 2010 292 of 327
Testing>Final inspection checklist<strong>Jabiru</strong> <strong>J160</strong> Constructors <strong>Manual</strong>Testing>Final inspection checklistThis is the checklist that we use in the factory: it covers every part of the aircraft and it mustbe completed before your first flight.Time to complete properly: at least one full day, probably more. Do not rush these checks!Aircraft Registration:<strong>Jabiru</strong> Model:Firewall forward componentsPropeller: <strong>Jabiru</strong> / SensenichPropeller Size:Propeller Serial No:Propeller Bolts1 Check torque (<strong>Jabiru</strong> prop 7 ft/lbs, Senenich prop 12ft/lbs) 2 Check tip tracking is accurate to < 2mm, adjust if required 3 TorqueSeal the propeller nuts 4 Visually check propeller for serviceability Spinner1 Spinner screws secure 2 Check that the spinner and spinner backing plate has been indexedcorrectly and marked on the spinner and spinner flange3 Visually check spinner tracking with the engine running Engine1 Engine Serial Number: ___________________2 Engine mount bolts secure:a) firewall b) engine 3 Thrust washers in place and correct 4 Fuel hose secure:a) bulkhead to fuel pump b) fuel pump to carburettor c) fuel lines all clamped and tied d) fire sleeve covering clamps and lock wired in place 5 Breather hose from fuel pump: drain line routed correctly 6 Drip tray under fuel pump: drain line routed correctly Wednesday, April 7, 2010 293 of 327
<strong>Jabiru</strong> <strong>J160</strong> Constructors <strong>Manual</strong>Testing>Final inspection checklistSpark Plugs/Coil leads1 Spark plugs are secure in cylinder heads 2 Spark plug leads are secure on spark plugs 3 Spark plug leads not rubbing (on air ducts, cylinder heads) 4 Terminal nuts are secure 5 CHT sender (12mm terminal) secure 6 Spark plug leads secure in distributor caps 7 16 gauge earth wire secure and clipped to each coil Ram Air Ducts1 Baffles in place 2 Cap screws secure through ducts to cylinder heads 3 Springs in place inboard side of ducts 4 Spring lock-wire correct and secure 5 Check alignment of rubber front lip with the top cowl 6 Air ducts not touching the underside of the top cowl or oil door hinge 7 Cooling tubes directed onto coils Engine Oil1 Oil level correct (capacity: 2200 = 2.3 litres, 3300 = 3.5 litres) 2 Sump plug tightened and lock wired 3 Oil filter secure (spin on filter, hand pressure only) 4 Oil cooler bracket secured to engine 5 Oil cooler secured to bracket 6 Oil cooler hose clamps secure x 4 7 Check oil hose routing 8 Fire sleeve secure and lock wired over hose clamps 9 Oil breather hose and oil bottle secure Throttle cable1 Cable lock nuts secure on both ends of cable 2 Cable end free in carburettor link 3 Split pins secure 4 2 x 5/16 washers between cable and carburettor link 5 Cable alignment correct with outer at both ends 6 Cable adjustmenta) full throttle b) idle Wednesday, April 7, 2010 294 of 327
<strong>Jabiru</strong> <strong>J160</strong> Constructors <strong>Manual</strong>Testing>Final inspection checklistChoke Cable1 Lock nuts secure both ends of cable2 Cable end free in carburettor link 3 Split pin secure 4 Cable alignment correct with outer 5 Operational Carburettor Heat Cable1 Lock nuts secure both ends 2 Cable end free in carburettor link 3 Split pin secure 4 Cable alignment correct with outer 5 Operational Cabin Heat Cable1 Lock nuts secure both ends 2 Butterfly sealing in ON and OFF positions 3 Over-centre spring fitted properly and working 4 SCAT hoses routing – nothing rubbing, etc Scat Hoses1 Hot air mixer box to carburettora) hose clamps secure b) hose not bunched up under carburettor c) cobra head fitted and aligned properly d) smooth routing 2 NACA duct in cowl to hot air mixer box cold air inleta) hose clamps secure b) smooth routing and secure 3 Heat shroud on muffler to hot air mixer box hot air inleta) hose clamps secure b) smooth routing Wednesday, April 7, 2010 295 of 327
<strong>Jabiru</strong> <strong>J160</strong> Constructors <strong>Manual</strong>Testing>Final inspection checklistNose leg and housing1 Front tyre pressure checked: 34 psi 2 [Tyre Pressure] decal in place on spat above grommet 3 Nose wheel - ease of rotation 4 Nose leg – lubricated and ease of rotation left to right 5 Assembly – all bolts secure in nose leg 6 Housing bolts secure 7 Rod ends secure both sides 8 Safety hole in rod ends within limits 9 Jam nuts on rod ends secure 10 Air valve grommet in place 11 Spat retaining screws secure 12 Centring springs do not become coil bound full deflection Electrical1 Battery tie down secure 2 Battery terminals secure 3 Battery earth secure on firewall 4 Starter solenoid locknuts and wires secure 5 Regulator wires secure and correct 6 Temp sender wires secure (EOT and CHT) plus EGT if fitted 7 All wiring cable tied and secure 8 Oil pressure wire correct and secure (G terminal) Cowls1 Top and bottom cowl alignment correct (no gaps) 2 Retained nuts secure and correct 3 Oil door operational 4 Spinner not touching front of cowl and Propeller 5 Oil cooler not touching bottom cowling 6 Cylinder heads not touching top or bottom cowling 7 NACA duct secure with no sharp edges 8 Cam locks secure and operational Wednesday, April 7, 2010 296 of 327
<strong>Jabiru</strong> <strong>J160</strong> Constructors <strong>Manual</strong>Testing>Final inspection checklistInteriorFuel system1 Fuel filter secure and flow direction correct 2 Fuel pump (electronic) secure and flow direction correct 3 Fuel lines secure:a) fuel pickups and breather lines from wing roots to header tank inlets b) header tank outlet to fuel filter c) fuel filter to electric fuel pump d) electric fuel pump to fuel tap on console e) fuel tap on console to bulkhead fitting 4 Fuel line sheathing in place and secure 5 Check fuel valve mounting and lever secure to console 6 Fuel Breather:a) check breather hose clamps and breather route b) wing breather tube to wing root secure c) check ball in breather in wing tank cap is free d) check fuel breather tube is secure to body fuel filler e) fuel breather check has been conducted: Note: you must be able to hear air in all outlets independently by:i) Removing filler cap in left wing and blow into tank ii) Removing filler cap in right wing and blow into tank Fuel gauges LEFT RIGHT1 Window fitted in fuselage opposite wing roots 2 Calibration decal in place left and right 3 Wires connected to left and right senders 4 Left sender drives left gauge and vice versa 5 No leaks from sender boss Fuel flow test1 20 litres of fuel in each wing tank 2 Check fuel tap has been correctly indexed i.e. ON is on OFF is off 3 Select fuel tap on and measure the fuel flow (recorded in Calibrate fuel gauges task)a) electric fuel pump OFF ____________ litres per minute b) electric fuel pump ON ____________ litres per minute There should be around 1 litre per minute flow with the electric fuel pump ONWednesday, April 7, 2010 297 of 327
<strong>Jabiru</strong> <strong>J160</strong> Constructors <strong>Manual</strong>Testing>Final inspection checklistControlsRudder pedals1 Rudder springs installed properly 2 Rudder stops lining up properly 3 2 x Pedal mount bolts secure (pushrod to pedals) 4 Rudder pedal keepers secure and correct 5 2 x ¼” and 4 x 3/16” bolts secure in bearing blocks 6 2 x ¼” bolts secure in pushrods (pushrod to nose leg yoke) 7 Check jam nuts on rod ends secure x 5 8 Check safety hole is within limits on rod ends x 5 9 Check rod end free play at full deflection, both directions 10 Rudder clear of fin channel. Rudder cannot bind on channel Rudder cable1 Anchor secure and correct position in clamp 2 Rod end secure in pedal with ¼” washer outside 3 Safety hole is within limits on rod ends 4 Jam nuts on rod ends secured 5 Rod end free play at full deflections, in both directions 6 Rudder pedal stops adjusted and secure:rudder should move 78mm left and right from the 5mm offset centre mark Trim1 Trim levers (left and right) are secure 2 Lever pivot secure and split pin fitted through nut 3 Free play between left and right side levers not excessive 4 Friction correct and secure 5 Rod end secure 6 Safety hole is within limits on rod ends 7 Jam nuts on rod ends secured 8 Cable position in clamp correct and anchor secure 9 Operation full forward and full back trim 10 Spring not coil bound with elevator fully deflected up 11 Placard fitted to console top in correct sense Wednesday, April 7, 2010 298 of 327
<strong>Jabiru</strong> <strong>J160</strong> Constructors <strong>Manual</strong>Testing>Final inspection checklistBrake1 Handle assembly correct and secure 2 Check safety hole within limits 3 Operation 4 Free play 5 Fluid level full 6 Stainless striker in place 7 Handbrake correct and operational Throttle1 Cable anchor secure 2 Cable alignment correct 3 Cable end free in output lever 4 Output lever secure 5 Input lever x 2 secure 6 Throttle lock hole in pilot‟s input lever 7 Bearing blocks x 2 secure 8 Throttle stops correct and secure Main control shaft1 Control stick pivot secure 2 Yoke secure (no free play) 3 Rod end secure 4 Safety hole is within limits on rod ends 5 Jam nuts on rod ends secured 6 Elevator cable anchor secure and correct position in clamp 7 Elevator cable clear of centre console in all positions(particularly elevator UP and aileron to left hand side)8 Rod end free at full deflections 9 Aileron bell crank lines up properly with stops and is not binding Wednesday, April 7, 2010 299 of 327
<strong>Jabiru</strong> <strong>J160</strong> Constructors <strong>Manual</strong>Testing>Final inspection checklistAileron Cable LEFT RIGHT1 Cable anchor wedges in place 2 “R” clips in place 3 Rivets x 3 TLR through each bracket and seat back 4 Rod end secure 5 Safety hole is within limits on rod ends 6 Jam nuts on rod ends secured 7 Aileron stoppers secure x 2 (cannot over centre aileron bellcrank) Seat belts LEFT RIGHT1 Check bolts are through Nyloc and buckle has free play 2 Operation of buckle and length adjustments play 3 Belts not twisted play 4 Seat belt anchor secure (lower and upper) play 5 Door frame compression struts in place, no sharp edges Headsets1 Hook secure Wednesday, April 7, 2010 300 of 327
Instrument panel<strong>Jabiru</strong> <strong>J160</strong> Constructors <strong>Manual</strong>Testing>Final inspection checklist1 Secure and level 2 Instruments square (check that the slip/skid ball is centred). 3 Slip/skid ball air bubble not visible 4 Circuit breakers secure and correctly labelled 5 Switches secure and correctly labelled 6 Registration number displayed on panel 7 Mag switch guard in place and square with rounded edges 8 All instruments fitted and operational * 9 Instrument markings correct 10 Altimeter QNH correct 11 All avionics installed and operational 12 Cigarette lighter / 12v power fitting installed * Fit 1 metre of rolled up surgical tubing to the brass static tube connector under the panel.Watch the pressure instruments while slowly unrolling the tubing. The altimeter should startto show an increase in altitude. The vertical speed indicator should start to show a positiverate of climb and the airspeed indicator may show a small positive indication.When the altimeter shows 2000 feet pinch off the tubing. There will be some initial decreasein altitude and the vertical speed indicator will read zero. The altimeter should then hold theindicated altitude for at least one minute. If altitude is lost then look for leaks.Note: NEVER apply suction orally or mechanically to a static line - it can damage theinstruments.Flaps1 Mounting bolts secure 2 Rod end bolt secure: motor end and flap shaft ends 3 Rod end not binding in any position 4 Safety hole is within limits on rod end 5 Jam nut on rod end secured 6 Visual on input switch (knob shape, operation and decal) 7 Visual on bearing blocks 8 Check all nuts are in safety Flap indicator1 Secure and correct indication:a) Flaps up b) First stage: half flap c) Second stage: full flap Wednesday, April 7, 2010 301 of 327
<strong>Jabiru</strong> <strong>J160</strong> Constructors <strong>Manual</strong>Testing>Final inspection checklistUpholstery:1 Fitted and clean 2 Seat covers 3 Map pockets 4 Flap shaft upholstered 5 Centre console upholstered 6 Fuel line covers in place Placards and decals:1 [No Smoking] on panel 2 [No Intentional Spins] on panel 3 [Voltage must be displayed at all times] above EMS (if applicable) 4 [Transponder not calibrated] (if applicable) 5 Switches labelled (label above switch, [OFF] below switch) 6 [Aircraft built to LSA standards] decal beside main placard 7 Warning placard above windscreen. Weight entered 8 Baggage (Limit, loading rules, seat backs) 9 Loading stations Doors: LEFT RIGHT1 Operation: open and shut, latches working 2 Restraining straps secure and correct length 3 Hinge and pin secure 4 Catches secure and freely operating (main plus top latch) 5 Visual on door jamb 6 Visual on door seal 7 Visual on handle 8 Visual on top catch 9 Decalsa) [Do Not Lean On Door] b) [Exit] c) [Open] Wednesday, April 7, 2010 302 of 327
<strong>Jabiru</strong> <strong>J160</strong> Constructors <strong>Manual</strong>Testing>Final inspection checklistExteriorWings: LEFT RIGHT1 Root bolts inspected (correct tension) x 2 2 Strut bolts x 2 inspected, correct tension 3 Warning decals in wing roots x 2 [Do Not Tighten] 4 Wing root cover strips secure 5 Upper strut fairing secure and clear of strut 6 Lower wing strut/belly fairings secure Flaps1 Hinge points secure with pivot bolts in safety 2 Pushrod rod ends secure and not binding in any position 3 Safety hole in rod ends is within limits 4 Jam nuts on rod ends secure 5 Pushrods not fouling on cover strips 6 Drive shaft output secure 7 Drain holes have been drilled 8 Flap operation:a) flaps up b) first stage – half flap c) second stage – full flap, not fouling fuselage 9 Flap slot gap even, smooth and the same size on both wings Fuel caps1 Filler caps secure in fuel filler body 2 Earth wires secure from caps to breather fitting in tank 3 Quick drain: operation and lock wired 4 Decals in place and correct Wednesday, April 7, 2010 303 of 327
<strong>Jabiru</strong> <strong>J160</strong> Constructors <strong>Manual</strong>Testing>Final inspection checklistAilerons LEFT RIGHT1 Deflectionsa) Neutral (level with lower wing skin) with stick centred b) UP ________degrees, or touches template c) DOWN ________degrees 2 Hinge pins and pin retainers secure 3 Rod ends secure 4 Safety hole on rod ends within limits 5 Jam nuts on rod ends secure 6 Cable anchor secure and correct position in clamp 7 Drain holesa) Wing drain hole in trailing edge b) Aileron cable inspection windows secure Pitot1 Secure 2 ASI operation (see * below) 3 Cover present 4 Pressure Test with no leaks (see * below) * Slip 1 metre of surgical tubing over the pitot tube. Have one person watch the airspeedindicator while the other person very slowly rolls up the tubing. This will apply pressure tothe instrument in a gentle and controllable manner. When the ASI needle reaches cruisingspeed pinch the tube shut – the ASI should hold that reading for at least one minute. A fastdrop off will indicate a leak in the instrument, fitting, lines or the test hose attachment.Note: NEVER blow into a pitot tube – it can damage the ASI.Stall warning:1 Stall warning horn secured in cabin 2 Operation correct (suck to ensure reed is working) 3 Gauze and lip installed correctly and clear Wednesday, April 7, 2010 304 of 327
<strong>Jabiru</strong> <strong>J160</strong> Constructors <strong>Manual</strong>Testing>Final inspection checklistMain Undercarriage LEFT RIGHT1 Main gear legs secure 2 Stub axle secure 3 Hubs secure 4 Stub axle extension is secure 5 Calliper secure 6 Discs secure 7 Ease of rotation 8 Tyre pressure 45 psi 9 [Tyre Pressure] decal in place 10 Brake line not rubbing on spat 11 Spatsa) screws secure b) clear of tyre c) retain nuts d) outer edge – nothing rubs e) air valve grommet in place f) [No Step] decal in place Wednesday, April 7, 2010 305 of 327
<strong>Jabiru</strong> <strong>J160</strong> Constructors <strong>Manual</strong>Testing>Final inspection checklistEmpennageElevator Deflections1 UP ________ degrees, or touches the UP template 2 DOWN ________ degrees, or touches the DOWN template 3 2mm clearance to the stop on fuselage at full DOWN deflection Elevator1 Hinge pins and retainers secure 2 Rod ends secure 3 Safety in rod ends within limits 4 Jam nuts on rod ends secure 5 Cable anchor secure and correct position in clamp 6 Drive plate secure 7 Rod end free play at full deflections 8 End-plug not touching end-cap full deflection down 9 Elevator min 2mm clear of stabiliser channel 10 Elevator cannot bind on horizontal stabiliser channel Trim1 Pivots secure 2 Spring roda) split pins secure b) springs lubricated c) black block secure and free d) rod ends secure e) safety hole within limit f) jam nuts secure g) rod end free at full deflections 3 Trim cablea) cable anchor secure and correct position in clamp b) rod ends secure c) safety hole in rod ends within limits d) jam nuts on rod ends secure e) rod end free at full deflections Wednesday, April 7, 2010 306 of 327
<strong>Jabiru</strong> <strong>J160</strong> Constructors <strong>Manual</strong>Testing>Final inspection checklistVentral Fin:1 Retained nuts in fuselage secure 2 Elevator horn not hitting cut-out in ventral fin at full up deflection 3 Inspection holes drilled 4 Drain holes drilled out 5 Ventral fin secure onto fuselage Rudder:1 Centre 5mm offset to right when pedals level 2 Deflectiona) Left _________mm from the offset centre mark b) Right _________mm from the offset centre mark 3 2mm clearance to the stops on fuselage at full deflection 4 Hinge pin and pin retainers secure 5 Rod end secure 6 Safety in rod end within limits 7 Jam nut on rod end secure 8 Cable anchor secure and correct position in clamp 9 Rod end free at full deflections Static Vent:1 Tip secure 2 Holes clear 3 Decal in place Note that leak testing of the static system has been performed as part of the instrumentchecklist.I hereby certify that I have completed this Final Inspection Checklist:Owner / Builder / Engineer (strike out any that do not apply)DateWednesday, April 7, 2010 307 of 327
Testing>Flight testingObjectives of this task:<strong>Jabiru</strong> <strong>J160</strong> Constructors <strong>Manual</strong>Testing>Flight testingTo safely and successfully test fly the aircraft, record information resulting from the flight testsequence and use that information to fine tune the flying characteristics of the aircraft.Well, this is what it all comes down to: you have built your own <strong>Jabiru</strong>, you have painted itand assembled it and checked and tested every part of it to your satisfaction and now it is timeto finish the project and actually fly the machine for the first time!This is no small undertaking, and you must ask yourself if you are capable of performing theflight test on your own, or, perhaps, if your experience level or recency is low, you may wishto hire a more experienced pilot to conduct some or all of the flight testing for you.This task will step you through each of the flight testing stages that we employ here in ourfactory testing program, along with the appropriate forms to record the results of each stage.The correct sequence for rectifying any out of rig conditions will be explained along the way.Reference documentationThe Australian Civil Aviation Safety Authority (CASA) produces a “Flight Test Guide forCertification of CAO 101.28 Category Airplanes”. This document is required to be completedas part of the approval process for Australian-built aircraft.In countries other than Australia, the amateur builder should seek advice from the appropriateAirworthiness Authority and/or the relevant amateur building association (EAA Chapter orequivalent) as regards their requirements.In the USA the FAA publishes the “Amateur-Built Aircraft and Ultralight Flight TestingHandbook” (publication AC90-89A), which addresses the topic in considerable detail andwhich may be obtained here: www.faa.gov/library/manuals/SequenceThis task will address the following steps:Preliminary worko Airport selectiono Emergency plans and equipmento The test pilotSequence #1: Ground runso Engine parameterso Taxi testingSequence #2: Initial flight and function testingo First flight, rigging checkso Rigging correctionsSequence #3: Performance flight testingWednesday, April 7, 2010 308 of 327
Airfield selection<strong>Jabiru</strong> <strong>J160</strong> Constructors <strong>Manual</strong>Testing>Flight testingAirfield selection will play a very important role in your testing and you should approach yourchoice of airfield with considerable care. The nearest flat piece of land may not necessarily bethe best or safest place and you may have to consider transporting your new <strong>Jabiru</strong> by road toa suitable airfield for the flight testing sequence.The ideal airfield would be at or near sea level with a runway of at least 1000 metres length(for every 1000 feet increase in elevation add 200 metres to the length required) in an areathat is relatively flat with few obstructions near the airfield. Ideally there should not be manybuildings surrounding the airfield and there should be enough open space around the airfieldto allow for the possibility of an out landing.The test pilot should familiarise himself with the surrounding area from the air with particularregard to suitable landing areas for emergency use before starting the testing sequence.Emergency plans and equipmentBefore any testing can begin you must have a plan in place to deal with emergency situations.You must address what actions to take if it all goes badly and an accident happens and knowthe local emergency telephone numbers.A support crew of 2 suitably experienced people will be required to support the flight testingsequences and assist the test pilot with refuelling and checking the aircraft.The following details the bare minimum requirements, to which you may wish to add yourown items:The GROUND emergency planAll crew (pilot and ground crew) should know how to:Open the cabin doorsRelease the pilots harness/seat beltLocate and turn off the fuel valveLocate and turn off the Master switch and the magneto switchesRemove the cowling and disconnect the battery for fire fighting purposesThe IN-FLIGHT emergency planThe pilot will need to consider his response to the following:EquipmentComplete or partial engine failure, particularly shortly after takeoffFlight control problems including severe out of rig conditionsFire in the engine compartment or cockpitThe pilot should carry a CO2 detector in the cockpit at all times during all flight testing.The crew should have access to a dry powder fire extinguisher.There should be 2-way radio communication between the pilot and the support crew at alltimes as well as any radio communication required by local regulations. Most <strong>Jabiru</strong> aircraftwill have a VHF radio installed, and if the support crew have a hand-held VHF radio then adiscreet frequency can be used to communicate during the test flight sequence.Wednesday, April 7, 2010 309 of 327
The test pilot<strong>Jabiru</strong> <strong>J160</strong> Constructors <strong>Manual</strong>Testing>Flight testingFlight testing must only be carried out by a suitably qualified and experienced test pilot.Test flying any newly built aircraft is risky. For example, minor changes to aircraft riggingcan significantly alter stall behaviour, leading to extreme wing drops or spinning. Test pilotsmust be aware of this and all other potential risks and be suitably skilled to recover control ofthe aircraft from extreme and unusual attitudes.The Test Sequence in this task is based on the Test Schedule used by <strong>Jabiru</strong> Aircraft onfactory-built models and is supplied as reference material as a part of the construction data forthis kit. Several of the manoeuvres required by this schedule will result in extreme aircraftattitudes and carry an increased risk of spinning or other undesirable aircraft behaviour.Pilots choosing to follow the <strong>Jabiru</strong> Aircraft Test Sequence do so at their own risk.RecencyIn particular, the test pilot should have a recently demonstrated ability to:Deal with an engine failure at low altitude (~200ft) after takeoffRecover from stalls in level flight and in banked turnsRecover from a spinRecover from unusual attitudes (including a spiral dive)Carry out a flapless landingCarry out a glide approach and landingMedical considerationsThe test pilot should be in good health and should abide by the following conditions:ClothingShould not have a head cold or any current sinus problemsHave had no local or dental anaesthetics for at least 48 hours prior to test flyingAlcohol: an absolute minimum of 24 hours, preferably longer, must have elapsedbetween the last consumption of alcohol and any test flyingShould not have donated blood for at least 3 weeks prior to test flyingThe test pilot should consider the possibility of an in-flight fire and dress accordingly:ChecklistsDress ONLY in natural fibres and do NOT wear any synthetic materialsLong pants and long sleeves – no bare skin should be exposedNomex gloves for hand protection (most pilot supplies shops carry these)The test pilot should be completely familiar with the normal and emergency checklists in theOwners <strong>Manual</strong> and should commit to memory the critical airspeeds that are specified in theOwners <strong>Manual</strong>.It may be useful to write these speeds down and tape them to the instrument panel for ease ofreference in flight.Wednesday, April 7, 2010 310 of 327
Sequence #1 – First start, ground run and taxiPrint and use the Flight Testing form Sequence #1 for this sequence.<strong>Jabiru</strong> <strong>J160</strong> Constructors <strong>Manual</strong>Testing>Flight testingLocate the aircraft on a suitable run-up area with no gravel or small stones in the area underthe propeller, point the nose of the aircraft into wind and chock the main wheels.Pre startRemove the upper cowling and set it aside. Remove the spark plugs, turn the Master switchON and leave both magneto switches OFF. Press the starter button and allow the engine tocrank over. Watch the Engine Oil Pressure (EOP) gauge for the first indication of oilpressure. Stop cranking once oil pressure is seen. Refit the spark plugs and upper cowling.StartTurn both magneto switches ON and pull the choke ON. Turn the fuel tap ON, turn the fuelpump ON and listen for its operation for 10 seconds. Turn the fuel pump OFF.Press the starter button; listen for the click of the solenoid, and the winding of the startermotor. The engine should start within a few revolutions, usually as soon as fuel reaches thecarburettor. Listen for the sound of the starter motor disengaging after engine start.Watch the EOP and if it does not rise in the first 10 seconds after starting shut the enginedown and call the mechanic. The EOP range should be from 220 to 525 kPa.Idle conditionThe idle should be smooth and may be up to 1400 rpm with the choke on, and up to 900-950rpm with the choke off. Note that the requirement for choke will vary with OAT. Check theEngine Oil Temperature (EOT), it should rise slowly and steadily to 50 – 60 °C, and theCylinder Head Temperature (CHT) should rise to 85 – 105 °C. The Exhaust GasTemperature (EGT) gauge (if fitted) should read between 425 – 485 °C.Once the engine has warmed (EOT 50°C or more) then you may proceed, but before you dothe idle speed must be adjusted correctly in accordance with the procedure in the next step.Idle speed adjustmentOnce the engine has been warmed to operating temperature then the idle speed must beadjusted before proceeding. This idle speed adjustment procedure will require 2 people: oneinside the cabin operating the engine and one adjusting the idle stop on the carburettor.Stop the engine by turning both Mag switches to the OFF position. If the engine will not stopit means that a Mag earth wire is not correctly connected – in this event stop the engine byturning the fuel tap OFF and waiting until the engine stops. Connect the earth wire beforere-starting the engine.Remove the upper cowling and set it aside. The Pilot side throttle input shaft has 2 alloycollars while the Co-Pilot side has 1 collar. Loosen all 3 collars with an Allen key, workingthrough the holes in each side of the instrument panel housing. Start the engine and adjust theidle stop on the carburettor until the engine idles at 900 rpm. Stay well clear of the propeller!Adjust the collars on the input shafts so that when the engine is at idle the collars on eachinput shaft are just touching the back of the input shaft pivot block. Lock each idle collar inplace. With the engine turned OFF push both input shafts to full throttle and adjust the Pilotside collar so that it is just touching the other side of the pivot block and lock it in place.Re-test the idle and make any further adjustments required. Replace the upper cowling.Wednesday, April 7, 2010 311 of 327
Run up and full power check<strong>Jabiru</strong> <strong>J160</strong> Constructors <strong>Manual</strong>Testing>Flight testingRe-start the engine and smoothly increase the engine speed to 2000 rpm. Check that alltemperatures and pressures are in the green part of the range.Check each magneto individually: the maximum permissible rpm drop is 200 rpm but it istypically much less. If an rpm drop of more than 100 rpm occurs on either magneto, shut theengine down and call for the mechanic.Still at 2000 rpm apply carburettor heat: the maximum permissible rpm drop is 100 rpm but itis typically much less. Check that all temperatures and pressures are still in the green.Advance the throttle until it is fully open: the engine should not falter or surge during thisoperation. Record the maximum sustained static speed (2975 – 3050 rpm); wait for 60seconds and then record the EOP, EOT, CHT and EGT (if fitted). Limit the full powersegment of the ground run to less than 2 minutes total time.Bring the engine smoothly back 1200 rpm for a minute or 2 and then back to idle.Engine shutdownAllow the engine to return to idle: the idle should be smooth at 900 rpm. Turn both magnetoswitches OFF and the engine should stop smoothly.Turn the Master switch OFF.Remove the cowling and check for any leaks of oil or fuel. Correct as required beforeproceeding with the testing sequence.Taxi testsRe-start the engine and taxi to the movement area or ramp with your headset off.Listen for and note:Airframe soundsElectric fuel pump functioningSuspension movementDoors and windscreen structure movementWheel bearings and brakesTyres rubbing on the wheel spats (if fitted)Steering: should steer positivelyApproaching the movement area or ramp cut the engine.Check that the aircraft rolls freely without brake drag. At a slow speed and without your feeton the rudder pedals apply the brakes firmly, the brakes should pull straight and the aircraftshould stop abruptly.Any brake binding or wheel rubbing issues should be rectified before the first flight.Restart the engine.On the movement area or ramp check the turning circle (left and right turns). The radius of theleft and right turns should be the same.Face into and taxi into wind. The aircraft should track straight with feet off the rudder pedals.Wednesday, April 7, 2010 312 of 327
Compass swing<strong>Jabiru</strong> <strong>J160</strong> Constructors <strong>Manual</strong>Testing>Flight testingWhile you are out in the run-up area and provided that the ground run has gone well, thiswould be a good time for a compass swing before you start the actual test flying.You will need assistance to turn the aircraft accurately onto headings and your ground crewcan help you with this. You'll need a small, brass, non-magnetic screwdriver and ideally anairport with a compass rose: a compass rose is a pattern painted on the ground, whichaccurately depicts magnetic headings. If your local airport doesn‟t have one you can makeyour own using the known magnetic orientation of the runways at an airport or a „knowngood‟ hand held reference compass with an alignment sight.Be careful with this approach though, just because a runway is marked "14" doesn‟t mean it isoriented at 140º, it might actually be oriented 144º or 138º. Check with your local airportoperator to get the precise orientation. A hand held reference compass is usually preferable.Remove all metal objects from your person and the aircraft before you start and make surethat the selected area has no nearby metal structures that could affect the magnetic compass.For the test the aircraft should be configured as it would be for flight, with the engine runningand all avionics and Nav and strobe lights turned on. Try some test transmissions with yourVHF comms to see if transmissions affect the compass in any way.Under the compass‟ display window are 2 screws that are used to compensate for instrumenterrors, one for North South adjustments and the other for East West adjustments.Position the aircraft at a known North heading using a compass rose or a reference compass.1. With the aircraft oriented North, the engine running, and all radios switched on, adjustthe N-S adjusting screw until the compass reads due North, or 0º.2. Rotate the aircraft to a known East heading, and use the E-W adjusting screw to makethe compass read due East, or 90º.3. Rotate the aircraft to a known South heading. Note how many degrees off South thecompass reads. Turn the N-S adjusting screw to remove one half of the error.4. Rotate the aircraft to a known West heading. Note how many degrees off West thecompass reads. Adjust the E-W adjusting screw to remove one half of the error.5. Rotate the aircraft through the N, E, S and W headings again, confirming that theerrors for North and South are the same, and the errors for East and West are the same.You may want to repeat steps 1-4 to fine-tune the corrections.6. Now rotate the aircraft from North, stopping at each 30º point on the compass rose orreference compass (e.g., 030, 060, 090, 120, 150, 180, 210, 240, 270, 300, and 330degrees) and make a note of the actual aircraft compass reading compared to thecompass rose or reference compass at each point, then complete the compasscalibration card that was packed with your compass, which you should then mount inthe holder on the front of the compass for reference.If you cannot get a usable set of readings you will need to locate any sources of magneticinterference. Look for steel screws, washers or other components near the compass. Youshould also experiment with aircraft electrical systems (lights, for example), to see whetheractivation of that equipment causes the compass to misbehave.The compass should be re-swung after any significant changes to the panel or engine bay andat least once every 2 years.Wednesday, April 7, 2010 313 of 327
<strong>Jabiru</strong> <strong>J160</strong> Constructors <strong>Manual</strong>Testing>Flight testingSequence #2 – First flight and rigging testsPre-flightPrint and use the Flight Testing form Sequence #2 for each test flight in this sequence.RecordingUse a kneeboard or clipboard to hold the Flight Test forms and record details of each testflight, however the first priority must always be to fly the aircraft so write things down onlywhen it is safe to do so.LoadingLoad the aircraft with the test pilot and 20 litres of fuel in each wing tank.If you have followed the instructions in the Testing>Calibrate fuel gauges task you shouldalready have 20 litres per side at this point, if not then drain or add fuel as required.Engine Start and Run-upStart the engine normally, taxi to the run-up area and perform an engine run-up.Check temperatures and pressures and make sure that the idle is correct when the engine iswarm – it should idle at around 900 rpm.Pre-take off ChecksRecord the date and engine hours as well as the wind direction and strength, the OAT, theRunway in use and the Pressure Altitude. Set the altimeter back to the local QNH.Check controls for full and free movement and correct sense – see each control surfacemovement. Any sense of controls binding must be addressed before proceeding.Listen for traffic and wait for the traffic to clear for first flight. Carry out the pre-takeoffchecks specified in the Owners <strong>Manual</strong>.Advise all traffic that a first flight is to be conducted.Wednesday, April 7, 2010 314 of 327
Flight testingTakeoff and climbUse the full length of the available runway, which should be into wind.Apply full power in a positive manner over a count of 4.<strong>Jabiru</strong> <strong>J160</strong> Constructors <strong>Manual</strong>Testing>Flight testingCheck engine rpm indication and ASI function on the roll and abort if either is incorrect.Immediately after takeoff check instruments and LISTEN, FEEL and SMELL and if in anydoubt abort and land on the remaining runway, otherwise proceed.Climb at full power at 80 KIAS while remaining over the airfield: remain within glidingdistance of the airfield at all times on the first flight: plan your climb carefully so that you arealways within reach of the field should the engine fail. This may require an initial turn at lessthan 500 ft AGL depending on the layout of the airfield.Monitor the engine gauges carefully while climbing and note any tendency towardsoverheating. If temperatures get near to the top of the green range, increase airspeed to 90KIAS to improve the cooling airflow. If the temperatures are still too high, reduce powerslightly. Be particularly alert when you reduce the power for the first time.At 3,000 ft above the airfield reduce the power to 2800 rpm, trim the aircraft for straight andlevel flight and check the rigging of the aircraft.Rigging testsIf the aircraft flies straight with the ball in the centre and the rudder pedals are level therigging is correct. There are 4 steps or tests that must be made:1. If the aircraft flies straight with the ball in the centre but with the rudder pedals displacedthen the pushrods that connect the rudder pedals to the steering yoke need adjusting.2. If the aircraft flies straight but requires pressure on one rudder pedal to keep the ball in thecentre then the rudder cable needs adjusting.If the ball is centred and the rudder pedals are level but the aircraft tends to roll or turn thenthe flaps may need adjustment. Check the stall before making any changes to the flaps.Slow the aircraft to near the point of stall in a clean configuration at idle power with theball centred and note any tendency to roll just before the point of stall. If this happens thenslow the aircraft to near the point of stall in a clean configuration several more times andnote which wing drops just before the point of stall.3. If the aircraft rolls just before the point of stall then the angle of incidence will need to beadjusted by means of the eccentric wing root bushes that are supplied with your kit.The correct installation procedure is explained later in this task.4. If all flight up to the stall is wings level then the angle of incidence can be considered tobe correct and any roll corrections can be made by individual adjustment of the flaps.Slow the aircraft to V FE , test the flaps at both half and full settings and then retract them.Descent and landingDescend to circuit height and conduct a normal approach and landing.During the landing roll check that the undercarriage does not have any unusual noises, that theaircraft is easily controlled and that the brakes work evenly when applied.Wednesday, April 7, 2010 315 of 327
Rigging corrective actions<strong>Jabiru</strong> <strong>J160</strong> Constructors <strong>Manual</strong>Testing>Flight testingIt is particularly important that any rigging problems are dealt with in the correct sequence.Use the flowchart below to work your way through any rigging problems: it may be necessaryto step through the flowchart more than once, but the sequence is very important so workthrough each line one at a time, making corrections as indicated and retesting each time untilthe rigging is correct.NoDoes the aircraft flystraight and levelwith the ball centred?YesAre the rudderpedals displaced?YesAdjust the rudderpedal pushrods1NoIs rudder pressureneeded to keepthe ball centred?YesAdjust the ruddercable length2NoIs there anytendency to rollor turn?YesDoes the aircraftroll just beforethe stall?YesAdjust the Angleof Incidence3NoNoRigging iscorrectAdjust theflaps individually4Retest the aircraft after each adjustment has been made and keep working through theflowchart from line #1 all the way to line #4 until you reach the “Rigging is correct” box atthe bottom left of the chart.The Flight Testing form Sequence #2 should be printed out and used to record informationwhile in flight. Print one form per test flight and retain each as a permanent record.Wednesday, April 7, 2010 316 of 327
1. Adjusting the Rudder Pedal Pushrods<strong>Jabiru</strong> <strong>J160</strong> Constructors <strong>Manual</strong>Testing>Flight testingIf the rudder pedals are displaced fore and aft when the aircraft is in straight and level flight,adjust the rudder pedal pushrods that connect the rudder pedals to the steering yoke until thepedals sit level. Retest and adjust as required.2. Adjusting the Rudder CableIf pressure is required on one rudder pedal to keep the aircraft straight in straight and levelflight: if pressure is required on the right pedal then the rudder cable must be shortened, whileif pressure is required on the left pedal then the rudder cable must be lengthened.To alter the length of the rudder cable the rod ends must be removed from the connectingbolts, the lock nuts must be loosened and each rod end must be moved and equal amount,either in or out. Note that the rudder pedal stops must be readjusted at the same time.It is not possible to predict the amount of adjustment required as each case will be different,but as a general guide try moving each rod end one full turn for a total of 2 full turns (1 ateach end of the cable) and then test fly that configuration to see if more or less adjustment isrequired. Take careful note of each change and the effect on the flying qualities of the aircraft.Care must be taken: the threaded end of the rudder cable must always be visible through thesafety hole in each rod end, the lock nuts must be tightened against each rod end and theNyloc nuts on the connecting bolts should be replaced before each test flight.3. Adjusting the Angle of Incidence (AoI)Use this procedure only if the aircraft repeatedly rolls towards the same wing just before thepoint of stall in a clean configuration as explained earlier in this task. The wing that drops isstalling slightly ahead of the other wing and it will need to have its angle of incidence reducedby a small amount. You will need to fit the eccentric bushes to the wing that drops to decreasethe Angle of Incidence by 0.4°, which will entail placing the offset hole in the front bush UPand the offset hole in the rear bush DOWN. This very small change will be all that is required.This procedure can be carried out without removing the wing from the aircraft.Remove the wing root fairings. Chock the main wheels and support the outboard end of thewing. Remove the nuts from the wing root bolts and then very carefully tap each bolt out: aseach bolt is removed, replace it with a length of stout wire of approximately 5mm thickness sothat the wing root will not drop and damage the fuel lines or the side of the fuselage. Notecarefully the position of the flat washers for reassembly.Now the front wire can be removed and the wing can be slightly lifted so that the front bush israised above the mounting lugs on the fuselage and the wing must then be held in this positionby placing a bolt back through the front wing lug on the fuselage so that the wing lug can siton the bolt. Take your time and make sure that the wing is unable to move or fall from thisposition by making sure that the outboard end of the wing is firmly supported fore and aft aswell as underneath.Heat the front bush with a soldering iron and remove it completely from the lug and cleanaway all of the flock from the bush mounting hole in the lug then tap the hole to 5/8” UNC inpreparation for screwing in the eccentric bush.It is very important that the tap be exactly square on to the lug and not angled in any way.It may be necessary to remove a small amount of material from the leading edge at the wingroot to allow a straight approach to the hole in the front lug when tapping the thread.The wing root fairing will cover a small cutout here if it is required.Wednesday, April 7, 2010 317 of 327
<strong>Jabiru</strong> <strong>J160</strong> Constructors <strong>Manual</strong>Testing>Flight testingTest fit the eccentric bush into the wing lug dry, using a gently tapered object such as an oldround file through the centre of the bush to screw the bush into the lug, ending when the bushis centred in the lug with offset hole facing UP to test the threads. Remove the bush.Mix a very small batch of resin and separate it into 2 portions and then use one portion to coatthe thread in the bush mounting hole in the wing lug and then coat the outside of the eccentricbush. Add flock to the other portion and apply a small amount to the bush and then screw thebush back into the lug, ending when the bush is centred in the lug with offset hole facing UP.Wipe away all excess flock and lower the wing lug and bush back into the fuselage lugs andplace the length of wire through the holes in the lugs and the bush.Repeat the process for the rear bush, first test fitting the bush dry and then fitting it with resinand flock, but this time end with the offset hole in the bush facing DOWN.Wipe away all excess flock and lower the wing lug and bush back into the fuselage lugs andhold in place with the wire. Leave the flock overnight to cure.The next day fit the wing bolt though the lugs and the new bush. Refit the flat washers to thebolts as before. Remove the wire from the front bush and refit the wing bolt and flat washers.Fit new Nyloc nuts to each wing bolt and tighten to safety. Do not reuse these nuts.DO NOT OVERTIGHTEN THESE BOLTS. They should be just tight enough to preventrotation. Over tightening may result in failure of the wing attach lugs.Refit the wing root fairings. Retest the aircraft and, if required, make any small rollcorrections by adjusting each flap individually.4. Adjusting the FlapsUse this procedure if the aircraft shows a tendency to roll in straight and level flight and notjust before the point of stall in a clean configuration as mentioned in the previous step thenminor adjustments may be made to each flap individually.If the aircraft rolls to the left then the left flap may be lowered slightly, or the right flap maybe raised slightly. If the aircraft rolls to the right then the right flap may be lowered slightly,or the left flap may be raised slightly.Remove the wing root fairings as required to gain access to the flap pushrods. Remove the rodend connecting bolt from the drive yoke, loosen the lock nut and move the top rod end in orout and then refit the rod end to the drive yoke, tighten the lock nut. Refit the wing rootfairings before each test flight.It is not possible to predict the amount of adjustment required as each case will be different,but as a general guide try moving a rod end one full turn and then test fly that configuration tosee if more or less adjustment is required. Take careful note of each change and the effect onthe flying qualities of the aircraft.If, for example, down adjustment becomes a problem on one flap then adjust the other flap up.If it becomes necessary to adjust the flap end of the pushrod, remove the flap to do so.Care must be taken: the threaded end of the rod end must always be visible through the safetyholes in each end of the pushrod, the rod end lock nuts must be tightened against each end ofthe pushrod and the Nyloc nut on the connecting bolt through the drive yoke should bereplaced before each test flight.Wednesday, April 7, 2010 318 of 327
Sequence #3 – Performance and handling<strong>Jabiru</strong> <strong>J160</strong> Constructors <strong>Manual</strong>Testing>Flight testingPrint and use the Flight Testing form Sequence #3 for each test flight in this sequence.If all of the rigging corrections in Sequence #2 have been done correctly and all equipmentperforms correctly then this sequence will usually only require one flight.Record the date and engine hours as well as the wind direction and strength, the OAT, theRunway in use and the local QNH.Loading rulesThis Sequence is performed with either:StallsPilot weighing 100 Kg or less and 100 litres of fuel; orPilot and 1 passenger for a combined weight of 172Kg or less and 50 litres of fuel.Climb at 80 KIAS using full power to 3000 feet AGL or higher, watching the engineinstrumentation for any tendency towards overheating. If temperatures get near to the top ofthe green range increase airspeed to 90 KIAS improve the cooling airflow, and if temperaturesare still too high then reduce power as required. Once established in a suitable test area,perhaps directly over the airfield, stall testing can start. During the course of the stall testing itwill be necessary to climb back to the starting altitude from time to time.The stalls are performed in the configurations listed on page 1 of the Flight Testing formSequence #3.Each stall is started from 60 KIAS and the aircraft is decelerated at a constant rate of 1 knotper second until the wing is fully stalled, which will require an increasing rearward rate ofmovement of the control stick.Record the Indicated Airspeed (IAS) at which each stall occurs.If anything out of the ordinary occurs during the stall testing phase record it in the Notessection at the end of the form.Trim Speed RangeIn the cruise configuration (2800-2900 rpm) record the trim speeds achieved at the full aft andfull forward trim lever positions. Trim speed limitations are 50-65 KIAS in the aft trimposition and 90-140 KIAS for the forward trim position.In the approach configuration (full flap, engine at idle: 1000-1200 rpm) record the trim speedsachieved at the full aft and full forward trim lever positions. Trim speed limitations are: 60-70KIAS in the aft trim position, and then trim forward until the airspeed reaches the end of thewhite arc (V FE ) on the ASI.Glide at 62 KIASRetract the flaps, reduce the power to idle and trim the aircraft for a 62 KIAS glide.Note the controllability and if the controls are rigged properly.V NEDescend under power, typically 2700-2900 rpm, and approach V NE in small speed increases.Note any vibration or buffeting as well as the overall controllability of the aircraft.Do not exceed V NE under any circumstances.Wednesday, April 7, 2010 319 of 327
Maximum Power Flight<strong>Jabiru</strong> <strong>J160</strong> Constructors <strong>Manual</strong>Testing>Flight testingDescend to 1000 feet AGL, set the altimeter subscale to 1013.2 hPa and record the PressureAltitude and OAT.With the engine at wide open throttle and the aircraft in straight and level flight, record theindicated airspeed and engine rpm and the EOP, EOT, CHT and EGT (if fitted).Timed ClimbSet the aircraft up in the cruise configuration at 2800-2900 rpm. Record the Pressure Altitude,which will also be the start height, and the OAT.With the engine at wide open throttle and the aircraft trimmed to 80 KIAS, record the timetaken to climb 1000 ft, the indicated rate of climb, the engine rpm and the EOP, EOT, CHTand EGT (if fitted).Set the altimeter subscale back to the local QNH that you recorded before takeoff.GeneralRecord your observations of the following:EquipmentLateral & Directional Control RiggingLateral & Directional Rigging and TrimLateral & Directional Stability and ControlLongitudinal Static StabilityTest and record the operation and performance of the VHF comm(s), the transponder (iffitted), the GPS (if fitted), all flight and engine instrumentation and any other fitted equipmentsuch as strobe and Nav lighting or UHF comm.Ground handling during and after landingWhen landing check that the undercarriage does not have any unusual noises, that the aircraftis easily controlled on the runway and that the brakes work evenly when applied.Post flightImmediately after landing and securing the aircraft record your observations of the overallcharacteristics of the aircraft and it‟s systems as well as calculating the total engine hours andthe fuel consumption rate.When you are satisfied that the aircraft performs satisfactorily then this completes theTesting>Flight testing task and signals the end of this <strong>Manual</strong> as well.The futureCongratulations, you have achieved something that most people can only dream about: youhave built and flown your very own aircraft! This is a significant achievement and one thatyou can be justifiably proud of. Well done!Please drop us a line here at <strong>Jabiru</strong> and tell us all about it, we would love to know.We are sure that you will have many enjoyable hours of flying your very own <strong>Jabiru</strong> aircraftand we are equally sure that you will enjoy the low operating costs as well as the pleasurableflying characteristics that all <strong>Jabiru</strong>‟s share.Wednesday, April 7, 2010 320 of 327
Testing>FormsObjectives of this task:<strong>Jabiru</strong> <strong>J160</strong> Constructors <strong>Manual</strong>Testing>FormsThis final task of the Constructors <strong>Manual</strong> contains a set of forms that are intended be used torecord the details of your new <strong>Jabiru</strong> aircraft and all of the flight testing sequences.The first form, Aircraft Identification, should be used to record the serial numbers of allcomponents: the kit number, engine serial number, propeller details and all instrumentation.The other forms should be used in conjunction with the preceding task Flight Testing.Taken as a group these forms should be kept as a permanent record.AbbreviationsHere is a listing of common abbreviations that are used throughout these forms:AGL Above Ground LevelAH Artificial HorizonALT AltimeterCHT Cylinder Head TemperatureEFIS Electronic Flight Information SystemEGT Exhaust Gas TemperatureEMS Engine Management SystemEOP Engine Oil PressureEOT Engine Oil TemperatureETC Electric Turn Co-ordinatorGPS Global Positioning SystemIAS Indicated Air SpeedISA International Standard Atmosphere: 1013.2 hPa, 15°CKIAS Knots Indicated Air SpeedMAG Magneto - engine ignition systemOAT Outside Air TemperatureP. ALT Pressure Altitude: the indicated ALT at ISA conditionsRPM Revolutions Per Minute - engine speedRWY RunwayUHF Ultra High Frequency - sometimes used for remote area commsVHF Very High Frequency - standard aircraft commsVSI Vertical Speed IndicatorWednesday, April 7, 2010 321 of 327
<strong>Jabiru</strong> <strong>J160</strong> Constructors <strong>Manual</strong>Testing>FormsAircraft IdentificationOwnerAddressPhoneMobileFaxModelKit #JRegistrationEngine Serial numberPropeller: <strong>Jabiru</strong> / Sensenich(Cross out one)Size x PitchSerial NumberFlight instrumentationEFIS/AHGPSMake/Serial numberASIALTVSIETCSerial numberEMSEngine instrumentationMake/Serial numberTACHEOPEOTCHTEGTVOLT<strong>Jabiru</strong> #Serial numberWednesday, April 7, 2010 322 of 327
<strong>Jabiru</strong> <strong>J160</strong> Constructors <strong>Manual</strong>Testing>FormsSequence #1 – Ground runDateWINDOATEngine hours startPilotRun up - 2000 rpmLeft MAGRight MAGCarb Heatrpm drop(200rpm max)EOPEOTEngine parametersCHTEGTAll in the green rangeFull power checkMaximum sustained rpmIdle check2975 – 3050 rpmRestrict the full power run to less than 2minutes total timeIdle rpm800 - 900 rpmAllow the engine to run at 1200 rpm for2 minutes and then check the idleEOPEOTEOPEOTEngine parametersCHTEGTAll in the green rangeEngine parametersCHTEGTAll in the green rangeTaxi testsNotesBrakes both pull evenlyand release with no dragSteering: tracks straightinto wind with feet offSteering: left and rightturns are equal radiusWednesday, April 7, 2010 323 of 327
<strong>Jabiru</strong> <strong>J160</strong> Constructors <strong>Manual</strong>Testing>FormsSequence #2 – RiggingDateWINDOATEngine hours startRWYP. ALT1013.2 hPaLoadingFull power climb at 80 KIASPilotPilot only, no PAX,20 litres of fuel per sideEOPEngine RPM2900 – 3050 rpmCHTNoDoes the aircraft flystraight and levelwith the ball centred?EOTEGTYesAre the rudderpedals displaced?YesLEFTRIGHT1Which pedal is BACK?NoIs rudder pressureneeded to keepthe ball centred?YesLEFTRIGHT2Which pedal?NoIs there anytendency to rollor turn?YesDoes the aircraftroll just beforethe stall?YesLEFTRIGHT3Which way?NoNoRigging iscorrectLEFTRIGHT4Which way?Wednesday, April 7, 2010 324 of 327
<strong>Jabiru</strong> <strong>J160</strong> Constructors <strong>Manual</strong>Testing>FormsSequence #3 – Performance & handlingpage 1 of 3DateWINDOATEngine hours startRWYQNHLoadingPilotPAXLoading rules - either:Pilot < 100Kg only: 100 litres fuel; orPilot and 1 PAX to 172Kg total: 50 litres fuelStallsAll stalls are started from 3000 feet AGL or above, starting from 60 KIAS.Airspeed is decreased at a constant rate of 1 knot per second until the aircraft isfully stalled and the IAS at the point of stall is recorded below.IDLEpowerFULLpowerNO FlapHALF FlapFULL FlapNO FlapHALF FlapFULL FlapStraight Ahead: [40 – 50]30 Bank to LEFT30 Bank to RIGHTStraight Ahead30 Bank to LEFT30 Bank to RIGHTStraight Ahead30 Bank to LEFT30 Bank to RIGHTStraight Ahead: [38 – 45]30 Bank to LEFT30 Bank to RIGHTStraight Ahead30 Bank to LEFT30 Bank to RIGHTStraight Ahead30 Bank to LEFT30 Bank to RIGHTWednesday, April 7, 2010 325 of 327
Trim test<strong>Jabiru</strong> <strong>J160</strong> Constructors <strong>Manual</strong>Testing>FormsSequence #3 – Performance & handlingpage 2 of 3Cruise power, cleanAFT [50-65 KIAS]FWD [90-140 KIAS]Idle, full flapAFT [60-70 KIAS]FWD [end of white arc]Glide at 62 KIASControllabilityGlide engine RPMControl rigging[1000-1200rpm]V NE 2700-2900 RPMVibrationControllabilityBuffetingControl riggingFull power, Straight & LevelIAS at full powerRPM at full powerP. ALT1013.2 hPaCHTEGTOATEOPEOTTimed climb at 80 KIASStart P. ALT1013.2 hPaFinish P. ALTOATTime to climb 1000 ftsecCHTEOPRate of climb (indicated)fpmEGTEOTGeneralLateral & DirectionalControl RiggingLateral & DirectionalStability and ControlLateral & DirectionalRigging and TrimLongitudinal StaticStabilityWednesday, April 7, 2010 326 of 327
EquipmentVHF Comm #1VHF Comm #2operationoperation<strong>Jabiru</strong> <strong>J160</strong> Constructors <strong>Manual</strong>Testing>FormsSequence #3 – Performance & handlingpage 3 of 3Transponder operationInstrumentationGPS operationOther equipment:Lights, UHF, etcGround handlingControl - landingBrakes - landingControl - taxiBrakes - taxiUndercarriageSteeringPost flight reviewTrim and handlingcharacteristics satisfactory?Stalls satisfactory?Control rigging satisfactory?Avionics operation throughoutsatisfactory?Engine operation throughoutsatisfactory?Stability satisfactory?Instrumentation operationthroughout satisfactory?Engine hours finish Fuel used LEngine hours totalFuel consumption rateL/hrNotesWednesday, April 7, 2010 327 of 327