IRWIN® Rafter Square Reference Guide Complete Instruction Book ...
IRWIN® Rafter Square Reference Guide Complete Instruction Book ...
IRWIN® Rafter Square Reference Guide Complete Instruction Book ...

You also want an ePaper? Increase the reach of your titles
YUMPU automatically turns print PDFs into web optimized ePapers that Google loves.
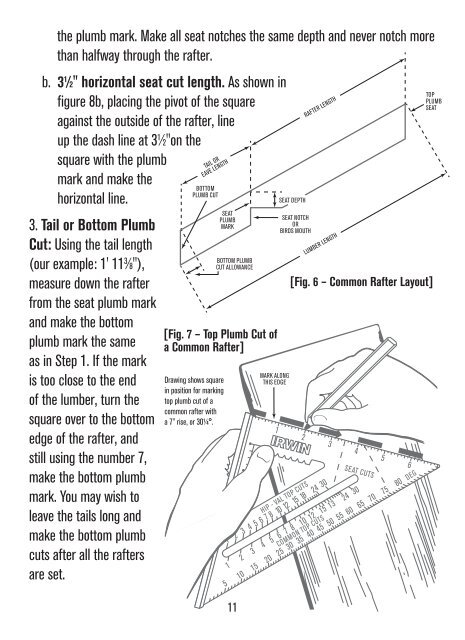
the plumb mark. Make all seat notches the same depth and never notch morethan halfway through the rafter.b. 3 1 ⁄2" horizontal seat cut length. As shown infigure 8b, placing the pivot of the squareagainst the outside of the rafter, lineup the dash line at 3 1 ⁄2"on thesquare with the plumbmark and make thehorizontal line.3. Tail or Bottom PlumbCut: Using the tail length(our example: 1' 11 3 ⁄8"),measure down the rafterfrom the seat plumb markand make the bottomplumb mark the sameas in Step 1. If the markis too close to the endof the lumber, turn thesquare over to the bottomedge of the rafter, andstill using the number 7,make the bottom plumbmark. You may wish toleave the tails long andmake the bottom plumbcuts after all the raftersare set.TAIL OREAVE LENGTHBOTTOMPLUMB CUTSEATPLUMBMARKBOTTOM PLUMBCUT ALLOWANCE[Fig. 7 – Top Plumb Cut ofa Common <strong>Rafter</strong>]Drawing shows squarein position for markingtop plumb cut of acommon rafter witha 7'' rise, or 30¼°.11MARK ALONGTHIS EDGE1SEAT DEPTHSEAT NOTCHORBIRDS MOUTHHIP - VAL TOP CUTSRAFTER LENGTHLUMBER LENGTHFIGURE 6: Common <strong>Rafter</strong> Layout2 3 4 5 6COMMON TOP CUTSSEAT CUTS1 2 3 4 5 6 7 8 10 12 15 18 24 301 2 3 4 5 6 7 8 10 12 15 13 24 305 10 15 20 25 30 35 40 45 50 55 60 65 70 75 80 DEGTOPPLUMBSEAT[Fig. 6 – Common <strong>Rafter</strong> Layout]