IRWIN® Rafter Square Reference Guide Complete Instruction Book ...
IRWIN® Rafter Square Reference Guide Complete Instruction Book ...
IRWIN® Rafter Square Reference Guide Complete Instruction Book ...

You also want an ePaper? Increase the reach of your titles
YUMPU automatically turns print PDFs into web optimized ePapers that Google loves.
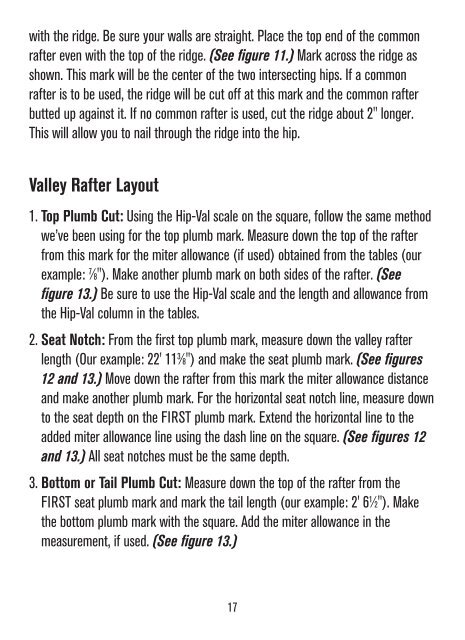
with the ridge. Be sure your walls are straight. Place the top end of the commonrafter even with the top of the ridge. (See figure 11.) Mark across the ridge asshown. This mark will be the center of the two intersecting hips. If a commonrafter is to be used, the ridge will be cut off at this mark and the common rafterbutted up against it. If no common rafter is used, cut the ridge about 2" longer.This will allow you to nail through the ridge into the hip.Valley <strong>Rafter</strong> Layout1. Top Plumb Cut: Using the Hip-Val scale on the square, follow the same methodwe’ve been using for the top plumb mark. Measure down the top of the rafterfrom this mark for the miter allowance (if used) obtained from the tables (ourexample: 7 ⁄8"). Make another plumb mark on both sides of the rafter. (Seefigure 13.) Be sure to use the Hip-Val scale and the length and allowance fromthe Hip-Val column in the tables.2. Seat Notch: From the first top plumb mark, measure down the valley rafterlength (Our example: 22' 11 3 ⁄8") and make the seat plumb mark. (See figures12 and 13.) Move down the rafter from this mark the miter allowance distanceand make another plumb mark. For the horizontal seat notch line, measure downto the seat depth on the FIRST plumb mark. Extend the horizontal line to theadded miter allowance line using the dash line on the square. (See figures 12and 13.) All seat notches must be the same depth.3. Bottom or Tail Plumb Cut: Measure down the top of the rafter from theFIRST seat plumb mark and mark the tail length (our example: 2' 6 1 ⁄2"). Makethe bottom plumb mark with the square. Add the miter allowance in themeasurement, if used. (See figure 13.)17