SLP Single Pipe for 2007 Polaris 700 H.O. ... - Snowmobile Parts
SLP Single Pipe for 2007 Polaris 700 H.O. ... - Snowmobile Parts
SLP Single Pipe for 2007 Polaris 700 H.O. ... - Snowmobile Parts

Create successful ePaper yourself
Turn your PDF publications into a flip-book with our unique Google optimized e-Paper software.
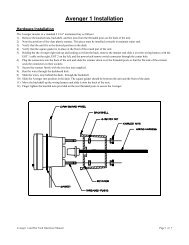
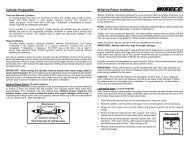
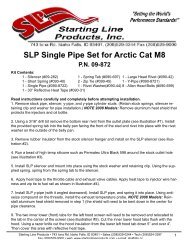
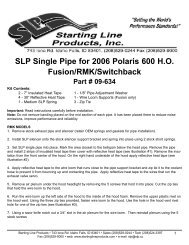
<strong>SLP</strong> <strong>Single</strong> <strong>Pipe</strong> <strong>for</strong> <strong>2007</strong> <strong>Polaris</strong> <strong>700</strong> H.O.Dragon IQ/RMKPart # 09-723Kit Contents:1 - 1/8” <strong>Pipe</strong> Adjustment Washer 3 - 30” Reflective Heat Tape1 - Large Head Rivets 1 - Spring Tabs3 - Zip TiesImportant: Read instructions carefully be<strong>for</strong>e installation.Note: Do not remove banding placed on the mid section of each pipe. It has been placed there to reduce noiseemissions, improve per<strong>for</strong>mance and reliability.1. Remove stock exhaust pipe and silencer (retain OEM springs and gaskets <strong>for</strong> pipe installation).2. Install <strong>SLP</strong> silencer onto the stock silencer support bracket and spring into place using 3 stock short springs.3. Remove the insulation from the right front of the hood. Cover area of the hood where the insulation wasremoved with reflective heat tape(see illustration #1).4. On the right hand side of the bulkhead cross member support (see illustration #2) measure up 1” and 1/2” to thefront of the sled and drill a 3/16” hole. Rivet the spring tab into place using the large head rivet with the spring tabpointing up.5. Remove air plenum under the hood headlight by removing the 5 screws that hold it into place. Cut the zip tiesthat hold the wire loom to the hood.6. Run the wire loom up the left side of the hood to the inside of the hood foam. Remove the upper plastic rivet onthe hood vent. Using the three zip ties provided, fasten wire loom to the hood. Use the hole in the hood vent rivethole <strong>for</strong> one of the zip ties (see illustration #3).7. Using a razor knife notch out a 3/4” slot in the air plenum <strong>for</strong> the wire loom. Then install the plenum using 5stock screws. Cover stock wire loom with reflective heat tape.8. Install the <strong>SLP</strong> single pipe and spring into place using 3 stock springs on the head pipe and 2 stock springs onthe stinger. Install the exhaust temperature probe into the pipe using ani-seize compound on the threads. Use a siliconesealer such as Loctite 598 Ultra Black on the pipe to silencer joint and from the silencer to bellypan <strong>for</strong> agood seal. Spring the pipe to the stock pipe support bracket on the out side of the pipe and 1 short spring on theinside (see illustration #4). If the pipe needs to be adjusted <strong>for</strong> belly pan or hood clearance (1/8”) washer can beStarting Line Products • 743 Iona Rd. Idaho Falls, ID 83401 • Sales (208)529-0244 • Tech (208)524-3397Fax (208)529-9000 • web: www.startinglineproducts.com • e-mail: slp@slp.cc1
added or removed from the stock rubber mushroom. Apply reflective heat tape to the wire loom that runs close tothe pipe.9. Trim right hand hood vent as needed <strong>for</strong> 1/8” minimum clearance. Trim wire loom mounting tab <strong>for</strong> 1/8” minimumclearance (see illustration #5).<strong>SLP</strong> recommends the use of, <strong>SLP</strong> High Flow Air Horn kit part # 14-123, (4) Flow-Rite Intake Vents part #14-197,and Powder Snow Pre-Filter Kit part #14-227.ILLUSTRATION #1ILLUSTRATION #2Starting Line Products • 743 Iona Rd. Idaho Falls, ID 83401 • Sales (208)529-0244 • Tech (208)524-3397Fax (208)529-9000 • web: www.startinglineproducts.com • e-mail: slp@slp.cc2
ILLUSTRATION #3ILLUSTRATION #4Starting Line Products • 743 Iona Rd. Idaho Falls, ID 83401 • Sales (208)529-0244 • Tech (208)524-3397Fax (208)529-9000 • web: www.startinglineproducts.com • e-mail: slp@slp.cc3
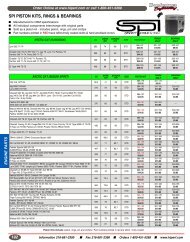
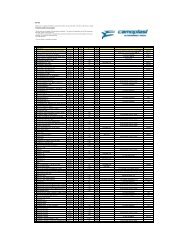
ILLUSTRATION #5<strong>Polaris</strong> <strong>700</strong> Dragon Clutching ChartAltitude(feet)0-3000 ftDrive ClutchDriven ClutchClutch Spring Shift Weight Cluch Spring Driven Helix<strong>SLP</strong>Black / Pink#40-75<strong>SLP</strong> MTX65g#40-823g outer hole1g inner holeTEAM Ind.Red/Black(Stock)TEAM Ind.64/42.36(Stock)3000-6000 ft<strong>SLP</strong>Blue / Yellow#40-70<strong>SLP</strong> MTX65g#40-822g outer holeTEAM Ind.Black(Stock)TEAM Ind.56/42.36(Stock)6000-8000 ft<strong>SLP</strong>Blue / Yellow#40-70<strong>SLP</strong> MTX62g#40-813g rivet in theouter holeTEAM Ind.Black(Stock)TEAM Ind.56/42.36(Stock)8000-10000 ft<strong>SLP</strong>Blue / Yellow#40-70<strong>SLP</strong> MTX62g#40-811g rivet in theouter holeTEAM Ind.Black(Stock)TEAM Ind.56/42.36(Stock)Running RPM 8100-8300Starting Line Products • 743 Iona Rd. Idaho Falls, ID 83401 • Sales (208)529-0244 • Tech (208)524-3397Fax (208)529-9000 • web: www.startinglineproducts.com • e-mail: slp@slp.cc4
Caring <strong>for</strong> your ceramic coated pipes and/or silencer:Ceramic Coating is an aluminum matrix applied to your exhaust system to provide a thermal barrier <strong>for</strong> more consistent per<strong>for</strong>mance.It is a coating which requires little maintenance to keep your pipes and/or silencer looking like new.Upon completion of new installation, wipe the ceramic coated parts of the exhaust system down with brake cleaner. This willprevent oils and grease (usually in the <strong>for</strong>m of fingerprints) from burning on and staining the exhaust during first initial startup.To maintain your ceramic coated system, wash it with soap and water periodically (especially necessary after trailering it toand from your riding area on roads that have been treated with salt and other ice removing chemicals). Salt and other iceremoving chemicals will attack and eat away at the ceramic coating. This will result in rust coming through the coating.Typically you will notice this rusting after your snowmobile has set <strong>for</strong> a period of time without the exhaust system beingbrought up to running temperature.Periodically polish your ceramic coated pipes and/or silencer after each washing with an aluminum polish such as Mothers,Maas or Blue Magic aluminum polish that can be found at any automotive parts store. Do not use any acidic cleaners! Forstubborn stains use fine 000 steel wool, then use a soft cloth with polish. Failure to maintain your ceramic coated pipes orsilencer can result in damage to the ceramic coating <strong>for</strong> which there is no warranty coverage. A little care will insure that yourpipes and/or silencer will continue looking like new <strong>for</strong> many years.Note: In areas of the ceramic coated system where skin temperatures exceed 1300 degrees F, it is normal <strong>for</strong> the coating toturn dull gray. These areas should also be washed and polished periodically.Starting Line Products • 743 Iona Rd. Idaho Falls, ID 83401 • Sales (208)529-0244 • Tech (208)524-3397Fax (208)529-9000 • web: www.startinglineproducts.com • e-mail: slp@slp.cc5