Avenger 1 Installation - Racepak Data Systems
Avenger 1 Installation - Racepak Data Systems
Avenger 1 Installation - Racepak Data Systems
- No tags were found...

You also want an ePaper? Increase the reach of your titles
YUMPU automatically turns print PDFs into web optimized ePapers that Google loves.
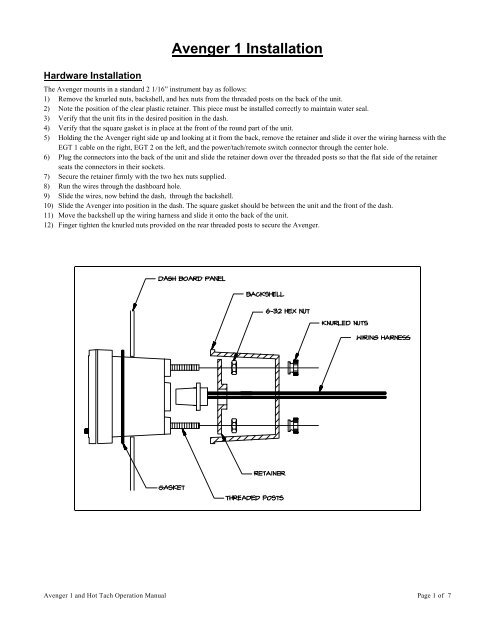
Hardware <strong>Installation</strong><strong>Avenger</strong> 1 <strong>Installation</strong>The <strong>Avenger</strong> mounts in a standard 2 1/16” instrument bay as follows:1) Remove the knurled nuts, backshell, and hex nuts from the threaded posts on the back of the unit.2) Note the position of the clear plastic retainer. This piece must be installed correctly to maintain water seal.3) Verify that the unit fits in the desired position in the dash.4) Verify that the square gasket is in place at the front of the round part of the unit.5) Holding the the <strong>Avenger</strong> right side up and looking at it from the back, remove the retainer and slide it over the wiring harness with theEGT 1 cable on the right, EGT 2 on the left, and the power/tach/remote switch connector through the center hole.6) Plug the connectors into the back of the unit and slide the retainer down over the threaded posts so that the flat side of the retainerseats the connectors in their sockets.7) Secure the retainer firmly with the two hex nuts supplied.8) Run the wires through the dashboard hole.9) Slide the wires, now behind the dash, through the backshell.10) Slide the <strong>Avenger</strong> into position in the dash. The square gasket should be between the unit and the front of the dash.11) Move the backshell up the wiring harness and slide it onto the back of the unit.12) Finger tighten the knurled nuts provided on the rear threaded posts to secure the <strong>Avenger</strong>.<strong>Avenger</strong> 1 and Hot Tach Operation Manual Page 1 of 7
Routing Power and Sensor CablesRoute the power and sensor cables to the <strong>Avenger</strong>, keeping all wires as far as practical from heat sources and ignition wires. Connect thewires in the order listed below:• Black - The black wire is ground and must be connected directly to the engine.• Orange - The orange wire provides both tach signal and power. Connect this wire to the positive lead from the lighting coil.Warning: Failure of the sled’s voltage regulator may damagethe <strong>Avenger</strong>. The use of fuses as shown belowmay help prevent such damage.• Blue - This wire connects to the blue wire on the optional Remote Switch. If you do not have a remote switch, coil this wire out of theway.• Remote Switch Black - If you have the optional Remote Switch, connect its black wire to the engine or to an instrument ground wire.• Red - The red wire optionally supplies +12V DC to the unit. Note that the unit is on whenever +12V DC is supplied. The <strong>Avenger</strong>requires very little power, but will eventually drain the battery if stored with the power on.Warning: Do not connec the red wire to the lighting coil.Connecting the Red wire to the lighting coil willdamage the <strong>Avenger</strong>.Connecting PowerConnect and secure all other wires before attaching the redwire. Failure to connect the power wire last may result indamage to the unit or the vehicle.Connecting Exhaust SensorsInstall the EGT sensors as close as convenient to the header flange.<strong>Avenger</strong> 1 and Hot Tach Operation Manual Page 2 of 7
Getting Started<strong>Avenger</strong> I Operation ManualFollow the enclosed installation guide to mount the RacePak <strong>Avenger</strong> 1 or Hot Tach on your vehicle.Your RacePak turns on automatically when power is applied and turns off when power is removed. Verify all connections and apply powerto your RacePak. The unit’s display should flash and enter Run Mode:The first time you turn on your RacePak it may show only a 0. This display indicates that the unithas never been set up. Once you follow the procedure in Initial Setup the instrument will skipdirectly to the next step.Press & Hold the Display button and release it when the display blanks.The unit should display the current engine RPM. The figure at left shows 4380 RPM. Don’t worryif your RPM looks wrong or reads 0; we’ll correct it during Initial Setup below.Press the Display button and release it when the display blanks.The unit should now show you the current temperature of EGT1 in degrees Fahrenheit.Press Display again to show EGT2.The display should now show you the current temperature of EGT 2.Press Display again to show the MAX EGTThe display should now show the temperature of the hottest EGT. In the example on the left, theunit shows EGT2 at 1207 since it is hotter than EGT1 at 586 degrees.Press Display again to return to RPMYour RacePak is back to showing engine RPM.Hold the Display button to turn off the backlight. The backlight should turn off when you releasethe button after about 3 seconds of holding it. Hold Display to turn the backlight on again.Pressing and Holding ButtonsThe RacePak recognizes two types of button action: Press and Hold. Press means press the button and release it after about half a second.Hold means press and hold the button for about 3 seconds. The RacePak acknowledges that a button has been pressed by blanking thedisplay. When the the unit recognizes a Hold, it restores the display.<strong>Avenger</strong> 1 and Hot Tach Operation Manual Page 3 of 7
Initial SetupIn order to compute RPM your RacePak must know how many ignition pulses are generated during each revolution of the engine. Followthe steps below to set the RacePak to work on your vehicle.Apply power to the unit. It should show engine RPM. (If the RacePak has never been set up it willshow only a 0. Follow this procedure as though it showed RPM.)Hold the Mode button until the display blanks and comes back on, about 3 seconds. Release theMode button to enter Setup Mode.When you release the Mode button, the display should show the number of ignition pulses yourRacePak expects to see each engine revolution. Press or hold Display to step to the next pulsenumber. Select 0 if your ignition system generates 1 pulse per two revolutions.One pulse per revolution is a good first guess. See Troubleshooting for more detail.Press Mode to step to the next Setup option.This option lets you select RPM, EGT1, EGT2, or MAX EGT as the channel to view when theRacePak is first turned on. Press Display. Repeat until the desired channel appears.Press Mode to step to the next Setup option.The warning LED tells you that you are setting an overlimit warning level -- RPM in this case. IfEngine RPM exceeds this value, the unit will switch to display RPM and flash the warning light.Press or hold Display to change the warning level. Select 18.00 to disable the RPM limit.Press Mode to step to the next Setup option.This is the warning limit for EGT1. Press or hold Display to change the warning level. Select 1600 todisable the EGT1 limit.Press Mode to step to the next Setup option.This is the warning limit for EGT2. Press or hold Display to change the warning level. Select 1600 todisable the EGT2 limit.Press Mode to save any changes and end Setup.To exit Setup Mode without saving the changes, disconnect power from the gage.The RacePak flashes the display and the warning light to acknowledge the new Setup.Repeat these steps to change any setup option.<strong>Avenger</strong> 1 and Hot Tach Operation Manual Page 4 of 7
Viewing Max ReadingsYour RacePak constantly keeps track of the highest reading on each channel. Follow the steps below to view these peak values.With the unit in Run Mode showing RPM, press the Mode button to enter MAX Mode.Note: You can enter MAX Mode while displaying any channel. RPM is chosen here only as anexample.The unit now flashes MAX in the display to indicate that the readings are MAX, not current,values. The display now shows the highest RPM it has recorded since it was turned on.Press the Display button to show MAX EGT1.The display now shows EGT1’s highest value.Press the Display button to show MAX EGT2.The display now shows EGT2’s highest value.Press the Display button to show the highest MAX EGT.The display now shows the highest value either EGT has reached since the unit was turned on. The1 or 2 indicates which channel recorded the peak value.Press the Mode button to return to Run Mode. Hold Mode to clear the MAX readings beforereturning to Run Mode..MAX stops flashing and the display now shows the current temperature of the hottest EGT.Note: If there is a recorded run, the RacePak will enter Playback Mode instead of Run Mode. SeeViewing Recorded <strong>Data</strong> below for details.Clearing MAX readingsThe RacePak automatically clears all MAX values to zero when it is turned on. To reset the peak values without turning off the unit, enterMAX Mode as outlined above. If you hold the Mode button to return to Run Mode, instead of simply pressing it, the unit resets theMAX values.Overlimit WarningsThe RacePak compares each reading of each channel to the alarm limit programmed in Initial Setup above. If any channel exceeds itslimit the unit flashes the warning light and displays that channel. If more than one channel is in alarm, the unit shows each in turn.Temporarily Disabling AlarmsPress the Mode button to temporarily clear all active alarms. The RacePak disables the alarm for any channel that is over its limit when youpress the Mode button. Note that to enter MAX Mode while a channel is in alarm requires pressing the Mode button twice: once to clearthe alarm and once to enter MAX Mode.Re-enabling Temporarily Disabled AlarmsAll alarms are enabled when the unit is turned on or when you leave MAX Mode. See Viewing Max Readings above for details onMAX Mode.<strong>Avenger</strong> 1 and Hot Tach Operation Manual Page 5 of 7
The Optional External SwitchThe external switch allows you to switch the display and to record a 356 second run.Changing the DisplayIn Run and MAX Modes, pressing the external switch steps the unit to the next display just as pressing the Display button would.Recording a RunWith the unit in Run Mode, hold the external switch until the R starts flashing. When you release theswitch your RacePak will begin recording data.The flashing R indicates that your gage is currently recording data. The unit records for 356 secondsor until you press the Mode button and enter MAX Mode.Note: See Viewing Max Readings and Temporarily Disabling Alarms for details onentering MAX Mode.When the R stops flashing, the recording is complete.Your RacePak stores the recorded run until you either record a new run or modify the unit’s setup(See Initial Setup above). Turning the unit off does not clear the recorded run.Viewing Recorded <strong>Data</strong>With the unit in Run Mode showing RPM, press the Mode button to enter MAX Mode. If anyalarms are active you must press Mode a second time to enter MAX Mode. See TemporarilyDisabling Alarms.Note: You can enter MAX Mode while displaying any channel. RPM is chosen here only as anexample.The unit now flashes MAX in the display.Press Mode. If the unit has a recorded run it enters Playback Mode to display it. The unit returns toRun Mode, as in Viewing Max Readings above, if there is no recording.The display now shows the RPM recorded in the first frame of data. The flashing P indicates thatthe unit is in Playback Mode showing recorded data.Press the Display button to show the EGT1 recorded in the first data frame.This is the EGT1 reading recorded during the first frame.Press Display to show EGT2. Press again for MAX EGT. Press Display again to show RPM.The display again shows the RPM recorded in the first frame of data.Press the external switch to step to the second recorded frame.<strong>Avenger</strong> 1 and Hot Tach Operation Manual Page 6 of 7
The display now shows the RPM recorded during the second frame.To replay the run at full speed, hold the external switch. Release the switch to pause playback.To exit to Run Mode, press Mode.When the recording is over, the P stops flashing and the unit returns to Run Mode.To view the run again, re-enter Playback Mode as above.TroubleshootingThe following table lists some common problems and likely solutions:Unit will not turn on. Make sure power is getting to the unit. Check the fuse.RPM or EGT isunstable.RPM is stable, but toohigh or too low.RPM is 0.Display button will notchange display.Check that the ground wire goes directly to a good engine ground.Check that the cables are routed as far from ignition or kill wires as possible.If EGT readings are stable and correct when the engine is not running, the problem is almost certainlyone of the above.The value for P in Initial Setup does not match your ignition. Follow this procedure to determinethe correct setting:1) Set P to 1. (See Initial Setup above to change P.)2) Briefly run the engine at about 2000 RPM and note the RPM reported by the gage.3) If the gage read too high, round the reported RPM to the nearest 2000 and skip to step 5.Example: If the gage read 5.60, round to 6.00.4) If the gage reads low, the value to use for P should be 0.5) Set P to half the value from step 3 or to 0.Example: If the rounded RPM was 6.00, set P to 3.6) Run the engine and check the RPM. If it still seems wrong, contact your dealer for assistance.Make sure that the RPM pickup wire is connected correctly.If the Alarm light is flashing, the unit has overridden the Display button to show an over limitchannel. Press Mode to temporarily clear the alarm. See Overlimit Warnings for details.Six Month Limited Warranty on Parts and WorkmanshipPurchaser’s only remedy and seller’s only liability shall be to repair or replace materials provided by the purchaser to be defective andreturned to seller with a copy of purchaser’s receipt. Seller shall not be liable for any injury, expenses, profits, loss or damage, direct,incidental, or consequential, or any other pecuniary loss arising out of the use or inability to use the product in question even if seller hasbeen advised of the possibility of such damages. Because some states do not allow the exclusion or limitation of liability for consequentialor incidental damages, the above limitation may not apply to you.It is purchaser’s responsibility to notify seller of suspected defects as soon as purchaser becomes aware of them, and to follow seller’sinstructions to minimize further damage. Seller is not responsible for damage resulting from purchaser’s inaction.Exhaust gas temperatures are intended only for use as a tuning tool. Due to differences in installation and airflow the reported temperatureat the probe may be substantially different from the temperature inside the cylinder. The determination of such differences is the soleresponsibility of the user of the equipment.CSI assumes no liability for probes. Temperature probes are covered by Exhaust Gas Technologies’ warranty.<strong>Avenger</strong> 1 and Hot Tach Operation Manual Page 7 of 7